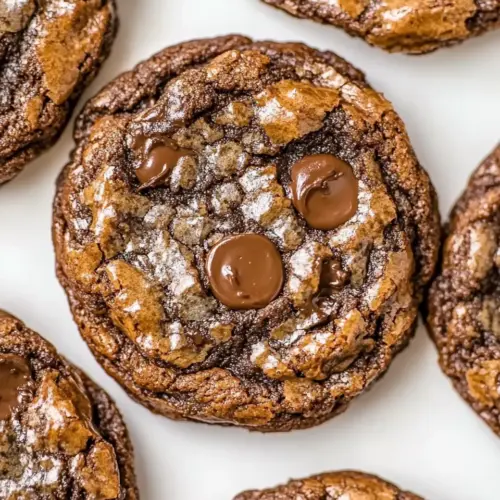
Brownie Cookies
Brownie Cookies are fudgy, crackled cookies with a molten center and bursts of melty chocolate, perfect for easy weeknight baking or sharing at parties. Creamy melted chocolate and melted butter create a rich base while a brief chill yields a chewy interior and crackled top. Make them plain or top with crushed peppermint for a festive twist, an irresistible reason to bake now.
Equipment
- Reynolds Kitchens Parchment Paper with SmartGrid
- Kitchen Scale(optional)
- Stand mixer
- Baking Sheet
Ingredients
- 4 tablespoons salted butter 57 grams (1/2 stick) Melted provides rich fat and a glossy texture to the batter, helping create fudgy, chewy brownie cookies; also adds a subtle salty balance when using salted butter. Melt into the chocolate to form a smooth base and incorporate into the eggs and sugar for structure and flavor.
- 1 pound chopped semisweet chocolate 454 grams Chopped semisweet chocolate supplies deep chocolate intensity and body to the cookies, melting into a dense, fudgy matrix when combined with butter and eggs. Use quality chocolate for improved flavor and glossy crumb, and chop uniformly to ensure even melting during mixing.
- 4 large eggs 200 grams, room temperature Beaten eggs act as the primary binder and contribute structure, moisture, and a tender crumb to the brownie cookies when whisked into the melted chocolate and sugar. Room-temperature eggs emulsify more easily with fats, producing a smooth, cohesive batter that bakes evenly.
- 1 1/2 cups granulated sugar 300 grams Granulated sugar sweetens the dough while aiding in moisture retention and contributing to the cookies' tender, slightly crackled surface when creamed or dissolved into the warm chocolate. Amount influences chewiness and spread, so measure accurately to maintain the intended brownie-like texture.
- 1 teaspoon pure vanilla extract 4 grams Pure vanilla extract enhances and rounds out the chocolate flavor, adding aromatic complexity and depth without altering texture; use a quality extract for best results. Stir in near the end of mixing to preserve its volatile flavor compounds.
- 1/2 cup all-purpose flour 60 grams, sifted All-purpose flour provides structure and a slight lift to the brownie cookies, contributing gluten that balances the rich, fudgy interior to prevent excessive collapse. Sifted measurement ensures light incorporation and helps avoid lumps that could create dense spots.
- 1/2 teaspoon baking powder 2 grams Baking powder offers a gentle leavening lift that lightens the dense brownie batter slightly, creating tender cookie edges and a soft interior without turning them cakey. Use the stated amount to achieve subtle rise while preserving the characteristic fudgy texture.
- 12 ounces milk chocolate chips 340 grams Milk chocolate chips add pockets of sweet, creamy chocolate that contrast the deeper semisweet base, melting into gooey bites throughout the cookies. Fold in toward the end of mixing to preserve chip shape while allowing some melty streaks during baking.
- Crushed peppermint optional, for topping Crushed peppermint provides optional crisp, refreshing minty flavor and decorative crunch when sprinkled on top after baking, creating a festive contrast to rich chocolate. Apply lightly so it complements rather than overpowers the brownie cookie profile.
Instructions
- Place a heatproof bowl over a saucepan of simmering water. Add the butter and the chopped chocolate. Stir until smooth, about 5-10 minutes.: The moment the bowl warms, you will smell the rich aroma of melting chocolate mingled with warmed butter , a scent that signals the base is forming. Keep the water at a gentle simmer, not a rolling boil, because excessive steam can introduce condensation into the chocolate, making it seize. As the pieces soften, stir in slow, circular motions so the mixture becomes glossy and velvety, without lumps. You will see the texture change from grainy to shiny, and that sheen is a visual cue that the fat and cocoa solids have emulsified properly. If you notice tiny white streaks or grit, reduce heat and stir longer; overheating can break the emulsion and make the chocolate grainy. To avoid seizing, ensure no water splashes into the bowl and dry utensils thoroughly. The goal is a smooth, pourable ganache like consistency that will coat the back of a spoon, which also helps the baked cookie stay fudgy inside.
- In the bowl of a stand mixer fitted with the paddle attachment, beat the eggs with the sugar on medium speed, then beat in the vanilla. Scrape the sides if needed. Pour in the melted chocolate and beat until combined. Mix in the flour and baking powder. Turn off the mixer.: As you beat the eggs and granulated sugar , you will notice the mixture lighten slightly and become glossy, signaling that sugar has begun dissolving and air is being incorporated. The sound is a soft hum from the mixer rather than a roar, and the batter will have a ribbon like fall when lifted with the paddle. Add the vanilla and scrape the bowl to ensure even mixing, because any unmixed pockets can yield uneven texture. When the warm chocolate goes in, the batter will loosen and emit a warm, chocolatey steam; beating briefly ensures even distribution without cooking the eggs. Once you fold in the sifted flour and baking powder , the mixture will thicken and look dense and glossy. Avoid overmixing at this stage, which can develop gluten and make the cookies tougher. A common mistake here is adding the flour too fast; sprinkle it in and fold or mix just to combine, watching for any streaks of dry flour to disappear.
- Gently fold in the chocolate chips.: You will hear a soft scrape as a spatula moves through the dense batter, and visually, little pools of batter will cling to the chips. Fold carefully so the milk chocolate chips remain intact and do not melt into the batter, preserving those delightful pockets of melty chocolate after baking. Folding preserves air pockets and keeps the batter dense rather than homogenized. If you stir too vigorously, the chips can break down and the texture will be less contrasted. The right texture is a cohesive, slightly sticky dough dotted with whole chips.
- Pour the batter into a large bowl and cover. Freeze for 1 hour.: Chilling firms the dough so the cookies spread less and develop that signature cracked top with a fudgy center. The dough will cool and the butter will solidify, making it easier to scoop. You will notice the batter stiffen and become more scoopable, which visually indicates readiness. A common oversight is skipping the chill, which often results in thinner, flatter cookies with more cakey interiors. If you are short on time, fifteen minutes in the fridge will help, but the freeze step gives the best texture contrast. Covering the bowl prevents the dough from forming a skin and keeps fridge odors out.
- Preheat the oven to 350°F. Line a baking sheet with Reynolds Kitchens Parchment Paper with SmartGrid. Scoop 2 tablespoons of batter into a ball (doesn't have to be pretty) and place on the prepared baking sheets, about 2 inches apart.: As the oven warms to 350°F , you can prepare the tray. The parchment makes removal simple and the SmartGrid helps with even spacing, so the cookies bake uniformly. When you scoop, the chilled dough will hold shape, and you may notice slightly shiny spots where chips press through. Leave space because as they bake they will relax and spread a bit outward, developing a crackled surface. Overcrowding is a common mistake that leads to joined cookies, so respect spacing. If your balls are cold and firm, the outside will set quickly and the inside will stay gooey, which is exactly what you want.
- Bake for 10 minutes, or until the cookies crack on top and appear dry on the edges.: The oven will transform the batter, and you will start to see tiny fissures appear on the glossy tops as steam escapes. The edges should look set and slightly dry while the center remains shiny and soft. Listen for a subtle change in the oven sound, no vigorous sizzle, just the quiet hum and the occasional pop as pockets of air release. Removing the cookies too early can leave them unset, while baking too long makes them firm and loses the fudgy heart. A typical pitfall is relying solely on clock time; instead, watch for the visual cues: cracked tops and dry edges. The aroma will shift from warm chocolate to a deeper roasted note, signaling readiness.
- Let cool on the cookie sheet for 10 minutes, then transfer to a cooling rack to cool completely.: After removing them from the oven, you will notice the cookies are still soft and fragile, so the ten minute rest helps them finish setting while retaining the gooey center. The bottoms will continue to firm as residual heat redistributes, so resist the urge to move them immediately. When you transfer to a rack, you will see steam rise and feel slightly warm to the touch. A common error is trying to flip them too soon, which risks them falling apart. Patience here preserves the glossy interior and clean edges.
- If wanting to make the peppermint version, sprinkle cookies with crushed peppermint upon removing from the oven. Lightly and carefully press them into each cookie to adhere. Allow to cool as stated above.: The crushed peppermint releases a bright, cooling scent against the warm chocolate, creating a festive contrast. Sprinkle while the cookies are hot so the peppermint sticks but do not press so hard that you disturb the cracked top pattern. The texture contrast is delightful, a crisp mint crunch against a fudgy bite. One mistake is using very fine dusted peppermint which can bleed color into the cookie; larger flakes keep the visual appeal and provide texture. Letting the cookies cool with the peppermint in place ensures it sets into the surface slightly and adheres well.
Notes
- Keep ingredients at proper temperature: Bring eggs to room temperature before beating so they incorporate smoothly and produce a shiny, homogenous batter.
- Melt chocolate gently: Use a heatproof bowl over simmering water and stir slowly so the chopped semisweet chocolate and butter form a glossy emulsion rather than grainy bits.
- Do not overmix after flour: Once you add the sifted flour and baking powder, mix just until combined to avoid developing gluten and ending up with cakier cookies.
- Chill for structure: Freeze the batter for the recommended time so the cookies spread less and the centers stay fudgy, producing a pleasing crackle on top.
- Use parchment with guides: Line your sheets with parchment like Reynolds Kitchens SmartGrid to space cookies evenly and prevent sticking, which makes cleanup quick.
- Add mix ins at the end: Fold in milk chocolate chips after primary mixing so they remain whole and create melty pockets rather than dissolving into the dough.
- Watch for visual doneness: Look for cracked tops and dry edges rather than relying only on minutes, since ovens vary and the sensory cues are reliable.