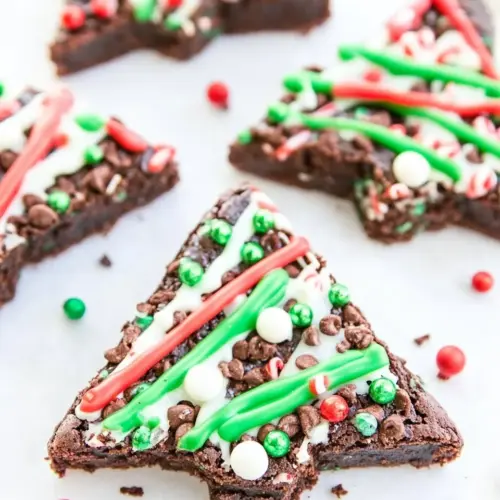
Brownie Christmas Trees
Brownie Christmas Trees are fudgy, festive, and easy to make with a boxed brownie mix and a few candies. These bite sized chocolate trees combine creamy frosting, crunchy candy canes, and bright sprinkles for a playful holiday treat, perfect for cookie swaps and parties. Quick to assemble and eye catching on a platter, they are a joyful choice to share this season.
Equipment
- 9x9 inch pan
- Mixing Bowl
- Knife
- Piping bag or small baggie
Ingredients
- 1 (18.3-ounce) box brownie mix Provides the base batter for the brownies and supplies most of the dry mix and leavening. Use according to package directions to create a sturdy, fudgy cake that will be cooled and cut into tree shapes for decorating. Enhances texture and structure so the brownies hold up when stacked or frosted.
- 1 (16-ounce) container vanilla frosting Creates a smooth, spreadable topping that doubles as adhesive and decorative icing for the trees. Tint with coloring to achieve a vivid green and apply evenly for a festive finish. Adds sweetness and a contrasting creamy texture to the dense brownie.
- green food coloring Tint the frosting to a festive green hue to mimic evergreen branches and provide uniform color. A few drops go a long way; mix thoroughly until the shade is even and vibrant. Adjust intensity gradually to avoid over-coloring while preserving flavor.
- sprinkles and red hots Provide colorful accents and small, sparkling details that emulate ornaments and garlands on each tree. Sprinkle generously over frosted brownie trees to add texture, crunch, and visual interest. Combine varieties for varied shapes and sizes that catch the eye.
- 6 candy canes Serve as edible tree trunks or hanging decorations when placed at the base or top of each brownie tree. Break or use whole depending on desired presentation; they add peppermint flavor and structural contrast. Arrange thoughtfully so they complement the iced design and provide a crunchy bite.
- 12 red hot candies Function as small round ornaments that can be pressed into the frosting to mimic classic red baubles. Place individually across each tree to create a balanced, colorful look and a burst of cinnamon flavor. Use sparingly so the candies don't overwhelm the sweet frosting.
Instructions
- Line a 9×9 brownie pan with foil then coat with vegetable spray.: The moment you place the lined pan on the counter you should notice how the foil shine makes the pan look clean and ready; lining ensures easy lift out later, which preserves the edges of your brownie when you cut shapes. Use a light coat of vegetable spray so the foil does not stick, and smooth the foil carefully to avoid air pockets. A typical mistake is to skip lining, which makes removal messy and can tear brownies; take the extra minute to line and spray.
- In a large bowl, prepare the brownie mix as directed on the box and bake as directed for a 9×9-inch pan.: As you mix, pay attention to the batter texture, which should be glossy and thick but pourable; this influences the fudgy crumb. While the brownies bake, the kitchen will fill with a warm chocolate perfume, a good cue the oven is doing its job. Avoid overmixing which can make the brownie cakier instead of fudgy, and resist opening the oven too often which drops temperature and affects rise.
- Remove from oven, let cool completely, and then lift out.: Cooling fully is critical because warm brownie will crumble when cut and the frosting will melt on contact. You should feel a firm surface and only a faint give when pressed lightly. If you try to cut or decorate too soon, edges will crumble and frosting will slide, so be patient and let it cool until set.
- Cut into three equal strips and then cut each strip into 4 triangles.: When you begin cutting you will hear a soft slicing sound and see neat chocolate edges form, which is the right visual sign. Cutting into strips first gives uniformity, and triangles create the tree silhouette everyone recognizes. Use a sharp knife wiped between cuts to prevent dragging crumbs across slices; a dull knife often causes ragged edges.
- Cut candy canes into about 2-inch pieces and place them in the end of a triangle brownie.: As you snap the candy canes you will notice a crisp crack and the sugary scent of peppermint; these short pieces serve as the trunk and make the trees handheld. Press them gently into the base of each triangle so they anchor without splitting the brownie. A common error is forcing the candy too deep which can fracture the brownie, so insert with measured pressure.
- Mix 1/2 can of frosting with green food coloring (about 20-25 drops).: The moment color touches the frosting you will see it transform into a vibrant green, which is satisfying and helps set the mood. Stir until the color is even and the frosting retains a thick pipeable consistency; if it gets too loose, chill briefly. Too much coloring or stirring can thin the frosting, so adjust in small increments.
- Place frosting in a small baggie and snip the end. Starting at the top of the brownie triangle, pipe on frosting garland moving from side to side as you work down to the bottom.: When you squeeze the bag you want a steady ribbon of frosting that holds shape, not a liquid stream. The small snip controls the thickness of garlands, and practicing a bit on parchment helps you find the right amount of pressure. Cutting too large a hole results in blobs rather than delicate garlands, so start small and widen if needed.
- Sprinkle as desired and top with a red hot candy.: As you pipe each curve, notice how the frosting settles, holding a ribbon like a tiny garland; that texture is the satisfying payoff and creates the tree layers. Work steadily from top to bottom so the design flows and you can space ornaments evenly. A frequent mistake is piping too fast which creates uneven lines, so take deliberate, even squeezes to maintain control.
- Sprinkle as desired and top with a red hot candy.: The final touch of sprinkles and a single red hot candy at the top provides color contrast and a festive focal point. Lightly tap the tray so any loose bits settle into the frosting, then let the trees rest to set. Adding decorations while the frosting is too soft will cause them to sink or slide, so wait until the garlands hold their shape.
Notes
- Prep ahead: Bake the brownies a day in advance and fully cool them wrapped to make cutting and decorating less rushed on the day you plan to serve.
- Use gel coloring: Gel green food coloring gives vivid color without thinning the frosting, so you keep a pipeable texture.
- Practice piping: Try a few strokes on parchment to get comfortable with pressure and tip size before decorating the actual trees.
- Slice with care: Cut slowly with a sharp knife, wiping the blade after each pass to maintain clean edges on the triangle shapes.
- Set time: Let decorated trees rest for 20 to 30 minutes so the frosting firms and the candies adhere firmly before storing or transporting.