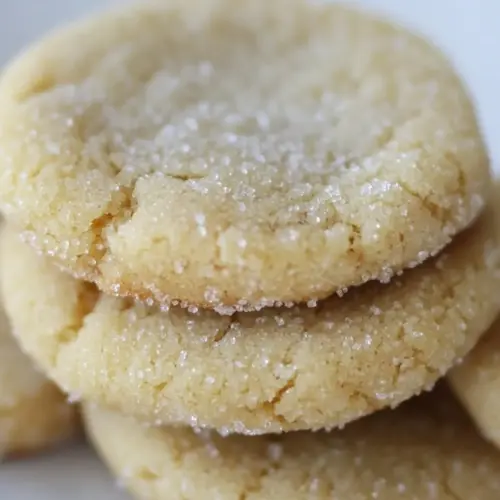
Brown Butter Hazelnut Sugar Cookies
Brown Butter Hazelnut Sugar Cookies are soft centered and lightly crisp at the edges, featuring browned butter, toasted hazelnuts, and a sparkling sugar crust. These easy cookies bring bakery level flavor with simple steps, perfect for gifting or weekend baking. Make a batch to enjoy tender, nutty bites that keep well and impress guests with minimal fuss.
Equipment
- 10-inch Skillet
- Medium Bowl
- Large Bowl
- Rimmed Baking Sheet
- Parchment Paper
- Whisk
- Rubber spatula
- Wire Rack
- wide metal spatula
Ingredients
- 2 1/4 cup unbleached all-purpose flour 1/2 teaspoon baking soda 1 teaspoon baking powder 1/2 teaspoon table salt 1 1/2 cups sugar - plus 1/3 cup for rolling 1/4 cup finely chopped toasted hazelnuts 2 ounces cream cheese - cut into 8 pieces 6 tablespoons unsalted butter - melted and still warm 1/3 cup vegetable oil 1 large egg 1 tablespoon milk 2 teaspoons vanilla extract Provide structure, leavening, and balance by combining unbleached all-purpose flour with baking soda, baking powder, and table salt; the flour forms the cookie’s framework while the chemical leaveners create lift and lightness. Add the measured sugar for sweetness and tender crumb, reserving 1/3 cup to roll the dough for a slightly crisp, crackled exterior that contrasts the soft interior.
Instructions
- Adjust oven rack to middle position and heat oven to 350 degrees. Line 2 large rimmed baking sheets with parchment paper. Whisk flour, baking soda, baking powder, and salt together in medium bowl. Set aside.: You will notice the oven warming and a gentle steady heat fills the space, which ensures even baking and prevents bottoms from burning. Preheating to 350 degrees creates the right environment so the cookies set around the edges while remaining tender inside. If you skip preheating the texture will be uneven and they may spread too much, so always wait until the oven reaches temperature.
- Place 1 1/2 cups sugar, hazelnuts, and cream cheese in large bowl. Place remaining 1/3 cup sugar in shallow baking dish or pie plate and set aside. Heat butter in 10-inch skillet over medium-high heat until melted, about 2 minutes. Continue to cook, swirling pan frequently, until butter is dark golden brown and has nutty aroma, 1 to 3 minutes. Pour butter over sugar and cream cheese mixture; whisk to combine (some small lumps of cream cheese will remain but will smooth out later). Whisk in oil until incorporated. Add egg, milk and vanilla; continue to whisk until smooth. Add flour mixture and mix with rubber spatula until soft homogeneous dough forms.: When the sheets are prepared, you will appreciate the smooth release and easy cleanup parchment provides, plus it protects the bottoms from over browning. Rimmed sheets keep cookies contained as they spread slightly, which helps maintain shape and spacing. A common mistake is using non rimmed or warped sheets which can cause uneven baking, so choose sturdy rimmed pans.
- Divide dough into 24 equal pieces, about 2 tablespoons each. Using hands, roll dough into balls. Working in batches, roll balls in reserved sugar to coat and set on prepared baking sheet, 12 dough balls per sheet. Using bottom of drinking glass, flatten dough balls until 2 inches in diameter. Sprinkle tops evenly with 4 teaspoons reserved sugar (2 teaspoons per tray), discarding any remaining sugar.: The dry mixture should look uniform and slightly aerated after whisking, which encourages even lift and consistent texture throughout the batch. Whisking prevents pockets of leavening that could create uneven holes, and it evenly distributes salt to balance sweetness. Avoid over mixing once wet ingredients are added because that will develop gluten and toughen the cookies.
- Bake, 1 tray at a time, until edges are set and just beginning to brown, 11 to 13 minutes, rotating tray after 7 minutes. Cool cookies on baking sheets 5 minutes. Using wide metal spatula, transfer cookies to wire rack and cool to room temperature.: As you combine these ingredients, the grainy sugar will coat the small cream cheese pieces and the hazelnut fragments, creating a base ready to accept warm butter. The contrast of cold cream cheese pieces against warm butter later helps create pockets of tenderness. One pitfall is using large cream cheese chunks which will not disperse properly, so cut into small pieces as instructed.
- Place remaining 1/3 cup sugar in shallow baking dish or pie plate and set aside: This reserved sugar will be used to roll the dough balls and give a sparkling crust, so arrange it near your work surface for efficient assembly. Having it handy keeps the workflow smooth and prevents the sugar from clumping. Do not skip this step, because rolling is key to the finished texture.
- Heat butter in 10 inch skillet over medium high heat until melted: As the butter melts you will hear a soft sizzle, and soon it will turn foamy as water evaporates, signaling the start of browning. This auditory and visual progression cues you to watch closely because browning happens quickly once the milk solids begin to color.
- Continue to cook, swirling pan frequently, until butter is dark golden brown and has nutty aroma: The moment the butter reaches a dark golden brown and the kitchen fills with a toasty smell, remove it from heat and pour it into the sugar mixture. This deep, nutty aroma is what defines the cookie's flavor profile. Common error is leaving butter on heat too long, which will burn the solids and give a bitter taste, so swirl and watch the color carefully.
- Pour butter over sugar and cream cheese mixture; whisk to combine: When you pour the warm browned butter over the sugar and cream cheese, you will see small bits of cream cheese remain as tiny lumps, which is expected. Whisking will start melting them into the sugar and butter while integrating flavors, creating a silky base. If you stop too soon, the mixture may remain grainy, so whisk until mostly smooth.
- Whisk in oil until incorporated: Adding the vegetable oil after the butter helps maintain tenderness and creates a glossy batter. The oil blends seamlessly and keeps the dough soft at room temperature. A mistake to avoid is skipping this ingredient, which will make cookies firmer and less tender.
- Add egg, milk and vanilla; continue to whisk until smooth: As you add the egg , milk , and vanilla , the mixture will loosen and become silky, with the egg lending richness and structure. Whisking thoroughly ensures a homogeneous base that will accept flour without lumps. Ensure the egg is room temperature to prevent chilling the butter and causing the fats to seize.
- Add flour mixture and mix with rubber spatula until soft homogeneous dough forms: Once the dry mixture is folded in with a spatula, you will see a soft, unified dough that holds together but is not stiff. Folding gently preserves tenderness and prevents gluten overdevelopment, which keeps the cookies tender. Avoid vigorous stirring here, which would toughen the dough and change the texture.
- Divide dough into 24 equal pieces, about 2 tablespoons each: Dividing the dough evenly ensures uniform baking so every cookie finishes at the same time. I use a small cookie scoop or scale for consistency, which removes guesswork and creates tidy portions. If portions vary, some cookies will overbake while others remain underdone, so measure carefully.
- Using hands, roll dough into balls: Rolling dough by hand warms the surface slightly and smooths seams, creating round shapes that translate into evenly shaped cookies once flattened. The tactile feel helps you sense dough texture, whether it needs a touch more moisture. Do not over-handle or the dough will become too soft and sticky, making it hard to coat in sugar.
- Working in batches, roll balls in reserved sugar to coat and set on prepared baking sheet, 12 dough balls per sheet: Rolling each ball in the reserved sugar gives a sparkling exterior that caramelizes at the edges while the interior stays soft. Space them as instructed to allow gentle spreading. Crowding the sheet leads to merging cookies, so keep 12 per rimmed sheet as suggested.
- Using bottom of drinking glass, flatten dough balls until 2 inches in diameter: Pressing with a glass creates consistent thickness and encourages the characteristic crinkle. The visual cue of a uniform two inch disk helps predict baking time and final texture. Avoid pressing too thin which can make cookies brittle and over crisp.
- Sprinkle tops evenly with 4 teaspoons reserved sugar: A light sprinkle of additional sugar on top adds sparkle and an extra hint of crispness when baked, enhancing both texture and appearance. Distribute evenly for consistent caramelization, and discard any excess to avoid overly sweet spots.
- Bake, 1 tray at a time, until edges are set and just beginning to brown, 11 to 13 minutes: While baking you will see edges set and the centers puff slightly, with a faint golden color appearing around the rims. Rotating the tray after 7 minutes ensures even browning, and baking one sheet at a time helps maintain consistent oven temperature. Overbaking is a common error and will dry the cookies, so pull them once edges are pale golden.
- Rotate tray after 7 minutes: Rotation equalizes hot spots and creates an even finish, which is especially important when baking just a single tray near the rack. You will note uniform color across the tray after rotation, an indicator of careful timing. Forgetting to rotate can produce uneven browning, so set a timer as a reminder.
- Cool cookies on baking sheets 5 minutes: Letting cookies rest briefly on the hot sheets allows them to set while finishing gentle carryover cooking, which keeps centers soft while firming edges. The smell of toasted sugar and hazelnut will be strongest now, which is always tempting. Resist moving them too soon or they may break apart.
- Using wide metal spatula, transfer cookies to wire rack and cool to room temperature: Sliding them onto a cooling rack prevents the bottoms from steaming and keeps the texture crisp where desired, while the middle cools to tender perfection. Cooling to room temperature develops the final flavor balance. Packing while warm traps steam and softens the exterior, so wait until fully cooled for storage.
Notes
- Measure flour correctly, spoon flour into the measuring cup and level off rather than scooping, to prevent dense cookies from too much flour.
- Control browning, remove butter from heat as soon as it turns dark golden and smells nutty to avoid any burnt notes that would ruin the delicate sweetness.
- Small cream cheese pieces, cut the cream cheese into small pieces so they disperse into tiny pockets that keep the interior tender instead of leaving large melted puddles.
- Use a cookie scoop, a 2 tablespoon scoop ensures each cookie is the same size so baking times and final texture remain uniform across the batch.
- Toast hazelnuts first, toast the hazelnuts until aromatic and let them cool before chopping to preserve crunch and deepen flavor.
- Watch baking time, pull cookies when edges are set and just starting to brown, they will finish setting on the pan and avoid becoming dry.