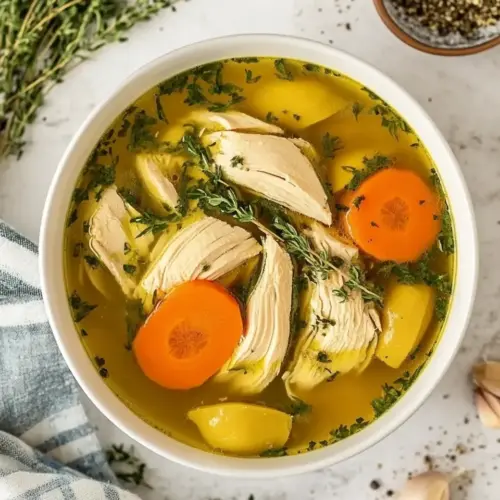
Brodo Di Pollo
Brodo Di Pollo is a clear, savory Italian chicken broth with a silky mouthfeel and comforting aroma. This easy to make stock uses simple ingredients to produce a rich, nourishing base perfect for an easy weeknight dinner or restorative meal. Make a big pot and enjoy it plain, with pastina, or as a flavor booster for countless recipes.
Equipment
- Large heavy bottomed stockpot
- Slotted Spoon
- Fine-mesh strainer
Ingredients
- 1 whole chicken, (or 4-5 skin-on, bone-in chicken pieces) Roast or simmer to create a rich, gelatinous base for the broth; provides body, savory depth, and collagen that yields a silky mouthfeel when simmered low and slow for hours.
- 2 large carrots, peeled Simmer after chopping to add natural sweetness and earthy flavor; softens into tender pieces and contributes aromatic balance and subtle vegetal notes to the stock.
- 1 large onion, halved Sear or simmer to impart caramelized, sweet, and savory layers; releases sulfurous and sweet aromatics that enhance the overall complexity of the broth when halved and added to the pot.
- 2 celery stalks Bruise or chop and add to the stock for fresh vegetal aroma and mild bitterness; supplies background flavor and aromatic lift that complements the sweeter root vegetables.
- a small bunch of parsley Bundle or chop and add to the simmering pot to brighten flavor; provides fresh herbaceous, slightly peppery notes and a fragrant lift that balances the rich chicken base.
- 2 bay leaves Crush lightly and add to the simmering stock to introduce a subtle, warm, and slightly floral herbal note; helps round out flavors and adds a faint, savory complexity.
- 1 teaspoon whole black peppercorns Crush or add whole to the simmering pot to contribute sharp, pungent heat and aromatic lift; releases bursts of spicy, peppery flavor that season and brighten the broth.
Instructions
- Place the whole chicken in a large heavy-bottomed stockpot, followed by the carrots, onion, celery, parsley, bay leaves and black peppercorns. Cover with water and bring to a boil.: As the ingredients hit the cold water you will notice the kitchen smell faint and raw, the promising start of transformation. The sight of a whole chicken nestled among chunky vegetables feels reassuring, and you'll see pale foam begin to form as proteins tighten with rising heat. The reason for starting everything together in cold water is that it encourages the proteins and collagen to dissolve slowly, creating a clearer, more gelatinous broth. A sensory cue to watch for is the first tiny bubbles around the pot edge as it edges toward a boil, and a grayish foam collecting on the surface. This foam is where impurities gather, and skimming it off will keep the broth bright. A frequent mistake here is cranking the heat too high to rush the process, which traps impurities and clouds the liquid. Keep the pot steady and patient for the best results.
- Reduce the heat, partially cover with a lid, and simmer on low heat for 120 minutes. Whilst the broth simmers, skim the top with a slotted spoon or fine-mesh strainer to remove the fat in excess.: When you bring the pot up to a boil, the kitchen will fill with a fuller, roasted note as the heat teases oils from the chicken skin and sweetness from the carrots and onion . The surface will churn with larger bubbles, and you may see a renewed foam rising to the top. The intention of a rolling boil is simply to get everything hot and active before reducing to a gentle simmer. The key sensory sign is vigorous bubbling and a concentrated broth aroma that feels thicker in the air. One thing to avoid is leaving it at a violent boil for long periods, since sustained high heat drives off volatile aromatics and can emulsify fat into the broth, making it greasy and cloudy.
- Once ready, remove the chicken from the stockpot, then strain the broth through a fine-mesh strainer.: At this stage the sound softens to lazy, intermittent bubbles and the scent becomes deep and rounded, with the chicken note coming forward. Simmering gently for 120 minutes melts the collagen from bones and skin into the liquid so you end up with a velvety mouthfeel. Partially covering keeps enough steam escaping to concentrate flavor but preserves moisture, while a full lid can make the broth too flat. A troubleshooting tip is to check occasionally for a gentle bubbling action; if it looks like a boil, turn the heat down. Another common error is simmering at too low a temperature where nothing moves, which can prevent proper extraction and leave the broth weak, so keep it in that sweet spot of a quiet simmer.
- Serve the prepared brodo di pollo immediately on its own, with pastina or tortellini, or use it to flavor other recipes. Alternatively, cool it completely, refrigerate overnight, and the next day, remove the fat layer from the top before reheating.: The visual cue here is a soft film and little islands of fat gathering on the surface, especially after the initial boil. Skimming keeps the final broth clean and less greasy, which is crucial for a pleasing mouthfeel. I like to scoop every 10 to 20 minutes early on, and less often later as things calm down. The sound is minimal, but your hands should feel the difference when you tilt a ladle and see the clarity improving. A pitfall is neglecting to skim, which leaves a cloudy, heavy broth that tastes muddled. If the fat becomes stubborn, chilling briefly and removing the solidified layer is another option, but for immediate serving, steady skimming works best.
- Once ready, remove the chicken from the stockpot, then strain the broth through a fine mesh strainer: As you lift out the chicken the meat will be tender and yielding, the bones softening where collagen has done its work. The broth strained through a fine mesh should be clear and shimmering, with a warm golden color and a scent that is concentrated yet delicate. Straining removes the spent vegetables and aromatics so the liquid is clean on the palate. A key why here is that leaving solids in can continue to break down and muddy both texture and taste, so straining arrests that process. A small mistake I see is pouring the pot too rapidly into a strainer, which can splash and waste precious liquid; pour slowly and steady to retain every spoonful.
- Serve the prepared brodo di pollo immediately on its own, with pastina or tortellini, or use it to flavor other recipes: When you ladle the broth into bowls it will emit a soft steam with a layered aroma of chicken and sweet vegetables. Serving it plain showcases the clear flavor, while adding tiny pasta like pastina creates a heartier, nostalgic meal that children and adults both love. Using the broth as the base for risottos or sauces will instantly elevate those dishes with deeper savory notes. A practical tip is to taste for seasoning when it is warm rather than piping hot, because salt perception changes with temperature. Avoid over salting at this stage, since reduction during reheating can concentrate saltiness.
- Alternatively, cool it completely, refrigerate overnight, and the next day, remove the fat layer from the top before reheating: After cooling, the fat will congeal into a pale cap that is simple to lift away, leaving a lean, crystal clear broth beneath. The chilled broth will smell slightly muted, a normal state after refrigeration, and reheating will bring the aromatics back into focus. This resting step is why I often make broth a day ahead, because the clarified result tastes cleaner and looks more refined. A common slip is reheating too long on high heat, which can over reduce the broth and intensify salt or bitterness, so warm slowly until just simmering before serving.
Notes
- Cold Water Start: Always begin with cold water so the proteins dissolve slowly, which yields a clearer, more gelatinous broth.
- Gentle Simmer: Maintain a low simmer rather than a boil to keep the liquid clear and to extract flavor steadily without emulsifying fat.
- Frequent Skimming: Skim foam and fat in the first hour to remove impurities and prevent the broth from tasting cloudy or greasy.
- Use Bone In Chicken: Bone in, skin on pieces or a whole chicken add collagen and depth that boneless cuts cannot match.
- Strain Carefully: Pour slowly through a fine mesh strainer to capture all solids without wasting liquid, and consider a double strain for the clearest result.
- Chill to Clarify: Refrigerate overnight and remove the solidified fat for an elegant, lean broth that reheats cleanly.