Boston Cream Cupcakes
Boston Cream Cupcakes offer a creamy, glossy, and indulgent bite with a light cake base, silky pudding filling, and shiny chocolate ganache. This easy to assemble dessert blends convenience and classic pastry technique for a crowd pleasing treat that works for parties and weeknight celebrations, making it a must make for anyone craving a refined but accessible dessert.
Equipment
- Oven
- Cupcake Pan
- Paper cupcake liners
- Stand mixer or handheld mixer
- Mixing Bowls
- Whisk
- Heat safe bowl
- Pastry bag or Ziploc bag
- Wire Rack
Ingredients
- 15.25 ounces white cake mix Provides a pre-mixed base that simplifies cupcake batter preparation; contains flour, sugar, leavening, and flavoring to ensure consistent texture and rise. Helps achieve a tender crumb and uniform sweetness without measuring multiple dry ingredients. Works as the structural foundation for the cupcakes and pairs well with added liquids and fats.
- 1 cup water Hydrates the cake mix and activates leavening agents to create proper batter consistency and rise. Adds necessary moisture for a soft, tender crumb and helps dissolve dry components evenly. Temperature and quantity influence final texture and baking time.
- 1/2 cup vegetable oil Contributes fat to tenderize the crumb, add moistness, and improve mouthfeel; oil helps keep cupcakes soft and prevents drying out. Provides a neutral flavor that lets vanilla and fillings shine while promoting even baking. Helps produce a finer crumb than butter in quick batters.
- 4 egg whites Incorporates air and structure while providing protein without added yolk fat, which yields lighter, slightly drier cupcakes. Whipped egg whites help with leavening and improve height and texture when folded into batter. Also reduces overall fat content compared to whole eggs, affecting richness.
- 1 3/4 cup heavy cream Forms the base for a rich pastry cream when whipped and stabilized, contributing smoothness and a luxurious mouthfeel to fillings. Heavy cream’s high fat content ensures a silky custard texture and helps the filling set firmly when combined with pudding mix. Also adds richness that balances the cake and chocolate glaze.
- 3.4 ounces instant vanilla pudding mix Thickens and flavors the pastry cream, providing instant thickening power and concentrated vanilla flavor for the filling. Dissolves quickly into cream to create a smooth custard without cooking, yielding stable filling when chilled. Enhances sweetness and helps the cream hold its shape inside the cupcakes.
- 3/4 cup heavy cream Whips into stabilized cream to fold into or lighten the pudding-based filling, adding volume and an airy texture to the custard. Creates a softer, lighter filling when combined with the instant pudding mixture, balancing density and richness. Chilled whipped cream also helps maintain structure after piping.
- 12 ounces semi-sweet chocolate chips Melts into a glossy ganache that provides a rich chocolate topping with semi-sweet balance between bitter cacao and sugar. When combined with cream or corn syrup, chocolate chips create a smooth, pourable glaze that sets with a shiny finish. Offers deep chocolate flavor that contrasts the sweet custard and cake.
- 3 tablespoons light corn syrup Adds shine and elasticity to the chocolate glaze, preventing it from seizing and creating a silky finish. Helps keep the ganache glossy and smooth while slightly thinning the melted chocolate for easy pouring or dipping. Also contributes subtle sweetness and improved spreadability.
Instructions
- Preheat the oven to 350°F. Place paper cupcake liners into the cupcake baking tin and set aside.: When I preheat to 350°F , the kitchen fills with a faint warmth that hints at what is coming, and the air carries a subtle scent of sugar as the oven reaches temperature. Preheating ensures the cupcakes rise evenly and develop a delicate golden surface at the right rate, which is why I always wait until the oven signal shows it has stabilized before putting trays in. A common mistake is placing batter in an oven that is not fully hot, which causes uneven domes and a denser crumb, so resist the urge to rush and take a moment to line your pans while the oven warms.
- Using either a stand mixer or a large mixing bowl and a handheld mixer on medium speed, prepare the cake mix according to the instructions on the back of the box.: Setting liners into the tin creates neat, easily removable cupcakes and allows the edges to bake evenly. I press each liner gently into a muffin cavity so it sits flush against the sides, which helps the batter climb the walls and form a tidy dome. If liners are placed crookedly, the cupcakes may bake unevenly or stick to one side, so take a quick second to adjust them before filling.
- Spoon the cupcake batter into the cupcake liners, filling them half full. Bake for 15-18 minutes or until the cupcakes are lightly golden and a toothpick inserted comes out clean. Allow the cupcakes to cool completely.: As I combine the white cake mix , water , vegetable oil , and egg whites using a stand mixer or handheld mixer, the batter becomes smooth and slightly glossy; that sheen is a cue the fats and proteins are well emulsified. Mixing on medium speed blends ingredients without over aerating, which keeps the crumb tender but not dry. Overmixing is a frequent pitfall leading to gummy cupcakes, so I stop as soon as the batter is homogeneous with no streaks of flour visible.
- Leave the cupcakes in the cupcake liner, use a sharp knife or a large decorator icing tip, carefully core out only the center of the cupcake about the size of a quarter. Be careful not to cut too deep and cut the liner. Do not replace the tops of the cupcake. Leave them open for the cream.: Filling each liner to about half full gives the cupcakes room to rise without spilling over, and it helps create a top that can be cored cleanly for the filling. I use an ice cream scoop or two spoons to portion the batter consistently, which results in uniform bake times and even presentation. If you overfill, cupcakes can flatten or bake unevenly, so keep an eye on portion sizes as you go.
- Using a handheld mixer and a medium-sized mixing bowl, combine the heavy cream and the instant pudding mix. Beat on medium-low speed until the pudding starts to thicken. Cover with cling wrap and allow the pudding to chill in the refrigerator until filling the cupcakes.: As the cupcakes bake, you will notice the aroma of warm sugar and vanilla, and the tops will turn a pale golden hue; that is your visual cue to check doneness. The toothpick test in the center should emerge clean or with a few moist crumbs but not wet batter. Opening the oven door too often during this stage can cause the cupcakes to sink, so try to rely on visual cues and a timed check.
- In a heat-safe small bowl, heat the heavy cream for 2 to 2 1/2 minutes. It is essential that the cream is hot when poured over the chocolate chips.: Cooling fully stabilizes the crumb so you can core and fill without tearing the cake. I transfer the tin to a wire rack and let the cupcakes rest until they reach room temperature, which prevents the filling from melting or the liners from tearing during coring. Cutting into warm cupcakes will cause the centers to collapse and lead to messy filling, so patience here pays off.
- In a medium-sized heat-safe bowl, add the 12-ounce bag of chocolate chips and the light corn syrup. Once the cream is piping hot, carefully pour the cream over the chips. Allow the chips, corn syrup, and cream to sit for 2 to 3 minutes before whisking to allow the chips to melt. Use a whisk to combine the hot cream, corn syrup, and chocolate chips. Continue whisking until the chips are melted. Cover the ganache with cling wrap and allow the ganache to cool for about 1 to 1 1/2 hours.: When I core, I use a sharp knife or a coring tool to remove only the center portion, leaving the outer wall intact to hold the filling. The smell of baked vanilla mingles with the faint warmth still in the cake crumbs, and working gently helps maintain the overall shape. A common misstep is cutting too deep and penetrating the liner, which can make filling difficult, so aim for a quarter sized cavity and go slowly.
- Once the ganache has cooled, using either a stand mixer, or a handheld mixer, whip the ganache for 1 minute until fluffy. (If the ganache is a bit stiff, you can add 1/2 tablespoon of lukewarm heavy cream): As I whip the 1 3/4 cup heavy cream with the instant vanilla pudding mix , the mixture quickly transforms into a stable, slightly glossy filling that holds its shape. The pudding mix adds structure so the cream does not weep, and the texture becomes velvety with soft peaks forming. If you overbeat, the mixture can become grainy or too stiff, so stop when it is thick and pipeable.
- To prepare the ganache frosting for the cupcake, you can use a decorators frosting bag and larger frosting tip (Wilton tip 2 D or 2 A -or- a generic large decorators tip). If you don’t have these, you can use a gallon-sized Ziploc baggie with a small corner tip cut off.: The moment the heavy cream begins to steam and form tiny bubbles at the edge, it is ready; this heat level is essential so the cream melts the chocolate chips evenly. Pouring hot cream over the chips releases a rich chocolate aroma and helps produce a smooth emulsion. Avoid bringing the cream to a full boil, which can separate the ganache and affect texture.
- Using either a gallon-sized disposable Ziploc baggie with a small section of the corner tip snipped off, or a decorator’s bag with no tip, fill the bag 1/3 of the way full of cream. This will help keep the cupcake filling process a bit less messy and give a bit more control. Twist the top unused portion of the bag to help keep air out and give more control of the cream flow. Place the tip of the bag into the cupcake and use light even pressure to fill the cupcake. Continue until all cupcakes are filled. You will have to stop and refill your baggie with cream.: Letting the hot cream rest over the 12 ounces semi sweet chocolate chips and 3 tablespoons light corn syrup allows the chocolate to soften gently, and that quiet pause leads to a silkier ganache when you whisk. After waiting, whisk slowly from the center outward until glossy and homogenous, the scent becoming deeply chocolatey and inviting. If you whisk too aggressively initially, you may trap air bubbles, so whisk with a steady rhythm to achieve a mirror like surface.
- To frost the cupcakes, hold the ganache baggie about 1/2 in from the center surface of the cupcake above the cream. Use even pressure, squeeze to form the center of the star-swirl. Keeping the tip elevated and using the same amount of pressure, follow the outer line of the star-swirl. Making kind of a C around the star-swirl until the outer swirl lines connect. Continue until all the cupcakes are frosted.: As the ganache cools, its texture shifts from pourable to pipeable, and the surface loses steam and gains body. I cover it with cling wrap to prevent a skin from forming and check periodically for a softly set consistency. Rushing this step yields runny frosting that will slide off the cupcakes, so resist the urge to use it until it has cooled sufficiently.
- Whip the cooled ganache for 1 minute until fluffy, add lukewarm heavy cream if stiff: When I whip the ganache briefly, it becomes lighter and easier to pipe, with a sheen that still holds. If the ganache feels too firm, adding up to 1/2 tablespoon lukewarm heavy cream helps loosen it without compromising structure. Over whipping can incorporate too much air and change the mouthfeel, so a short whip to aerate slightly is all you need.
- Prepare a decorator's bag or gallon sized Ziploc for piping: Using a pastry bag with a larger tip creates neat star swirls, but a simple Ziploc with a corner snipped works well too, and it is what I rely on when I want minimal cleanup. The tactile satisfaction of steady pressure and a controlled flow makes the decorating step meditative. Cutting the tip too large or too small can alter the swirl shape, so test on parchment if you are unsure.
- Fill the pastry bag one third full of the pudding filling and pipe into each cupcake: I twist the top of the bag to push the cream toward the tip and apply gentle, steady pressure when filling each cavity; the filling should appear smooth and hold shape. The contrast between the pale filling and the golden cake is visually pleasing, and a consistent fill ensures every bite has that creamy center. Overfilling can cause the filling to spill out during frosting, so refill the bag as needed rather than packing it too full.
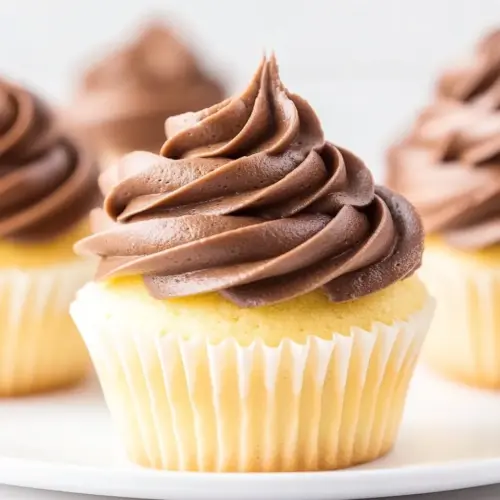
- Frost with whipped ganache using a star swirl technique: Holding the bag about 1/2 inch above the cupcake, I start with a small center star then pipe an outer swirl that creates a neat rosette, finishing by connecting the lines to produce a polished look. The ganache should feel silky and slightly cool under your fingers as you pipe, and the glossy finish signals success. If the ganache becomes too warm while piping, pop it briefly into the fridge to firm up slightly, as a too soft ganache will collapse the swirl shape.
Notes
- Make ahead strategy: The cake bases can be baked and frozen unfrosted for up to one month; thaw fully at room temperature before coring and filling to avoid condensation forming between the cake and filling. When I prepare a batch in advance, I find it saves time on the event day and still delivers great texture when finished properly.
- Shine boosting: Adding the light corn syrup to the ganache is a small trick that creates a glossy finish that photographs well and resists dulling over time. I always include the corn syrup for a professional looking sheen, especially when transporting cupcakes for gatherings.
- Use a makeshift piping bag: If you do not own a pastry bag, a gallon Ziploc with a corner snipped works wonderfully and reduces cleanup. I rely on this hack for impromptu baking sessions and still achieve neat rosettes using steady pressure and practice swirls on parchment first.
- Stabilize the filling: The instant pudding mix in the filling helps it hold shape and minimizes weeping, which is why this method is my go to for cupcakes that need to sit for a few hours before serving. It gives the filling structure while keeping a creamy mouthfeel.
- Control ganache temperature: If the ganache becomes too cold and stiff while decorating, warm it very briefly in a bowl over hot water to regain pipeable consistency; be cautious and stir gently to avoid separating the emulsion. I find short, controlled warming cycles keep the ganache workable without losing its gloss.