Blueberry Sweet Rolls
Blueberry Sweet Rolls are soft, tender, and jam packed with fruity bursts and a glossy vanilla glaze. These easy, slightly enriched rolls offer a creamy frosting, crunchy sliced almonds and a delightful mix of preserve and whole blueberries, perfect for easy weeknight baking or leisurely brunches. Make them for guests because they vanish fast and taste like a homemade treat.
Equipment
- Stand mixer
- Dough Hook
- Mixing Bowls
- Rolling Pin
- 13 x 9 baking pan
- Wire Rack
Ingredients
- 4 -1/2 to 5 cups all-purpose flour divided Provide structure and bulk to the dough, helping form gluten networks that trap gas for rise; measure precisely between 4-1/2 to 5 cups depending on dough hydration and kneading results. Adjust amount based on humidity and how wet the dough feels, adding slowly until a soft, slightly tacky consistency is reached.
- 1/3 cup granulated sugar Add sweetness to the dough and filling while aiding browning during baking; 1/3 cup granulated sugar also feeds the yeast lightly to support fermentation. Dissolve into the warm liquid for even distribution and to create tender crumb and pleasant crust color.
- 2 packets rapid rise yeast approx. 2 1/4 teaspoons per packet Leaven the dough quickly and reliably so rolls rise in a shorter timeframe; two packets of rapid rise yeast (approx. 2 1/4 teaspoons each) produce a predictable, airy texture. Activate gently in warm water if desired, but avoid excessive heat that can kill yeast.
- 1 teaspoons salt Enhance overall flavor and control yeast activity by strengthening gluten and balancing sweetness; 1 teaspoon salt also regulates fermentation rate. Sprinkle into dry ingredients to ensure even distribution for consistent dough development.
- 1 -1/2 cups water Provide warmth and hydration to activate yeast and hydrate the flour, contributing to dough consistency; 1-1/2 cups water should be lukewarm to activate rapid rise yeast without damaging it. Add gradually while mixing to achieve a soft, elastic dough that holds shape.
- 6 tablespoons butter Contribute richness, tenderness, and enhanced flavor to the dough when softened and incorporated; 6 tablespoons butter also improves crumb softness and shelf life. Soften to room temperature for even mixing or melt slightly if recipe directs, ensuring uniform fat distribution.
- 1 egg Bind ingredients, add richness, and assist with moisture and structure in the dough; 1 egg also promotes golden color on the baked rolls. Beat lightly before adding to incorporate air and ensure even mixing throughout the batter.
- 1 cup blueberry preserves Provide concentrated blueberry flavor and sweetness for the filling, helping create a spreadable layer that holds fruit in place; 1 cup blueberry preserves adds both fruit pieces and sugary syrup. Spread evenly over rolled dough to ensure each roll receives a flavorful center.
- 1 cup fresh blueberries Offer fresh texture and bursts of natural flavor throughout the filling and topping; 1 cup fresh blueberries contribute juiciness and tartness to balance sweetness. Sprinkle or fold into the preserves layer carefully to avoid crushing too many berries during rolling.
- 2 tablespoons butter melted Add a brushed, glossy finish and extra buttery flavor to the rolls before or after baking; 2 tablespoons butter melted also help toppings adhere to the surface. Use melted butter to baste the dough or combine with fillings for enhanced richness.
- 2 -1/2 cups powdered sugar Sweeten and thicken the glaze to finish the rolls with a smooth, sweet coating; 2-1/2 cups powdered sugar dissolves easily into liquid to create a pourable icing. Sift before mixing to remove lumps and whisk with creamer or butter to desired consistency.
- 2 tablespoons butter softened Provide creamy body and rich flavor to the glaze while adding a soft mouthfeel; 2 tablespoons butter softened blends smoothly with powdered sugar. Beat into the icing off heat to emulsify and achieve a silky texture that sets attractively on cooled rolls.
- 2 to 3 tablespoons all natural vanilla coffee creamer Impart vanilla-like aroma and additional creaminess to the glaze while thinning it to a pourable consistency; 2 to 3 tablespoons all natural vanilla coffee creamer adds flavor and smoothness. Adjust amount to reach desired glaze thickness without making it too runny.
- 1/2 cup Fisher Nuts Sliced Almonds divided Contribute crunchy texture and nutty flavor as a topping or garnish, enhancing contrast with soft rolls; 1/2 cup Fisher Nuts Sliced Almonds divided allows sprinkling before and after baking for layered crunch. Toast lightly to deepen flavor and ensure even distribution across servings.
Instructions
- In the bowl of a stand mixer, add 2 cups of the all-purpose flour, sugar, yeast, and salt. Mix well with the dough hook until all the ingredients are well distributed.: You will notice the dry ingredients take on a uniform, sandy look and the aroma of yeast becomes faintly sweet, which signals even distribution. This matters because even seasoning and yeast placement ensure consistent rise across the dough. A common mistake is dumping ingredients unevenly, which can leave pockets of salt or sugar that affect fermentation.
- While they're mixing, place water and butter together in a microwave safe measuring cup, and microwave in 10 second increments until very warm, but not hot to the touch. (120-130°F maximum. The butter won't be entirely melted.): Warmth is tactile here, the water should feel very warm to your wrist but not scalding, and the butter should soften into little pockets. This temperature range wakes the yeast without killing it, which ensures an active rise. If the liquid is too hot you will kill the yeast and the dough will not rise properly.
- Add the butter mixture and egg to the dry ingredients.: When you pour the warm mixture in, you will hear a soft sloshing and see the dough start to come together in a shaggy mass. The egg adds silkiness and color, improving the doughs elasticity. A frequent slip up is adding a cold egg which can lower the dough temperature and slow yeast activity.
- Mix for about two minutes at medium speed with the dough hook, scraping the sides occasionally.: The dough should transition from crumbly to a cohesive ball that clings to the hook, and you may see a smooth sheen forming. This initial mixing develops gluten just enough to hold structure while still being soft. Overmixing here can lead to a tougher crumb, so stop when the dough looks glossy and unified.
- Add 1 cup of flour and mix for another two minutes at high speed, scraping the bowl occasionally.: Adding flour in stages allows you to gauge hydration, and the higher speed helps incorporate air for a lighter crumb. You will notice the dough tightening and pulling away from the bowl sides. If you add flour too quickly you risk making the dough dry and dense, so proceed slowly.
- From here, add flour in small increments and mix after each addition. Stop adding flour when you have a supple dough that can be formed into a ball.: The final dough should feel elastic, slightly tacky, and spring back when pressed gently, which are signs of correct hydration and gluten development. You will also smell a faint yeasty scent. A common error is adding too much flour too fast, resulting in heavy, dry rolls rather than tender ones.
- Flour your work surface and knead the dough for 5-10 minutes - when the dough is soft, elastic, and springs back lightly when pressed with two fingers, you're ready to let it rest.: Kneading transforms the dough into a smooth, satiny ball and you will hear a soft tearing sound and feel the dough firm then relax as gluten forms. Proper kneading ensures an even, airy crumb once baked. Under-kneading yields dense dough, while over-kneading can make it too tight and resistant to rise.
- Cover the dough ball with a clean kitchen towel and let it rest for 10 minutes.: Resting relaxes the gluten, making the dough easier to roll out and shaping less stressful; you might feel the dough puff slightly as it relaxes. This short pause also helps distribute moisture evenly. Skipping this rest makes the dough spring back and resist rolling, which leads to uneven shaping.
- In a small mixing bowl, combine blueberry preserves and fresh blueberries.: When you gently fold the preserves and berries, you will see glossy jam and whole berries mingling into a jewel like mixture, and you will smell concentrated fruit and a hint of fresh brightness. This blend gives pockets of jam and bursts of freshness inside each roll. Be careful not to mash the berries too aggressively, or the filling will become watery.
- Mix well, but gently so as not to break the fresh blueberries. Set aside.: The visual cue is a cohesive but lumpy mixture where berries remain largely intact, and the aroma is sweet and fruity without being cloying. Gentle mixing prevents excess moisture which could make the dough soggy; a common mistake is overmixing which releases berry juices and thins the filling.
- Lightly flour your work area. Using a rolling pin, roll the dough into a large rectangle - about 10 x 15 inches.: As you roll, you will feel the dough stretch and become thinner, and you can see the glossy surface smoothing out. Even thickness ensures uniform baking and consistent rolls. Rushing this step can create uneven thickness leading to overdone edges and undercooked centers.
- Use a pastry brush to brush the melted butter onto the dough, stopping about an inch from the edges on the long sides of the rectangle.: Brushing melted butter adds a savory richness and helps the filling stick, and you will see a sheen where the fat tints the dough. Leaving a margin prevents filling leakage during rolling. A typical mistake is overbrushing which can make the dough greasy and heavy.
- Spread the blueberry mixture over the dough in the same areas as the butter, using a spoon to evenly distribute. Be gentle so as not to burst the fresh blueberries.: The spread should be even, with visible berries sitting on a bed of jam, and the aroma will deepen as the preserves meet the warm buttered surface. Uniform distribution ensures each roll has equal fruit. If you heap the filling too thickly it can squish out during rolling and bake onto the pan.
- Begin with the long end of the rectangle, roll the dough up tightly but gently. Pinch the seams to seal.: A tight roll yields neat spirals that bake evenly; you will feel a slight resistance as you roll and the seam should be pinched to stop unrolling. Proper sealing prevents the rolls from unwrapping in the oven. Rolling too loosely results in distorted shapes and uneven baking.
- Cut into 12 equally sized rolls.: Cutting reveals the spiral cross sections, and you should see even rings of filling. Using a sharp knife or dental floss yields clean edges. Unequal sizing leads to inconsistent baking times and may leave smaller rolls overdone while larger ones remain underbaked.
- Spray a 13 x 9 baking pan with cooking spray (I use the kind with flour in it), and then placing the cut sides down, put all the rolls into the pan. They will be cozy.: Arrange the rolls snugly so they support each other while rising, and you will see the spirals nestling together like a patchwork. Tight placement ensures soft sides where rolls touch. Spread out too much and you lose the soft pull apart texture.
- Cover with a clean kitchen towel; let rise in warm place until about doubled in size, approximately 1 hour.: During this rise you will notice the rolls puff and the spirals soften visually, and the dough will feel airy to the touch. This step is crucial for lightness; a weak rise gives dense rolls. If the environment is cold, the rise can take longer so be patient rather than increasing temperature drastically.
- Preheat the oven to 350ºF.: Preheating ensures consistent bake and proper oven spring so the rolls set with a golden top. You should smell a faint warmth when the oven is ready and the temperature should be stable. Putting unrisen dough into a cold oven leads to poor texture and uneven coloring.
- Top the rolls with 1/4 cup of almonds and bake for 25-30 minutes, or until the rolls are golden brown. Allow to cool on a wire rack for 15-20 minutes.: As they bake you will hear soft crackling and see the tops turn a warm golden hue, while the almond aroma toasts in the oven. Cooling on a wire rack prevents sogginess from trapped steam. A common oversight is removing them too soon which can make the centers doughy.
- While the rolls are cooling, make the frosting.: The kitchen will fill with the scent of powdered sugar meeting butter and creamer, and whisking forms a silky glaze that clings to the spoon. This step adds the final glossy finish. If you make the glaze too thin immediately you may lose the luscious coating effect when poured.
- In a mixing bowl, combine powdered sugar, butter and 2 tablespoons of creamer.: The texture should transform into a thick, spreadable glaze, and you will notice the powdered sugar lose its dustiness and become glossy. This balance controls sweetness and pourability. A typical slip is adding too much liquid at once which makes the glaze runny.
- Mix well with a whisk until a glaze forms. If you'd prefer a more liquid texture, add more vanilla creamer 1 teaspoon at a time and whisk again until you reached the desired consistency.: Whisking aerates the glaze slightly and gives it a silky sheen. The aroma of the creamer lifts the sugar and butter. Add extra creamer slowly because small amounts dramatically change consistency.
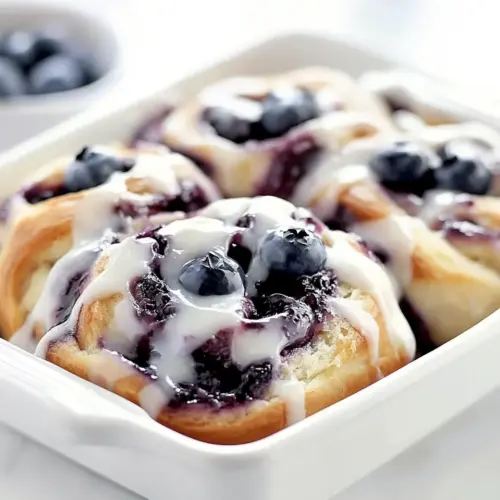
- Pour the frosting over the rolls. When you've covered them to your desired amount, top with the remaining sliced almonds.: Pouring the glaze yields a glossy cascade that fills the spiral valleys and highlights the golden tops; the final dusting of almonds adds crunch and visual contrast. Let the glaze set briefly so slices hold shape when served. Pouring too hot glaze can melt into the rolls and reduce the glossy appearance.
- Serve immediately.: The warm rolls will be tender and aromatic, with the glaze slightly set and the almonds crisp. Serving right away maximizes the contrast between warm interior and crunchy topping. If you wait too long the rolls will settle and lose some of their fresh texture.
Notes
- Proofing temperature: Keep your dough in a warm draft free spot around 75 to 80˚F for the best rise, and if your kitchen is cold I set it by the oven with the oven turned off but the light on to create a cozy microclimate.
- Flour adjustments: Flour absorption varies, so add flour gradually and stop when the dough is supple and slightly tacky, not dry, to maintain a tender crumb rather than a dense one.
- Handling berries: Fold fresh blueberries gently into the preserves to avoid bursting, because excess juice can make the rolls soggy and interfere with proper structure.
- Even slicing: Use dental floss or a very sharp knife to slice the log cleanly, which preserves the spiral shape and prevents overflowing filling during baking.
- Almond toasting: The almonds toast beautifully during baking, but if you want extra color toast them briefly on a sheet beforehand, watching closely because nuts can go from golden to burnt quickly.
- Make ahead option: Assemble the rolls, cover them, and refrigerate overnight; bring them to room temperature and allow the final rise before baking for fresh morning rolls with minimal morning work.