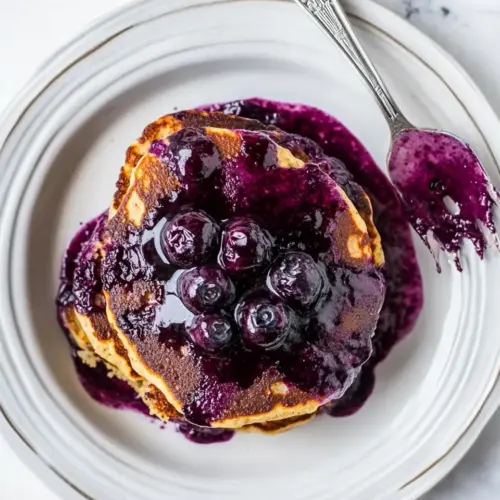
Blueberry Coconut Flour Pancakes
Blueberry Coconut Flour Pancakes are tender, coconut scented pancakes topped with a glossy blueberry compote, perfect for a solo breakfast. Lightly sweet and naturally flavorful, these pancakes balance creamy coconut notes with bright berry bursts, making them an easy weekend treat or quick weekday lift. Make them for a cozy morning when you want something special with minimal fuss.
Equipment
- Small Saucepan
- Mixing Bowl
- Large Skillet
- Rubber spatula
- Fork
Ingredients
- 2 eggs Provide structure and moisture while acting as a binding agent, helping the batter hold together and create a tender crumb when cooked.
- 1/4 cup full-fat coconut milk or unsweetened almond milk Add creaminess and richness to the batter, contributing fat for tender pancakes and a subtle coconut or nutty flavor depending on the choice.
- 1 tbsp coconut oil melted Introduce additional fat for richness and help prevent sticking on the griddle; melted form disperses evenly in the batter for moist pancakes.
- 1 pinch sea salt Enhance and balance flavor by cutting sweetness and emphasizing other ingredients; a pinch rounds out the batter and supports leavening action.
- 3 tbsp coconut flour Absorb liquid and thicken the batter while delivering a light, slightly nutty texture; its high fiber content produces denser, yet tender pancakes.
- 1 tsp baking powder Provide lift and lightness by releasing gas when heated, working with eggs to create a fluffy texture and slightly increased volume.
- 1/2 cup frozen organic blueberries Contribute bursts of fruity flavor and moisture; frozen berries add juiciness and natural sweetness without needing fresh fruit preparation.
- 2 tablespoons honey or agave nectar Supply sweetness and subtle flavor complexity while helping to brown the pancake surface and improve overall palatability.
- 1/2 tsp ground cinnamon Introduce warm, aromatic spice that complements fruit and sweeteners, enhancing perceived sweetness and adding depth to the flavor profile.
- 1 to 2 tsp tapioca flour or arrowroot flour Lighten batter density and slightly improve elasticity when used sparingly, helping create a more tender texture and better mouthfeel.
Instructions
- Start by preparing your blueberry topping, as it can simmer while making the pancake batter. In a small saucepan over low heat, add the frozen blueberries and agave nectar and cover with a lid. If you are using fresh blueberries, add about a tablespoon or two of water. After about 3 minutes, check on the blueberries – once juices begin to seep out, mash the blueberries with a fork, add the cinnamon and tapioca flour and stir well. Continue cooking for 3 to 10 minutes, or until the blueberry topping reaches your desired level of consistency. Remove it from the heat and set it aside until ready to serve.: The moment the frozen blueberries hit a warm saucepan you will hear a gentle, steady bubbling and begin to smell the bright, fruity perfume as the skins soften, this indicates the fruit is releasing its juices and you should keep the heat low so the berries break down slowly into a glossy syrup. As the mixture simmers, use a fork to mash some berries, which helps the sauce thicken and develop a deeper sweetness, the sugar in the agave nectar or honey will gently caramelize at the edges adding complexity to the flavor. A common mistake here is cooking at too high a temperature, which will splatter and turn the fruit bitter, so maintain low heat and stir occasionally to prevent sticking. Watch for visual cues, when you see the liquid take on a jewel like sheen and small bubbles rise evenly, you are close to the desired consistency, if it looks too runny add the thickener slowly while stirring to avoid lumps.
- While blueberries are on the stove, prepare pancake batter. In a mixing bowl, combine all wet ingredients and beat together. Add the coconut flour, baking powder and salt and continue to mix until all clumps are smoothed out and you’re left with a very thick batter. If you are using a mixer, you might need to scrape the sides of the bowl with a rubber spatula to get the coconut flour fully integrated. Allow batter to sit for about 5 minutes.: Fresh blueberries need a little extra moisture to gently release their juices, adding one to two tablespoons of water creates steam that helps them burst without drying out, you will notice steam curling from the pan and the fruit becoming plump and translucent. Stirring helps distribute heat so pieces soften evenly and prevents scorching, the auditory cue is a soft simmer rather than an aggressive boil, this is the sweet spot. Avoid adding too much water at once as that will lengthen cooking time and dilute flavor, instead add sparingly and allow the fruit to cook down. If your topping refuses to thicken, check that your heat is low and add a pinch more thickener for a glossy finish.
- Heat a large skillet on medium-low. Once warm, spread a dollop of butter evenly over the skillet. Using a spoon or rubber spatula, portion out about a third of the batter and shape it into a pancake on the skillet. Coconut flour pancakes need to be manipulated more than the standard all-purpose flour pancakes, as coconut flour tends to hold its shape. (Note: If your pancakes begin to melt around the edges, it is because there is not enough coconut flour in your batch. Add more coconut flour a teaspoon at a time until the batter stays together on the skillet.): When the juices appear they will look syrupy and translucent, and mashing releases more pectin and natural sugars, intensifying the aroma. Adding ground cinnamon at this stage lets the spice bloom in the warm liquid, elevating the flavor, while the tapioca flour bonds with the juices to create a silky texture, sprinkle it in gradually to avoid lumps. The sound changes to a slightly thicker simmer as the sauce gains body, and the visual cue is a shifting of color to a deeper purple. A frequent misstep is adding thickener too early, which can make the topping pasty, so wait until juices are visible before incorporating it.
- Repeat this step for the remaining 2/3 of the batter (this recipe makes 3 medium-sized pancakes), giving each pancake plenty of space for flipping. Allow pancakes to sit on the skillet for about 7 to 10 minutes (yup, that’s how long these bad boys need before flipping). Carefully work a large spatula under each pancake and gently flip (it is easy to “break” coconut pancakes, so the flipping process is the most difficult part about this recipe). Allow the pancakes to cook an additional 2 to 3 minutes then remove from heat.: You will want to stir occasionally and watch how the sauce evolves from runny to glossy and spooncoat consistency, that sheen signals the sugars are concentrated and the texture will cling nicely to the pancakes. If you prefer a chunkier topping let it simmer on the shorter end, for jam like thickness extend the cooking time, as water evaporates the aroma becomes richer and sweeter. Be mindful that high heat will reduce liquids too quickly and can scorch the fruit, so be patient and keep it low. A sign you have overcooked is a dull color and sticky residue on the pan, which you can avoid by removing from heat the moment you like the thickness.
- Top pancakes with the blueberry topping and confectioner’s sugar (you know…to make them pretty). If you are looking for more sweetness: drizzle agave nectar, honey or pure maple syrup over the tops of the cakes.: Once off the stove the topping will continue to thicken slightly as it cools and the sugars settle, you can taste and adjust sweetness if needed, a quick stir will smooth any formed skin. The residual warmth keeps the sauce spoonable, and leaving it in the pan with the lid off helps it reach the perfect texture for serving, if you leave it covered condensation can make it too loose. A common error is plating immediately while the topping is scorching hot which can lead to an overly runny pour and burns, allow a short resting period so it coats the pancakes rather than streaming off them.
- While blueberries are on the stove, prepare pancake batter: As the fruit simmers, combine the wet elements in a bowl and beat until smooth, the texture should become homogenous and glossy, this indicates the eggs and coconut milk are fully integrated and ready to accept the dry ingredients. When you add the coconut flour , sprinkle it in rather than dumping to avoid clumps, then fold in the baking powder and salt until the mix looks thick and velvety. Allowing the batter to rest for a few minutes is crucial because the coconut flour soaks up liquid and the rest period results in a cohesive texture that will hold on the skillet, without it the pancakes can spread too thin and fall apart. A common problem is overmixing which makes the batter tough, so mix until smooth then stop.
- In a mixing bowl, combine all wet ingredients and beat together: You will see the mixture turn slightly paler and a bit frothy as the eggs whip, that aeration helps provide lift later on; a hand whisk or fork works fine for this small amount. When the coconut oil is added be sure it is warm but not hot so it blends without cooking the eggs, the glossy sheen returns when everything is well combined. If you use a mixer, scrape the bowl to collect any pockets of flour, ensuring the batter is uniform, uneven batter often leads to uneven cooking. Avoid vigorous mixing after adding the dry ingredients to prevent gluten like toughness, with coconut flour you primarily want uniform hydration not elasticity.
- Add the coconut flour, baking powder and salt and continue to mix until all clumps are smoothed out and you’re left with a very thick batter: The batter should look dense yet moist, almost like a thickened paste, and you will notice it holds shape when scooped, which is a good sign for pan handling. Coconut flour absorbs liquid aggressively, so give it the full rest period to hydrate, the visual cue is a slight puffiness and a cohesive texture. If the batter seems too thin your pancakes may spread and not set properly, add a teaspoon more coconut flour at a time to correct it. Be cautious not to make it overly dry as that leads to crumbly pancakes, which is a common error at this stage.
- If you are using a mixer, you might need to scrape the sides of the bowl with a rubber spatula to get the coconut flour fully integrated: Scraping ensures there are no hidden lumps of dry coconut flour which would create dense pockets in the pancakes, the batter should be homogeneous and glossy before resting. Use a spatula to fold in any residual dry bits gently, the quiet scraping sound is a cue that the mixture is coming together. Not scraping can lead to inconsistent texture and undercooked bits in the final pancake, so take this small extra step for a smooth result. Overworking with the mixer can heat the batter and change texture, so keep mixing to a minimum once incorporated.
- Allow batter to sit for about 5 minutes: This rest is where the magic happens, the coconut flour soaks up the liquid and the batter firms up into a workable consistency, you will notice it become thicker and easier to portion. Skipping this pause is a common mistake that results in pancakes that spread too thin and do not hold together, patience here yields the best structure. During the rest you can taste the batter for seasoning balance if desired, and check that it is not overly stiff; if it is, add a splash of milk to loosen gently. The visual cue for readiness is a batter that holds its form when scooped and does not flatten into a puddle.
- Heat a large skillet on medium-low: A properly preheated skillet provides steady, even heat so the pancakes cook through without burning, you want the surface warm to the touch but not smoking, which yields an even, gentle browning. Spread a thin film of butter or oil across the surface, it should shimmer lightly, indicating readiness, and give you a pleasant sizzle when the batter lands. If the pan is too hot the outside will darken before the center sets, a common error, so err on the cooler side and extend cooking time slightly for safety. Visual cues during the first pancake will help you dial in the exact heat for subsequent cakes.
- Once warm, spread a dollop of butter evenly over the skillet: The butter helps create an even browning and a delicate crisp at the exterior edge, its nutty aroma when it melts signals the pan is ready. Use just enough to coat the surface so pancakes release easily, if the butter smokes the pan is too hot and you should reduce the heat and wipe it out to start again. Too much butter leads to frying rather than gentle griddling, which changes texture significantly, so moderate the amount. The sound should be a soft, steady sizzle when the batter hits the pan, not an aggressive frying crackle.
- Using a spoon or rubber spatula, portion out about a third of the batter and shape it into a pancake on the skillet: You will see the batter hold its shape, which is a welcome trait of coconut flour , and it will begin to set at the edges first, changing from shiny to a more matte appearance. Work gently to nudge the batter into a round, but avoid overmanipulation which can deflate the mixture, this step rewards a light touch. If the batter spreads excessively it likely needs more coconut flour , so add a teaspoon to the remaining batter to firm it up. The auditory cue is a quiet simmer rather than a rapid sizzle, and visually the edges should look set before attempting to flip.
- Coconut flour pancakes need to be manipulated more than the standard all-purpose flour pancakes, as coconut flour tends to hold its shape: Expect to care for each pancake attentively, using a thin spatula to nudge and lift, patience is key as they cook slower than typical pancakes. Watch for the edges to look firm and for small bubbles to form in the surface, that is your cue that the interior has set enough to flip without tearing. A common pitfall is flipping too early when the center is still raw and the pancake will break, so wait for those visual cues. The tactile feedback from the spatula will tell you if the pancake releases cleanly, which is when you know to proceed to the flip.
- Note: If your pancakes begin to melt around the edges, it is because there is not enough coconut flour in your batch : When edges slump and the cake loses its shape, it is a sign the batter is too wet; remedy by adding coconut flour a teaspoon at a time to the remaining batter until it holds. This issue often happens when liquids were measured without accounting for thickening during resting, so allow that pause and adjust accordingly. Overcorrecting with too much coconut flour can make pancakes dry and dense, so add sparingly, test with a small spoonful first. Visual clues include spreading edges and a glossy, wet surface, both indicating the need for more absorbent flour.
- Repeat this step for the remaining 2/3 of the batter, giving each pancake plenty of space for flipping: Cooking in batches ensures even heat distribution, and spacing prevents overcrowding which can lower pan temperature and lead to uneven browning. Keep the heat steady and adjust between pancakes if necessary, the first cake often serves as a gauge for final adjustments, such as adding a touch more oil or lowering the temperature slightly. Allowing enough room also makes flipping safer and reduces the risk of tearing, a common frustration with these delicate cakes. The visual rhythm of a few pancakes cooking at once helps maintain a steady workflow and consistent results.
- Allow pancakes to sit on the skillet for about 7 to 10 minutes: This extended cook time is normal for coconut flour pancakes as they need time for the center to set, you will see the edges firm and the surface lose its gloss, and the aroma will develop into a warm, toasty note. Listen for a softer sizzle which indicates the interior is cooking through rather than the outside burning, and use a spatula to gently test the underside for a golden color before flipping. A common mistake is reducing the time and ending up with raw centers, so trust the visual and tactile cues rather than a timer alone. The patience pays off with a uniformly cooked, tender interior.
- Carefully work a large spatula under each pancake and gently flip: The flip is the most nerve wracking part because coconut pancakes can tear, so slide the spatula fully under the cake and use a confident, swift motion to turn it over, you should hear a soft whisper of contact with the hot surface. If the pancake resists, give it another minute; forcing a flip will cause breakage. After flipping, the second side cooks faster, so watch closely and aim for a light golden hue without overbrowning. A common error is flipping repeatedly, which deflates the pancake and drains heat, so flip once and finish cooking.
- Allow the pancakes to cook an additional 2 to 3 minutes then remove from heat: The final brief cook sets the interior fully and gives the exterior a pleasant tone, you will notice a faint crust forming and the aroma will be slightly sweet and toasty, signaling readiness. Transfer the pancakes to a plate and keep them warm, either under a light tent of foil or in a low oven if serving multiple batches, avoid stacking immediately as steam can make them soggy. Overcooking at this stage will dry them out, so err on the side of a few less minutes rather than too many.
- Top pancakes with the blueberry topping and confectioner’s sugar: Spoon the warm blueberry sauce over the stack so it lightly soaks into the top layers, the contrast of hot fruit and tender cake is wonderful, and a dusting of confectioner’s sugar adds a pretty finish. If you want extra sweetness drizzle agave nectar or honey sparingly so it doesn’t overwhelm the fruit's brightness. A common misstep is adding too much syrup which masks the delicate coconut notes, so balance is key for the best flavor harmony.
- If you are looking for more sweetness: drizzle agave nectar, honey or pure maple syrup over the tops of the cakes : A light drizzle enhances each bite without drowning the fruit, and the aroma of warm syrup weaving with the blueberry compote is delightful, taste as you go because a little goes a long way. Keep presentation in mind, a gentle zig zag or small pools around the plate look inviting and concentrate sweetness where needed. Avoid pouring directly from a large bottle at once, which often results in an overpowering sweetness and sticky plate edges.
Notes
- Reduce sweetness: If you prefer less sugar, scale back the honey or agave nectar in the blueberry topping by half and rely on the fruit's natural sugars to carry the dish, this preserves brightness while cutting cloying notes.
- Richer texture: Use full fat coconut milk instead of unsweetened almond milk to add a creamier mouthfeel and deeper coconut aroma, it makes the pancakes feel more indulgent without extra steps.
- Thicker topping: For a jam like blueberry topping, simmer the sauce a little longer and add the tapioca flour gradually, stirring constantly to ensure a smooth, glossy finish that clings to the pancakes.
- Faster cook: If you need to shorten cook time, make slightly smaller pancakes so they set through quicker, but keep heat moderate to avoid over browning the outside before the center cooks.
- Make ahead: Prepare the blueberry topping in advance and refrigerate, gently rewarm before serving so you can assemble pancakes quickly without losing the fresh fruit character.
- Adjust batter thickness: If the batter seems too thin after resting, add a teaspoon of coconut flour at a time until it holds shape, this prevents spreading and improves flipping success.