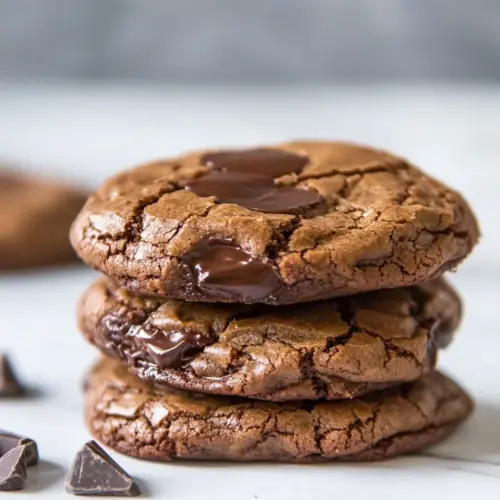
Better than Brownies Chocolate Cookies
Better than Brownies Chocolate Cookies offer a fudgy, glossy interior with a slightly firm edge, creating a portable brownie like experience. Rich bittersweet chocolate and pockets of semisweet chocolate chips deliver deep cocoa flavor, while simple technique makes this an easy weeknight baking win. Perfect for sharing and freezer friendly, they are a must bake when you want intense chocolate without fuss.
Equipment
- Heatproof Bowl
- Saucepan
- Whisk
- Rubber spatula
- Baking Sheets
- Parchment paper or silicone baking mat
- Cookie Scoop
Ingredients
- 16 ounce s(453.59 g) bittersweet chocolate, finely chopped Melting gives a rich, fudgy chocolate base that defines the cookie's deep cocoa flavor; finely chopping ensures even melting and smooth texture when combined with eggs and butter. Use high-quality bittersweet chocolate to balance sweetness and provide structure to the batter during baking.
- 4 tablespoons unsalted butter, at room temperature Softening contributes a tender, rich mouthfeel while helping create an emulsion with melted chocolate and eggs; room-temperature butter blends more evenly into the batter. Measure accurately to avoid making the dough too loose or too dense, and beat gently to incorporate air for slight lift.
- 4 eggs Binding provides structure and moisture while setting the cookie during baking; eggs also add richness and shine to the finished product. Lightly beat before adding to ensure even distribution and temperature balance with melted chocolate to prevent curdling.
- 11/3 cup s(266.67 g) granulated sugar Sweetening supplies bulk, sweetness, and helps create a crackly top as sugar dissolves into the warm chocolate-egg mixture; granulated sugar also contributes to the cookie's texture. Adjust slightly only if needed for taste, keeping measurement precise for predictable results.
- 1 teaspoon vanilla extract Flavoring imparts aromatic depth and rounds out the chocolate notes with a warm, sweet accent; vanilla enhances perceived sweetness and complexity. Add after sugar dissolves for the most even distribution without cooking off volatile aromatics.
- 1/2 cup (62.5 g) all-purpose flour Thickening provides minimal gluten development to keep cookies tender while giving enough structure to hold mix-ins; a small amount of flour prevents excessive spreading. Sift or whisk into the batter gently to avoid overmixing and ensure uniform pockets of richness.
- 1/2 teaspoon (0.5 teaspoon) baking powder Leavening offers a light lift and slight aeration for a balanced crumb without turning the cookie cakey; a small amount of baking powder helps create subtle rise and texture contrast. Ensure it is fresh for reliable chemical reaction and sprinkle evenly into dry ingredients.
- 1 cup (180 g) semisweet chocolate chips Inclusion adds bursts of melty chocolate throughout the cookie, enhancing texture and chocolate intensity; semisweet chips provide pockets of semi-soft chewiness. Fold in at the end of mixing to prevent overworking the batter and distribute chips evenly.
Instructions
- Preheat the oven to 350 degrees F. Line two large baking sheets with parchment paper or a silicone baking mat.: Your kitchen will smell warm and neutral as the oven comes to life, and the act of lining sheets signals intentional baking. A properly preheated oven ensures even rise and sets the exterior quickly, creating a slightly crisp outside while locking moisture inside. Common mistake to avoid, skipping the preheat can lead to flat, underbaked cookies. Pay attention to the oven light and check that the racks are centered for even heat circulation. When the oven reaches temperature you may notice a faint toasty scent that bodes well for browning.
- Put the chocolate and butter in a heatproof bowl and set it over a saucepan of barely simmering water, stirring occasionally, until completely melted and smooth. Set aside to cool to room temperature.: As the chocolate melts, it will transform from solid pieces to a glossy, viscous pool that reflects light; stirring gently keeps the texture uniform. Cooling to room temperature is crucial so that when the chocolate meets the eggs it does not scramble them. A quick troubleshooting tip, if the chocolate seems grainy, remove it from heat and stir off-heat until smooth. Avoid letting the water boil vigorously, because steam or splashes can seize the chocolate and ruin the texture. You want slow, patient melting for the creamiest result.
- In the meantime, whisk together the eggs, sugar, and vanilla extract in a medium bowl. Set aside.: Whisking until the mixture is slightly thickened and glossy introduces air and dissolves the sugar into the eggs, creating a silky base. You should see a ribbon when the whisk is lifted, indicating proper incorporation. This step influences the cookie interior texture, lending sheen and structure. A common error is under-whisking, which can yield denser cookies, so take an extra minute to reach that glossy stage. Use a clean bowl and whisk to avoid unintended grease that may prevent proper whisking.
- In a small bowl, sift together the flour and baking powder.: Sifting creates an even distribution and removes lumps, ensuring the leavener blends smoothly with the flour. The flour will look light and airy after sifting, making it easier to fold in without overworking the batter. This deliberate step prevents pockets of dry flour in the dough. One pitfall is skipping the sifting, which can lead to uneven texture; take a moment to sift and keep the flour light before adding it to the batter.
- Add the melted chocolate mixture to the egg mixture and stir with a rubber spatula until completely combined. Add the flour mixture in three batches, folding it gently into the batter with a spatula. Once all of the flour is incorporated, stir in the chocolate chips.: When you combine the cooled chocolate into the glossy egg mixture, the batter will turn very dark and glossy, and you will notice a thick, velvet-like consistency. Folding in the flour in batches prevents overmixing and preserves that dense, fudgy crumb; overworking develops gluten and makes the cookies cakier. As you fold, listen for the soft swish of the spatula hitting the bowl, and watch the batter thicken gradually. If the batter appears too loose, a short rest in the fridge for 10 to 15 minutes can help. A typical mistake is rushing the fold and vigorously stirring, which will incorporate air and change texture, so be gentle and patient as you bring everything together.
- Scoop 1 1/2 tablespoons of dough (or use a medium cookie scoop) onto prepared baking sheets. Bake for 10-12 minutes or until they are firm on the outside. Like brownies, do not over bake! Leave to cool completely on the baking sheets, then store in an airtight container at room temperature for up to 1 week. These can also be frozen for up to two months.: The dough should hold its shape as you scoop, looking slightly glossy and thick; as they bake, watch for a set outer edge with a slightly tender center. The smell will become richly chocolatey and slightly toasted, and the tops may develop subtle crinkles. Pull them at the lower end of the time window if you want gooey centers, and at the upper end for a firmer bite. A common mistake is leaving them in too long, which dries them out and diminishes the fudgy quality. Cooling on the sheet lets carryover heat finish the interior without further drying, so resist the urge to transfer too soon.
Notes
- Choose your chocolate carefully: Higher percentage bittersweet chocolate brings intense cocoa notes and less sweetness, while lower percentage or semisweet will soften the overall bitterness. I prefer a balance that highlights cocoa without being cloying.
- Cool the melted chocolate: Letting the melted chocolate and butter come down to room temperature prevents the eggs from curdling when you combine them, preserving a glossy, smooth batter. If it is still warm, the eggs can scramble which creates a grainy texture.
- Whisk eggs and sugar until glossy: This step adds body and shine to the batter. A glossy egg mixture helps create a slightly aerated crumb that still remains fudgy, and it can be the difference between dense and pleasantly tender cookies.
- Fold gently and in batches: Adding the flour gradually and folding preserves the dense, fudgy texture by preventing overdevelopment of gluten. Vigorous stirring will produce a cakier result, which is not the aim here.
- Watch baking time closely: These cookies go from perfect to dry quickly. Pull them as soon as the edges feel set and the centers still have a slight wobble for the best fudgy interior. Resist the temptation to leave them in longer for a deeper color, it will cost you moisture.
- Freeze dough for later baking: Scoop onto a tray and freeze, then transfer to a bag for future baking. Baked straight from frozen they take a minute or two longer and yield perfectly fresh cookies on demand.