Best Pumpkin Pie
Best Pumpkin Pie is a creamy, warmly spiced dessert with a toasty pecan oat crust and a silky cashew cream enriched filling. This easy holiday favorite blends classic flavors like cinnamon, ginger, and nutmeg for a comforting finish, perfect for Thanksgiving or any fall gathering. Make it for a crowd pleasing, effortless centerpiece that slices beautifully and keeps well in the fridge.
Equipment
- High Speed Blender
- Food Processor
- 10 inch pie pan
- Oven
- Mixing Bowls
Ingredients
- 1 1/2 cups raw cashews, soaked 4 hours or overnight Soaked to soften and become creamy when blended, enabling a rich, dairy-free base for the pie filling or cashew cream; imparts a mildly sweet, nutty flavor and smooth texture after processing.
- 1 1/2 cups water Added to blend soaked cashews into a silky cashew cream, providing the necessary liquid for emulsion and creating a smooth, pourable consistency for the recipe.
- 1 cup pecan halves, toasted Toasted to deepen flavor and enhance crunch when used in the crust or as a topping; contributes rich, buttery notes and a pleasant texture contrast in the finished pie.
- 1 cup oat flour Used as a binding, tenderizing dry component in the crust or base, offering a mild, slightly sweet whole-grain flavor and helping achieve a firm but tender crust structure.
- 1/4 cup packed brown sugar Packed to provide moisture and caramel-like sweetness to the crust or filling; balances spices and enhances browning for a deeper flavor profile.
- 1/3 cup butter or vegan butter, melted Melted to bind crust ingredients and add richness; supplies fat to create a tender, cohesive crust and can be swapped for a vegan option without altering technique.
- 1/2 teaspoon cinnamon Measured to lend warm, aromatic spice to the crust or filling; contributes familiar pumpkin pie aroma and complements other baking spices for depth.
- pinch of sea salt Included in small amount to heighten overall flavors and balance sweetness; enhances other ingredients and prevents the final pie from tasting flat.
- 1 1/2 cups canned pumpkin puree Pureed to deliver concentrated pumpkin flavor, moisture, and body to the custard filling; contributes color, natural sweetness, and a smooth texture when combined with other wet ingredients.
- 1 1/2 cups Cashew Cream, recipe above Prepared beforehand to provide a creamy, rich, dairy-free component for the filling; introduces velvety texture and subtle nutty flavor that supports the pumpkin custard.
- 2 eggs, well beaten Beaten to incorporate air and help set the custard filling; provides structure and richness that yields a firm yet silky pie when baked.
- 1/2 cup packed brown sugar Packed to sweeten the pumpkin filling, adding moisture and a deeper molasses-like flavor that complements the spices and balances the pumpkin's earthiness.
- 1 teaspoon cinnamon Measured to contribute warm, aromatic cinnamon flavor to the filling; pairs with other spices to create the classic pumpkin pie spice profile.
- 1 teaspoon ground ginger Ground to provide bright, peppery warmth and a slightly sweet bite, enhancing the pumpkin filling's complexity and balancing sweetness with heat.
- 1 teaspoon nutmeg Added to impart sweet, woody warmth with a slightly sharp edge, boosting the filling's aromatic depth and complementing other fall spices.
- 1/8 teaspoon ground cloves Measured sparingly to provide a pungent, warming note that intensifies the pumpkin pie spice blend without overpowering the filling.
- 1/4 teaspoon ground allspice Included in small quantity to deliver floral, peppery undertones that round out the spice mix and add nuanced complexity to the filling.
- 1/4 teaspoon sea salt Measured to balance sweetness and enhance all other flavors; helps highlight spices and pumpkin while ensuring the filling is well-seasoned.
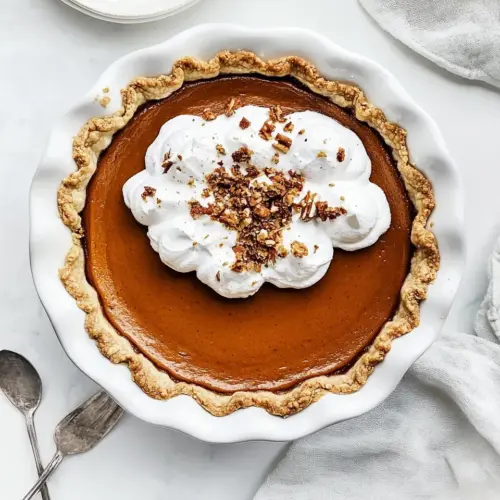
- whipped cream or Coconut Cream Used as a finishing touch to add light creaminess and sweetness when serving; can be dairy or coconut-based to accommodate dietary preferences while adding visual appeal.
- chopped pecans Chopped to provide a crunchy garnish that adds texture and nutty flavor contrast to the smooth filling; enhances presentation and offers a pleasant bite.
Instructions
- Make the cashew cream. Drain and rinse the soaked cashews. In a high-speed blender, blend the drained cashews and the water on high speed until very smooth, 2 to 3 minutes. Set aside.: The blender will emit a throaty roar as the soaked raw cashews and water transform into a glossy, pale cream, a scent that is faintly sweet and nutty. Watch for a uniform, silky stream pouring down the blender jar, with no grainy bits visible; that is the visual cue you want. The cream should be pourable yet substantial, clinging slightly to a spoon. This step matters because a well emulsified cashew cream prevents separation in the filling, keeping the texture smooth and cohesive. If your cashew cream seems gritty, stop and blend a bit longer, or add a tablespoon of water and scrape down the sides. A common mistake is under soaking the cashews , which strains the blender and yields a coarse texture, so give them time to soften when possible.
- Preheat the oven to 350°F.: Before you do anything else, let the oven come fully to temperature so the crust and filling bake evenly. You will notice the kitchen warms and the oven light flickers as the element cycles; that steady heat is what creates an even set in the pie. Accurate preheating is crucial because an oven that is too cool can cause the filling to remain gummy in the center, while one that is too hot can overbrown the edges. Use an oven thermometer if your appliance is old or you suspect temperature variance. Avoid opening the door repeatedly during this process, or you will extend preheat time and invite uneven heat.
- Make the crust. In a food processor, combine the pecans, oat flour, brown sugar, melted butter, cinnamon, and salt. Pulse until the mixture is finely ground and sticks together well when pressed between your fingers.: When you pulse the toasted pecan halves , oat flour , brown sugar , melted butter , cinnamon , and a pinch of sea salt together in the food processor, the mixture should turn into a grainy, fragrant mass that holds when you press it. You will smell toasted nuts and warm sugar notes; that aroma is your sign the crust is on the right path. The texture should be fine enough to pack yet still show tiny nut flecks. This technique matters because a well processed crust binds and bakes into a stable shell that will support the filling. A frequent error is over processing into a paste, which yields a greasy crust, so pulse carefully and check the texture often.
- Tip the pecan mixture into a 10-inch pie pan and, using the flat bottom of a glass, press it evenly and firmly onto the bottom and up the sides to form the crust.: Using the flat bottom of a glass to press the mixture into a 10 inch pie pan gives you an even, compact shell. Press firmly up the sides and into the corners so the crust is uniform in thickness, and you will feel the mixture become cohesive under the glass, releasing a faint nutty scent. Uniform pressing is why the crust holds together and bakes evenly without thin spots that could crack. If your crust cracks while pressing, moisten your fingers slightly and patch gently, rather than reprocessing the whole batch. One mistake is pushing too thin on the sides, which can lead to collapse when the filling is added.
- Bake for 12 minutes, or until the crust looks slightly cooked but not brown. Set aside.: As the crust warms, a gentle toasty aroma will rise and the surface will look set rather than wet, but not browned. The brief bake firms the crust so it does not become soggy under the filling, and the short time keeps it tender. Use visual cues here, the crust should look slightly drier and feel firmer to the touch. If you bake too long, the crust may darken and taste bitter, so watch closely and remove when it is just set.
- Make the filling. In a large bowl, combine the pumpkin puree, Cashew Cream, eggs, brown sugar, cinnamon, ginger, nutmeg, cloves, allspice, and salt. Whisk until smooth.: Combine the pumpkin puree , prepared Cashew Cream , well beaten eggs , brown sugar , and the spice blend of cinnamon , ginger , nutmeg , cloves , allspice , and sea salt in a large bowl. Whisk until the mixture becomes glossy and completely smooth, with the spices evenly distributed and no streaks of cashew cream. The aroma will bloom as the spices incorporate, becoming warmly fragrant. Achieving a homogenous mixture is essential for even setting and consistent flavor; if you skip thorough whisking, pockets of spice or cashew cream can create texture inconsistencies. Avoid over beating which can introduce excess air causing cracks during baking.
- Pour the filling into the crust and bake until the center of the pie is set (a butter knife should come out clean), 30 to 40 minutes. Transfer to a rack and let cool completely. Store, covered, in the fridge for up to 3 days.: As the filling settles into the par baked shell, you will notice it level out and shyly steam as it touches the warm crust. The contrast between the denser pumpkin mixture and the crisping crust is immediate and pleasing. This step matters because even pouring helps the pie set uniformly. If you see bubbles on the surface after pouring, gently tap the pan on the counter to release trapped air. A common mistake here is overfilling the crust which can lead to spillage while baking.
- Bake until the center is set: During the 30 to 40 minute bake, the kitchen will fill with a deep, spiced perfume, and the filling will darken slightly, firming at the edges sooner than the center. The correct doneness feels set but with a slight wobble in the center, and a butter knife inserted near the middle should come out clean. This careful bake ensures the texture is silky yet fully cooked, avoiding a runny center. If you overbake you risk cracking and a dry filling, so start checking at the earlier end of the time window and rely on the knife test.
- Transfer to a rack and let cool completely: Cooling on a rack lets air circulate and prevents steam from making the crust soggy. The pie will finish setting as it cools, smoothing any minor surface ripples. Patience here rewards you with clean slices and balanced texture. A common misstep is slicing the pie while it is still warm, which yields messy pieces and an unset center, so allow ample cooling time.
- Store covered in the fridge for up to 3 days: Chilling deepens the flavors and firms the filling for perfect slicing the next day. Cover the pie loosely or use a pie saver to protect the top and keep any refrigerator odors at bay. This storage method keeps the crust reasonably crisp for a short period. If you notice the crust softening after a day, allow the pie to come to room temperature briefly before serving to revive texture, but avoid long term storage if you want the best mouthfeel.
Notes
- Notes You can skip soaking the cashews if using a Vitamix Blender. This saves time but expect a bit more motor load, so use short pulses and scrape down as needed.
- Crust binding If the crust feels too dry when pressing, add a teaspoon of melted butter at a time and press until it holds. Too much fat makes it greasy, so add sparingly.
- Spice balance Toast a pinch of the spices briefly in a dry skillet before mixing to deepen their aroma. Work quickly to avoid scorching which turns spices bitter.
- Blender technique Blend the cashews with water on high for at least two minutes, stopping to scrape down the sides once, to ensure a perfectly smooth cream without grainy texture.
- Serving suggestion Chill the pie thoroughly and add whipped cream or Coconut Cream just before serving to keep the topping light and avoid softening the filling.