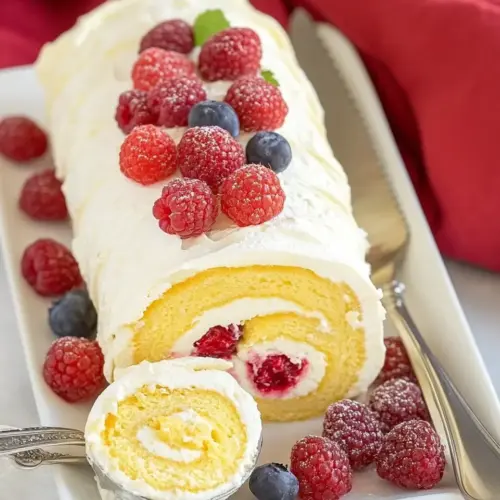
Berry Mascarpone Roulade
Berry Mascarpone Roulade is a tender sponge roll filled with creamy mascarpone and bright berries, offering a creamy yet airy mouthfeel and a visually striking swirl. The contrast of light eggs-based sponge and silky mascarpone makes it an easy showstopper for spring gatherings, brunches, or special occasions, and it is worth making for its elegant simplicity.
Equipment
- Stand mixer
- Whisk attachment
- 12x17-inch rimmed baking sheet
- Parchment Paper
- Cooling rack
- Mixing Bowls
- Sieve
- Spatula
- Serrated Knife
Ingredients
- 1/2 cup flour Provide structure and lightness to the sponge by forming the framework of the batter; sifted flour helps create a tender crumb when folded gently into whipped eggs and sugar. Balances moisture with the cornstarch to keep the roulade soft and pliable for rolling without cracking.
- 1/4 cup cornstarch Create a finer, tender texture by softening the protein network that flour forms; cornstarch reduces gluten development and yields a delicate, melt-in-mouth sponge. Works with flour to produce a smooth, even crumb that supports the filling without becoming heavy.
- 1/8 teaspoon of salt Enhance overall flavor by subtly brightening the sweetness and rounding savory edges; a small amount of salt intensifies other flavors and balances sugar. Stabilizes and highlights the mascarpone and berry notes once the roulade is assembled.
- 6 eggs, separated, at room temperature Contribute richness and aeration by separating yolks and whites and using both to build structure; yolks add fat and flavor while whites whipped to soft peaks provide volume. Room-temperature eggs whip more efficiently, producing a light, springy sponge that holds together during rolling.
- 2/3 cup sugar Provide sweetness and aid in volume by incorporating sugar into egg yolks and whipped whites; sugar helps stabilize beaten egg whites and creates tenderness in the baked sponge. Caramelizes slightly during baking to add subtle color and depth.
- 1/2 teaspoon vanilla Add warm aromatic flavor and enhance sweetness perception with a touch of vanilla; vanilla binds flavor components together and uplifts the fruit and mascarpone filling. Use pure vanilla for the cleanest, most pronounced aroma in the finished roulade.
Instructions
- To make the roulade, preheat the oven to 400. Line a 12×17-inch rimmed baking sheet with parchment paper.: The air in the oven should feel hot and ready to lift the sponge quickly, creating a puffed surface that sets before drying out. I can almost hear the heat rise and the slight hum of the oven fan as it comes to temperature. Preheating is vital because uneven or low heat will prevent the cake from puffing properly, leading to a flat, dense result. A common mistake is placing the pan into an oven that is still warming, which extends bake time and can toughen the sponge. Make sure your oven thermometer reads a steady 400 degrees before you slide the pan in, and take a moment to line the baking sheet so the parchment lies flat and even.
- Sift the flour, cornstarch and salt onto a piece of parchment paper.: The parchment should lie smooth, with the corners trimmed to fit, so the batter spreads evenly and releases cleanly after baking. Running your fingers over the sheet to press the paper into the corners helps avoid air pockets that can cause uneven baking. If the parchment shifts while spreading the batter, the cake can bake unevenly, so secure it with a dab of batter in the corners if needed. Visual cues to watch for are a uniformly thin layer of batter and no bubbling under the paper; this ensures even contact and consistent browning.
- Put the egg whites into the bowl of a stand mixer fitted with the whisk attachment. Whip the whites until they are just starting to hold their shape. Slowly pour in the sugar and beat on high speed for another couple of minutes till the meringue is very firm.: Sifting combines these dry elements into a fine, airy mixture that is easier to fold into the egg base without deflating it. The sound of the sifted powder falling is soft and promises a light crumb. I always sift directly onto parchment to keep measurements precise and prevent clumps. If you skip sifting, you risk pockets of dense flour that mar the sponge texture. Aim for a soft, powdery appearance before you set the dry mix aside.
- Put the yolks in a separate bowl with 1/2 teaspoon of vanilla and whisk until smooth.: As the mixer begins, the whites will whirl into foam, turning from translucent to opaque and starting to hold soft peaks. The noise of the whisk becomes steadier as air is incorporated, and the bowl will warm slightly from the motion. Starting at medium speed helps develop structure without splattering. A pitfall is using a bowl with any grease residue, which will prevent the whites from foaming properly; make sure the bowl and whisk are impeccably clean and dry.
- Whisk about 1/4 of the meringue into the yolks. Scrape the yolks onto the meringue and then put the dry ingredients on top of them. Gently fold all of the ingredients together, but do not overmix. Pour the batter onto the prepared pan and spread evenly.: You want a billowy, glossy foam that will support added sugar. At this stage the whites will form soft peaks that gently curl when the whisk is lifted. The texture should be elastic and light; it should shine. Overwhipping can lead to dry, grainy whites that will not incorporate smoothly, so stop when soft peaks form. I often check by lifting the whisk and watching how the peak falters, this tells me the whites are ready for the sugar addition.
- Bake for 8-10 minutes, or until the sponge is puffed and golden. Transfer to a cooling rack.: Adding sugar gradually allows it to dissolve into the foam, creating a stable, glossy meringue that holds stiff peaks and resists collapse. The sound becomes brighter and the whisk leaves distinct trails. You should be able to turn the bowl upside down briefly and feel the meringue cling, a reliable sign of readiness. If the sugar is added too quickly, the meringue may weep or remain grainy. Scrape the bowl periodically so all sugar absorbs evenly and the texture is smooth.
- Dust a kitchen towel with powdered sugar and invert the cake onto the sugared cloth. Carefully peel away the parchment paper.: The yolks should become velvety and slightly pale as the vanilla is incorporated, which enhances aroma and flavor. The whisking brings a glossiness that helps when the yolks are folded into the meringue, ensuring they distribute evenly without streaking. A common error is under-whisking, which can leave yolk clumps that create uneven texture in the batter. Aim for a silky, homogeneous mixture before proceeding.
- Place the cake so that there is a long side closest to you, and roll the cake up in the towel. Allow to cool.: This step lightens the yolk mixture, making it easier to incorporate the rest of the meringue without deflating it. The action creates a smooth, buoyant base and you should notice the combined mixture becoming airy and pale. If you fold incorrectly here, you can lose air and end up with a dense sponge. Use gentle, sweeping motions to blend, and stop when the mixture looks uniformly integrated and light.
- Put the mascarpone in a bowl and sift the powdered sugar over it. Gently whisk the two together and then stir in the vanilla.: Layering the components this way helps with gentle incorporation. Pouring the yolk mix over the meringue creates pockets that make folding easier, while adding the sifted dry mix on top helps distribute the flour and cornstarch without overworking the batter. You should see soft ribbons when the ingredients begin to come together. A frequent mistake is aggressive mixing, which deflates the meringue; be patient and use broad, gentle folds until the batter is uniform and still airy.
- Whip the cream in the bowl of a stand mixer fitted with the whisk attachment until it holds firm peaks. Stir a quarter of the cream into the mascarpone to lighten it, then gently fold in the rest.: Folding should be deliberate and languid, turning the bowl as you lift and fold so the batter blends without losing air. The texture will look billowy and smooth, and there should be no visible streaks of flour. Overmixing develops gluten and knocks out volume, yielding a tougher sponge. If you notice the batter becoming shiny and heavy, stop and transfer immediately to the pan to preserve lift.
- To assemble the cake, unroll it. Spread the filling evenly over the cake, leaving an inch perimeter without any topping. Evenly disperse the berries over the filling. Use the towel to help you lift and roll the cake, starting with the long side farthest from you and finishing so that the seam is on the bottom. Trim off both ends with a serrated knife. Refrigerate at least two hours before serving. Sprinkle with powdered sugar before slicing.: As the batter meets the parchment it should flow into a thin, even layer that fills the sheet without gaps. Use a flexible spatula to coax it toward the edges gently, keeping the surface smooth. A lumpy or uneven surface can cause uneven baking, so take a moment to level it. If the batter is thick in areas, it will bake at different rates, so correct this before it goes into the oven.
- Bake for 8-10 minutes, or until the sponge is puffed and golden: While baking you will see the cake rise and develop a warm, golden color, and the kitchen will smell lightly sweet and eggy. The edges should pull slightly from the pan and the top should spring back when touched gently. Overbaking dries the sponge and makes rolling difficult, so watch closely toward the end of the time window. If it browns too fast, tent with foil for a minute to prevent burning while allowing center set.
- Transfer to a cooling rack: A swift transfer helps arrest baking and prevents the cake from drying further. The underside will steam slightly as it cools, which is normal. Leaving the cake in the pan can cause sogginess where steam condenses, so lift it promptly. A common oversight is letting it sit too long, which makes unrolling more fragile, so move quickly to the next step.
- Dust a kitchen towel with powdered sugar and invert the cake onto the sugared cloth: The sugared towel prevents sticking and gives the cake a faint sweetness on the exterior. Inverting should be done confidently so the sponge lands evenly on the towel. If the cake clings to the parchment, carefully peel it away to avoid tearing. Use a steady motion to avoid folds or wrinkles that could mar the surface.
- Carefully peel away the parchment paper: Remove the parchment slowly, keeping the sponge smooth and intact. The cake surface should look satiny and even, and the aroma of warm sponge and sugar will be pleasant and subtle. Ripping the paper too quickly can tear the cake, so go slow and use a fingertip to lift any stubborn corners.
- Place the cake so that there is a long side closest to you, and roll the cake up in the towel: Rolling while warm sets the shape and trains the sponge to coil without cracking. The towel should guide the roll and create a snug cylinder, with the seam side tucked under once cooled. If you roll too tightly you risk compressing the sponge, and if too loosely the roll may not hold its shape. Aim for a gentle, even roll that feels secure but not strained.
- Allow to cool: Cooling lets the roll set so it will hold the filling without collapsing. The cake should be completely cool before unrolling to add the filling, otherwise the filling can melt and make the sponge soggy. A common misstep is rushing this step; patience ensures clean slices and a stable swirl when re-rolled.
- Put the mascarpone in a bowl and sift the powdered sugar over it: Sifting the sugar avoids lumps and makes the mascarpone smoother as you stir. The aroma will become gently sweet and creamy as the two combine. If the sugar is added too coarsely you may end up with grainy spots, so use a fine sieve and sift directly into the bowl for even distribution.
- Gently whisk the two together and then stir in the vanilla: The mixture should become silky and lightly sweet, with the vanilla adding a round aromatic note. Whisking gently preserves the creaminess without turning the mascarpone runny. Overworking can cause the cheese to separate, so stop once the texture is smooth and homogenous.
- Whip the cream in the bowl of a stand mixer fitted with the whisk attachment until it holds firm peaks: The sound will shift as air becomes incorporated, and the cream will thicken to a glossy, billowy consistency. Firm peaks mean the cream will support structure when folded into the mascarpone, creating a light yet stable filling. Underwhipping yields a loose filling, while overwhipping can turn it grainy and buttery, so watch closely and stop at firm peaks.
- Stir a quarter of the cream into the mascarpone to lighten it, then gently fold in the rest: This step brings air into the filling and ensures a smooth, light texture that complements the sponge. Folding should be slow and deliberate to keep the filling airy. If you fold aggressively you will deflate the cream and the filling will be dense, so use broad strokes and stop when the mixture is uniform and pillowy.
- To assemble the cake, unroll it: As you unroll, you may smell the sweet tang of the sponge and the cool creaminess of the filling. The cake should open easily if cooled properly, revealing a soft inner surface ready to receive the filling. If the cake resists, it may not be fully cooled and could crack, so ensure it is at room temperature before proceeding.
- Spread the filling evenly over the cake, leaving an inch perimeter without any topping: Spreading should be done with a flexible spatula in smooth strokes so the filling lies flat and even. Leaving a border prevents the filling from spilling out when you roll, ensuring clean edges. Overfilling is a common error that leads to oozing and messy slices, so use a moderate layer and distribute the berries thoughtfully.
- Evenly disperse the berries over the filling: Scatter the berries so each slice gets a bright burst of fruit. The colors should contrast with the creamy filling, making each cross section visually inviting. If the fruit pieces are unevenly sized, some slices may be heavy and difficult to roll, so choose berries of comparable size or trim larger ones.
- Use the towel to help you lift and roll the cake, starting with the long side farthest from you and finishing so that the seam is on the bottom: The towel gives purchase and control, ensuring a tight, even roll. The seam on the bottom keeps the presentation neat and helps the roulade hold its shape. If you roll too quickly you can trap air pockets, so proceed at a measured pace and use the towel to guide the sponge into a smooth spiral.
- Trim off both ends with a serrated knife: Cutting the ends reveals the tidy spiral and removes any drier edges. A gentle sawing motion keeps the slices clean, and a serrated knife prevents compression of the soft sponge. Pressing down hard will flatten the roll, so use light, confident strokes.
- Refrigerate at least two hours before serving: Chilling firms the filling and helps the roulade slice cleanly, with the flavors melding into a cohesive whole. The cold brings a firmer texture to the mascarpone and lets the sponge relax into its spiral. Serving too soon can cause slumping and messy slices, so give it time to rest in the fridge.
- Sprinkle with powdered sugar before slicing: A light dusting adds a delicate finish and a subtle sweetness to the exterior. Use a fine sieve for an even snowfall of sugar that highlights the roll's swirl. Avoid heavy dusting which can become clumpy on moist spots, and apply just enough to enhance the presentation.
Notes
- Swap Berries Thoughtfully: Use whatever berries are at their peak in spring to highlight fresh flavor, and consider slicing larger berries for even distribution so each slice gets a balanced bite.
- Adjust Sweetness: If you prefer a less sweet filling, reduce the powdered sugar when combining with mascarpone, tasting as you go to keep the balance bright and creamy.
- Lighten the Filling: Fold in extra whipped cream to the mascarpone for an airier filling, but do so gently to retain a stable texture that will hold in the roll.
- Decorate Simply: A light dusting of powdered sugar highlights the spiral, while a few whole berries on top create an elegant, seasonal garnish without overwhelming the cake.
- Make Ahead Strategy: Assemble and refrigerate the roulade overnight to let flavors meld, then slice just before serving for the freshest presentation.