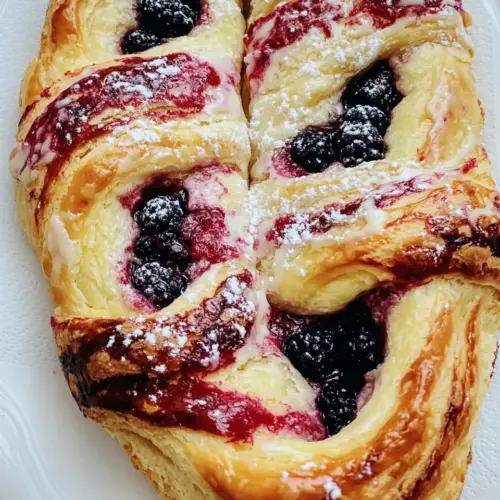
Berry Cheese Danish
Berry Cheese Danish is a creamy, flaky pastry with a soft enriched dough, tangy cream cheese filling, and bright berry jam center. These slightly sweet, golden pastries are perfect for an easy weeknight bake or a leisurely weekend brunch, offering a bakery quality finish without the fuss. They are ideal for gatherings because you can make parts ahead and still serve warm, impressive pastries.
Equipment
- half baking sheet
- Parchment Paper
- Large Bowl
- Stand up Mixer
Ingredients
- 1 tablespoon unsalted butter, at room temperature (for the baking pan) Grease the baking pan with a thin layer to prevent sticking and promote even browning during baking; use room-temperature butter so it spreads easily and coats corners well.
- 4 1/2 cups all-purpose flour (572 g) Provide the primary structure and bulk for the dough, contributing gluten development for chew and lift; measure by weight for consistent texture and crumb.
- 3 1/2 teaspoons Instant Yeast (see Notes for using dry active yeast) Leaven the dough rapidly to create light, airy layers and rise; instant yeast can be mixed directly into dry ingredients for predictable fermentation.
- 2 teaspoons kosher salt Season the dough to enhance overall flavor and to balance the sweetness of the filling; kosher salt also tightens the gluten network slightly.
- 1 1/3 cups whole milk Add moisture and richness to the dough while contributing to browning and tenderness; whole milk supplies fats and proteins that improve crumb and flavor.
- 1/4 cup unsalted butter Enrich the dough with fat for a tender, flaky texture and help create interchangeable layers when laminated or mixed; keep softened if needed for blending.
- 4 tablespoons honey Sweeten the dough subtly and add moisture while aiding browning and a glossy crust; honey also imparts a mild floral flavor that complements berries.
- 1 large egg Bind and enrich the dough, adding structure, color, and flavor; whole eggs contribute proteins that help with texture and overall richness.
- 2 large egg yolks Further enrich the dough with concentrated fat and emulsifiers, improving tenderness and contributing to a richer crumb and deeper color in the final bake.
- 8 ounces cream cheese Create a creamy, tangy filling that balances sweetness and adds smooth texture; cream cheese provides moisture and structure when blended with sugar and flavorings.
- 1/4 cup granulated sugar Sweeten and stabilize the cream cheese filling to achieve desired sweetness and to help set the filling during baking; granulated sugar also aids slight caramelization.
- 1/2 teaspoon vanilla, homemade or store-bought Add flavor depth and aromatic complexity to the filling and glaze; vanilla pairs with dairy and fruit to round out the overall taste profile.
- 5 tablespoons all-purpose flour Thicken the cream cheese filling, absorb excess moisture, and help it hold shape during baking; a small amount of flour prevents runniness.
- 1 tablespoon dark or light brown sugar Sprinkle a touch of caramelized flavor and additional sweetness to the filling or topping; brown sugar also contributes a hint of molasses character.
- Pinch kosher salt Enhance and balance the filling with a small touch of seasoning to lift sweetness and intensify flavors; a pinch of salt sharpens the dairy and fruit notes.
- 2 tablespoons melted unsalted butter, cooled to room temperature Brush melted butter into dough layers or over shaped pastries to promote browning, add flavor, and encourage flakiness once cooled to room temperature.
- 1 jar berry jam (I used a combination of wild blueberry and strawberry) Top or swirl into the pastries to provide concentrated fruit flavor, sweetness, and a glossy presentation; jarred berry jam supplies convenience and consistent taste.
- 1 large egg, beaten in a small bowl Apply as an egg wash to promote golden color, shine, and a slightly crisp surface on the baked danishes when brushed before baking.
- 1 cup powdered sugar Drizzle into a glaze to add smooth sweetness and a soft sheen while helping the glaze set to a pleasant consistency; powdered sugar dissolves easily for creamy glazes.
- 1 tablespoon whole milk Thin the powdered sugar glaze to the desired pouring consistency and add creaminess; whole milk contributes flavor and sheen without thinning too much.
- 1 teaspoon vanilla extract, store-bought or homemade Infuse the glaze with aromatic depth and finish, rounding out the sweetness with warm, familiar vanilla flavor for aromatic appeal and balance.
Instructions
- In the bowl of a stand-up mixer (with the hook attachment), add the flour, yeast and salt. Mix until combined.: The moment you combine these dry ingredients you will notice the faint yeasty aroma and the granular texture of the all-purpose flour under the hook, which tells you the base of the dough is ready. Use the mixer on low just long enough to distribute the Instant Yeast and kosher salt evenly, you want a homogenous mixture so the dough rises uniformly later. One common mistake is adding salt directly on top of the yeast in large amounts, which can inhibit yeast activity, so mix first, then proceed with the wet ingredients. If the flour feels overly dry, check your measuring, but resist the temptation to add a lot more liquid immediately, you will hydrate in the next step.
- In a small pot, set over medium-low heat, add the butter and when melted, pour in the milk and honey. The mixture should be lukewarm; not too hot (no more than 120 F or else it’ll kill the yeast).: As you warm the unsalted butter and whole milk together with honey , pay attention to the steam and sheen on the surface, you want a warm, cozy aroma without any sizzling which indicates overheating. The melting butter will lend a rich sheen to the milk, and the honey will dissolve and impart a gentle sweetness that helps the dough brown. If the mixture glows slightly and feels warm to the wrist, it is in the right range. A frequent error is overheating the milk which kills the yeast and prevents rise; if you suspect it is too hot, set it aside and feel it on your wrist before adding.
- If it does get a bit too hot, simply let it stand at room temperature until it cools down.: Cooling the liquid is crucial because warm but not hot liquid keeps the Instant Yeast alive and active. You'll feel relief as the steam subsides and the mixture loses its heat, turning lukewarm. Let it rest in an uncovered bowl or pot for a few minutes, and give it a whisk to ensure the butter and milk integrate again. Avoid plunging it into cold water to speed cooling because that can cool unevenly and shake the mixture, rather let it cool naturally and be patient, your dough’s rise depends on it.
- In a small bowl, add the egg and egg yolks and beat until combined.: The beaten egg and egg yolks should look glossy and uniform, their golden color promising richness for the final dough. Whisking aerates them slightly, which helps incorporate more evenly into the dough and yields a softer crumb. A poorly mixed egg can create streaks in the dough, so beat until smooth. One slipup is adding cold eggs to warm milk which can shock the mixture; aim for room temperature eggs to maintain consistent dough temperature.
- Pour the liquid mixture into the dry ingredients. Next, add the egg mixture to the flour mixture and knead with machine on medium speed for about 5-7 minutes, until smooth and elastic.: As you pour the lukewarm milk and honey into the dry base, the bowl will begin to morph into a shaggy mass that pulls away from the sides, the dough progressing from floury to cohesive. When you add the beaten egg and begin kneading with your stand mixer, watch the texture transform to smooth and elastic, with slight tackiness to the touch. Kneading develops gluten, giving the dough its chew and structure, which is why the 5 to 7 minute window matters. Avoid under kneading which yields dense danishes, or over kneading which can make the dough tough; stop once it springs back gently when poked.
- The dough will be sticky and that’s ok! Rub a medium bowl with about a teaspoon of oil, (I used olive oil), and transfer the dough to the bowl. Cover with a clean kitchen towel and allow to rise for 30-40 minutes or doubled in size (these times can vary depending on how warm/cold your home is).: The sticky feel indicates proper hydration, and transferring to an oiled bowl prevents sticking without adding flour that would dry the dough. Covering traps warmth and moisture, allowing the yeast to feed and create those tiny gas bubbles that make the crumb airy. Listen for a faint yeasty scent as the dough proofs, and look for a visible increase in volume. A common issue is rushing the rise; if the dough is not puffy, give it more time rather than baking it prematurely.
- Alternatively, cover the bowl with a lid or plastic wrap and allow to rise in the fridge for 12 to 24 hours.: Cold proofing develops more complex flavors as the dough ferments slowly, producing deeper aroma and better texture. You will notice a mild tang and a slightly denser feel when you take it from the fridge, which is normal. Plan ahead because the long chill period improves the final taste and makes scheduling a breeze. The only misstep is forgetting the dough in the fridge for too long beyond 24 hours, which can over ferment and weaken structure.
- Divide the dough into 10 equal pieces. Each piece of dough will weigh about 100 grams. Roll and shape them into balls. And place six balls on the prepared baking sheet. To another baking sheet, add the remaining four balls of dough.: Dividing the dough evenly ensures uniform baking so each danish finishes at the same time. Rolling into smooth balls creates surface tension which encourages a nice rise and seam free top. I like to gently cup the dough in my hands and rotate to form a taut skin. An easy mistake is making uneven portions which will lead to smaller danishes finishing earlier and larger ones underbaked; weigh to be consistent.
- Shape the balls of dough by flattening them into 4-inch diameter. Dust the bottom of a glass with dough and press it in the center of the dough ball. This will make the center super thin.: Flattening to a four inch circle gives you the right canvas for the filling, and pressing the center thin creates a pocket that will cradle the cream cheese and berry jam without overflowing. You will feel a slight resistance as the glass compresses the center, and the edges should remain slightly thicker for structure. Avoid pressing too hard so the center tears, which will let the filling leak during baking.
- In a medium bowl, add the cream cheese, sugar, lemon zest, vanilla and pinch of salt. Beat until nice and fluffy and smooth.: When you whip the cream cheese with granulated sugar and a touch of vanilla , it should transform into a pillowy, silky filling that holds shape but still spreads easily. The lemon zest and pinch of salt brighten and balance the sweetness, making the filling taste fresh. If the cream cheese is too cold it will be lumpy, so work with softened cream cheese for a velvety texture.
- In a small bowl, combine all of the ingredients and break it up with a fork.: This step refers to the streusel or crumb mixture, which when combined will be slightly coarse and crumbly, giving a crunchy contrast after baking. Rubbing the melted unsalted butter through the dry components yields small clumps that turn golden and crisp. Watch for overly wet crumbs which will bake into a paste instead of a crisp topping; if that happens, lighten with a small bit more flour.
- Add about a tablespoon of the cream cheese filling to the center of each flattened piece of dough. Top the cream cheese filling with a teaspoon of jam.: The visual cue here is beautiful, a pale circle of cream cheese capped with a glossy dab of berry jam , contrasting with the golden dough rim. Placing measured amounts ensures even baking and consistent flavor across the batch. If you overfill, the mixture can bubble out and create sticky, uneven edges, so stick to the measured spoonfuls for predictable results.
- Brush the edges with the egg wash and sprinkle on the streusel.: The egg wash will turn the exposed dough edges glossy and golden, while the streusel adds crunchy texture and a toasty flavor. Use a soft brush and a gentle hand to avoid knocking out the filling, and apply an even layer of crumbs so each bun gets a tidy topping. A frequent mistake is saturating the edges with egg which can make the streusel sink; brush lightly for the best finish.
- Transfer to the oven to bake for about 18-22 minutes, until puffed up slightly and medium golden brown.: As the pastries bake you will see them puff and the edges take on a warm golden color, while the filling softens and sets. The oven smell will shift from doughy to sweet and toasty, signaling they are nearing readiness. Use color as your guide, pulling when the tops are medium golden rather than very dark to prevent dryness. Avoid opening the oven frequently which causes temperature drops and uneven rise.
- In a small bowl, whisk together the powdered sugar, milk, salt and vanilla. Drizzle the danishes with the glaze right when they come out of the oven.: The glaze should be smooth and glossy, and when drizzled over warm pastries it settles into the crevices creating a delicate sweetness and sheen. The contrast of warm pastry and cool glaze is delightful, and the vanilla lifts the overall aroma. If the glaze is too thin it will pool; if too thick it will clump, so adjust with tiny drops of whole milk until it ribbons off your spoon.
Notes
- Jam Swap: Use a single variety of berry jam like strawberry or blueberry for a streamlined flavor profile that highlights one fruit note.
- Extra Citrus: Add more lemon zest to the cream cheese filling for a brighter, more citrus forward bite that pairs well with berry preserves.
- Streusel Focus: Make a larger batch of streusel with extra brown sugar and butter for an intensely crunchy topping that contrasts the soft pastry.
- Overnight Schedule: Proof the dough in the refrigerator for 12 to 24 hours to build richer flavors and make morning assembly effortless.
- Glaze Variations: Mix in a small amount of jam into the powdered sugar glaze for a tinted, fruit forward drizzle that adds both sweetness and color.