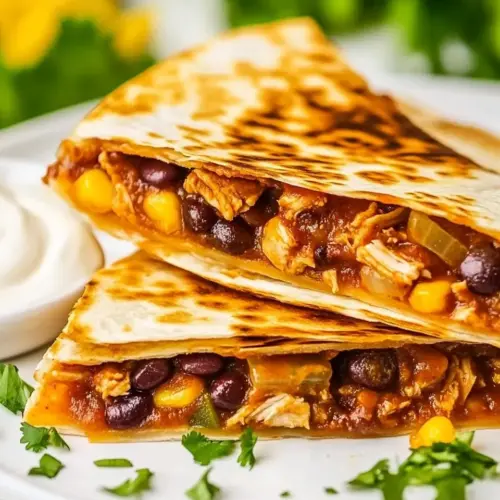
BBQ Chicken Quesadillas
BBQ Chicken Quesadillas combine smoky bbq sauce, tender shredded chicken, and melty cheese for a crispy, easy weeknight dinner. Quick to assemble and full of bold flavor, they are perfect for summer gatherings or a casual family meal. Make them when you want a satisfying, hands on dish that reheats beautifully and pleases a crowd.
Equipment
- 12-inch nonstick skillet
Ingredients
- 1/2 tablespoon olive oil Lightly drizzle and heat to coat the pan; helps prevent sticking and adds a subtle fruity flavor to sautéed aromatics or tortillas. Use sparingly to maintain a balanced mouthfeel while allowing other ingredients to shine. Olive oil also contributes a pleasant golden color when warming ingredients.
- 1/2 cup red onion, sliced Thinly sauté to soften and release a sweet, sharp flavor that complements savory fillings and balances smoky barbecue notes. Retain some texture by slicing rather than dicing, providing occasional bright bites in the finished quesadilla. Browning gently will enhance natural sugars and deepen overall flavor.
- 1 1/2 cups chopped cooked chicken Finely shred or chop and fold into the filling to provide primary protein, hearty texture, and absorb surrounding sauces for cohesive bites. Preferably precooked to ensure safety and quick reheating; can be seasoned lightly if desired before assembling. Chicken carries the barbecue flavor throughout each quesadilla layer.
- 1/2 cup bbq sauce Gently mix through the chicken to infuse sweet and tangy smoky character, binding ingredients with saucy moisture and boosting overall barbecue profile. Use enough to coat proteins without making the filling soggy, allowing cheese to melt and trap flavors. Concentrated flavor helps create signature taste of the dish.
- 1/2 cup cooked corn Fold in for bursts of sweet, vegetal crunch and to add summer-corn sweetness that complements smoky barbecue and melty cheese. Use cooked kernels to avoid releasing excess moisture; they provide pleasant textural contrast within the warm quesadilla. Corn also brightens presentation with pops of yellow.
- 2 cups mexican cheese blend Generously sprinkle to create rich, gooey melt that binds fillings and delivers a creamy, savory finish in each bite. Mexican cheese blends often combine milder and sharper cheeses for depth of flavor and ideal melting behavior. Cheese also helps hold the tortilla layers together when sliced.
- 4 large flour tortillas Warm or grill as the structural base to hold fillings and provide a soft yet sturdy wrap that crisps at the edges when toasted. Large flour tortillas offer pliability for folding and create golden, slightly chewy exterior when buttered and cooked. Proper heating prevents tearing and ensures even melting of interior cheese.
- 2 tablespoons butter Lightly melt to baste the tortilla exterior for a golden, crisp finish and to enhance buttery flavor on the quesadilla surface. Use in a hot skillet to achieve even browning and prevent sticking while adding richness that balances savory and tangy fillings. Butter also contributes a glossy, appetizing appearance.
- sour cream and chopped fresh cilantro for serving Serve alongside as cool, tangy, and herbaceous accents to brighten rich quesadilla flavors and provide contrast to smoky, cheesy filling. Sour cream adds creamy coolness while chopped cilantro offers fresh, citrusy notes and color when sprinkled on top. Use as optional garnishes to customize each serving.
Instructions
- Heat olive oil over medium heat in a nonstick skillet. Add onion and cook until soft.: The moment the olive oil warms, you will sense a soft shimmer on the surface and a faint fragrance that signals readiness; this gentle heat helps the red onion release sugars slowly, creating a sweet and tender base for the filling. I watch for tiny ripples rather than smoke, because too hot oil will char the onion, giving a bitter edge that competes with the bbq sauce . One common mistake is rushing to high heat, which can brown the onion unevenly; patience produces softness and a mellow aroma that elevates the whole dish.
- In a medium bowl, stir together onion, chicken, bbq sauce, and corn.: As the red onion surrenders, it becomes translucent and fragrant, filling the kitchen with a gentle sweetness that will balance the smokiness of the bbq sauce . Stir occasionally so each slice softens evenly, and listen for a quiet hiss rather than an aggressive sizzle; that sound tells you the sugars are coaxing out without burning. If the pan gets too dry, a teaspoon of water or another splash of olive oil will rescue the texture. Avoid overcooking to the point of caramelization unless you want an intensely sweet, jammy flavor.
- Melt 1/2 tablespoon of butter in nonstick skillet over medium heat. Place 1 tortilla in skillet. On half the tortilla, sprinkle 1/4 cup of cheese, 1/4 of the chicken mixture, followed by another 1/4 cup of cheese. Fold the tortilla over the filling.: When you combine this mix, you should notice the glossy sheen of the bbq sauce coating the shredded chicken and the kernels of corn scattered through. The aroma will brighten as the sweet and savory elements join, and the texture should look cohesive but not soupy. Toss gently to keep the pieces intact; overmixing can break down the protein and create an unappealing mush. A frequent error is to add too much sauce, which makes the filling wet and prevents the tortillas from crisping properly, so keep the balance for a satisfying bite.
- When golden on the bottom, flip over and continue to cook until cheese is melted.: As the butter liquefies, it releases a nutty aroma that primes the tortilla for browning. Lay the first flour tortilla into the skillet and listen for a soft crackle, which indicates the surface is engaging with the heat; if there is silence, the pan is not hot enough. The tortilla should begin to blister at the edges and take on a pale golden flecking within moments, a visual cue that the stage is set for filling. Avoid pressing down too hard, which can squeeze out filling and inhibit crisping.
- Repeat with remaining 3 tortillas. Serve with sour cream and chopped fresh cilantro.: When you layer the cheese , then the saucy chicken , then more cheese , you create a melty seal that helps the folded tortilla crisp and hold together. The initial sprinkle of cheese acts as a glue, while the top layer ensures the filling is encased in gooey richness. Press gently along the fold to encourage contact, and you will hear a faint sizzle as the heat reaches the interior. A common pitfall is overfilling, which leads to tearing or uneven cooking; leave a small border so the tortilla can fold cleanly.
- When golden on the bottom, flip over and continue to cook until cheese is melted: The bottom should be a warm golden brown with crisp edges and a slight bounce when you lift the spatula; that visual is your cue to flip. After turning, the second side will take slightly less time, and you will begin to see the cheese melt and ooze at the edges, signaling readiness. The smell will intensify, combining buttered toast notes with smoky bbq sauce and melted cheese . If the tortilla browns too quickly before the cheese melts, lower the heat and cover the skillet briefly to trap heat and allow internal melting without burning the exterior.
- Repeat with remaining 3 tortillas: As you work through the batch, you will get into a rhythm where the skillet retains steady heat and your hands move from assembly to flipping with ease. The second and third quesadillas often cook faster because the skillet is already warmed, so adjust the heat to maintain consistent coloring across all pieces. Stay attentive to avoid crowding the pan, which lowers the temperature and results in limp tortillas. A simple strategy I use is to keep a warm plate in the oven to stack finished quesadillas so they stay crisp until serving.
- Serve with sour cream and chopped fresh cilantro: When plated, the contrast of cool sour cream and bright chopped cilantro refreshes the palate between bites, and the garnish adds color and a hint of herbal lift. Spoon the sour cream alongside or dolloped on top and sprinkle the cilantro last so it stays vibrant. One common oversight is adding garnishes while the quesadillas are too hot, which can wilt delicate herbs; wait a moment so they remain fresh and crisp.
Notes
- Spice it up: Swap regular bbq sauce for a spicy version or stir in 1/4 teaspoon of cayenne to the filling to add a steady, warming heat that pairs well with the cheese.
- Make it lighter: Use a reduced fat cheese blend and a light spray of olive oil instead of butter to cut calories while keeping the melty texture.
- Double the corn: Increase the amount of corn for added sweetness and texture, which makes the quesadillas feel more vegetable forward.
- Use leftovers: Shred leftover roasted or rotisserie chicken and toss with the bbq sauce for a fast assembly that avoids extra cooking time.
- Make ahead: Prepare the filling and keep it refrigerated for up to two days; assemble and cook just before serving for the best texture.