Bang Bang Shrimp
Bang Bang Shrimp delivers crispy, golden coated shrimp drizzled with a creamy, sweet spicy sauce that pops with flavor. This easy weeknight dinner is crunchy, tangy, and slightly spicy, making it ideal for feeding a crowd or spicing up a regular evening meal. Try it when you want an impressive plate with minimal fuss and big, crave worthy results.
Equipment
- Large 12 inch Skillet
Ingredients
- 1 lb raw shrimp peeled and deveined Provide tender, protein-rich shrimp that form the base of the dish when peeled and deveined, cooking quickly to a firm, slightly sweet texture; ensure they are thoroughly drained and patted dry for better coating adhesion.
- 2 large eggs Bind and help egg wash adhere to the shrimp while contributing moisture and a light richness; whisk until smooth and use as the primary wet coating element prior to dredging.
- 1 cup gluten-free bread crumbs Create a crispy, gluten-free exterior when used to coat the shrimp; press crumbs firmly to form an even crust that fries to golden brown and adds crunch.
- 1/2 cup gluten-free all-purpose flour Act as a light dry coating component and binder to help the breading stick, while keeping the recipe gluten-free; sift or shake off excess to avoid heavy, gummy coatings.
- 1/2 tsp garlic powder optional Add concentrated savory, aromatic garlic flavor when included, enhancing overall taste without adding moisture; sprinkle lightly to avoid overpowering the shrimp.
- 1/2 tsp sea salt Season the shrimp and coatings with a clean, mineral-like saltiness to elevate flavors and balance sweetness from the sauce; distribute evenly for consistent taste.
- 1/4 tsp black pepper optional Introduce mild heat and a toasty, slightly bitter note when used, complementing the sweet chili and sriracha; add sparingly to maintain balance.
- 3 tbsp avocado oil for frying Provide a high-heat frying medium with a neutral flavor and healthy monounsaturated fats, enabling a crisp exterior; maintain proper oil temperature to prevent greasy coatings.
- 1/3 cup plain Greek yogurt Contribute creaminess, tang, and body to the sauce, substituting for mayonnaise in a lighter version while helping emulsify sweet and hot elements; whisk smooth for a cohesive dressing.
- 4 tbsp sweet chili sauce Deliver primary sweet and mildly spicy flavor to the bang bang sauce, offering a sticky, glossy texture and balanced sweetness that pairs with the tangy yogurt and heat.
- 2 tsp sriracha optional Supply concentrated heat and chile flavor when included, allowing control over spiciness; blend carefully into the yogurt and chili sauce mixture to achieve desired kick.
Instructions
- Mix together the bang bang sauce ingredients in a small bowl until well-combined. Refrigerate the sauce until you’re ready to use it. Note: you can prepare the sauce mixture up to 4 days in advance.: Right away you will notice the sauce take on a smooth, glossy texture as the Greek yogurt , sweet chili sauce , and sriracha emulsify. The aroma will be slightly sweet with a vinegary tang, and the surface should look uniform, free of lumps. This matters because a cohesive sauce adheres better to the shrimp and gives you a consistent flavor with every bite. A common mistake is under mixing, which leaves pockets of concentrated spice or tang; whisk thoroughly until even. If the sauce seems too thick for your taste, a tiny splash of water will loosen it without diluting flavor.
- Remove the shrimp from its packaging. If the shrimp still contains its shells, remove and discard the shells. You can also remove the tails if you’d like, but I leave them on. If the shrimp has a lot of excess moisture on it, pat it dry with a paper towel or transfer the raw shrimp to a plate lined with a paper towel.: As you unwrap the shrimp , check for any remaining shells or tails you do not want to serve. Pat each piece dry with a paper towel until the surface stops releasing moisture; this drying step is audible and tactile, you will feel the difference as the shrimp becomes tacky rather than wet. Properly dried shrimp will allow the coating to stick and the oil to sizzle on contact, forming an even crust. A frequent oversight is tossing wet shrimp into the coating, which can cause soggy spots or the breading to fall off while frying. If they seem slimy, rinse and pat again.
- Whisk two eggs in a small bowl until they are well-beaten. Transfer the flour, breadcrumbs, garlic powder, salt, and pepper to a mixing bowl and stir together until everything is well-combined.: The eggs should look uniformly yellow and slightly frothy on top, indicating air has been incorporated. Transfer the dry ingredients into a separate bowl and mix them until the color and texture are uniform, which helps produce an even coating on every shrimp . This separation of wet and dry stations matters for organization and keeps the batter from clumping. A common misstep is skipping the whisking, which can lead to uneven adhesion; take the extra thirty seconds to whisk well.
- Dip the shrimp in the egg mixture, followed by the flour mixture, ensuring each of the shrimp are well-coated.: When you dip, you will feel a slight tack as the egg clings to the dried shrimp , then a gentle resistance as the crumbs adhere. Work methodically so each piece receives the same treatment. Place coated shrimp on a tray to rest briefly, which helps the coating set and prevents large flakes from falling into the oil. Avoid overcrowding the tray or stack them, or the coating may become patchy. If breading starts to feel loose, recoat gently to maintain integrity.
- Heat a large nonstick skillet over high heat and add 3 tablespoons of avocado oil or high-temperature cooking oil of choice (I don’t recommend olive oil). Allow the skillet to heat up for a few minutes, until it is sizzling hot. You want the temperature of the oil to be above 400 degrees F.: The oil will shimmer and may produce a faint wisp of steam when it reaches the target heat; this is your cue. You want the surface to be hot enough that a breadcrumb sizzles immediately on contact. That sizzling sound is a key sensory sign that the oil is ready and will promote an even golden crust. Too cool and the crust absorbs oil and becomes greasy, too hot and the exterior burns before the inside cooks. Use a thermometer if you have one, aiming above 400 degrees F for the proper effect.
- Carefully place the breaded shrimp on the hot surface in a single layer. Cook for 2-3 minutes per side, or until the shrimp is golden brown, crispy and cooked through. You can tell shrimp is fully cooked once it curls and turns opaque all the way through. Avoid overcooking the shrimp so that you end up with tender shrimp. Depending on the size of your skillet, you may need to do this in 2 to 3 batches. Mine take 2 batches in a 12-inch skillet.: The moment the shrimp hits the oil you should hear a lively sizzle, and within a minute the edges will begin to turn golden. Let them cook without moving for the first minute to allow a stable crust to form, then flip to achieve even browning. The visual cue is important, you will see the color transition from pale to deep golden and the texture change from soft to crisp. A typical mistake is flipping too soon, which can tear the coating; be patient and wait for the crust to release easily from the pan.
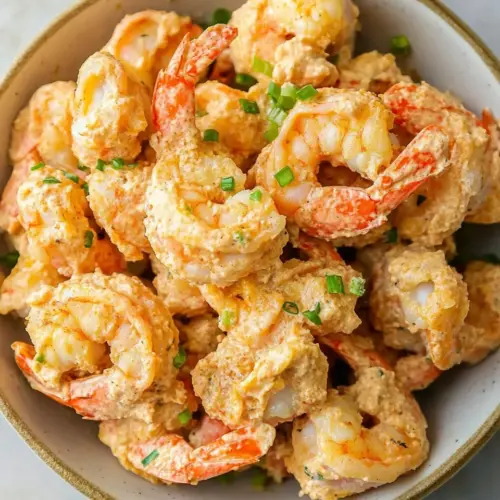
- Serve crispy shrimp with bang bang sauce drizzled on top, or keep the sauce in a bowl to be used as dipping sauce. If you’d like, garnish the shrimp with chopped green onions. I like serving the shrimp with fresh lemon wedges or lime wedges for a little drizzle of fresh lime juice or lemon juice.: During this short time you will sense the aromas intensify, a combination of toasted crumbs and sweet, caramel notes from the oil. The shrimp should curl and turn opaque, and a gentle press will show firmness but not hardness. Avoid overcooking, as shrimp will quickly become rubbery; remove them promptly when opaque through the thickest part. If you notice uneven color, it may mean your heat is inconsistent, so adjust the burner slightly lower and give the skillet a minute to stabilize.
- Serve crispy shrimp with bang bang sauce drizzled on top: The final presentation is where texture and flavor meet; the sauce should gloss the shrimp with a shiny finish that looks appetizing. If serving family style, keep extra sauce in a bowl for dipping so each diner can control their spice level. A common serving mistake is saucing too early which softens the crust; if you prefer maximum crunch, serve sauce on the side so the shrimp arrives at the table still crisp.
Notes
- Swap the breadcrumbs Use regular panko if you are not gluten free for a lighter, airier crust that crunches loudly when bitten, creating an indulgent texture contrast.
- Adjust the heat Increase or decrease the sriracha in the sauce to suit your spice tolerance, tasting as you go to find your ideal balance between sweetness and heat.
- Make it lighter Replace some of the Greek yogurt with a touch of water or a splash of lemon juice to thin the sauce while preserving tang and creaminess.
- Advance prep Mix the sauce up to four days ahead and store it in the refrigerator, which deepens the flavors and shortens final assembly time.
- Keep it crisp Serve the sauce on the side rather than drizzling immediately if you prefer maximum crunch on each shrimp.
- Oil choice Use avocado oil or another high smoke point oil to safely reach the temperature needed for rapid crisping without burning.
- Gluten free swap Follow the provided gluten free breadcrumb and flour instructions to keep the dish accessible for those avoiding gluten while keeping the texture satisfying.