Banana Pudding Cheesecake Bars
Banana Pudding Cheesecake Bars blend creamy cream cheese and banana pudding into a silky, sliceable dessert with a crunchy vanilla wafer crust. This easy no bake style bar offers creamy, light textures and nostalgic banana flavor, perfect for weeknight gatherings or potlucks. Make ahead friendly and crowd pleasing, it is an irresistible reason to bake today.
Equipment
- 9x9 baking dish
- Parchment Paper
- Stand mixer or handheld mixer
- Mixing Bowls
- Offset Spatula
- Sharp Knife
- Piping bag and star tip
Ingredients
- 2 cups crushed vanilla wafers (plus 9 wafers for garnish) Provide a crunchy, sweet base by combining crushed vanilla wafers to form the crust and a garnish element with additional whole wafers for presentation.
- 2 tablespoons granulated sugar Add a touch of sweetness to balance flavors and help bind the crust when mixed with the crushed vanilla wafers.
- 1/2 cup salted sweet cream butter (melted and cooled) Incorporate melted and cooled salted sweet cream butter to moisten the crust, add richness, and help the wafer crumbs set firmly when chilled.
- 16 ounces cream cheese (softened) Beat softened cream cheese until smooth to create a rich, tangy cheesecake layer that provides structure and creamy body to the bars.
- 1/3 cup granulated sugar Sweeten the cheesecake filling slightly with granulated sugar to enhance flavor while maintaining balance between tangy and sweet.
- 3.4 ounces banana cream instant pudding mix (any brand; I used Great Value) Provide concentrated banana flavor and thickening power using banana cream instant pudding mix to ensure the filling sets with banana notes.
- 16 ounces whipped topping (thawed; divide out 1 1/4 cups for the filling; the remainder of the container will be for the optional swirl garnish. The second container will top the filling) Fold in whipped topping to lighten the texture, add volume and creamy mouthfeel to the filling while reserving portions for garnishing or swirling.
- 1 1/4 cups half and half cream Add half and half cream to hydrate the instant pudding mix, contributing to a smooth, custard-like filling consistency and richer taste.
- 2 tablespoons crushed vanilla wafer crumbs (optional garnish) Sprinkle crushed vanilla wafer crumbs as an optional garnish to add a delicate crunch and visual contrast on top of the bars.
- 9 slices ripe bananas (garnish) Place ripe banana slices atop the finished bars to contribute fresh fruit flavor, visual appeal, and complementary texture to the dessert.
Instructions
- Line a 9×9 baking dish with parchment paper.: You will notice the texture of the parchment when you smooth it into the pan, it should lay flat without large air pockets, which helps the bars lift cleanly after chilling. This step matters because it prevents sticking and keeps edges neat when you remove the bars, and a common mistake is not letting the parchment extend over the edges enough, making it hard to lift the whole slab out later. The sound of the paper settling and the visual cue of a snug fit tell you you are ready for the crust.
- Add the crushed vanilla wafers and granulated sugar to a small mixing bowl. Stir to combine. Add the melted butter and stir to coat the crumbs completely.: As you mix, you'll smell the warm, toasty aroma of the crushed vanilla wafers meeting the melted butter , which signals the crust will be flavorful. The why behind coating the crumbs thoroughly is simple, it ensures even binding so the crust holds together after chilling. A frequent error is adding butter that is too hot, which can make the crumbs greasy; let the butter cool slightly before combining. Visually, the crumbs should look evenly moistened, not puddled with butter .
- Press the buttered crumbs into the bottom of the prepared baking dish. Chill the crust in the refrigerator while you prepare the banana cheesecake filling.: When you press the crumbs, use a flat measuring cup or the bottom of a glass to compact them firmly, and you should hear a slight scraping sound as the crumbs pack together. Compacting is crucial, because a dense crust provides structural integrity when slicing. The common mistake is pressing unevenly, which leads to cracks or loose edges; take time to press into corners and across the surface for uniformity. Chilling firms the butter so the base sets properly.
- Using a stand mixer or a large mixing bowl and handheld mixer on medium-high speed, beat the cream cheese and granulated sugar for 1 to 1 1/2 minutes until smooth.: As you beat the softened cream cheese with the granulated sugar , you will see the mixture transform from slightly chunky to silky and glossy, and that visual cue indicates lumps have been eliminated. This step matters because lumps in the cream cheese can create an uneven texture in the filling. Avoid rushing by using cold cream cheese ; it should be at room temperature for smoothness, otherwise you may end up with a lumpy mixture.
- Add the instant banana pudding mix and continue to beat just until combined.: When you fold in the banana pudding mix, a sweet, concentrated banana aroma will emerge—this is the flavor anchor. The pudding helps thicken and flavor the filling, so mixing just until combined prevents overworking which could make the texture gummy. A typical pitfall is overmixing at this stage, which can incorporate too much air and affect how the bars set. The surface should look uniform in color with no pockets of dry powder.
- Lower the mixer speed to low. Add 1 1/4 cups of thawed whipped topping and continue mixing on low speed.: The moment you add the thawed whipped topping , the filling starts to lighten in texture; you will see it become silkier and less dense. Mixing on low preserves the airy quality of the topping while ensuring integration. The reason for low speed is to avoid deflating the whipped component, and a common mistake is adding it at high speed which will collapse the air and make the filling heavy. Aim for a homogeneous, pillowy appearance.
- Drizzle in the half and half. Continue mixing just until the half and half is well incorporated.: Adding the half and half cream adjusts the filling to a spreadable consistency, and you should hear a soft, liquid sound as it pours in. This liquid helps the pudding hydrate fully and create a smooth mouthfeel. The why is texture control, because too thick and you cannot spread easily, too thin and the filling will not set properly. A common issue is adding too much at once; drizzle slowly and stop when you reach the desired softness.
- Evenly spread the filling over the chilled crust.: When you spread the filling, use an offset spatula to create a uniform layer that reaches the edges, and you should see a satiny sheen across the surface. Even spreading ensures each bar has the right balance of crust to filling in every bite. The reason this matters is for presentation and texture balance, and people often underfill corners, leaving some bars thin and others thick. Take a moment to smooth the top and check for peaks that could tear the parchment when removed.
- Spread 1 full container of whipped topping over the filling layer. Chill in the refrigerator for at least 6 hours to overnight.: Adding the full container of whipped topping creates a soft cap that contrasts with the denser filling, and the smooth motion of spreading should leave a billowy, even finish. Chilling for at least 6 hours allows the layers to set and fuse, which makes slicing clean and enhances texture. A common error is slicing too soon, which yields messy edges and a filling that is too soft; patience is rewarded here with neat slices and ideal mouthfeel.
- Just before serving, lift the cheesecake bars out of the baking dish with the parchment paper. Use a large sharp knife to slice the banana cheesecake into 3 slices x 3 slices (9 slices total). Sprinkle the 2 tablespoons of crushed vanilla wafers over the top of the bars.: The tactile moment of lifting the slab should feel solid yet yielding, and your knife should glide through for clean cuts if chilled properly. Sprinkling the extra crushed vanilla wafer crumbs adds a crunchy contrast and a visual cue of the crust's flavor. Avoid slicing while the bars are warm; this often smears the topping and ruins neat presentation. Rewiping your knife between cuts helps maintain pristine edges.
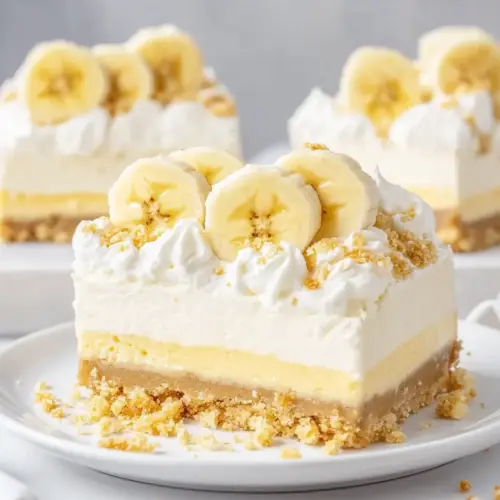
- Add the remaining container of whipped topping to a piping bag fitted with a large open star decorator's tip (I used the Wilton 1 M tip). Hold the piping bag about 1/2 inch from the surface of the center of the individual bar. Use even pressure and squeeze a center star-swirl of whipped topping. Repeat for the remaining bars. Add a slice of banana and 1 vanilla wafer to the top of the star-swirl of whipped topping. Serve immediately.: Piping the final swirls provides a professional finish and invites guests to admire before tasting, and you'll feel the gentle resistance of the whipped topping as you squeeze. The visual of a star swirl crowned with a banana slice and a wafer is instantly inviting. The reason this final flourish matters is both aesthetic and textural, as the fresh bananas bring a soft bite right on top. Try to pipe with steady pressure to avoid uneven stars, and place the banana slices just before serving to prevent browning.
Notes
- Swap the crust texture. Try pulsing the vanilla wafers a bit more for a finer, sand like base or leave slightly chunkier crumbs for added crunch, pressing firmly so either style still holds together when slicing.
- Adjust sweetness level. Reduce the 1/3 cup of granulated sugar in the filling by one tablespoon if you prefer a less sweet bar, tasting the mixture as you go to keep the balance with the banana pudding.
- Garnish alternatives. Instead of whole wafer pieces, crush a few wafers more finely and dust them lightly over the piped stars for a delicate look that still echoes the crust flavor.
- Presentation style. Make individual servings by pressing crust and filling into a muffin tin lined with parchment squares, chilling until set, then unmolding for portable mini bars.
- Banana handling. Slice bananas just before serving and toss briefly with a squeeze of citrus if you are prepping them ahead to slow browning without altering the flavor.