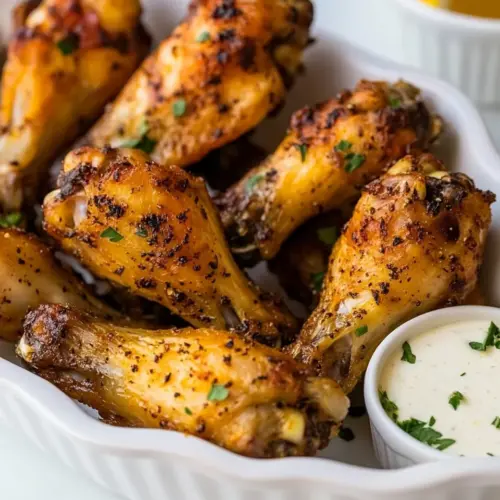
Baked Lemon Pepper Wings
Baked Lemon Pepper Wings deliver crispy, citrus kissed skin and juicy chicken inside, perfect for an easy weeknight dinner or party platter. The simple combo of lemon-pepper, a touch of olive oil, and baking powder creates a crunchy texture without frying. Quick to prepare and full of bold flavor, these wings are a reliable crowd pleaser you will want to make again and again.
Equipment
- Oven
- Baking Sheet
- Wire Rack
- Tongs
- Large Bowl
Ingredients
- 2.5 -3 pounds trimmed chicken wings (often called party wings) Provide tender chicken pieces essential for the recipe, offering the primary protein and structure for the wings; trimmed party wings cook evenly to achieve crisp skin while staying juicy inside. Ensure wings are patted dry before seasoning so coatings adhere and skin crisps properly in the oven or air fryer.
- 1/4 cup lemon-pepper seasoning Season aggressively to infuse bright, citrusy heat throughout the wings; lemon-pepper seasoning combines acidity and cracked black pepper to balance richness and cut through fat. Sprinkle and rub evenly so every wing receives consistent flavor before cooking.
- 3 tablespoons olive oil Coat wings lightly to promote even browning and help dry seasonings and baking powder adhere; olive oil also contributes subtle fruitiness and helps conduct heat on the skin for crisping. Use measured tablespoons to avoid excess oil that could make the coating soggy.
- 2 teaspoons baking powder (aluminum-free) Aid in creating an extra-crispy exterior by reacting with moisture on the skin to raise pH and draw out water during baking; aluminum-free baking powder is preferred to avoid metallic flavors. Toss wings with the powder thoroughly and allow a short rest so the coating begins to form before cooking.
- nonstick cooking spray Prepare the cooking surface to prevent sticking and ensure easy release of finished wings; nonstick cooking spray creates a thin barrier without adding extra oil or altering flavor. Lightly spray baking sheets or racks to protect the crisped skin when turning or removing wings.
Instructions
- Preheat the oven to 450 degrees F. Set a baking rack on a large rimmed baking sheet. Spray the rack with nonstick cooking spray.: As the oven warms, you should notice a faint dry heat that will help the wings crisp from all sides. Placing a rack on the sheet allows hot air to circulate underneath, so the underside of each wing dries out and browns rather than stewing in rendered fat. A common mistake is skipping the rack, which leads to soggy bottoms and uneven texture. If your oven runs hot, keep a close eye during the final minutes to avoid burning.
- Use paper towels to thoroughly squeeze and dry every single wing. The drier the wings are, the crispier they will get.: Touching the wings, you want them to feel almost tacky but not damp. The drying process removes surface moisture that would otherwise create steam and slow the crisping. You'll notice the skin go from glossy to matte as moisture leaves. Avoid the temptation to skip this step, because even slightly damp skin will reduce final crunch.
- In a large bowl, mix the lemon pepper, olive oil, and baking powder. Add the wings to the bowl and toss to coat. Use your hands to make sure the wings are fully covered on all sides.: When you press the mixture into the skin, you should feel a coarse, gritty texture that adheres. The oil acts as a binder while the baking powder starts to work on the surface. Smell the mixture before adding the wings the lemon and pepper should be prominent. A typical error is to undercoat the wings, leaving patches unseasoned, so take a moment to massage the seasoning into each piece.
- Lay the wings on the baking rack, making sure they do not touch. Bake for 30 minutes. Then use tongs to flip the wings. Bake another 15-20 until very brown and crispy.: Spacing is crucial because crowded wings steam instead of roast. Each wing should sit alone with a gap around it, so you can hear a faint sizzle as they hit the hot rack and sheet. That sizzle is a good sign that fat is rendering and the skin is starting to crisp. If they are touching, rearrange them to ensure even airflow, otherwise some pieces will remain soft.
- Bake for 30 minutes: Early in the bake, you'll notice the chicken releasing fat and the edges taking on a pale gold. The aroma will shift from raw poultry to roasted and fragrant, with the lemon pepper beginning to bloom. This stage sets the foundation for deep color. A common oversight is opening the oven too often; each peek bleeds heat and can lengthen cooking time.
- Then use tongs to flip the wings: Once you flip, pay attention to how much golden color has developed on the underside, that guides your next actions. Flipping exposes the less-browned side to direct heat so both sides finish evenly. Be gentle to avoid tearing the skin, which can let juices escape and dry the meat. If the skin sticks, wait a minute and try again, it will release when sufficiently browned.
- Bake another 15 to 20 until very brown and crispy: In this final stretch, the oven transforms the wings from merely cooked to deeply caramelized and crackly. The sound changes too, from soft sizzling to a sharper crisping noise as moisture finishes evaporating. Watch the color, aiming for deep golden brown without blackened spots. Overbaking will make the meat dry, so if you see extreme darkening, remove them earlier and rest briefly.
Notes
- Dry the wings thoroughly, pat each piece until surface moisture is gone, because moisture is the enemy of crispness and this single action often determines success.
- Use aluminum free baking powder, it helps the skin puff and crisp without imparting any off tastes that some cheap powders can cause.
- Massage the seasoning into the wings with your hands, pressing the lemon pepper and oil into the skin so the flavor adheres through roasting rather than falling off.
- Ensure adequate spacing on the rack, allow hot air to circulate around each wing so every side browns rather than steams.
- Check visual cues not just time, aim for deep golden brown and a crackling sound near the end, which often signals readiness sooner than the clock.
- Rest briefly after baking, letting wings sit for a few minutes firms the skin and concentrates the juices for a better bite.