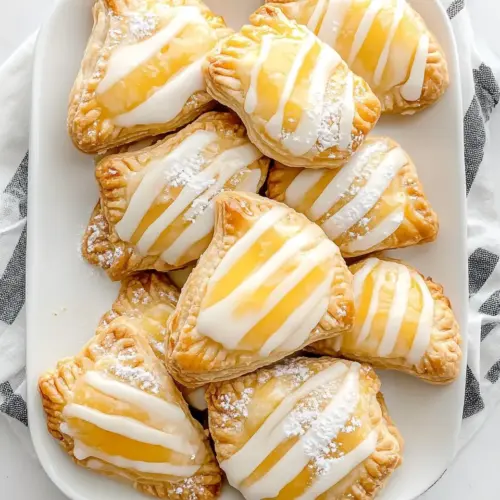
Baked Lemon Curd Hand Pies
Baked Lemon Curd Hand Pies are crisp, flaky pastries filled with creamy, tangy lemon curd and finished with a delicate vanilla glaze. These easy, portable treats pair bright citrus flavor with a golden, buttery crust, making them perfect for brunch, picnics, or casual gatherings. Try them for a simple yet impressive bake that always disappears in minutes.
Equipment
- Rolling Pin
- 2 1/2-inch round cutter
- Baking Sheet
- Parchment Paper
- Small Bowl
- Whisk
- Paring knife
Ingredients
- Hand Pie Dough (recipe follows) Provides the structural pastry casing that holds the lemon curd; use chilled, pliable dough to ensure neat seams and even baking. Blind-chill or rest as directed to prevent shrinking, and handle gently to keep layers tender and flaky. Use a consistent thickness for uniform baking and golden color.
- 1 cup (284 grams) lemon curd Adds concentrated tart and sweet citrus filling that defines the flavor profile; spoon into dough centers without overfilling to avoid leakage. Provides moisture and brightness that contrasts with the buttery crust, and sets slightly during baking for a creamy texture.
- 1 large egg (50 grams) Binds and glazes the hand pies when beaten; brush onto seams to help dough pieces adhere and create a glossy finish. Also contributes to browning through Maillard reactions for an attractive golden exterior.
- 1 tablespoon (15 grams) water Thins the egg wash to a smooth, brushable consistency; mix with beaten egg to achieve even coverage and prevent cracking. Helps the glaze adhere and provides controlled sheen without running off the pies.
- 1 cup (120 grams) confectioners’ sugar Sweetens and adds a fine, velvety texture to the finishing glaze; sift if necessary to remove lumps for a smooth icing. Dissolve gradually into liquid for a glossy finish that balances the tart filling and adds sweetness.
- 1 tablespoon (15 grams) whole milk Loosens confectioners’ sugar to make a pourable glaze and adds a touch of richness; whisk with sugar until smooth to reach desired drizzling consistency. Contributes to shine and mouthfeel while slightly mellowing the sweetness of the icing.
- 1/2 teaspoon (2 grams) vanilla extract Enhances and rounds the flavor of the glaze with warm, aromatic notes; add to the sugar-milk mixture to complement the lemon curd. A small amount boosts complexity and balances sweetness for a more polished final taste.
Instructions
- On a lightly floured surface, roll half of Hand Pie Dough into a ?-inch-thick circle. Using a 2 1/2-inch round cutter, cut dough, rerolling scraps once. Place 1 inch apart on a parchment paper-lined baking sheet. Top each with 2 teaspoons (6 grams) lemon curd, leaving a 1/2-inch border around edges.: The air will smell faintly of butter as you work the chilled Hand Pie Dough , and your rolling pin should glide with steady pressure, creating an even surface that glints slightly with tiny pockets of butter. Rolling the dough evenly matters because inconsistent thickness leads to uneven baking, spots that brown faster, or areas that underbake. If the dough warms and becomes sticky, return it to the fridge for 10 to 20 minutes to firm up before continuing. A common mistake here is pressing too hard, which compresses the layers and prevents flakiness; instead, apply gentle, even pressure and rotate the dough periodically to keep a round shape.
- On a lightly floured surface, roll remaining Hand Pie Dough into a ?-inch-thick circle. Using a 2 1/2-inch round cutter, cut dough, rerolling scraps once.: As you cut, you should hear a soft, clean sound as the cutter slices through the chilled dough, and the edges will be neat and defined. Rerolling scraps once preserves the integrity of the layers while minimizing waste, but repeated rerolling will toughen the dough, so keep it to a single re roll. Watch for uneven halves when cutting; press straight down and avoid twisting the cutter, which can seal the edges prematurely and distort the shape.
- In a small bowl, whisk together egg and 1 tablespoon (15 grams) water. Brush edges of curd-topped dough circles with egg wash, and top with remaining dough circles, slightly stretching top circles so they drape over filling and pressing edges firmly to seal; press edges with the tines of a fork. Freeze for 30 minutes, or refrigerate for 1 hour.: The feel of the cold dough against the parchment is reassuring, and spacing the rounds evenly ensures hot air circulates so they bake uniformly. Crowding causes overlapping and uneven coloring, while proper spacing yields consistent golden tones. If your baking sheet is warm, let it cool or use a second sheet, because placing chilled dough on a hot surface can start melting the butter prematurely and flattening the pies.
- Preheat oven to 425°F (220°C).: Spoon a measured amount of lemon curd onto each dough circle so the filling sits glossy and centered, and the border remains visible for sealing. The curd should look thick and slightly shiny, not runny; leaving a border prevents leakage and ensures a neat crimp. If the curd is too soft, chilling it for a short time will help, and avoid overfilling which leads to bursting during baking.
- Brush top of dough with egg wash. Using the tip of a paring knife, make a small “X” cut in top of dough.: Return to the remaining dough with a cool countertop and repeat the rolling technique, aiming for the same thickness as the first batch so top and bottom pieces match when assembled. Consistency between both dough halves is key to even baking and appearance. If the second batch seems harder to roll, it might be colder; let it sit at room temperature for a few minutes, checking frequently to avoid warming too much.
- Bake until crust is golden brown, 12 to 14 minutes. Transfer to another baking sheet, and let cool completely.: Cut the top circles carefully, ensuring they align with the bottom rounds. The little top pieces should drape easily over the curd, and you should avoid overworking scraps. A common issue here is mismatched sizes, which makes sealing awkward; keep the cutter perpendicular and press firmly once to get a uniform shape.
- In a small bowl, whisk together the confectioners’ sugar, milk, and vanilla. Drizzle on top of cooled hand pies.: As you whisk the egg with water , the mixture will turn glossy and uniform, making a perfect wash that spreads easily on dough. This wash promotes a deep golden color and helps the top and bottom pieces adhere. If you see any whites that are clumpy, continue whisking until smooth; cold eggs may not blend as well, so use room temperature if possible.
- Brush edges of curd-topped dough circles with egg wash, and top with remaining dough circles, slightly stretching top circles so they drape over filling and pressing edges firmly to seal; press edges with the tines of a fork: The egg wash on the borders should glisten when brushed, acting like edible glue as you place each top circle. Slightly stretching the top helps it conform over the curd, creating an attractive dome while preventing gaps. Pressing with a fork produces a decorative ridge and a reliable seal, which is critical to keep the curd inside while baking. One mistake is skipping the egg wash on the seal, which increases the chance of leaks; another is over stretching the top so thin that it tears, so handle it gently.
- Freeze for 30 minutes, or refrigerate for 1 hour: Chilling the assembled pies firms the butter again, which promotes flakiness and prevents spreading in the oven; the kitchen will feel cooler and the dough stiffer when you touch it. Freezing speeds the process and is handy if you are short on time, while refrigerating is gentler if you prefer more control. Avoid baking straight from the counter, as warm dough can flatten and leak during the initial oven blast.
- Preheat oven to 425°F (220°C): Preheating is about building the right environment so the pies get an immediate lift and begin to brown. You might smell a faint toasty note as the oven reaches temperature. If the oven is not fully preheated, the pies can bake unevenly or absorb more fat, yielding a less flaky crust. Use an oven thermometer if your oven runs cool or hot to ensure accuracy.
- Brush top of dough with egg wash: A final brush of the glossy egg wash will make the pies sheen in the oven and help the top develop an even, inviting golden tone. Apply it gently so it does not pool in the center or leak down the sides, which can create uneven browning. If streaks appear, smooth them with a soft brush; too heavy a coat can brown too quickly, so a light, even layer is best.
- Using the tip of a paring knife, make a small “X” cut in top of dough: A tiny incision lets steam escape and prevents the pies from bursting, and you will see a little puff as the filling vents during baking. The cut should be modest, just enough for steam, not so large that filling spills out. Be careful not to press deeply with the knife, which could cut through to the bottom layer and cause leakage.
- Bake until crust is golden brown, 12 to 14 minutes: As they bake, aromas of butter and citrus will mingle and the crust will transform from pale to a warm golden tone; listen for a faint crackle as the crust sets. Timing matters, because underbaking leaves dough doughy, while overbaking dries the interior and dulls the curd's flavor. Rotate the sheet halfway through if your oven has hot spots, and if edges brown too fast, tent lightly with foil.
- Transfer to another baking sheet, and let cool completely: Moving pies off the hot sheet prevents residual heat from continuing to cook the bottoms, and cooling allows the filling to set so it does not spill when you bite in. You will notice the filling firm slightly and the crust retain its crispness as it cools. Resist the urge to glaze while they are warm, which can cause the sugar to run and create a wet sheen rather than a neat drizzle.
- In a small bowl, whisk together the confectioners’ sugar, milk, and vanilla: The glaze will come together into a smooth, opaque ribbon that falls slowly from your whisk; its aroma will be sweet with a whisper of vanilla. Drizzle it over cooled pies for a finishing touch that contrasts the lemon curd. If the glaze is too thin, add a little more confectioners’ sugar, and if too thick, a few drops of milk will loosen it; avoid adding too much liquid at once which can overshoot the texture.
- Drizzle on top of cooled hand pies: The final drizzle should glitter on the cooled crust, making each pie look polished and bakery worthy. Use a spoon or fork to create ribbons of glaze that set to a soft shell, and let them rest until the glaze firms slightly before serving. A common error is glazing while pies are still warm, which makes the glaze run and lose its shape; patience here pays off with a neat, attractive finish.
Notes
- Chill the dough often: Work in short bursts and return the dough to the refrigerator when it starts to feel warm. Cold dough traps air pockets during baking, which creates flakiness. If you skip chilling, the butter melts too quickly and the crust becomes dense rather than layered.
- Measure filling precisely: Use a small spoon or scale to portion lemon curd so each pie receives the same amount, preventing spills and ensuring uniform baking. Overfilling is the leading cause of bursts in the oven, so precise scoops keep the assembly tidy.
- Brush the seal, not the whole top: Apply egg wash to the edge to secure the seal and a light coat to the top for color, but avoid puddling wash in the center which can cause leaking. If wash pools, dab it carefully with a paper towel to redistribute it.
- Freeze if short on time: Freezing assembled pies for 30 minutes firms them faster than refrigeration and allows you to keep baking at your rhythm. Frozen pies will bake well from frozen, but you may need an extra minute or two, so watch closely for golden color.
- Drizzle glaze after cooling: Always wait until the pies are completely cool before glazing; warm pies will melt the glaze and make it run. A cool surface ensures a neat, set finish that looks professional.
- Sift confectioners’ sugar: For the smoothest glaze, sift the confectioners’ sugar before whisking it with milk and vanilla, preventing lumps and giving a silky finish.