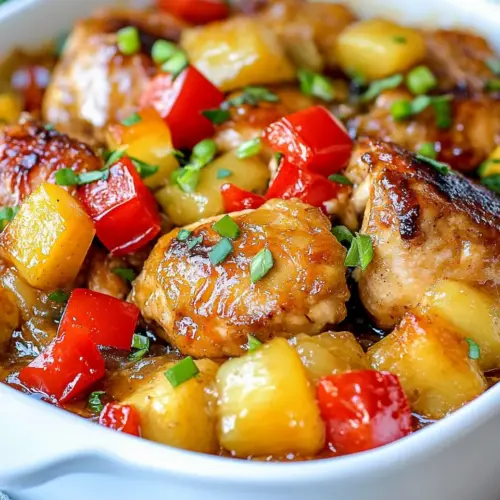
Baked Hawaiian Chicken
Baked Hawaiian Chicken is a sweet and savory, easy weeknight dinner with crispy chicken cubes glazed in a glossy pineapple lime sauce. Bright citrus, caramelized brown sugar, and tender pineapple tidbits create a tropical profile that families love. It is approachable, pantry friendly, and perfect for casual gatherings, making it a reliable choice when you want a flavorful crowd pleaser.
Equipment
- Large non stick skillet
- 9 x 13-inch baking pan
- Mixing Bowls
- Whisk
Ingredients
- 4 chicken breasts boneless and skinless - cut into 1-inch cubes Cut into 1-inch cubes to ensure even cooking and quick baking; provides the primary source of protein and hearty texture for the dish. Season well so flavors penetrate the pieces and allow them to absorb the sauce during baking.
- Salt and pepper to taste Season to taste to enhance overall flavor balance and bring out natural savory notes; helps tenderize slightly when applied before cooking. Use sparingly at first and adjust after baking to avoid oversalting.
- 1 cup cornstarch Coat chicken pieces evenly to create a light crispy exterior when baked; helps the sauce adhere and thickens slightly during cooking. Dredging in cornstarch reduces moisture and promotes browning in the oven.
- 3 large eggs beaten Beat until smooth to create an egg wash that helps the cornstarch coating stick to the chicken; adds a touch of moisture and richness. Use enough to thoroughly bind the coating without making it soggy.
- 1/4 cup vegetable oil Heat briefly to lightly brown and flavor the coating before baking or to grease the baking dish; contributes subtle richness and prevents sticking. Choose a neutral oil to avoid altering the intended flavor profile.
- 1 cup pineapple juice use from the pineapple can Use from the pineapple can to add tropical sweetness and acidity; helps build the base of the glaze and infuses the chicken with fruit-forward flavor. Provides liquid for thinning the sauce and balancing savory elements.
- 1/2 cup orange juice Add for citrusy sweetness and body to the sauce; complements the pineapple and balances salty components. Contributes natural sugars that caramelize slightly during baking.
- 2 tablespoons lime juice Squeeze fresh for bright acidity that lifts the sauce and balances sweetness; enhances overall brightness and depth of flavor. Use measured juice to maintain consistent acidity throughout the glaze.
- 1 lime zested Zest to impart concentrated citrus oils and aroma; adds fragrant brightness without extra liquid. Sprinkle finely into the sauce mixture to amplify fresh lime notes.
- 1/2 cup brown sugar Sweeten and add depth with molasses-like notes that caramelize during baking; balances soy sauce saltiness and citrus acidity. Dissolve into warm juices to create a cohesive glaze.
- 1/3 cup low-sodium soy sauce Provide savory umami and saltiness while remaining lower in sodium to control overall salt level; forms the savory backbone of the glaze. Combine with sweet and acidic ingredients for a balanced sauce.
- 1 teaspoon rice vinegar Add a touch of tang and subtle fermented acidity to brighten the glaze; helps balance sweet and salty components. Use sparingly to avoid overpowering the delicate fruity flavors.
- 2 cloves garlic minced Mince finely to release pungent aromatics that deepen savory flavor; infuse the sauce with garlicky warmth and complexity. Sauté briefly or mix into the sauce to mellow sharpness while preserving aroma.
- 2 tablespoons cornstarch Mix with cold liquid to create a slurry that thickens the glaze when heated; ensures a glossy, clingy sauce for the chicken. Add gradually while whisking to prevent lumps and achieve desired consistency.
- 1 red bell pepper chopped Chop to contribute crisp texture and a mildly sweet, vegetal flavor contrast to the tender chicken and pineapple. Toss in near the end of cooking or as a fresh addition for color and crunch.
- 1 20 oz. can pineapple tidbits drained Drain thoroughly to prevent excess liquid from thinning the sauce; provide juicy bursts of pineapple sweetness throughout the dish. Distribute evenly so fruit complements each chicken piece without making the bake soggy.
- Green onions chopped Chop to use as a bright, herbaceous garnish that adds freshness and subtle onion flavor; enhances presentation and provides a mild crunch. Sprinkle over the finished dish to retain color and texture.
- Sesame seeds Toast lightly before serving to add nutty flavor and visual contrast; provide a subtle crunch and garnish that completes the dish. Scatter sparingly to avoid overpowering delicate flavors.
Instructions
- Preheat oven to 325° F.: As you heat the oven, you will notice a gentle warmth building in the kitchen that sets the stage for slow, even cooking. This lower and steadier temperature helps the sauce thicken without the chicken drying out, producing tender meat and a caramelized top. Listen for the faint hum of the oven into which the aromas will later concentrate. A common mistake at this stage is rushing and setting the oven to a much higher temperature, which can overbrown the surface while leaving the interior dry. If your oven runs hot, use an oven thermometer to confirm the temperature for accuracy.
- Grease a 9 x 13-inch baking pan with cooking spray and set aside.: Coating the pan ensures the sauce does not glue itself to the dish, and it will make lifting pieces easier once cooked. The metal or glass will both heat differently, so choose the one you are familiar with to judge baking times. You might hear a faint sizzle if the spray meets a very hot pan, but normally it remains quiet. Avoid using too much spray, which can pool and cause the sauce to slide.
- Add chicken to a large bowl and season it with salt and pepper.: After seasoning, the chicken should smell lightly of salt and pepper, which primes the meat to take on the sauce flavors. Seasoning early helps the meat absorb the flavors rather than just coating the surface. A frequent error is under seasoning, leaving the final dish bland, so taste a small cooked scrap to check if you need more.
- Place cornstarch in a large bowl, and eggs in another medium bowl.: Setting up a tidy dredging station helps maintain even coating and prevents clumping. The visual contrast between the dry cornstarch and the glossy beaten eggs signals the order of operations. If the cornstarch gets wet, it will cake, so keep the bowls separate and dry. Messy stations lead to uneven coatings, so line a tray to hold dredged pieces.
- Dip seasoned chicken pieces in cornstarch to coat, then coat in eggs.: As you dredge each cube, you'll feel a light powder cling to the surface, then the egg will make it tacky and ready to hold during searing. This two step process builds a thin barrier that crisps and helps the sauce adhere. If your hands are damp, the cornstarch will clump, so dry them between pieces. Skipping the cornstarch yields a softer exterior and less textural contrast.
- Place a large non-stick skillet over medium-high heat. Add vegetable oil.: The oil should shimmer but not smoke, signaling it is hot enough to sear. When you test with a small breadcrumb, it should sizzle on contact. This step is crucial because a properly hot pan creates a Maillard reaction, producing golden brown color and savory depth. If the oil smokes, lower the heat, because burnt oil brings bitter notes. Using too little oil results in sticking and uneven browning.
- Once the oil is hot, cook coated chicken, in batches so you don't over-crowd pan, until golden-brown on all sides.: You will hear a confident sizzle as the pieces hit the pan and see the edges turn from pale to golden in just a couple of minutes per side. Cooking in batches preserves pan heat and ensures quick browning, instead of steaming the meat. Overcrowding creates pale, soggy pieces, so give them space and transfer to a tray between batches. A common oversight is trying to rush by adding too many pieces at once, which prevents proper crust formation.
- Once cooked, place the chicken in the prepared baking dish.: As the browned cubes collect in the dish, you will notice an enticing aroma of caramelized chicken . Arranging them evenly helps the sauce coat every piece during baking. If you pile them, the sauce may pool and not penetrate evenly. Let any excess oil drip off briefly to avoid an oily final sauce.
- In a medium bowl whisk together all the sauce ingredients. Pour evenly over the chicken.: Whisking combines the pineapple juice, orange juice, lime juice, brown sugar, low sodium soy sauce , rice vinegar, minced garlic , lime zest and a bit of cornstarch for body. As you whisk you will see the sugar dissolve and the mixture take on a glossy sheen, smelling bright and sweet. Pouring it over the chicken ensures each piece will bathe in flavor as it bakes. If the sauce looks too thin, you can mix a small additional cornstarch slurry, but adding too much will make it gummy.
- Distribute the chopped bell pepper and pineapple evenly on top of the chicken.: The peppers add pops of color and a crisp counterpoint while the pineapple gives juicy sweetness and texture. Scatter them so each portion gets both elements after baking. The visual contrast is part of the appeal, and the juices from the pineapple will mingle with the sauce as it heats. Ensure the pineapple is drained well, because excess liquid can thin the sauce and extend baking time.
- Bake, uncovered, for 1 hour, stirring the mixture a few times.: During baking the kitchen will fill with a warm, fruity aroma while the sauce reduces and thickens into a shiny glaze. Stirring a couple of times promotes even coating and prevents the bottom from sticking, allowing the chicken to absorb the sauce. Baking uncovered encourages slight caramelization on top. A mistake is leaving it untouched for too long, which may cause uneven browning or parts to dry; brief gentle stirring avoids that.
- Remove from the oven and let stand 10 minutes before serving.: Letting the dish rest allows the sauce to cool and thicken slightly, making it cling better to the chicken and making serving neater. The aromas will settle and the temperature will even out, which is kinder to the palate. Serving immediately can cause the sauce to run and be overly hot, risking burns or a loose texture.
- Serve over rice, garnish with green onions and sesame seeds.: As you plate, the contrast of fluffy rice under sticky, glossy chicken pieces is comforting and visually appealing. The green onions add a fresh bite and the sesame seeds contribute a nutty crunch. Garnish just before serving so the green onions remain vibrant. Avoid garnishing too early, which will cause the herbs to wilt and lose color.
Notes
- Prep your dredging station: Set out the cornstarch, beaten eggs, and a tray for dredged pieces so you can move quickly and keep coatings even, which prevents clumping and ensures uniform browning.
- Bring eggs to room temperature: Cold eggs can cause the cornstarch to clump when dipping, so leaving the eggs out for a few minutes makes coating smoother and more consistent.
- Toast sesame seeds briefly: If you want deeper nuttiness, toast the sesame seeds in a dry pan for 1 to 2 minutes until fragrant, watching closely to avoid burning, then sprinkle over finished servings.
- Adjust sweetness with lime: If the sauce tastes too sweet after baking, a squeeze of fresh lime brightens and balances the flavors without changing texture.
- Use an oven thermometer: Ovens vary, and a thermometer helps ensure the 325° F target is accurate, which is important for even cooking and proper sauce reduction.