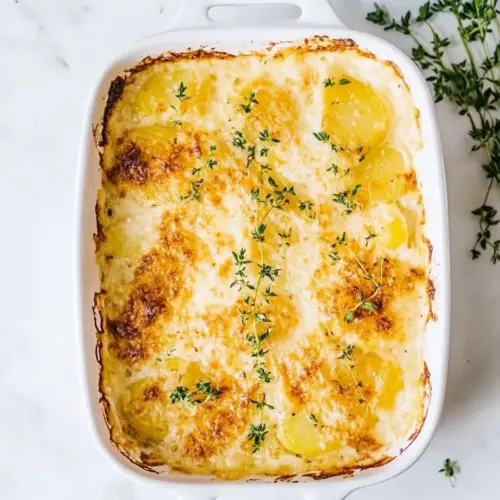
Au Gratin Potatoes
Au Gratin Potatoes delivers creamy, cheesy comfort with a golden bubbling top and tender layered gold potatoes. This classic side is rich, easy to scale for gatherings, and ideal for an easy weeknight dinner or holiday table. The blend of sharp Cheddar cheese and nutty Gruyère cheese makes every bite irresistible, giving you a reason to make it tonight.
Equipment
- Mandoline Slicer
- 9 x 9 inch baking pan
- Large nonstick pot
Ingredients
- Cooking spray Lightly coat the baking dish to prevent sticking and promote even browning; ensures easy serving and cleanup after baking.
- 6 packed cups gold potatoes 2 pounds, see note 1 Thinly slice and pack to measure; provides the starchy base and structure for layers, yielding creamy texture when cooked through.
- 3 tablespoons unsalted butter Melted into the sauce to add richness and silky mouthfeel; helps carry flavors and create a smooth roux when combined with flour.
- 2 teaspoons minced garlic 2 cloves Finely chopped and sautéed briefly to release aromatic oils; contributes savory depth and a subtle garlic flavor throughout the gratin.
- 3 tablespoons flour Whisked with butter to form a roux that thickens the milk; creates a creamy sauce that clings to the potato slices.
- Salt and pepper Season to taste for balance and depth; enhances the natural flavors and brightens the overall dish when added judiciously.
- 2 cups milk see note 2 Warm and whisked into the roux to form a béchamel-style sauce; provides the liquid base that yields a tender, creamy interior.
- 1 cup shredded sharp Cheddar cheese 3 ounces Shredded and folded into the sauce or sprinkled on top to add sharpness and melty cheesiness; contributes flavor contrast and color.
- 1 cup shredded Gruyère cheese or more Cheddar, 3 ounces, divided Shredded and layered or sprinkled to melt into the dish; offers nutty, slightly sweet tones and gooey texture when heated.
- 1/2 cup freshly grated Parmesan cheese see note 3 Finely grated and sprinkled over the top to create a savory, salty crust; adds umami and a crisp, golden finish when broiled.
- 2 teaspoons fresh thyme or 1/4 teaspoon dried, optional Chopped or sprinkled to add herbal brightness and subtle aromatic complexity; optional for a fresh, slightly floral finish.
Instructions
- Preheat oven to 350°F. Grease a 9×9-inch (or 2-quart) baking pan with cooking spray and set aside.: As you begin, you should notice the oven warming up and the faint mechanical hum shifting into a steady heat. Preheating ensures the dish starts cooking at the correct temperature, which helps the layers set and the sauce thicken evenly. A common mistake is putting the pan into a cold oven, which prolongs cooking and can leave unevenly cooked potatoes. If your oven runs hot, consider checking with an oven thermometer and aim for consistent heat so the top browns at the right moment.
- Peel and thinly slice potatoes (1/8-inch thick). I use a mandolin slicer for speed and accuracy (see note 1). Measure 6 tightly packed cups of sliced potatoes.: When you spray the pan, take note of the even shine across the interior, which signals adequate coverage. This step prevents sticking and encourages clean edges and easy serving. A trap I often see is using too little oil, which can lead to dried, stuck edges; use a light but complete coat. If you prefer, wipe excess spray with a paper towel to avoid pooling at the bottom.
- In a large nonstick pot, melt butter over low heat. Add garlic and sauté for 1 minute until fragrant. Stir in flour and whisk constantly for 1 minute until smooth (avoid browning). Gradually whisk in 1 cup of milk until smooth. Increase heat to medium-high and gradually add the second cup of milk. Stir occasionally until the mixture boils. Season with salt and pepper (I use 1 teaspoon salt and 1/4 teaspoon pepper).: As you slice, the sound is almost whisper-quiet if you use a mandoline, and the translucent, even rounds stack neatly. Uniform thickness is vital for even cooking and texture, so keep your slices consistent. A common error is uneven slicing which creates some pieces that cook faster than others; take your time or use a mandoline guard to keep fingers safe and slices uniform.
- Once boiling, reduce heat to medium-low and stir constantly for 2 minutes until the sauce thickens (see note 4). Remove from heat and let cool for 2 minutes. Stir in Cheddar cheese, a handful at a time, until melted and smooth. Add the sliced potatoes and stir to coat.: Packing the cups gives you a reliable volume that translates to consistent results from batch to batch. You want the slices snug but not crushed, so they layer well in the pan. An issue to avoid is loosely measured cups that lead to a thinner bake; if your layers look sparse, you may need to reduce air gaps by pressing gently when layering.
- Assemble the dish by layering 1/3 of the potatoes in the prepared pan, then sprinkle in 1/2 cup Gruyere cheese and 1/3 of the fresh thyme. In the same pan, repeat with another 1/3 of the potatoes, the remaining 1/2 cup Gruyere, and 1/3 thyme. Finish with the remaining potatoes and thyme.: The butter should foam gently and develop a sweet, nutty aroma, not brown. Low heat prevents the milk and roux from taking on toasted flavors too early. A frequent pitfall is overheating the butter which will brown and change the sauce flavor; keep the heat low and steady to maintain a neutral, rich base.
- Cover the pan with foil and bake for 1 hour 15 minutes. Remove the foil and check for tenderness by piercing the potatoes with a knife. If not tender, bake a few more minutes and check again. Once tender, sprinkle 1/2 cup Parmesan cheese on top.: When the garlic hits the butter, you should smell a warm, savory perfume within seconds. Sautéing briefly softens the raw edge of the garlic and releases flavor into the fat. Avoid browning the garlic, which creates bitterness, by stirring constantly and lowering the heat if it begins to color too quickly.
- Bake uncovered for another 10–15 minutes or until golden and bubbly. For extra color, broil for 1 minute at the end. Let stand for 5–10 minutes before serving to allow the sauce to thicken.: The roux will become a pale paste that loses its raw flour taste; whisking prevents lumps and builds the thickening base for the sauce. You want a smooth texture and a faint toasted scent, not a brown color. A common mistake is adding milk too quickly which produces lumps; keep whisking while slowly adding liquid for a glossy result.
- Gradually whisk in 1 cup of milk until smooth: As the first cup of milk blends, the mixture should loosen and become silkier, the whisk leaving visible waves in the sauce. Adding milk slowly allows the roux to hydrate evenly and prevents separation. If you rush and dump the milk in, you risk a lumpy sauce; always add in a slow stream while whisking.
- Increase heat to medium-high and gradually add the second cup of milk: The sauce will warm and begin to steam, and small bubbles will form around the pot edge as it approaches a simmer. Increasing heat helps activate the thickening power of the roux, but adding milk gradually keeps the texture smooth. A typical error is cranking heat too high which can scorch the milk at the bottom; keep the pot moving with a spoon and lower heat if you see browning.
- Stir occasionally until the mixture boils: You want steady, small rolling bubbles and a gentle steam rising from the pot, signaling that the sauce has reached full cooking temperature. Boiling helps the starch fully thicken the sauce. Avoid leaving the pot unattended; vigorous boil can foam and cling to the pot sides, leading to scorching that gives the sauce an off flavor.
- Season with salt and pepper I use 1 teaspoon salt and 1/4 teaspoon pepper: The aroma will shift as the seasoning melds, with the salt enhancing the dairy and cheese notes. Seasoning at this stage ensures the base sauce is balanced before the cheeses and potatoes join. A common oversight is under-seasoning early and then over-salting later when cheese is added, so taste carefully and adjust gradually.
- Once boiling reduce heat to medium-low and stir constantly for 2 minutes until the sauce thickens: As you stir, the sauce should coat the back of a spoon and move with a slow, teardrop-formation when you swipe it. This stage builds body so the sauce clings to the potatoes instead of pooling. If you stop stirring, hot spots can form causing lumps or burning, so keep the motion constant and even.
- Remove from heat and let cool for 2 minutes: The steam will subside slightly and the sauce will settle into a silkier texture. Cooling briefly prevents the cheeses from breaking when added, helping them incorporate smoothly. A mistake I see is adding cheese to piping hot sauce which can cause graininess; a short cool-down prevents that.
- Stir in Cheddar cheese a handful at a time until melted and smooth: As each handful melts, you will see glossy ribbons fold into the sauce and smell that sharp, creamy note. Adding cheese incrementally ensures it melts evenly and keeps the sauce velvety. If you dump all the cheese at once, it can seize into clumps, so add slowly and stir gently until smooth.
- Add the sliced potatoes and stir to coat: The potatoes will take on a sheen and look uniformly glossy when properly coated, which helps even baking and flavor penetration. Stirring ensures every slice has sauce between layers so the center cooks tender. Avoid aggressive stirring that could break slices; be gentle to preserve their shape.
- Assemble the dish by layering 1/3 of the potatoes in the prepared pan then sprinkle in 1/2 cup Gruyere cheese and 1/3 of the fresh thyme: Layering creates pockets of melted cheese and herb aroma. You should see distinct tiers when you place each layer, and the thyme releases a subtle perfume as it warms. A common misstep is uneven layering which causes inconsistent pockets of sauce, so distribute cheese and thyme evenly across the layer.
- Repeat with another 1/3 of the potatoes the remaining 1/2 cup Gruyere and 1/3 thyme: As you continue, the pan begins to look abundant and rich, each layer adding density and flavor. Keeping an eye on even distribution prevents dense clumps and ensures consistent cooking. If you cram too many slices in one spot, those areas may stay undercooked, so spread layers evenly.
- Finish with the remaining potatoes and thyme: The top layer should be neat and slightly compacted to minimize air pockets, which helps the dish set uniformly while baking. This final herb layer will infuse aroma into the top during the bake. Don't press so hard that slices deform, or the texture can become pasty; a gentle press is sufficient.
- Cover the pan with foil and bake for 1 hour 15 minutes: Covered baking steams the potatoes and allows them to cook through gently, creating a tender interior. You should hear a faint sizzle as moisture circulates under the foil. A mistake is removing the foil too early which can dry out the surface; keep it covered for the recommended time to ensure tenderness.
- Remove the foil and check for tenderness by piercing the potatoes with a knife: The knife should slide through with little resistance and the exposed edges will start to show browning. This check tells you whether the center is cooked. If the knife meets resistance, return to the oven briefly, as underdone potatoes will leave a raw texture that affects the whole dish.
- If not tender bake a few more minutes and check again: Baking a little longer allows residual steam to finish the job, and you will see juices bubble more at the edges. Avoid repeated lengthy returns to the oven which can overcook the top, instead add short increments and recheck often. Overbaking can dry the potatoes, so watch closely during these final minutes.
- Once tender sprinkle 1/2 cup Parmesan cheese on top: The grated Parmesan cheese will begin to soften and create a salty, savory crust as it meets the heat. You will smell a savory lift almost immediately. A trap is using pregrated shelf stable cheese which won t melt properly; fresh grated yields a much better finish.
- Bake uncovered for another 10 to 15 minutes or until golden and bubbly: Now you want a deeply golden, bubbling surface that crackles slightly at the edges, signaling caramelization and flavor concentration. If you want extra color, broil for 1 minute at the end, watching constantly to prevent burning. The most common mistake is leaving it under the broiler too long, which can quickly char the top.
- For extra color broil for 1 minute at the end: The broil brings a quick burst of intense heat that crisps and browns, producing a toasty, savory aroma. Keep the oven door ajar if your broiler is especially fierce, and always watch the pan to avoid blistering. Overbroiling will make the crust bitter, so a careful eye is essential.
- Let stand for 5 to 10 minutes before serving to allow the sauce to thicken: As the dish rests, the sauce sets and becomes easier to serve in neat portions. You will notice steam ease and the layers hold together better. A common oversight is serving immediately which leads to runny portions; a short rest improves texture and presentation.
Notes
- Choose your potato: Use gold potatoes for a creamy texture that holds shape, or try russets if you want a slightly fluffier interior, keeping thickness consistent at 1/8 inch for even cooking.
- Milk selection matters: Whole milk gives the richest sauce, while 2 percent will still work if you prefer a lighter finish; avoid skim which can yield a thin sauce.
- Cheese timing: Add the Cheddar cheese gradually off the heat so it melts evenly into the sauce, preventing graininess and ensuring a glossy texture.
- Layer with care: Distribute the Gruyère cheese and thyme evenly between layers to create pockets of flavor rather than concentrated clumps that cook unevenly.
- Baking sequence: Cover the dish for the majority of baking to steam the potatoes until tender, then uncover to brown and crisp the top in the final minutes for the best contrast.
- Fresh Parmesan: Use freshly grated Parmesan cheese on top for authentic flavor and better melt behavior compared to pregrated options.
- Short rest: Let the casserole rest 5 to 10 minutes after baking to allow the sauce to set, which makes slicing cleaner and portions neater when serving.