Asparagus and Morel Pizza with Garlic Confit
Asparagus and Morel Pizza with Garlic Confit is an elegant spring pizza that balances creamy mozzarella, earthy morel mushrooms, and bright asparagus with mellow confit garlic. The crust crisps while the toppings remain vibrant, making this an easy weeknight dinner or a dinner party standout. Try it for a seasonal, savory treat that tastes like a special occasion.
Equipment
- Saucepan
- Sauté Pan
- Pizza Stone
- Pizza Peel
Ingredients
- 16 ounces Pizza Dough enough for one 12 inch pizza (store bought or make your own) Provide a stretchy, chewy base for the pizza that crisps around the edges when baked; allow it to come to room temperature before stretching to prevent tearing and to achieve even cooking for a 12-inch pie.
- 1 pound asparagus ends trimmed and cut into and a half inch pieces Add bright, tender-crisp vegetable notes and a pleasant snap when roasted; trim and cut into half-inch pieces so they cook quickly and maintain texture atop the pizza.
- 1 pint morel mushrooms stems removed and cut into bite sized pieces Contribute earthy, woodsy flavor and meaty texture that complements spring produce; remove stems and cut into bite-sized pieces so they brown evenly and release umami.
- 4 garlic cloves minced Lend sharp, aromatic heat when minced and scattered sparingly; distribute evenly to infuse fresh garlicky pops across the pizza surface.
- 2 cups shredded mozzarella cheese Provide a melty, creamy topping that binds other ingredients and creates the classic pizza pull; shred finely so it melts uniformly for a golden finish.
- 1 teaspoon red pepper flakes plus more for topping (or to taste) Introduce controlled heat and a hint of smokiness; measure and sprinkle to taste during assembly and reserve extra for finishing to adjust spiciness.
- truffle salt * can use plain kosher salt if you don't have truffle salt Impart an intense, earthy aroma and seasoning balance when used as a finishing salt; substitute kosher salt in equal amounts if truffle salt is unavailable.
- Garlic Confit see below Offer a rich, mellow garlic flavor preserved in oil that can be spooned onto the crust or mixed with toppings; prepare or use ready-made confit to add depth without raw sharpness.
- cornmeal for pizza peel Prevent the dough from sticking to the peel and help transfer the pizza smoothly into the oven; dust the peel lightly with cornmeal to create a nonstick barrier.
- 1 head of garlic cloves separated and peeled (about 24 whole garlic cloves) Provide whole bulbs for making garlic confit, supplying many mild, sweet cloves after slow cooking; separate and peel the cloves so they cook evenly when submerged in oil.
- 1/4 cup olive oil or more, enough to cover garlic Create the cooking medium for garlic confit that gently poaches and preserves garlic in oil; use enough to fully cover the cloves and store the confit safely refrigerated.
Instructions
- Place garlic cloves in a small saucepan and cover with olive oil. Garlic cloves should be submerged.: The room will fill with the faint, green scent of raw garlic as you nestle peeled cloves into the olive oil . Make sure each clove is fully covered so they simmer without exposure to air, which ensures even, gentle cooking until the flesh becomes soft and tender. You should hear only a gentle whisper of movement in the oil, not vigorous bubbling, which indicates too-high heat. A common error is overcrowding the pan, which can cause uneven confit; use a small saucepan where the cloves sit in a single layer.
- Bring oil to a simmer over medium heat but do not boil. As soon as it comes to a simmer, reduce heat as low as possible and cook for about 45 minutes, until garlic is soft and tender.: As the oil comes to a delicate simmer, you ll notice the aroma lighten and sweeten, losing sharp edges. Reduce the flame to the lowest setting so the surface shows tiny, slow-moving ripples, and maintain that gentle warmth for about 45 minutes. The cloves should become silk pale and offer no resistance when pressed. If the oil bubbles hard or the cloves brown, the heat is too high and the flavor will be bitter; lowering the temperature prevents this. Patience here yields cloves that spread like butter.
- Remove garlic with a slotted spoon and set aside. Save oil for use on the pizza.: Pulling the soft, glossy garlic from the oil, you ll see cloves transformed into tender jewels. Set them on a plate or bowl to cool slightly while reserving the infused olive oil . The oil will smell faintly sweet and savory; it s precious for brushing the crust. Avoid discarding the oil, since it carries concentrated garlic flavor and seasons the sautéed vegetables and dough. A pitfall is letting the oil sit too hot around the garlic which can continue to cook and darken the cloves; cool them promptly.
- Place oven rack in the very top position of the oven and place pizza stone on it. Heat oven to 550°F.: Preheating your oven with the stone in the top position builds a scorching surface that mimics a wood fired oven, producing crisp, blistered crust. You ll hear a steady hum from the oven as it reaches that intense heat; give it at least 45 minutes to ensure the stone is fully heated. When you slide the pizza onto a hot stone you should hear a satisfying sizzle, a sign the bottom is searing properly. If you rush this step, the crust may cook slowly and become dense rather than light and airy.
- If refrigerated, set pizza dough on the counter for at least half an hour.: Bringing chilled dough to room temperature relaxes gluten and makes it pliable and forgiving to stretch. Touch it gently, and you ll feel it warm and soften, which allows it to stretch without snapping back. If the dough is still tight after 30 minutes, give it another 10 to 15 minutes; forcing cold dough leads to tears and uneven edges. Resist the temptation to flour excessively, because too much flour will dry the surface and inhibit proper browning.
- Take one tablespoon of the oil from the garlic confit and place in a large sauté pan with the 4 cloves of minced garlic and the red pepper flakes. Heat until fragrant, then add the morel mushrooms and a good dash of the truffle salt and sauté for a few minutes. Add the asparagus and another dash of salt and cook for 3-4 more minutes, until bright green and still crisp.: The moment you warm the confit oil with minced garlic and red pepper flakes , it releases a heady aroma that signals flavor building. Add the morel mushrooms so their porous texture picks up oil and browns slightly, creating concentrated, nutty notes. When you toss in the asparagus , its color will flash to a vivid green, and you ll want to stop cooking while it retains a crisp snap to add contrast against the melted mozzarella . Overcooking blunts brightness and creates limp vegetables, so keep a brisk motion in the pan and rely on sight and a fork test to stop at the ideal moment.
- Remove from heat and taste mixture, adjust seasoning if needed.: As the pan cools a touch the flavors meld, and you ll be able to judge whether the mix needs more salt or a pinch more heat. Taste a small piece of asparagus with a morel to assess balance. If it feels flat, a little more truffle or kosher salt can lift it, while additional red pepper flakes will add brightness. The mistake here is over-salting early; seasoning in stages helps avoid overshooting.
- Spread cornmeal on to pizza peel. Use your hands to work the pizza dough ball into a disc, when it gets to be 6-8 inches across, place on the pizza peel and continue to spread into a 12 inch disc. If the dough starts to spring back and gets to difficult to work with, let it sit for 10-15 minutes and it should relax. When pizza dough has been shaped into a 12 inch flat disc, give the pizza peel a shake to make sure the dough is not sticking to it.: Rolling and stretching the dough is tactile and satisfying; you ll feel the center thin while the edge stays slightly thicker to form a rim. Cornmeal on the peel creates a tiny cushion that makes the dough slide, and that initial 6 to 8 inch forming helps you maintain control. If the dough resists, rest it and breathe; forcing it leads to tears. Before topping, give the peel a confident shake; if it sticks, lift and re dust with cornmeal rather than attempting to slide a stuck pizza onto the stone.
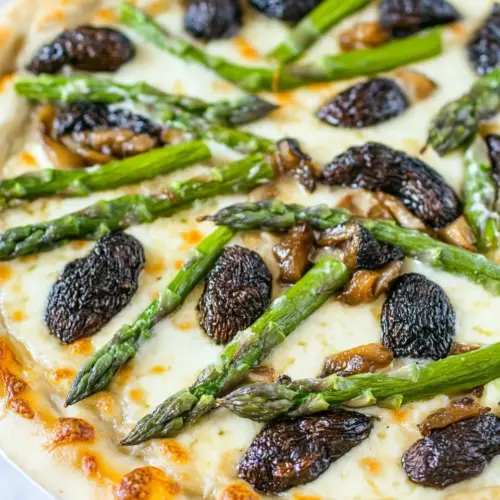
- Use a pastry brush to brush one tablespoon of the garlic confit oil all over the crust. Spread the shredded cheese all over the dough, leaving about an inch of space all around the outside edge of the crust. Cover with the morel/asparagus mixture. Arrange the garlic confit cloves on top. Sprinkle with a little more truffle salt and pinch of red pepper flakes.: Brushing the crust with infused oil imparts savory scent and encourages a golden brown exterior while the mozzarella melts into a glossy blanket. Leaving a one inch border protects the rim from becoming soggy and lets it blister nicely. Scatter the sautéed topping in a single layer so every bite has a mix of morels and asparagus , and tuck the soft confit cloves in pockets where they can warm without burning. Finishing salts and red pepper flakes added at this stage intensify aroma during baking. Avoid piling toppings too high, which can prevent proper heat circulation and yield a limp center.
- Give the pizza peel another shake to make sure the dough is not sticking in any places.: That final shake is your insurance policy; you want the pie to glide off cleanly. When you rock the peel gently, listen for a faint rolling sound and feel the dough move freely. If any area sticks, lift and dust more cornmeal under that spot. Trying to launch a sticky pizza can cause it to fold or tear mid transfer, so take the extra second to confirm mobility.
- Now comes the tricky part! Transferring the pizza from the peel to the hot pizza stone. This is why you want to make sure your dough isn't sticking to the peel. Open the oven and pull the rack out about halfway so that you have easier access to the hot stone. Quickly, carefully and deliberately, shake the pizza from the peel onto the hot stone, then close the oven. It helps to have two people involved, and for the second person to have a spatula or other heat proof utensil to help guide the pizza onto the stone if needed.: When the stone greets the dough you should hear an immediate sizzle as the bottom sears, a satisfying confirmation that the oven and stone are properly preheated. Use decisive, fluid motions and keep your hands steady; hesitation can cause the dough to stick. Having a second person is helpful because one can guide while the other slides. A common misstep is opening the oven too long, which drops heat and slows cooking; be prepared so the transfer is swift.
- Cook for 8-10 minutes, until crust is golden and cheese is bubbly. Carefully transfer pizza back to pizza peel to remove from oven (again, the second person standing nearby with a spatula is helpful for this).: As the pizza bakes the edges will puff and take on golden brown spots while mozzarella becomes molten and slightly bronzed in places. Sniff for a warm, toasty aroma and watch for the crust to feel springy when nudged with a spatula. Remove when the cheese bubbles and the underside is crisp, listening for a hollow sound when you tap the crust. Avoid leaving it too long, since cheese can overbrown and toppings can dry out. Bring it back to the peel with care, using a spatula if needed to coax it loose, and let it rest a minute before slicing so the toppings settle.
Notes
- Use store bought dough for speed, if you re short on time choose a high quality refrigerated or frozen pizza dough and let it come to room temperature before stretching, which preserves texture while saving prep time.
- Adjust spice to taste, start with the called for teaspoon of red pepper flakes and add more at the table so guests can control heat without overpowering the delicate morels and asparagus.
- Double the garlic confit, the soft garlic cloves are wonderful spread on bread or stirred into pasta later, so making extra gives you a bonus condiment and deepens flavor for leftovers.
- Finish with truffle salt sparingly, a light sprinkle after baking elevates umami and complements morel mushrooms, but use it lightly because a little goes a long way.
- Make ahead the sautéed topping, cook the morels and asparagus earlier in the day and refrigerate; rewarm briefly before assembling so you shave time on a busy evening.