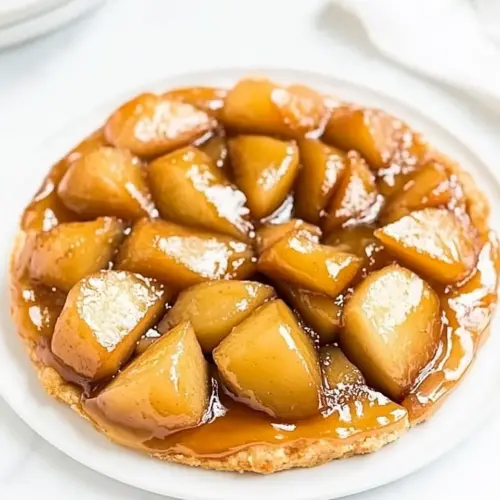
Apple Tarte Tatin
Apple Tarte Tatin brings glossy caramelized apples and a flaky short crust together in a rustic, showstopping dessert. With rich butter, sweet castor sugar, and tender Braeburn apples, this easy weeknight dessert becomes a memorable fall centerpiece. Serve warm for the best texture and aroma, and enjoy why this classic keeps becoming a favorite.
Equipment
- Food Processor
- Non-Stick Skillet
- Parchment Paper
- Rolling Pin
Ingredients
- 2 cups all-purpose flour Provide structure and bulk to the pastry; all-purpose flour develops gluten that creates a tender yet workable dough when combined with fat and liquid. Measure precisely and sift if lumpy to ensure even texture and prevent dense crusts.
- 1/2 teaspoons ea salt Enhance overall flavor balance by adding a touch of salinity that heightens sweetness and reduces blandness; use the measured amount to avoid overpowering. Dissolve evenly into the dough or sprinkle as needed to ensure consistent seasoning.
- 1 tablespoon castor sugar Add light sweetness to the pastry dough and help promote browning during baking; caster sugar dissolves quickly for a smooth, uniform crumb. Incorporate thoroughly with the flour and butter to distribute sweetness evenly throughout the crust.
- 6 tablespoons cold unsalted butter, cut up Provide cold fat for flakiness and tenderness; cold unsalted butter cut into small pieces creates pockets of steam during baking that yield a layered pastry. Keep chilled until combining to prevent the butter from fully blending into the flour and losing its laminating effect.
- 1 large egg Bind the dough and contribute richness and color; a large egg adds moisture, protein, and helps create a cohesive dough that holds together when rolled. Beat lightly before adding to ensure even distribution throughout the mixture.
- Cold water Moisten and bring the dough together without overworking; cold water adds the necessary hydration while keeping fats solid to maintain flakiness. Add gradually, a tablespoon at a time, until the dough just forms and remains slightly shaggy.
- 1/2 cup castor sugar Caramelize with the apples to create a glossy, sweet topping; caster sugar melts and browns to form the tarte tatin’s signature caramel. Cook the sugar slowly to avoid burning and achieve a deep amber color for rich flavor.
- 3/4 stick cold unsalted butter, cut up. Contribute richness and a silky mouthfeel to the caramel; cold unsalted butter cut up added to melted sugar creates a smooth, glossy sauce that coats the apples. Add in pieces and stir briefly off the heat to incorporate without separating.
- 4 large peeled, cored, and quartered Braeburn apples Provide firm, flavorful fruit that holds shape when caramelized; Braeburn apples offer a balance of sweetness and tartness and maintain texture after cooking. Peel, core, and quarter them evenly so they cook uniformly in the caramel.
Instructions
- Preheat the oven to 400°.: Before anything else, check that the oven is fully up to temperature so the crust and filling cook evenly. You should feel a steady warmth from the center of the oven and the interior racks should not wobble. This step ensures a consistent bake so the pastry sets as soon as it goes in, preventing sogginess. A common mistake is putting the tart into an oven that is still heating, which can lengthen bake time and affect browning.
- Start by making the short-crust pastry dough by processing some flour, salt, a tablespoon of castor sugar, and butter in a food processor on high speed until the butter is the size of rice.: As the machine runs, you will hear a steady chopping rhythm and see the butter pieces breaking down into pea to rice sized bits, which is ideal for flakiness. The contrast between the pale flour and flecks of butter is a visual cue that you are on track. If you over-process, the mixture will become mealy and may not produce flaky layers, so pulse and check frequently.
- Next, add the egg and mix until combined and the dough starts to come together. You may need to add a few tablespoons of water.: When the egg incorporates, the texture will shift from crumbly to a cohesive mass that still holds visible butter pieces. Add cold water by the tablespoon only if the dough resists forming; it should cling together without becoming wet. A common pitfall is adding too much water, making the dough sticky and elastic instead of tender and flaky.
- Transfer the dough to a clean surface and knead for 1 to 2 minutes.: Under your hands the dough should feel cool, slightly tacky, and pliable. Knead gently to bring it together, not to develop gluten; you will notice if it becomes smooth and springy, that indicates overworking. If the dough warms up, chill it briefly to keep the butter solid and maintain flakiness.
- Form it into a thick disk, wrap it in parchment paper and keep it in the refrigerator until we are ready to pull it out and use it.: Chilling firms the butter and relaxes the gluten, which makes rolling easier and improves texture. The disk should feel cold and compact when you press it. If you skip chilling, the pastry may stretch and tear while rolling, so resist the urge to proceed immediately.
- In the meantime, the 1/2 cup of castor sugar in a non-stick skillet over low heat until it is melted and lightly brown. You will need to stir this frequently with a high-temperature rubber spatula.: As the sugar melts, listen for a soft bubbling and watch it transform from grainy to a smooth, amber liquid. Move the pan in steady circles and scrape the bottom to prevent hot spots. The danger here is letting the sugar darken too far and turn bitter, so remove it from heat just before it reaches the color you want, knowing it will continue to cook slightly off the heat.
- Stir in the butter until completely combined.: When the pieces of butter melt into the caramel, the sauce will go from glossy to silky, with a rich aroma of toasted sugar and dairy. Stirring continuously helps emulsify the mixture into a smooth glaze that coats the apples beautifully. If the caramel seizes or looks grainy, reduce heat and stir vigorously; adding a small splash of warm water can sometimes re-liquefy it, but be cautious to avoid splatter.
- Form the quartered apples around the skillet to form a circular, fanned shape. See the video.: The apples should fit snugly and stand upright or slightly tilted, creating a compact pattern. You will hear a faint sizzle as they meet the warm caramel, and their edges should begin to look glossy almost immediately. Crowding them too loosely will create gaps and uneven cooking, while an overcrowded pan can lead to steaming rather than caramelization.
- Place on a lid and cook over low to medium heat for 15 minutes or until the apples are softened.: During this stage the aroma of caramelized fruit intensifies and the apples start to bend slightly at the edges, signaling tenderness. Check occasionally; the apples should be pliable when pierced with a fork but still hold their shape. Overcooking can make them mushy, so rely on texture more than time alone.
- Roll out the dough until it is slightly smaller than the size of the skillet with the apples.: On a lightly floured surface, roll from the center outward to avoid thin spots, and lift the dough occasionally to prevent sticking. The disc should cover the apples with a small margin but not hang over excessively. If the pastry is too cold and cracks, let it warm for a minute, then patch and press gently; if it gets too warm, chill briefly to firm it back up.
- Remove the lid from the apples and place the dough right on top.: Fit the pastry carefully over the fruit, tucking any excess around the edges. As you work, the caramel will bubble softly around the sides, and the contact between pastry and fruit is what creates a sealed finish. If you leave gaps, the caramel can leak during baking, so press the edges gently to form a seal.
- Tuck in the sides of the dough with a spoon and then poke several holes in the dough to let the heat escape.: Tucking creates a neat edge and prevents pastry edges from puffing too much. The small holes allow steam to escape, keeping the crust from becoming soggy inside. Avoid making large slits, which can cause the caramel to spill during baking.
- Bake at 400° for 30 to 35 minutes or until the crust is browned and cooked.: You will see the pastry turn an even golden brown and the caramel may bubble up at the vents, giving a glossy sheen. When you tap the crust it should sound hollow and feel firm. Underbaked pastry will be pale and doughy, so if the color looks too light, give it a few extra minutes while monitoring closely to avoid overbrowning.
Notes
- Make-Ahead: You can prepare the tart components the day before. Keep the assembled, unbaked tart covered in the refrigerator for up to one day. When ready to bake, bring it out for a few minutes so the pastry eases slightly before sliding into the oven. This saves time on service day while maintaining texture.
- How to Store: After cooling, cover the tarte and refrigerate for up to four days. For longer storage, freeze it wrapped tightly for up to three months, then thaw in the refrigerator for one day before reheating and serving. Reheating briefly in a warm oven helps revive the crust crispness.
- Dough Fixes: If the dough is too dry during processing, add a tablespoon or two of cold water until it just comes together. If it gets too wet, add a few tablespoons of flour and chill before rolling. These small corrections keep the pastry workable without compromising flakiness.
- Flavor Enhancements: After adding the butter to the caramel, you may stir in optional aromatics like a teaspoon of cinnamon or a sliced vanilla bean to complement the apples. Add sparingly to avoid overpowering the pure caramel and apple flavors.
- Pan Choices: While a heavy skillet is ideal, you can use a 9 inch deep cake pan or an 8 to 9 inch cast-iron skillet. Ensure the pan is oven-safe and that the fruit fits snugly for even caramel coverage and cooking.