Apple Pie Recipe
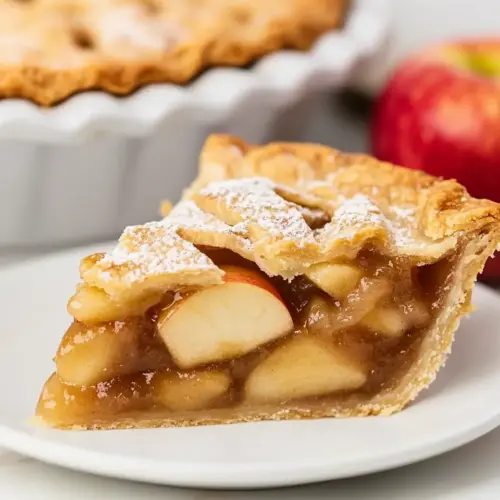
Apple Pie Recipe offers a flaky golden crust and a tender, warmly spiced filling that blends crisp Granny Smith and sweet Honeycrisp apples. This creamy yet slightly tangy dessert is perfect for easy weeknight dinners or holiday gatherings, delivering comforting aromas and reliably gorgeous slices. Make it to share, and enjoy a timeless dessert that always impresses.
Equipment
- 9-inch pie plate
- parchment lined rimmed baking tray
- Mixing Bowl
- Slotted Spoon
- Paring knife
- Pastry Brush
Ingredients
- 6 to 7 cups sliced apples (from a combination of 3 large Granny Smith and 3 large Honeycrisp apples) Provide thin, even slices that offer a balance of tartness and sweetness; combine Granny Smith and Honeycrisp for texture and flavor contrast that holds up during baking. Ensure slices are uniform to promote even cooking and to create a pleasing layered filling in the pie.
- 3/4 cup light brown sugar Add moisture and deep caramel-like sweetness to the filling; brown sugar melts into the apple juices to help thicken and intensify flavor as the pie bakes. Measure precisely to avoid an overly sweet or soggy filling.
- 1/4 cup granulated sugar Contribute bright sweetness and help balance the brown sugar; granulated sugar dissolves easily into apple juices to enhance fruit flavor without adding extra moisture. Use as measured to maintain the intended sweetness level.
- 1 1/2 teaspoons apple pie spice blend Provide a warm blend of spices that enhances the apples; apple pie spice adds cinnamon, nutmeg, and other aromatics to create the classic pie profile. Sprinkle evenly over the apple slices for consistent flavor throughout.
- 1/2 teaspoons salt Enhance overall flavor by balancing sweetness and intensifying fruit notes; salt also helps suppress bitterness and improves the perception of other flavors in the filling. Dissolve into the sugar mixture so it is evenly distributed.
- 2 tablespoons fresh lemon juice Brighten and prevent apple browning while adding a subtle tang; lemon juice also helps balance the sweetness in the filling. Toss with sliced apples immediately after cutting to maintain color and flavor.
- 1 package Pillsbury ready-made pie crusts (you will use both crusts (14.1-ounce package)) Supply a ready-made, flaky crust for both the bottom shell and the top lattice or full cover; using both crusts saves time and ensures proper crust coverage. Handle gently and keep chilled to preserve texture and prevent shrinking while baking.
- 1/4 to 1/3 cup cornstarch (this amount will vary based on the amount of liquid your apples yield. I had 1 cup of liquid and used 1/3 cup cornstarch for this pie. If you have less liquid you can stick with the 1/4 cup cornstarch) Thicken the apple juices into a glossy filling while keeping the fruit pieces distinct; cornstarch quantity should be adjusted based on how much liquid the apples release. Mix into the sugar-spice mixture to avoid clumping and achieve the desired consistency.
- 1 1/2 tablespoons unsalted butter (cold and cut into small cubes) Add small pockets of rich, buttery flavor that melt into the filling and create a silky mouthfeel; cold, cubed butter helps produce small tender areas within the fruit. Dot evenly over the apples before adding the top crust for optimal distribution.
- 1 egg Bind the egg wash for color and shine on the crust while adding a bit of richness; beaten egg promotes browning and helps any decorative sugar adhere. Whisk before brushing lightly over the pastry surface prior to baking.
- 2 teaspoons water Thin the egg wash so it spreads smoothly and creates an even glaze; water dilutes the egg for a more manageable consistency. Combine thoroughly with the beaten egg to ensure uniform color and sheen on the crust.
- 1 tablespoon coarse sanding sugar (optional) Provide a sparkling, decorative finish that enhances texture and appearance when sprinkled atop the crust; coarse sanding sugar adds a pleasant crunch and visual appeal. Apply sparingly to avoid overly sweet or grainy spots on the baked pie.
Instructions
- Peel, core, and slice the Granny Smith and Honeycrisp apples into 1/4-inch slices. Cut those slices in half so you have smaller, bite-size pieces of apples. Place the apples into a large mixing bowl.: The first sensory cue is the crisp sound of knife against apple and the bright citrus scent when you cut into a Granny Smith. As you slice to uniform 1/4 inch thickness, notice the texture change from firm to flexible. Even slices ensure consistent cooking, which prevents some pieces from becoming mushy while others remain underdone. A common mistake is uneven thickness, which leads to an inconsistent filling texture, so take your time and rotate the apples for steady slices. If the apples start to brown, toss them quickly in the bowl with the lemon juice in the next step to preserve color.
- Add the light brown sugar, granulated sugar, apple pie spice blend, salt, and lemon juice to the apple slices. Stir to evenly coat all the apple slices in the sugar and spices. Set aside for 1 hour to allow the juices to come out of the apples.: At this stage you will feel the sugars dissolve into the fruit as the bowl begins to glisten and the aroma of warm spice rises. The lemon juice prevents oxidation and lifts the sweetness, while the salt frames the flavors. Letting the apples sit for an hour draws out juices and begins the maceration that forms the base of your filling. The main issue here is rushing the rest period, which leaves a drier filling and less integrated flavor. If you are short on time, extend gentle stirring every 15 to 20 minutes to encourage juice release, but the full rest yields the best syrupy liquid that pairs with cornstarch later.
- Preheat the oven to 400°F. Place a 9-inch pie plate on top of a parchment-lined rimmed baking tray. This will make sure that any juices that may bubble out from your pie do not spill into your oven and create a mess.: As the oven warms, you will notice a faint metallic scent from the heating elements and the comforting hum of a kitchen gearing up. Preheating to the right temperature ensures the crust begins to set immediately when the pie enters the oven, which helps create flakiness. The tray under the pie is a practical shield that catches overflow and prevents burnt drips that can smoke later. A frequent oversight is placing the pie directly on the rack without protection, which risks a messy oven and lost filling. Make sure the oven racks are positioned so the pie has room to brown evenly on top.
- While your oven is preheating, thaw and unroll both your pie crusts according to the package instructions.: The tactile feel of pliable dough is key; it should be cool but workable. Thawing as directed avoids cracking when you unroll and keeps the layers intact for flakiness. If you find the crust cold and stiff, let it rest at room temperature for a few minutes rather than forcing it, which can tear the dough. Avoid overhandling, which warms the fat and reduces flakiness. Gently unroll on a lightly floured surface if needed to keep it from sticking.
- Place one of the unrolled pie crusts into the pie plate.: You will feel the dough settle into the pan and hear a soft pat as you ease it into place. Pressing lightly against the sides ensures there are no air pockets beneath the crust, which can lead to uneven baking. Trim any excess with a sharp knife but leave a small overhang for crimping later. A common misstep is stretching the dough as you place it, which causes shrinkage while baking. To avoid this, handle the dough gently and refrigerate briefly if it becomes too warm.
- Using a slotted spoon, transfer the apples into the pie crust. Spread them out into an even layer. Do not pack them in tight.: As you lift the apples, the juices remain in the bowl, which is important to control the moisture that goes into the pie. An even, loosely arranged layer allows heat to circulate between slices so they cook through while retaining shape. Avoid tamping the apples down, which compacts the fruit and can cause a dense, gummy filling. Listen for the soft clink as slices settle; that tells you they are piled but not crushed.
- Add the cornstarch to the bowl with the remaining juices and whisk to create a slurry. You do not want any lumps of cornstarch remaining. Pour the slurry evenly over the apples in the pie pan.: The slurry should be smooth and glossy, a cue that it will thicken uniformly as it bakes. The slurry integrates with the juices and forms the thick, glossy coating that cradles the apple slices. If lumps remain, they can cook into starchy pockets that look and feel unpleasant. The trick is to whisk vigorously until smooth, then pour slowly and distribute it across the filling so you do not concentrate thickener in one area. Over thickening can yield a gummy texture, so stick to the recommended amount and adjust based on how much liquid you collected.
- Randomly place the little pieces of unsalted butter cubes over the top of the apples.: These tiny butter islands melt into the fruit, lending a buttery richness and small caramelized spots where sugars concentrate. The melting butter also helps the filling develop a deeper flavor profile. Scatter the cubes rather than clumping them so the richness is distributed evenly. A common oversight is using room temperature butter, which blends in too quickly and loses those delightful pockets of flavor. Keep the butter cold until the last moment.
- Using a sharp paring knife, cut 1 1/2-inch strips from the second unrolled pie crust. You will create a lattice topping and crimp the edges of the crust to seal.: As you cut strips and weave them into a lattice, notice the tactile rhythm and the visual satisfaction of a balanced pattern. The lattice allows steam to escape and creates a beautiful browned top. When crimping the edges, press gently but firmly to seal so the juices remain inside. A common mistake is making strips too wide or uneven, which leads to an imbalanced bake and uneven coloration. Take your time for neat, uniform strips that weave neatly over the filling.
- In a small bowl, whisk together the egg and water to create an egg wash. Using a pastry brush, brush the egg wash over the lattice-topped apple pie.: The egg wash should be uniformly blended and look a touch frothy. Brushing it on yields a glossy, golden surface that browns evenly. Apply lightly to avoid pooling in the lattice openings. If you brush too vigorously you may dislodge sanding sugar or compress the crust, so use gentle strokes for a smooth finish. The scent of baked egg and butter will begin to form in the oven as the wash browns.
- Sprinkle the coarse sanding sugar over the top of the lattice crust. The egg wash will help keep the sanding sugar adhered to the crust. This is an optional step but it does create a beautiful crust with a great little crunch to it.: The sugar adds sparkle and a pleasant crunch contrast to the flaky crust. Sprinkle evenly so you do not overload one area, which can melt and darken faster. If you skip this step the pie still tastes wonderful, but you will miss the extra texture and sheen that makes the presentation pop. Be mindful that larger sugar crystals can darken quickly, so keep an eye on the pie as it bakes.
- Bake for 30 minutes. At this point, you may want to tent your apple pie with aluminum foil to prevent your crust from over-browning. Bake for an additional 15 to 20 minutes.: The first 30 minutes allow the crust to set and begin to brown; you will see the edges deepen in color and the filling start to bubble gently. If the crust edges brown too fast, tent foil to protect them while the center finishes baking. The additional 15 to 20 minutes ensure the filling reaches the right temperature and the cornstarch activates fully, thickening the juices. A common error is baking too hot or too long, which can burn the crust while leaving the filling underdone. Keep watch and test for gentle bubbling in the center as a cue that the pie is cooked through.
- Allow your apple pie to cool completely before slicing and serving.: Cooling is when the filling truly sets, transforming from a syrup to a sliceable texture. As it cools, you will notice the bubbling slow and the filling firming into a glossy, sliceable consistency. Cutting too soon causes the slices to collapse and the juices to run, which ruins presentation. Patience at this stage rewards you with clean, attractive servings. Plan your timing so the pie has several hours to cool, or make it a day ahead for the most polished slices.
Notes
- Choose complementary apple varieties, combining tart Granny Smith with sweet Honeycrisp gives a complex flavor and prevents the filling from turning to mush, because the firmer apples hold their shape while the sweeter ones break down to make a lovely syrup.
- Measure your thickener after juices develop, add cornstarch to the collected juices and whisk into a slurry so you can adjust between the 1/4 and 1/3 cup range depending on how much liquid the apples released, avoiding an overly gummy or too loose filling.
- Keep butter cold and small, small cold cubes dotted over the filling create pockets of richness and caramelization, whereas warm butter will simply blend in and reduce textural contrast.
- Protect crust edges while baking, tent the pie with foil after the initial browning period to prevent over darkening, ensuring the edges do not burn before the center is fully baked.
- Make the pie ahead, bake a day in advance and refrigerate to let the filling firm up which makes for cleaner slices and improved flavor melding when you serve.
- Use a sharp serrated knife for slicing, a serrated blade cuts through the crust without compressing it, yielding neat slices that look as good as they taste.