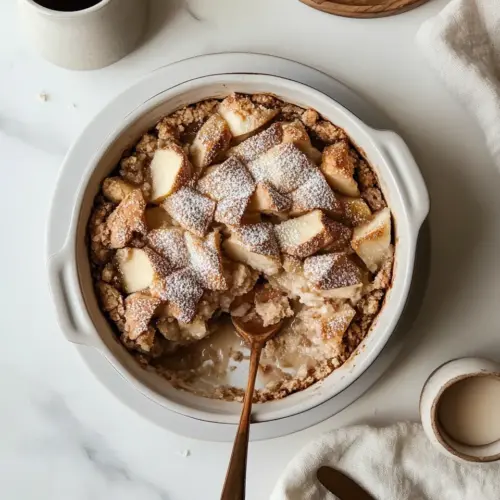
Apple Pandowdy
Apple Pandowdy is a warm, cozy dessert featuring tender apples bathed in a buttery brown sugar sauce with flaky pie crust on top. This easy, rustic treat offers crisp pastry, bubbling butterscotch notes, and comforting spices, making it an ideal easy weeknight dessert or holiday favorite that invites seconds.
Equipment
- Cast-Iron Skillet
- Baking Sheet
- Mixing Bowl
Ingredients
- 1 single pie crust, homemade or store-bought Provide a sturdy, buttery top layer that becomes flaky and golden when baked; holds the filling and soaks up juices while creating textural contrast. Can be homemade or store-bought, and should be chilled before baking to maintain flakiness.
- 2 pounds honey crisp apples, peeled and sliced Offer a mix of sweet-tart flavor and tender texture when cooked; sliced evenly to ensure uniform softening and caramelization. Peel to remove tough skin and choose ripe apples for optimal balance of sweetness and structure.
- Juice from 1/2 lemon Add bright acidity that prevents apple slices from browning and balances overall sweetness; distribute evenly over the fruit for subtle citrus notes. Freshly squeezed juice is preferred for the most vibrant flavor.
- 3 tablespoons all-purpose flour Act as a thickening agent to absorb excess juices released by the apples and create a cohesive filling; toss with the fruit to coat evenly. Helps prevent a soggy crust by binding liquid into a glossy, slightly thickened sauce.
- 2 teaspoons ground cinnamon Provide warm, aromatic spice that complements the apples and deepens the filling’s flavor; mix thoroughly with the fruit and sugar. Quantity can be adjusted slightly to taste but contributes essential autumnal character.
- 1/2 teaspoon ground all-spice Contribute a complex, slightly peppery warmth that layers with cinnamon and enhances depth; use sparingly to avoid overpowering. Ground allspice adds traditional holiday-like notes and pairs well with brown sugar and butter.
- 2/3 cup brown sugar Supply caramel-like sweetness and moist richness to the filling; sprinkle and mix with apples to sweeten and promote caramelization. Brown sugar’s molasses content deepens color and flavor in the cooked fruit.
- 2 tablespoons heavy cream Lend a touch of creaminess and help create a slightly richer topping or drizzle when combined with butter; brush or pour carefully to add sheen. Heavy cream also aids browning and adds a smooth mouthfeel to finished crust pieces.
- 2 tablespoons unsalted butter Introduce richness and encourage a silky, buttery glaze on the baked fruit and crust; dot the filling or brush on top to melt into tender pockets. Unsalted butter lets you control overall saltiness when combined with flaky sea salt.
- 1 teaspoon turbinado sugar Provide crunchy, crystalized sweetness and attractive finishing texture when sprinkled on crust before baking; enhances visual appeal and gives a satisfying contrast. Turbinado sugar resists melting fully, leaving little bursts of texture on the surface.
- 1 teaspoon flaky sea salt Add a bright, savory accent that balances sweetness and enhances overall flavor perception; sprinkle cautiously to avoid oversalting. Flaky sea salt also offers pleasant bursts of saltiness and a subtle crunch in bites.
Instructions
- Using homemade or store-bought, cut out the crust however you like. I used a rectangular cookie cutter, creating a shingle-like topping. Feel free to use any cookie cutter you like. You can also roll out the dough and using a knife make shapes, triangles, etc. Get creative! Place the pieces of pie crust on a baking sheet and stick them in the freezer to chill while you make the remaining pandowdy.: When the room fills with the faint, cold scent of pastry straight out of the freezer, you know the crust is set to hold shape during baking. The tactile feedback of pressing a cookie cutter into dough gives you control over the thickness and edge definition. You want the pieces chilled so they brown rather than slump, so keep them on a baking sheet in the freezer until needed. A common mistake is working the dough until it gets warm, which makes the crust lose flakiness, so if it softens take a short chill break before proceeding. Trust the slight firmness under your fingers as the cue to move on.
- In a bowl, add the apples, lemon juice, flour, cinnamon and all-spice. Toss together until evenly coated.: The first fresh scent of citrus and spice will hit as you toss these together, and that immediate brightness signals balance. Coating the slices ensures each piece picks up the thickening and seasoning needed to become saucy and deeply flavored. Look for an even dusting on the apple slices rather than clumps of flour, and if you notice uneven coating, use your hands to separate and toss gently. Avoid over mixing here because bruised or mashed apple edges will produce excess liquid during cooking.
- In a 9-inch or 10-inch (I used a 10-inch) cast iron skillet, set over medium-low heat, add the brown sugar, heavy cream and butter. Stir it until the butter melts and allow it to come to a boil; cooking at a gentle boil for 3 minutes. Turn off the heat, add the apples and gently mix together until the apples are coated in the butterscotch.: As the butter melts and the sugar dissolves you will hear a soft bubble and smell a toffee like perfume building in the pan. This mix will transition from grainy to glossy, which is the visual clue that it is ready for the apples . Allow it to reach a gentle boil for about three minutes so the flavors meld and bitterness cooks away; you want a light caramel aroma, not a burnt note. A common error is turning the heat too high, which can scorch the sugars, so keep the flame moderated and stir frequently for even melting.
- Preheat oven to 375 degrees F.: The moment the fruit hits the hot butterscotch, steam and the scent of warmed apple rise immediately. Gently folding the mixture ensures each slice is lacquered with the sauce without breaking apart. Work carefully so the slices stay intact and present well in the skillet; excessive stirring or pushing can create mushy pieces. If you find the sauce too thin at this point, let the skillet sit off heat for a minute so it thickens slightly before arranging the top crust.
- Flatten the apples into one even layer and add the pie crust pieces on top, overlapping them slightly (the crust will shrink so the overlapping is important). Brush the tops of the pie crust pieces with egg wash and sprinkle with turbinado sugar. Transfer to the oven to bake for 35 to 45 minutes, until the crust is golden brown and the butterscotch is bubbling.: The dry heat of the oven is what transforms the top pieces into crisp, golden shards and causes the sauce to bubble and concentrate. You will feel a slight warmth radiating from the oven as it reaches temperature, and that readiness is essential before baking. Do not rush by placing the dish into an underheated oven, because the crust will take longer to brown and the filling may over reduce. Wait until a stable temperature is reached, using the oven light to monitor if needed.
- Remove from the oven and allow to cool for about 10 minutes. Sprinkle with the sea salt. The butterscotch is going to be too hot to eat right away. Scoop out mounds into bowls or on plates and serve warm with vanilla ice cream.: The visual of a tidy, overlapped crust is satisfying, and overlapping prevents gaps once the dough naturally shrinks while baking. Brush the tops with egg wash to promote deep browning and sprinkle with turbinado sugar for crunch. You will hear tiny crackles as the crust starts to bake, and the color change to golden is the main visual cue. A frequent misstep is arranging pieces too sparsely which leads to large exposed filling patches, so plan for overlap to keep everything cohesive.
- Transfer to the oven to bake for 35 to 45 minutes, until the crust is golden brown and the butterscotch is bubbling: In the oven you will notice the aroma intensify, the top darkening, and the syrup starting to bubble at the edges, which means the filling is thick and the sugars have concentrated. Use a gentle tap on the skillet to hear the faint bubbling, but avoid opening the door too often because that cools the oven and extends bake time. A common trouble is overbaking which can dry the fruit, so start checking near the lower end of the time range and rely on the visual cues of bubbling syrup and golden crust.
- Remove from the oven and allow to cool for about 10 minutes: As the skillet cools slightly the syrup will thicken and become spoonable, and the aroma settles into a deep, warm note. Ten minutes gives you safer handling and a better texture for serving, because the filling will hold shape rather than run. Be careful not to skip this rest, as scooping too hot will lead to burns and an overly loose presentation. If the filling still seems excessively runny after resting, give it another five minutes; residual heat will continue to set the sauce.
- Sprinkle with the sea salt: That bright, crystalline pop of flaky sea salt across the surface sharpens the sweetness and rounds out flavors, creating tiny bursts of contrast in each bite. The visual of white flakes on glossy caramel is appealing, and the salt enhances the depth of the overall profile. Avoid using too much, because a heavy hand can overshadow the delicate apple notes; a light scatter is all you need to lift the dish.
- Scoop out mounds into bowls or on plates and serve warm with vanilla ice cream: Serving warm preserves the contrast between hot filling and cool ice cream, and the first spoonful mixing hot and cold is a highlight of the experience. Listen for the soft sigh as the ice cream meets the hot syrup, and enjoy the meld of textures from soft fruit, crisp pastry, and creamy ice cream. Be mindful that the caramel will remain hot, so allow a brief cool down and warn guests accordingly to avoid burns.
Notes
- Chill the crust pieces: Cold pastry bakes up flakier and keeps its shape, so freeze or chill cut pieces until you are ready to assemble.
- Choose sturdy apples: Use varieties like Honey Crisp or other baking friendly apples that hold texture rather than turning to mush.
- Moderate the heat for caramel: Cook the sugar and butter mixture at medium low so it transforms into a glossy syrup rather than scorching.
- Even apple slices: Slice the apples uniformly so they cook at the same rate, ensuring no pieces are undercooked or over softened.
- Finish with flaky salt: A light scatter of sea salt at the end lifts the sweetness and adds a professional touch.
- Let rest before serving: Allow about ten minutes for the filling to set slightly so it is easier to spoon without running.