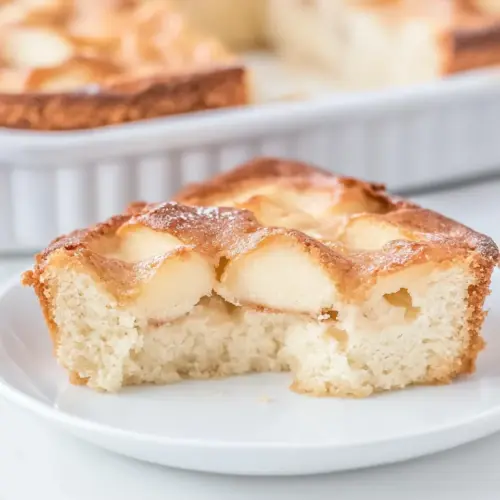
Apple Cream Cheese Coffee Cake
Apple Cream Cheese Coffee Cake is a creamy, comforting treat that blends tender apples with a velvety cream cheese layer and a cinnamon kissed topping. This easy to make crowd pleaser has a moist crumb and cozy spice notes, perfect for brunch or a weekend bake. Make it to bring warmth to your table and a moment of uncomplicated indulgence.
Equipment
- Hand Mixer
- 13 x 9-inch baking pan
- Mixing Bowls
- Sifter or fine mesh strainer
Ingredients
- 4 cups peeled and sliced apples Provide tartness and texture; peeled and sliced apples add moisture, natural sweetness, and a fruity layer to the cake. Use firm varieties to maintain shape during baking and distribute slices evenly for consistent fruit pockets.
- 2 tablespoons freshly squeezed lemon juice Offer acidity to prevent browning and brighten flavor; freshly squeezed lemon juice preserves apple color and adds a subtle citrus note. Juice shortly before use for maximum freshness and mix gently with apple slices to coat evenly.
- 8 ounces cream cheese, at room temperature Bring richness and creamy tang; cream cheese adds a smooth, velvety layer that balances sweet cake batter and contributes to tender crumb. Soften to room temperature for easy blending and avoid overmixing to maintain a light texture.
- 1/2 cup (1 stick) butter, at room temperature Contribute fat and structure; butter adds richness, enhances flavor, and helps create a tender, moist crumb when creamed with sugar. Use at room temperature to ensure proper aeration and incorporate evenly into the batter.
- 1 cup granulated white sugar Sweeten and aerate; granulated white sugar dissolves into the batter to provide sweetness and aids creaming with butter for lighter texture. Measure accurately and cream thoroughly to incorporate air for leavening support.
- 2 large eggs Provide structure and leavening; large eggs bind ingredients, add moisture, and help trap air for a stable rise. Bring to room temperature for better emulsification and add one at a time while mixing to ensure even distribution.
- 1 teaspoon almond or vanilla extract Add aromatic flavor; almond or vanilla extract imparts a warm, fragrant note that complements apples and cream cheese. Use sparingly for concentrated flavor and add during the mixing stage for uniform aroma throughout the cake.
- 1 3/4 cups all purpose flour Form the cake's base; all purpose flour supplies gluten and bulk, creating the structure that holds the cake together. Sift or whisk to remove lumps and combine with leavening agents for even texture and rise.
- 1 teaspoon baking powder Provide chemical leavening; baking powder helps the cake rise by releasing gases when heated, contributing to a light, airy crumb. Ensure it is fresh for reliable lift and mix with dry ingredients before combining with wet components.
- 1/2 teaspoon baking soda React with acids to produce lift; baking soda neutralizes acidity and aids browning while giving additional rise when paired with acidic ingredients like lemon juice or cream cheese. Measure carefully since excess can cause metallic taste or over-browning.
- 1/4 teaspoon salt Enhance overall flavor balance; salt brightens sweetness and deepens other flavors while strengthening gluten structure slightly. Dissolve with dry ingredients to distribute evenly and avoid noticeable salty spots.
- 1/4 cup milk Adjust batter consistency and moisture; milk adds liquid for proper batter viscosity and contributes to tenderness and browning. Use at room temperature to help with emulsification and combine with eggs and extracts for smooth incorporation.
- 1/2 cup granulated white sugar Provide additional sweetness and texture; granulated white sugar in the topping or swirl adds caramelization and balances tart apples. Sprinkle or layer as directed to create a sweet crust or streusel element.
- 1 teaspoon ground cinnamon Add warm spice; ground cinnamon introduces aromatic warmth that complements apple and cream cheese flavors, enhancing overall complexity. Mix into sugar or batter for even distribution and avoid overpowering delicate flavors.
- 2 tablespoons all purpose flour Offer thickening and texture for topping; all purpose flour binds with sugar and spices to create a crumbly streusel or coating for the apples. Combine with cold butter if making streusel to achieve a sandy, crumbly texture.
Instructions
- Preheat the oven to 350 degrees F. Spray a 13 x 9-inch pan with nonstick spray.: When you first step into the kitchen and set the oven to 350 degrees F , you should notice the ambient sounds of a home waking up, a quiet hum that promises warmth. I always preheat first so the oven is reliably at temperature when the batter goes in, which helps the cake rise evenly and form a proper crust. A properly preheated oven yields a golden exterior and a tender interior. Common mistake to avoid is rushing this step; an underheated oven can lead to a dense center. You should also prepare the pan thoroughly with nonstick spray so the cake releases cleanly, preventing tearing and preserving presentation.
- Place the apple slices in a bowl and drizzle the lemon juice on top. Toss to coat. Set aside.: After tossing the apple slices with lemon juice , you will smell a bright citrus lift that cuts through the fruit sweetness, and the apples will glisten slightly. This acid prevents browning and enhances the fruit's natural tang, which balances the rich cream cheese layer later. Set them aside to macerate briefly so some juices release, but do not let them sit so long that they become soggy. A frequent slip is overmixing or letting them sit too long, which can make the cake watery; toss just enough to coat and preserve texture.
- In a medium bowl, combine the cream cheese and butter; add in the sugar, and use a hand mixer to beat on medium speed until light and fluffy. Add in the eggs, one at a time, beating well after each addition. Beat in the extract.: The moment you cream cream cheese and butter with sugar , you should aim for a pale, airy mixture that looks slightly ribbon like when the beaters lift. This aeration contributes to a tender crumb and light mouthfeel. Adding eggs one at a time ensures a smooth emulsion, preventing curdling which can cause lumps. You will notice a change in texture as each egg blends in, creating silkier batter and a glossy sheen. If the mixture feels grainy, it often means the fats were too cold; letting them come fully to room temperature prevents that issue. Overbeating after the eggs are added can incorporate too much air leading to cracking or collapse, so mix until combined and smooth.
- Sift the dry ingredients into a separate bowl (flour, baking powder, soda & salt): Sifting the flour , baking powder , baking soda , and salt creates a light, lump free blend that distributes leavening evenly. As you sift, you will see the texture lighten and the mixture become airy, which helps the batter combine without overmixing. This step keeps pockets of leavening from forming and ensures a uniform rise. A common error is skipping sifting and then encountering dense spots or uneven crumb. If you do not have a sifter, whisk vigorously to aerate and combine.
- Add the flour mixture to the creamed mixture a little at a time, alternately with the milk, beginning and ending with the flour mixture; mix well after each addition.: As you fold the dry ingredients and milk into the creamed base, focus on gentle, even folding so the batter remains tender. The alternation prevents the batter from splitting and keeps it smooth. Visually, aim for a homogeneous batter that falls off the spatula in a thick ribbon, with no streaks of dry flour. The batter should feel slightly thick but pourable. Overmixing at this stage will develop gluten and produce a tougher cake, so stop as soon as ingredients are incorporated. A typical pitfall is dumping everything in at once and then overworking the mixture, which I advise against.
- Pour the batter into prepared baking pan.: When you pour the batter into the prepared 13 x 9 pan, notice how it settles and levels with a few gentle taps on the counter. The surface should look smooth with a bit of elasticity. Getting the batter evenly distributed ensures the cake bakes uniformly. If there are high spots, use a spatula to gently even them out, but avoid pressing too hard which can compress the air pockets you just created. A mistake to sidestep is leaving the batter lopsided which can cause uneven baking rates and odd shaping.
- Combine the topping ingredients in a small bowl. Sprinkle the topping over the apple slices and toss lightly to coat well. Arrange the apple slices evenly on top of the batter in the pan.: The topping, when mixed, should crumble slightly and carry the warm scent of cinnamon . Tossing it with the apple slices helps each piece pick up a light coat that will crisp and caramelize at the edges while the cake bakes. As you arrange the slices atop the batter, create a pleasing even layer for consistent texture in each slice. You will hear small shifts and see the apples settle into the batter, creating pockets of fruit that steam and perfume the oven. Avoid overloading one spot with too many slices, which can cause soggy areas; distribute them evenly for the best result.
- Bake 50 to 60 minutes, or until the cake tested done when a toothpick inserted into the middle comes out clean.: As the cake bakes, the kitchen will fill with warm notes of cinnamon , butter, and baked apple . You will see the top turn a golden shade and the edges pull slightly from the pan. A toothpick test is the most reliable check; when it comes out clean, the center is set. Relying on time alone can be misleading because oven temperatures vary, so watch for these visual cues. A common mistake is removing the cake too soon which yields a gooey center, or leaving it too long which dries it out. Let it rest briefly in the pan before slicing so juices redistribute and slices hold their shape.
Notes
- Swap extracts: Choose almond or vanilla based on preference, each will alter the aroma subtly and complement the apples differently.
- Apple variety: Use firmer apples for better texture retention during baking, which keeps slices distinct and pleasantly chewy.
- Topping texture: Adjust the sugar to flour ratio for the topping to create a softer or crisper finish, depending on whether you prefer a tender top or a bit of crunch.
- Milk options: Full fat milk gives a richer crumb, while lower fat will yield a slightly lighter texture.
- Make ahead: You can assemble the night before and refrigerate, bringing to room temperature before baking for convenience.