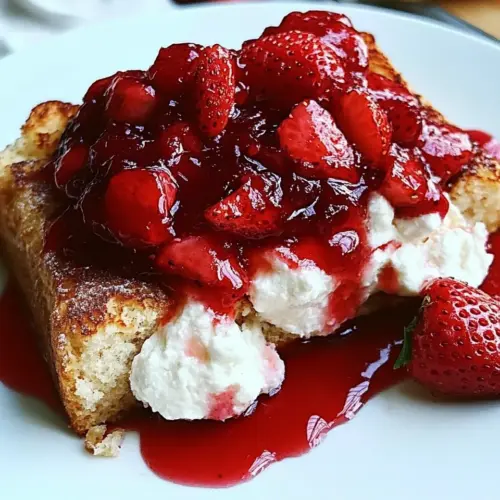
Angel Food Cake French Toast
Angel Food Cake French Toast delivers a creamy custardy center with a crisp golden exterior, brightened by a fresh strawberry syrup and a tangy cream cheese spread. This easy spring brunch favorite feels indulgent yet airy, perfect for a weekend with friends or a celebratory morning. Make it for an impressive, quick treat that turns simple ingredients into something memorable.
Equipment
- Large Nonstick Skillet
- Shallow Dish
- Serrated Knife
- Spatula
Ingredients
- 17 ″ store bought angel food cake Shop for a pre-baked angel food cake to provide a light, airy base that soaks up custard without collapsing; slice into thick pieces for even custard absorption and easy pan-frying. Maintain the cake’s structure by handling gently so it retains its spongy texture during soaking and cooking.
- 4 eggs, whisked Whisk eggs thoroughly to create a rich custard that binds to the cake and provides structure when cooked; eggs contribute protein and help set the outer crust for a golden finish. Beat until uniform to ensure even flavor and consistent soaking throughout the cake slices.
- 3/4 cups milk Measure milk to add moisture and thin the egg custard so it penetrates the cake evenly; milk balances richness and helps produce a tender interior. Choose milk fat level based on desired creaminess, with whole milk yielding a richer custard.
- 2 teaspoons vanilla extract Add vanilla extract to impart warm aromatic sweetness that enhances the overall flavor profile and complements the cake and strawberries; incorporate it into the custard for uniform distribution. Use pure vanilla for the most natural, nuanced taste.
- 1/2 teaspoon cinnamon Sprinkle cinnamon to introduce warm, slightly sweet spice that deepens the custard’s flavor and pairs well with strawberries and cream cheese. Mix into the custard to ensure the spice is evenly dispersed and avoid clumping.
- Pinch of nutmeg Include a pinch of nutmeg to contribute subtle earthy and nutty undertones that elevate the custard’s complexity without overpowering other flavors. Grate fresh nutmeg if possible for brighter, more aromatic notes.
- 2 tablespoons butter, divided Melt and divide butter to brown the cake slices and enrich the cooking surface; use part to grease the pan and part to finish the slices for added flavor and crispness. Control heat to prevent burning and achieve an even golden crust.
- 1 Recipe Fresh Strawberry Syrup Prepare and use Fresh Strawberry Syrup recipe to top the finished French toast with vibrant sweetness and fruity acidity that cuts through the richness. Warm slightly before serving to saturate the syrup’s flavors and create an appealing glaze.
- cream cheese, softened Soften cream cheese to a spreadable consistency to add tangy creaminess as a layer or dollop on the finished toast; it balances sweetness and contributes a silky mouthfeel. Whip briefly to remove lumps and ensure smooth incorporation with powdered sugar if desired.
- Powdered sugar Sift powdered sugar to dust over the plated French toast, adding delicate sweetness and an attractive finish that complements the strawberry syrup and cream cheese. Use sparingly for visual appeal and controlled sweetness.
Instructions
- Begin simmering Strawberry Syrup.: A gentle simmer for the strawberry syrup will concentrate the fruit flavor and thicken the liquid into a glossy sauce, filling your kitchen with a bright, jam like aroma. As it reduces, small bubbles will gather around the edges and the color will deepen to a vibrant red, signaling it is ready. Stir occasionally to prevent sticking, and avoid a vigorous boil which can break down fresh berries and lead to a grainy texture. If the syrup is too thin, simmer a bit longer, but watch carefully because it can go from perfect to over reduced quickly. A common mistake is leaving it unattended, causing scorching, so stay close and lower the heat if the bubbling looks aggressive.
- Meanwhile, slice angel food cake into 12-14 pieces, or to desired thickness. In a shallow dish, combine eggs, milk, vanilla, cinnamon and nutmeg. Melt 1 tablespoon butter in a large nonstick skillet over medium heat. Dip half of the slices (or as many that will fit in your skillet) into the egg mixture, resting for a few seconds on each side. Add the coated slices to the heated skillet and cook until golden brown, about 2-3 minutes. Melt 1 more tablespoon butter in skillet and repeat with remaining slices.: Slicing the angel food cake into even pieces ensures uniform soaking and cooking; aim for thickness that can handle a quick dip without falling apart. Use a serrated knife and a gentle sawing motion to preserve the airy crumb, which will otherwise compress and become dense. You should feel a soft resistance as the knife moves through, and the exposed crumb will look slightly glossy if cut cleanly. Avoid slicing too thin, as over soaking may cause the cake to disintegrate during cooking. If your slices compress while cutting, chill the cake briefly to firm it up for cleaner slices.
- Spread the cream cheese on the slices, and top with strawberry syrup and powdered sugar.: Whisking the custard creates the bath that will become the interior of the French toast, and you want it silky and homogenous so the cake soaks evenly. The aroma of the vanilla will be noticeable as soon as you whisk, and the spices will float as tiny specks distributing warmth. Let the mixture rest a minute so tiny air bubbles dissipate, which improves soaking uniformity. A typical error is under whisking, leaving uneven pockets of egg, so whisk until smooth. If the custard seems too concentrated, add a splash more milk to prevent a rubbery texture when cooked.
- Melt 1 tablespoon butter in a large nonstick skillet over medium heat: Melting the first portion of butter prepares the cooking surface and imparts a nutty, toasted aroma when it begins to foam and clarify slightly. The skillet should be evenly heated so the first batch browns without burning; you will see the butter foam subside and the surface shimmer when it is ready. If the pan smokes, lower the heat to avoid a bitter flavor. A frequent mistake is overheating the pan, which leads to rapid burning, so keep the heat at medium to form a golden crust slowly.
- Dip half of the slices into the egg mixture resting for a few seconds on each side: When you dip the angel food cake , the interior should feel slightly heavy as it absorbs the custard, and you will see the surface glisten. Resting for a few seconds allows the custard to penetrate without saturating the exterior so it still holds together. Remove any excess drip before placing the slice in the pan to avoid excess pooling of custard. Over soaking can turn the cake to mush when cooked, so one common pitfall is leaving the slices in the custard too long; aim for a gentle, quick soak, especially with such an airy cake.
- Add the coated slices to the heated skillet and cook until golden brown about 2 to 3 minutes: In the skillet the coated slices will sizzle softly and release a buttery, toasty scent as proteins and sugars caramelize, forming that classic golden crust. Watch for even browning along the edges and lift a corner to check the color before flipping. The surface should feel slightly firm to the touch and present a deep blond to golden hue. Avoid flipping too early, which can tear the tender crumb; patience ensures a clean flip. If the exterior is browning too quickly while the interior feels unset, lower the heat and cook a little longer to allow the center to cook through.
- Melt 1 more tablespoon butter in skillet and repeat with remaining slices: Adding the second portion of butter refreshes the pan and helps subsequent slices develop consistent browning, emitting the same rich aroma as the first batch. The skillet should still be warm, and you will notice the butter foaming more quickly on the second round. Keep the heat steady to maintain the golden sear and avoid crowding the pan which lowers surface temperature and prevents a crisp exterior. A common misstep is stacking too many slices at once, which leads to steaming rather than searing, so cook in batches as instructed.
- Spread the cream cheese on the slices and top with strawberry syrup and powdered sugar: Once warm, spreading softened cream cheese creates a creamy, tangy layer that melts slightly into the hot cake, releasing a rich dairy scent. The glossy strawberry syrup adds bright acidity and jewel like color, and a dusting of powdered sugar brings a final visual flourish and gentle sweetness. Assemble while the slices are still warm so the cream cheese softens and melds into the cake, creating a smooth mouthfeel. Avoid using cold cream cheese, which can clump and tear the cake; it should be pliable. If the syrup is too runny, spoon a little and let it settle so it does not make the bottom soggy.
Notes
- Choose a fresh cake for optimal structure: Fresh store bought angel food cake will hold together during dipping and cooking, while one that is too stale will absorb excess custard and collapse. If your cake is a touch old, slice it and let it dry for a few minutes to firm up slightly before soaking.
- Soak briefly to avoid sogginess: Because angel food cake is so airy, it soaks quickly. A few seconds per side is usually enough to achieve a custardy center without falling apart. Practice with one slice to dial in the timing for your cake and pan heat.
- Temperature control matters to develop color and texture: Cook over medium heat so the crust becomes golden while the interior cooks gently. If the pan is too hot, you risk burning the outside while the center remains underdone.
- Keep finished slices warm in a low oven: Set your oven to 200 degrees F to hold cooked slices as you finish batches, which helps retain crisp edges and warm centers for serving all at once. Use a rimmed baking sheet to keep them separated so they do not steam.
- Prepare the syrup ahead to streamline service: Having the strawberry syrup simmered and cooled slightly means you can assemble quickly when guests arrive. Rewarm gently if it cools and thickens too much.