Anadama Bread
Anadama Bread is a rustic, slightly sweet loaf with a cornmeal kissed crumb and rich molasses depth. This Anadama Bread yields a tender interior and golden crust, perfect for easy weeknight breakfasts or cozy sandwiches. The overnight soaker and gentle fermentation create a textured, flavorful loaf worth the pause, making it a rewarding recipe to bake and share.
Equipment
- Mixing Bowl
- Electric Mixer
- Dough Hook
- Bread pans
- Sheet Pan
- Instant read thermometer
- Cooling rack
Ingredients
- 1 cup (159 g) cornmeal, (6 ounces) Provide a gritty, toasty base that absorbs liquid and contributes a classic corn flavor; hydrates with warm water to form the initial porridge-like mixture and adds rustic texture to the loaf.
- 1 cup (250 ml) water, at room temperature, (8 ounces) Add moisture and help dissolve the cornmeal base while controlling dough temperature; used at room temperature to balance hydration without shocking yeast later in the process.
- 4 1/2 cups (562.5 g) unbleached bread flour, (20.25 ounces) Supply the dough’s primary structure and high gluten content for chew and rise; measured precisely to ensure proper gluten development and balanced crumb.
- 2 teaspoons instant yeast Leaven the dough rapidly and reliably by producing carbon dioxide; instant yeast mixes directly into dry ingredients for predictable fermentation and rise times.
- 1 cup water, lukewarm (90° to 100° F), (8 ounces) Activate and hydrate the yeast while warming the dough slightly to encourage fermentation; lukewarm water temperature ensures yeast becomes active without being damaged.
- 1 1/2 teaspoons (1.5 teaspoons) salt Enhance flavor and strengthen dough structure while regulating yeast activity; salt also controls fermentation speed and improves overall taste and crust color.
- 6 tablespoons molasses, (4 ounces) Sweeten and deepen the bread’s flavor while contributing color and a subtle chew; molasses also reacts with yeast and Maillard browning to enrich crust and crumb.
- 2 tablespoons unsalted butter, at room temperature Soften the crumb and add richness while improving shelf life and mouthfeel; room-temperature butter incorporates smoothly to create a tender, flavorful loaf.
- Cornmeal for dusting, optional Provide a nonstick surface and add rustic texture to the crust; optional dusting of cornmeal prevents sticking and reinforces the bread’s traditional appearance.
Instructions
- The day before making the bread, make the soaker by mixing the cornmeal and water in a small bowl. Cover with plastic wrap and let sit overnight at room temperature.: The first sensory cue you want is a thick, porridge like texture where the cornmeal has absorbed the room temperature water and smells faintly sweet and grainy. Overnight resting allows the meal to hydrate fully, which softens the final crumb and deepens flavor through mild enzymatic activity. If the mixture separates slightly by morning, give it a gentle stir; that separation is normal. A common mistake is using hot water which cooks the cornmeal and prevents the gentle fermentation and flavor development you need.
- The next day, to make the dough, stir together 2 cups of the flour, the yeast, soaker, and water in a mixing bowl (or in the bowl of an electric mixer). Cover the bowl with a towel or plastic wrap and ferment for 1 hour, or until the sponge begins to bubble.: By morning the soaker should look plump and slightly glossy, with a tiny fermented aroma that is pleasantly wheaty and tang free. This gentle sit is what transforms coarse meal into a flavorful component of the dough. Keep it covered to avoid skinning over, which can dry the surface and create a crust. If your kitchen is very warm the soaker can over ferment, so find a cooler corner to rest it.
- Add the remaining 2 1/2 cups of flour, the salt, molasses, and butter and stir (or mix on low speed with the paddle attachment) until the ingredients form a ball. Add water if necessary to make a soft, slightly sticky mass.: When combined the mixture should look shaggy and slightly wet, with the yeast dispersed into the flour. This early sponge stage starts building gluten frameworks and gives an early rise. The aroma will shift toward a faintly yeasty bread smell, which tells you fermentation is active. If the sponge seems overly soupy, add a small sprinkle of flour; too dry a sponge will slow fermentation greatly.
- Sprinkle flour on the counter, transfer the dough to the counter, and begin kneading (or mix on medium speed with the dough hook), sprinkling in more flour as needed to make a tacky, but not sticky, dough. The dough should be firm but supple and pliable and definitely not sticky. It will take about 10 minutes of kneading to accomplish this (or 6 to 8 minutes in the electric mixer). The dough should pass the windowpane test and register 77° to 81° F.: After an hour you should see small bubbles and a slight increase in volume, signaling the yeast is working. The surface may be dimpled and fragrant in a clean, yeasty way. This fermentation stage develops both flavor and structure, giving the final dough lift. Avoid skipping this rest, as it is crucial for a light crumb. If nothing bubbles, your yeast may be old, and you should test it separately before retrying.
- Lightly oil a bowl and transfer the dough to the bowl, rolling it around to coat it with the oil. Cover the bowl with plastic wrap and ferment the dough at room temperature for about 90 minutes, or until it doubles in size.: At this point the dough will begin to come together into a rough ball with pockets of sticky dough where the molasses and butter have incorporated. The aroma turns richer and slightly sweet as the molasses integrates. The mixture should be cohesive but still slightly tacky. If it feels dry and crumbly add a splash of water, if too wet add a bit more flour. Overmixing here with the paddle can lead to uneven gluten formation, so switch to a dough hook once it starts to pull away from the bowl.
- Remove the dough from the bowl and divide it into 2 equal pieces of 24 ounces, or 3 pieces of about 16 ounces. Shape the dough into loaves, and place them into bread pans that have been lightly oiled or misted with spray oil. Mist the tops of the loaves with spray oil and loosely cover the tops with plastic wrap.: The correct hydration results in a dough that yields slightly when pressed and clings gently to your fingers without leaving a heavy residue. This balance produces a tender crumb while allowing the loaf to hold shape. If the dough remains excessively sticky after resting for a few minutes, dust the counter sparingly with flour during kneading rather than adding large amounts at once. A typical error is adding too much flour early which creates an overly tight loaf.
- Proof at room temperature for 60 to 90 minutes, or until the loaves crest fully above the tops of the pans.: As you knead, listen for a soft, stretching sound and feel the dough become smoother and more elastic. With each fold the surface tightens and the dough develops a satiny sheen. This tactile feedback tells you the gluten is aligning and strengthening. Knead until the dough is supple and resilient, resisting gentle pokes rather than collapsing. A common mistake is kneading with too much force, which can tear the gluten rather than build it.
- Preheat the oven to 350°F with the oven rack on the middle shelf. Place the pans on a sheet pan and remove the plastic wrap. Mist the tops with a spray of water and dust with cornmeal.: When the dough reaches this stage it will hold shape and feel springy when pressed. This is the moment your dough is ready for the windowpane test. If it still tears easily when stretched, continue kneading briefly. Under kneading leaves dense crumb, while over kneading can create a tough texture, so aim for that middle ground.
- Place the sheet pan in the oven and bake for 20 minutes. Rotate the sheet pan for even baking and continue to bake for 20 to 30 minutes, or until the loaves are golden brown, including along the sides and bottom, and register at least 185° to 190°F in the center. They should make a hollow sound when thumped on the bottom.: Time is a guideline, not a rule; watch the dough rather than the clock. Around this point your hands will notice the resistance ease and the dough will begin to form smooth loops when folded. The work of developing gluten is both mechanical and sensory, so stay attentive to how the dough responds. A typical error is stopping too early because the dough looks nearly done; give it a little more time for full structure.
- When the loaves are done, remove them immediately from the pans and cool on a rack for at least 1 hour before slicing or serving.: To check, stretch a small piece into a translucent membrane without tearing, which indicates adequate gluten development. The dough temperature gives a clue about fermentation pace and final crumb; aim for the mid seventies to low eighties for steady yeast activity. If it s too cool, proofing will take longer, too warm and fermentation may run away. If the windowpane fails, continue gentle kneading and reassess.
- Lightly oil a bowl and transfer the dough to the bowl, rolling it around to coat it with the oil: Oiling prevents the dough from sticking as it proofs and allows for easy handling when it doubles. The dough should glisten slightly where it meets the oil, a subtle sign of readiness for bulk fermentation. Cover it to trap moisture and warmth. Overly tight covering can cause condensation to drip back onto the dough, so leave a little venting space.
- Cover the bowl with plastic wrap and ferment the dough at room temperature for about 90 minutes, or until it doubles in size: During this bulk rise you will notice the dough expand and become pillowy, with a domed surface and gentle air pockets. This is when flavors develop and the structure relaxes for shaping. If your room is cool, allow extra time; if warm, check earlier to avoid over proofing. Over proofed dough will collapse and lose oven spring, so monitor carefully.
- Remove the dough from the bowl and divide it into 2 equal pieces of 24 ounces, or 3 pieces of about 16 ounces: Weighing ensures even loaves and consistent baking times. The dough should feel airy and slightly cool to the touch, with a springy response. Divide on a lightly floured surface to prevent sticking. A common slip is making uneven loaves, which leads to mismatched bake and texture.
- Shape the dough into loaves, and place them into bread pans that have been lightly oiled or misted with spray oil: Shaping creates surface tension, which promotes oven spring and a uniform crumb. The shaped loaves should sit snugly in the pans, slightly tapered at the ends, and feel taut on top. Oiling the pans helps the loaves release cleanly after baking. If shaping is sloppy, your loaves may spread rather than rise upward during baking.
- Mist the tops of the loaves with spray oil and loosely cover the tops with plastic wrap: This light mist keeps the surface from drying out during proof and helps achieve an even crust. The plastic wrap should not press down onto the dough; it just keeps humidity in. If the surface becomes sticky or tacky, uncover briefly to let it firm slightly before baking. Pressing wrap onto the loaf can deflate the rise you worked for.
- Proof at room temperature for 60 to 90 minutes, or until the loaves crest fully above the tops of the pans: The final proof is visually evident when the dough rises to sit proudly above the pan rim and when a gentle poke springs back slowly. This is the stage that defines oven spring, so don t rush it. Under proofed loaves will remain dense, while over proofed loaves will collapse. If unsure, test by the poke method rather than time alone.
- Preheat the oven to 350°F with the oven rack on the middle shelf: An even, moderate heat encourages steady browning and full crumb set. Preheating thoroughly ensures the loaves begin to bake immediately and develop good crust. Positioning on the middle rack gives balanced top and bottom heat. Avoid opening the oven frequently during the initial bake, which can drop temperature and reduce oven spring.
- Place the pans on a sheet pan and remove the plastic wrap: Using a sheet pan makes it easier to rotate the loaves for even baking and protects the oven floor from drips. Removing the wrap lets the surface dry slightly and allows the crust to form. If you see condensation on the wrap s underside, blot gently before removing to prevent soggy tops. Leaving wrap on will prevent proper browning.
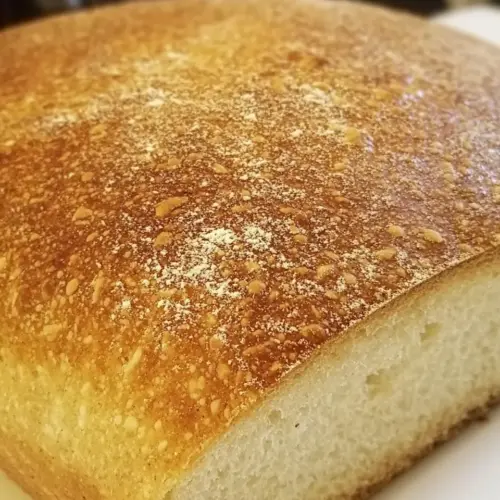
- Mist the tops with a spray of water and dust with cornmeal: The light mist adds steam which encourages a thin crisp crust, and the dusting of cornmeal gives the traditional rustic appearance and a slight toasted bite. The visual contrast of golden loaf and speckled cornmeal is part of the charm. Don t overdo the water or the cornmeal will clump and interfere with even browning.
- Place the sheet pan in the oven and bake for 20 minutes: During these first 20 minutes you will notice the loaves begin to rise further and the top takes on a pale golden tone. The oven s heat sets the crumb structure, and that initial period is when most oven spring occurs. Avoid opening the oven door in this crucial phase, which can cool the oven and stunt the rise. Opening the door too often also risks uneven browning.
- Rotate the sheet pan for even baking and continue to bake for 20 to 30 minutes, or until the loaves are golden brown, including along the sides and bottom, and register at least 185° to 190°F in the center: Rotation ensures all loaves receive equal heat, especially if your oven has hot spots. You want a deep golden brown all over and a hollow sound when tapped on the bottom, both indicators of doneness. Use an instant read thermometer to confirm the internal temperature reaches the stated range. Underbaked loaves will be doughy and dense; overbaked ones will be dry.
- They should make a hollow sound when thumped on the bottom: That hollow tone is a classic baker s test and signals the interior is fully set and not doughy. If the sound is dull, return the loaves to the oven for a few more minutes. Be careful not to overbake, as that will dry the crumb. Always cool briefly before retesting to avoid burning yourself.
- When the loaves are done, remove them immediately from the pans and cool on a rack for at least 1 hour before slicing or serving: Cooling lets steam escape and the crumb finish setting, producing a cleaner slice and better texture. The crust will firm and the interior will develop final flavor balance. Resist slicing too soon, which compresses the crumb and yields gummy slices. Patience here results in a dramatically better eating experience.
Notes
- Molasses note Use a robust unsulfured molasses for the cleanest flavor, and measure carefully so the dough remains balanced and not overly sticky.
- Flour choices Stick with unbleached bread flour to achieve the desired gluten strength and chew, avoiding all purpose if you want a more open crumb.
- Soaker timing The overnight soak for the cornmeal is crucial; do not shorten it if you want the full textural benefit and flavor depth.
- Proofing cues Rely on visual proof signs such as the dough cresting above the pan rather than only on clock time, especially in variable home kitchen temperatures.
- Baking finish Confirm doneness with an instant read thermometer aiming for 185° to 190°F in the center, and listen for the hollow sound when thumped on the bottom.