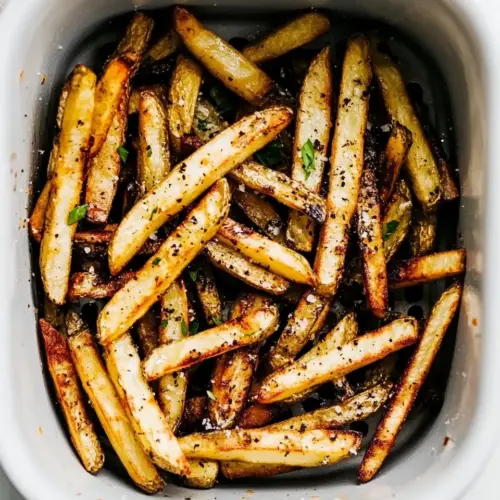
Amazing Air Fryer French Fries
Amazing Air Fryer French Fries deliver crispy golden outsides and fluffy interiors with minimal oil. This easy, flavorful recipe uses russet potatoes, olive oil, and Parmesan cheese to create a crowd pleasing side or snack, perfect for an easy weeknight dinner or casual gathering, try it because it is reliably crunchy and simple to make.
Equipment
- Air Fryer
- Bowl
- Paper towel
- Tongs
Ingredients
- 2 medium sized russet potatoes Provide starch and structure for the fries, offering a fluffy interior when cooked properly. Cut into even sticks to ensure uniform cooking in the air fryer. Choose russet potatoes for their high starch content which yields crisp exteriors and soft centers.
- 1 tablespoon olive oil Coat potato sticks lightly to promote browning and help seasonings adhere during air frying. Provide a subtle fruity flavor and healthy fats that crisp the surface without making fries greasy. Use measured oil to achieve a balance between texture and calorie control.
- 1 teaspoon Italian seasoning Add a fragrant blend of herbs to impart savory, aromatic notes to the fries. Sprinkle evenly so each fry receives a light herbal lift that complements the potato. Use Italian seasoning for convenience and consistent herb balance.
- 2 tablespoons Parmesan cheese, grated Contribute savory, umami-rich flavor and a light crunchy coating when grated over the fries. Melt slightly from the residual heat to create a cohesive, cheesy finish that enhances overall taste. Use grated Parmesan sparingly to avoid overpowering the seasoning blend.
- 1/2 teaspoon salt Enhance overall flavor by balancing and highlighting the natural potato taste. Control seasoning level to avoid under- or over-salted fries; dissolve into oil for even distribution. Adjust quantity to suit dietary sodium preferences.
- 1/4 teaspoon pepper Provide a mild heat and earthy note that rounds out the seasoning profile. Grind fresh or use pre-ground for consistent peppery accents across the fries. Use sparingly to complement salt and herbs without dominating the flavor.
Instructions
- Preheat the air fryer to 380 degrees Fahrenheit. Slice 2 medium sized russet potatoes using a fry cutter, or slice them into 1/4-inch strips.: The aroma of hot air fills the kitchen as the air fryer reaches temperature, and that first puff of heat is essential for immediate surface searing which helps create a crisp exterior, you should notice the basket warming and a faint warm scent. This rapid initial heat jumpstarts the Maillard reaction on the surface of the potatoes , producing golden browning rather than slow sweating that can make fries soggy. A common mistake is skipping preheating, which results in limp fries; always allow the unit to come to full temp so the fries encounter high heat right away. If your model has an indicator light or beep, wait for that cue and avoid crowding the basket from the start.
- Rinse the potato slices in cold water and pat dry with a paper towel.: As you work the knife or cutter, you will hear the satisfying snap of each cut and see uniform sticks stack up, which matters because even thickness ensures even cooking and predictable crisping. Cutting to roughly 1/4 inch gives you a balance of crispy edge and tender interior, and the exposed surface area browns attractively. Avoid inconsistent sizes, as thin pieces will overcrisp and thick ones will stay underdone; if some pieces look noticeably different, trim or regroup them to match. Rinsing and drying after slicing is important, so slice intentionally and keep the pieces similar in size for the most reliable result.
- In a medium-sized bowl, toss with 1 tablespoon olive oil, 1 teaspoon Italian seasoning, 2 tablespoons Parmesan cheese, 1/2 teaspoon salt, and 1/4 teaspoon pepper.: When you rinse the cut potatoes , watch the cloudy water turn clearer as surface starch washes away, which is a sign the fries will crisp better instead of sticking together. Patting them thoroughly with a paper towel should leave the pieces matte rather than wet, and that dryness helps the olive oil adhere without creating steam pockets that prevent browning. A frequent error is skipping the drying step, which can produce steamed rather than crisp fries; take a minute to remove surface moisture. If your kitchen is humid, use several paper towels and press gently until no visible moisture remains.
- Place the fries into the basket of the air fryer in a single layer. Cook for 15-20 minutes or until golden brown.: You will feel the texture change as the olive oil lightly coats the slices and the seasonings begin to cling, creating a dusty sheen on each piece that promises flavor in every bite. The oil encourages even browning and helps the Parmesan cheese toast, while the herbs infuse the surface. Gently toss so each fry gets an even touch of coating without being drenched, because too much oil can produce greasy fries that do not crisp properly. A common pitfall is overmixing aggressively, which can bruise the potatoes and release starch, so fold gently and check that the coating is even before proceeding.
- Toss the fries halfway through the cooking process to ensure the fries get evenly cooked.: As you arrange the fries, you should see air space around each piece, and that spacing allows the hot air to circulate and crisp the surfaces uniformly; a crowded basket traps steam and yields uneven results. The visual cue to aim for is that pieces are not stacked on top of one another and there is visible basket floor between groups of fries. If you have more fries than fit in a single layer, plan to cook in batches to maintain consistent texture throughout. A frequent mistake is overloading to save time, but the trade off is often undersized crisping, so be patient and work in manageable batches for the best outcome.
- Serve with ketchup or fry sauce.: During cooking you will hear gentle ticking and occasional soft clacks as fries shift in the basket, and you should watch for a deepening golden color at the edges which indicates readiness. The interior should remain tender when pierced, offering a contrast to the crunchy shell. If your fries are not browning by the suggested time, check thickness and spacing, because thicker cuts or crowded baskets lengthen cook time; conversely, thinner pieces may need less time. Avoid assuming a single fixed time fits all models, instead rely on color and a crisp test to determine doneness.
- Toss the fries halfway through the cooking process to ensure the fries get evenly cooked: When you pause and gently shake or flip the fries, you will notice the undersides begin to reveal golden patches, and that mechanical movement exposes new surfaces to direct heat which evens out browning. This action prevents hot spots and ensures each fry enjoys air contact on multiple sides, producing consistent crunch. A common oversight is not using tongs or a gentle shake, which leaves some pieces subdued in color; be careful not to bash the fries when turning them, as rough handling can break them and release starch. Aim for a confident but gentle motion so fries redistribute without damage.
- Serve with ketchup or fry sauce: The moment you lift the basket you will feel a burst of warm aroma, and serving right away preserves the crisp texture, as fries begin to soften if left sitting. Pairing with a simple dip like ketchup or fry sauce adds familiar contrast and completes the snack experience. If you wait too long to serve, the steam will lighten the exterior crisp, so plate quickly and offer dips immediately to keep the ideal mouthfeel. A common error is letting fries sit in the basket, which softens them from residual heat and moisture, so transfer to a plate and enjoy while hot.
Notes
- Choose the right potato Use russet potatoes for their starchy interiors which produce a fluffy center and sturdy exterior, making them ideal for fries.
- Dry thoroughly After rinsing, press the potatoes dry so the surface is matte, this step prevents steaming and helps the fries brown.
- Don’t over oil A tablespoon of olive oil is enough to promote browning without making fries greasy, excess oil reduces crisp.
- Season evenly Mix the Italian seasoning, salt, and pepper with the fries before cooking so every bite is seasoned consistently.
- Shake mid cook Toss or shake halfway through so the fries get exposed on all sides to hot air, this yields uniform golden color.
- Serve fast Transfer fries to a warm plate and offer dips immediately, they are at their best right out of the air fryer.