Almond Flour Strawberry Bread
Almond Flour Strawberry Bread is a tender, nutty loaf studded with fresh strawberries and gently sweetened with pure maple syrup. The crumb is soft yet sliceable thanks to a balance of almond flour and tapioca flour, while a touch of lemon zest brightens each bite. Perfect for spring brunches, easy mornings, or a cozy tea, this loaf is worth making for its fresh fruit pockets and comforting aroma.
Equipment
- Loaf Pan
Ingredients
- 3 large eggs Whisked to provide structure and lift; eggs bind the batter and trap air when beaten, creating a tender crumb. Also adds moisture, richness, and helps emulsify the wet and dry components for a cohesive loaf.
- 1/2 cup pure maple syrup Poured in to sweeten naturally and add moisture; pure maple syrup contributes a mild caramel-like flavor that complements almond flour. Its liquid sugars help keep the bread soft and extend freshness without crystallizing.
- 2 teaspoons pure vanilla extract Added to impart aromatic warmth and deepen flavor; pure vanilla extract enhances the overall sweetness and rounds out the profile. A small amount amplifies other flavors and provides a pleasant bakery-like aroma.
- 2 cups almond flour Folded in as the primary dry base; almond flour supplies a moist, dense texture and nutty flavor while keeping the loaf gluten-free. Its higher fat content contributes tenderness and a satisfying mouthfeel compared with grain flours.
- 1/2 cup tapioca flour Stirred in to lighten the texture and add chewiness; tapioca flour helps mimic the elasticity of gluten and improves sliceability. It also absorbs some moisture while contributing a subtle glossy crumb and slight stretch.
- 1 tsp baking powder Sprinkled to provide lift and improve rise; baking powder acts as the leavening agent that releases gas during baking. Proper measuring ensures an even rise without leaving metallic or chemical aftertastes.
- 1/2 tsp sea salt Added to enhance flavor balance; sea salt sharpens sweetness and brings out the nutty notes of almond flour. A small amount also influences the dough’s overall seasoning and helps control fermentation reactions.
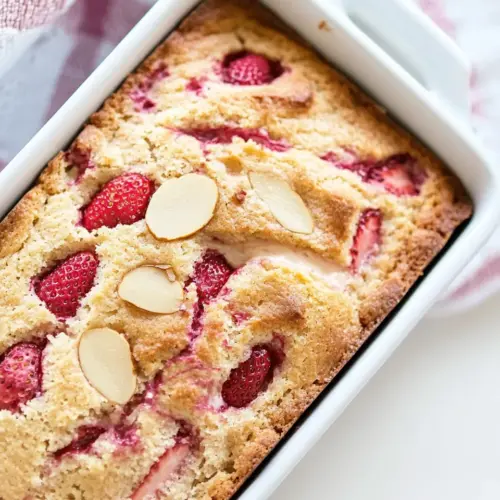
- 1 1/2 cups fresh strawberries chopped Folded in to provide bursts of fresh fruit flavor and moisture; chopped fresh strawberries add bright acidity, natural sweetness, and pleasant texture contrasts. Evenly distributed pieces prevent sogginess while ensuring flavorful bites throughout the loaf.
- 2 -3 tsp lemon zest optional Zested lightly to inject citrus brightness and aromatic lift; lemon zest can cut through richness and enhance the strawberry notes. Using 2–3 teaspoons optional allows flexible tartness depending on personal preference.
- 2 to 3 tbsp sliced almonds optional Sprinkled on top for added crunch and visual appeal; sliced almonds toast nicely during baking to provide a nutty finish. Optional use delivers a contrasting texture and reinforces the almond flavor theme of the bread.
Instructions
- Wash the strawberries with lukewarm water and pat them dry with a paper towel. Cut the strawberries into small pieces.: Right away you will notice the fresh, slightly sweet fragrance of the strawberries as you rinse them, and gently patting them dry preserves their texture so they do not bleed too much into the batter. Smaller pieces distribute more evenly, giving little bursts of juice rather than large wet pockets that can weigh down the loaf. A common mistake is leaving the fruit too wet, which adds extra surface moisture and can cause the center to remain under baked. If the berries seem especially juicy, spread them out on a towel and let them air dry for a few minutes before chopping.
- Preheat the oven to 350 degrees Fahrenheit and line a 9” x 5” loaf pan with parchment paper.: As the oven warms, you will hear the quiet hum of heat building and smell the faint metallic scent of warming air, which signals consistent baking conditions. Lining the pan with parchment makes removing the loaf simple and protects the crumb during cooling. If the oven temperature fluctuates, the loaf may bake unevenly, so use an oven thermometer if you suspect inaccuracies. Also, positioning the rack in the center ensures even top browning and a steady rise.
- Add the eggs, pure maple syrup, and vanilla extract to a large bowl and mix well until the wet ingredients are combined.: The mixture will go from glossy to slightly frothy as you whisk or beat, creating suspended air that aids lift. You should smell the warm, woodsy notes of the maple syrup melding with the floral hint of vanilla . Avoid over mixing here, which can break down the air you just incorporated; mix until the ingredients are homogenous and smooth for the best tenderness.
- Transfer the almond flour, tapioca flour, baking powder and sea salt to a separate bowl and mix to combine the dry ingredients.: Rubbing your fingers through the dry mix or whisking it will distribute the baking powder and salt evenly and break up any small clumps in the almond flour . You want a uniform color and texture, which signals even leavening. A common error is skipping this step, which can leave pockets of leavening and produce uneven holes in the final loaf. Take a moment to ensure the dry elements are well blended.
- Pour the flour mixture into the large mixing bowl with the wet ingredients and stir well until a thick batter forms.: The batter should be visibly thicker than pancake batter yet not rock solid, with a soft, slightly grainy texture from the almond flour . As you fold the flours in, the sound shifts to a quieter, denser scrape against the bowl and you will see the batter gain body. Over stirring can make the loaf heavy, so stop once the flour is incorporated and no dry streaks remain. If the batter seems excessively dry, double check your measurements rather than adding extra liquid impulsively.
- Fold in the fresh chopped strawberries and lemon zest (if adding) until well incorporated throughout the dough.: Folding rather than vigorous stirring helps the diced strawberries keep their shape and prevents them from breaking down into a pink slurry. You will notice flecks of red and bright citrus notes from the zest as you work, which is a good visual cue that distribution is even. A pitfall here is smashing the fruit during mixing, which releases too much juice and can change the bake time and texture; be gentle and deliberate with each fold.
- Transfer the dough to the prepared baking pan and spread it into an even layer. Sprinkle top of the batter with sliced almonds (if desired) and cover the pan with aluminum foil.: Spreading the batter evenly helps the loaf bake uniformly, and the top should look smooth with scattered pieces of fruit. The sliced almonds will toast on the surface and create an attractive, crunchy contrast. Covering with foil prevents the top from over browning during the long bake, but be careful not to press the foil down onto the batter which could leave marks.
- Bake on the center rack of the preheated oven for 60-75 minutes or until baked through.: As the loaf bakes you will smell the warming nuts and the fruit deepen into a jammy perfume, and the surface will shift from wet to set with a golden hue around the edges. The center will gradually firm; listening closely you may notice a faint crackle as moisture evaporates. Avoid opening the oven frequently which cools the oven and prolongs baking time, leading to uneven texture. If you find the top is browning too quickly despite the foil, tent a new piece loosely to protect the surface while the center finishes cooking.
- I’ve found the best way of checking for doneness of quick breads is to check the internal temperature using a digital thermometer. To do so, insert the thermometer into the center of the bread. If it is 190 degrees or higher, it is fully cooked. The texture will be best between 190 and 205 degrees Fahrenheit.: A thermometer gives a confident signal when the loaf is ready, avoiding the guesswork of visual cues alone. The crumb at 190 to 205 degrees will be set without being dry, and you will feel a slight spring when pressed gently. Relying on an inserted toothpick can be misleading if it hits a berry pocket and comes out wet, so the temperature reading prevents false negatives. If the thermometer reads lower than 190 after the suggested bake time, continue baking and check in ten minute increments.
- Let the bread cool completely before removing it from the pan and slicing. The easiest way to do this is to lift up on the parchment paper and transfer it to a cutting board. Use a sharp knife to cut the bread into individual slices.: Cooling allows the crumb to set and the interior moisture to redistribute, which prevents crumbly or gummy slices. You will notice a mellowed aroma as the loaf cools and the edges firm slightly. Cutting too soon leads to tearing and compressed slices, so be patient and use a serrated or very sharp knife when ready. If your slices seem sticky, allow an additional twenty to thirty minutes to rest before slicing.
Notes
- Reduce sweetness If you prefer less sweetness, gently decrease the pure maple syrup by one quarter but keep the same wet to dry ratio to maintain moisture and structure.
- Add citrus brightness Increasing the lemon zest by another half teaspoon will amplify freshness without adding liquid, elevating the fruit notes of the strawberries.
- Make it nut free For nut free needs, this recipe would need major restructuring because almond flour is central; I do not recommend substituting without a tested alternative.
- Boost the crunch Toast the sliced almonds lightly before sprinkling to deepen flavor and add textural contrast to the soft crumb.
- Adjust fruit amount If your strawberries are very juicy, reduce to 1 cup and check doneness earlier to avoid a soggy center.