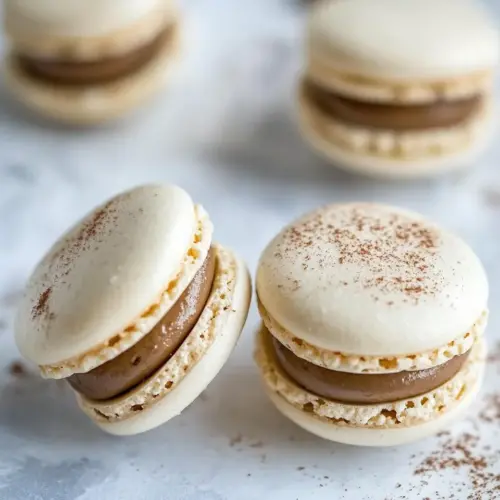
Almond Cookie Dough Macarons
Almond Cookie Dough Macarons are tender, crisp shells filled with a creamy, nutty cookie dough center and ribbons of dark chocolate. These elegant little sandwiches deliver contrasting textures and rich almond flavor, perfect for special occasions or an impressive tea time. Try them for a refined, satisfying treat that is both playful and sophisticated, an excellent reason to bake now.
Equipment
- Stand mixer or electric mixer
- Food Processor
- Fine mesh sieve
- Piping bag with 1/2-inch round tip
- Baking Sheet
- Parchment paper or silicone mat
- Wire Rack
Ingredients
- 85 grams almond flour or finely ground almonds Ground finely to provide a tender, nutty base for the macaron shells and contribute authentic almond flavor and texture. Helps create the delicate crumb structure when folded into the meringue without adding moisture. Use sifted almond flour to avoid lumps and ensure smooth, glossy feet during baking.
- 150 grams powdered sugar Powdered to dissolve quickly into the almond mixture, adding sweetness while helping to stabilize the batter and create a smoother surface. Combines with almond flour to produce the characteristic silky texture of macaron shells. Sifting prevents graininess and promotes even incorporation with the dry ingredients.
- 90 grams egg whites (from about 3 large eggs), room temperature Whisked to form the meringue that gives macarons their lift and airy structure, providing the foam needed for proper rise and feet development. Room temperature whites whip more easily and reach greater volume for a stable meringue. Measure by weight for accuracy and avoid any yolk contamination to ensure optimal whipping.
- 55 grams superfine or granulated sugar Sprinkled gradually into whipped egg whites to stabilize the meringue and add controlled sweetness without deflating the foam. Granulated or superfine sugar helps achieve glossy, stiff peaks that hold structure during macaron forming. Use superfine sugar for a smoother texture and faster dissolution into the whites.
- 1/4 cup unsalted butter, room temperature Beaten until smooth to create a rich, cookie-dough-like filling that adds creaminess and flavor contrast to the macarons. Room-temperature unsalted butter allows for proper creaming with sugars and other filling components without altering overall salt balance. Use unsalted to control seasoning and adjust salt elsewhere if needed.
- 2 tablespoons granulated sugar Sprinkled into the butter to add sweetness and help achieve a crumbly, cookie-dough texture in the filling when creamed together. Small granulated sugar amount provides slight crunch and structure without making the filling overly sweet. Add gradually to ensure even distribution and smooth mouthfeel.
- 1/4 cup light brown sugar, packed Creamed into the butter to introduce deep, caramel-like sweetness and moisture that mimic cookie dough flavor in the filling. Light brown sugar contributes molasses notes and a slightly chewy texture that contrasts with the crisp shells. Pack firmly when measuring to maintain recipe consistency.
- 3/8 cup all-purpose flour Folded into the filling to add structure and a tender, cakey bite that resembles cookie dough when combined with the butter and sugars. All-purpose flour helps absorb moisture and keeps the filling from becoming too soft while contributing subtle bulk. Measure accurately and avoid overmixing to prevent toughness.
- 1/8 teaspoon salt Sprinkled sparingly to balance sweetness and enhance the overall flavor profile of the filling or dough component. Salt strengthens other flavors and curbs excessive sweetness, creating a more rounded, bakery-quality taste. Use measured amounts to prevent overpowering the delicate macaron shells.
- 1/4 teaspoon vanilla extract Added in small amounts to provide warm, familiar aroma and enhance the overall sweetness of the filling with mellow vanilla notes. Vanilla extract deepens flavor complexity and pairs well with almond and chocolate components. Use pure vanilla for best flavor intensity.
- 1/4 teaspoon almond extract Dotted into the filling to intensify almond character and complement the almond flour in the shells, boosting aromatic, nutty depth. Almond extract is concentrated, so measure carefully to avoid an overpowering, artificial taste. Combine with vanilla for a balanced, layered flavor profile.
- 1 to 2 tablespoons heavy cream (or as needed) Dripped as needed to adjust filling consistency, providing creaminess and spreadability for perfectly pipeable cookie-dough filling. Heavy cream loosens overly stiff mixtures while adding richness and a smooth mouthfeel without diluting flavor. Add gradually until desired texture is reached for sandwiching macarons.
- 1.5 ounces dark chocolate, coarsely grated using a vegetable peeler (about 1/4 cup grated) Shaved coarsely to introduce intense chocolate flavor and a slight firm texture within the filling or as a decorative element atop shells. Dark chocolate contributes bitterness and depth that complements sweet, nutty components while enhancing overall balance. Use a vegetable peeler for irregular shavings that melt attractively when bitten into.
Instructions
- In a food processor, combine almond flour and powdered sugar; pulse for 20 to 30 seconds until evenly distributed. Sift at least once through a fine mesh sieve, discarding any larger particles.: The aroma of ground almond will bloom as you pulse, a warm, toasty scent that tells you the nuts are fresh. When you sift, you'll see the fine dust fall through and larger specks remain behind, which you should discard to ensure perfectly smooth shells. If you skip sifting you risk gritty tops and rough textures, so take the extra minute. A common mistake here is not pulsing long enough, which leaves uneven particle sizes. The why is simple, an even dry mix creates an even batter and a glossy surface, and visually you'll notice a silky, uniform powder ready to join the meringue.
- Place egg whites in a clean metal mixing bowl or the bowl of a stand mixer. Mix on medium speed until frothy, then slowly add superfine sugar, a little bit at a time with the mixer on medium speed, scraping down the side of the bowl periodically. When all the sugar has been added, increase speed to medium high and whip until meringue is firm and glossy and forms medium-stiff peaks.: You'll first see tiny, airy bubbles that gradually turn into a smooth, satiny mass. As you add the sugar slowly, the mixer will sing a steadier, higher pitched tone and the meringue will gain volume. Stop and lift the whisk to check for medium-stiff peaks that hold shape but have a slight bend at the tip. Overwhipping can make the meringue dry and prone to cracking, while underwhipping gives weak structure. If the meringue looks grainy, you likely added sugar too fast; start again with fresh egg whites for best results.
- Pour half of the almond flour mixture into the meringue and stir, folding and scraping a few times until no dry flour remains. Add the remaining flour and mix, folding and spreading the batter against the sides of the bowl about 15 to 20 times or just until the meringue and flour are incorporated and the batter falls off the spatula in thick ribbons. Do not overmix.: The batter should flow like lava, thick enough to hold a ribbon but fluid enough to smooth out within 10 seconds. You will notice the color lighten slightly and the batter become more homogenous; these are visual cues you're close. If the batter runs too freely you likely undermixed, which leads to flat shells; if it clumps and looks dense you overmixed, which kills the feet. One common misstep is counting folds instead of watching texture. Trust the fall of the batter rather than a number alone.
- Transfer the batter to a large piping bag fitted with a 1/2-inch round tip, twisting the end of the bag to prevent the batter from leaking. Pipe small circles onto a parchment or silicone-mat-lined baking sheet, leaving about 1-inch of space between them.: As you pipe, listen for a smooth squeezing sound and watch each circle settle into a tidy, even dome. If the batter clogs or comes out unevenly, it may need another gentle fold to re-integrate air. The circles should be consistently sized so they bake evenly; uneven sizing results in some cookies overbaking while others are underdone. A helpful trick is to pipe on a template under the parchment to maintain uniformity. Wipe the tip periodically to keep edges neat.
- Rap the baking sheet firmly on the counter, then smack the bottom of the baking sheet multiple times with your hand to remove any remaining air bubbles. If any pointy ‘tips’ still remain, you can gently press them down with a lightly moistened fingertip. Sprinkle with cocoa nibs (if using), and set aside to dry.: You will notice tiny bubbles rise and pop, and the sheet will look calmer after rapping. The surface should become smooth and glossy with a matte sheen as it dries, which usually takes some time depending on humidity. Pressing down any peaks prevents unsightly fissures during baking. The biggest mistake here is skipping the drying time, which causes cracked shells. Patience is your ally, and the final visual cue is a slightly tacky, not wet, surface.
- Preheat oven to 375 degrees F. When macarons are dry (you should be able to just barely touch the surface of the cookies with a dry finger without them sticking), stack the baking sheet on top of another empty baking sheet (this will help them bake more evenly). Reduce the oven temperature to 350 degrees F and bake for 15 to 18 minutes, keeping an eye on them to make sure they do not brown. Remove from oven and let cool completely on a wire rack, then gently remove from baking sheets.: As they bake you should hear nothing loud, but visually the shells will set and develop feet around their base. The edges should stay pale and not brown, which is a sign the oven is too hot. Sliding a second sheet underneath helps diffuse direct heat for even feet development. A common error is opening the oven early, which can deflate shells; resist peeking until the set time. Once cooled, they will lift gently from the parchment, revealing smooth bottoms and delicate feet.
- To prepare filling, beat butter, sugar, and brown sugar in a large bowl with an electric mixer on medium speed until light and fluffy. Mix in flour, salt, vanilla, and almond extract on low speed until incorporated. Add cream and beat until fluffy, about 2 minutes, adding more cream if necessary to achieve desired consistency. Stir in grated chocolate. Transfer mixture to a piping bag fitted with a 1/2-inch round tip. Gently pipe about a teaspoon of filling onto underside of half of the cooled cookies, then top with remaining cookies.: When creaming the butter and sugars, you'll notice the mixture lighten in color and take on a billowy texture. Fold in the dry flour and extracts until the mixture smells fragrant and balanced. Adding heavy cream adjusts pipeability; add just enough so the filling holds shape without oozing. The grated chocolate gives intermittent bursts of bittersweet contrast. A frequent mistake is piping too much filling which causes the cookies to slip or the filling to spill; aim for a neat, even dollop so each sandwich stays tidy and balanced.
- Cookies will keep, refrigerated in an airtight container, for up to three days.: Once assembled, place the macarons in a container where they sit flat and uncrushed; you will notice flavors mellow and integrate after a few hours in the fridge, which often improves texture. If refrigerated longer than recommended they may become too soft. A common oversight is storing them in a humid spot; always use an airtight container and separate layers with parchment to maintain their structure and crunch.
Notes
- Weigh Ingredients: Accuracy matters with macarons, so use a scale for almond flour, sugars, and egg whites. Small variances in weight change batter hydration and can affect foot formation and surface smoothness. Consistent weights lead to consistent results, and you will notice improved uniformity across batches.
- Room Temperature Items: Let your egg whites and butter reach room temperature before using. Warm egg whites whip better and room temperature butter creams into a silkier filling. Cold ingredients shorten whipping times and can create uneven textures.
- Humidity Awareness: Avoid making macarons on very humid days if possible. High humidity prevents shells from drying and can cause cracking or failed feet. If you must bake in humid conditions, lengthen the drying time and consider using a dehumidifier or air conditioning to stabilize the kitchen.
- Use Fresh Nuts: Fresh, finely ground almond yields bright flavor and smooth texture. If the nuts are stale the shells can taste flat, so store almond flour in the refrigerator and smell it before use to check freshness.
- Test Bake: If unsure about your oven's temperature, bake a single sheet to test for browning and even feet. Oven hotspots can cause uneven baking, and a quick test prevents wasting a full batch. Rotate sheets if necessary to ensure even results.