Air Fryer Roast Beef
Air Fryer Roast Beef delivers a crispy, herb crust and tender, juicy center, ideal for an easy weeknight dinner or a small gathering. The aromatic blend of garlic and rosemary with a quick high heat sear creates restaurant worthy results in less time. This method is dependable and approachable, making it a recipe you'll return to again and again.
Equipment
- COSORI Air Fryer 5.8 Quart
- Instant-read meat thermometer
Ingredients
- 2 -3 pound beef roast (top round or sirloin) Trimmed and tied as needed, provide a substantial, tender cut that will roast evenly in the air fryer, yielding sliceable beef for sandwiches or plates. Season well and monitor internal temperature for desired doneness, allowing it to rest after cooking to preserve juices and improve texture.
- 1 tablespoon olive oil Coat the roast lightly to help herbs and seasonings adhere while promoting browning during air frying. Add a subtle fruity flavor and assist in creating a flavorful crust without overpowering the beef.
- 2 cloves garlic (minced) Mince finely to release pungent, savory oils that infuse the meat surface with deep aromatic flavor when rubbed onto the roast. Distribute evenly to create pockets of garlic flavor that mellow and sweeten with heat during cooking.
- 1 tablespoon fresh rosemary (chopped) Chop fresh to release piney, aromatic oils that complement beef, adding bright herbaceous notes to the rub. Sprinkle on the roast to create a fragrant crust that enhances overall flavor complexity.
- 1 teaspoon salt Provide essential savory seasoning to enhance the natural beef flavor and help form a well-seasoned crust during high-heat air frying. Use measured amounts to balance taste and preserve the meat's natural characteristics.
- 1/2 teaspoon black pepper Crush to accentuate savory notes and add mild heat that complements the beef and other spices, helping to deepen overall flavor. Apply uniformly to avoid concentrated peppery spots and maintain a balanced bite.
- 1/2 teaspoon onion powder Add a subtle savory-sweet depth to the seasoning blend, enhancing the roast's overall umami profile and helping to build a rounded crust. Sprinkle evenly to ensure consistent flavor without masking the beef.
- 1/4 teaspoon smoked paprika (optional) Introduce a hint of smoky, slightly sweet complexity when used, elevating the roast with an optional layer of warmth and color. Use sparingly to avoid overshadowing the herb and garlic flavors while contributing visual appeal.
Instructions
- Preheat the air fryer to 400°F (200°C).: The air in the basket should feel hot and dry, circulating rapidly so the roast begins developing a deeply browned surface right away. You will notice the air fryer reach temperature in a few minutes, and it creates an immediate sizzle when the roast hits the basket, which helps lock in juices. Why this matters, I learned, is that the initial blast of heat creates the crust you want, preventing the center from overcooking later. A common mistake is skipping preheat, which can yield a less crisp exterior and longer, uneven cooking times, so always wait until the unit indicates it is up to temp.
- In a small bowl, combine the minced garlic, rosemary, salt, pepper, onion powder, and smoked paprika.: When you mix these seasonings, the aroma becomes immediate and heady, a preview of the roast's final scent. The texture should be evenly combined so no one spice concentrates in a single spot on the meat. I like to press the herbs with the back of a spoon to release oils, enhancing the scent. The why here is simple: an even rub guarantees balanced flavor in every bite. Avoid leaving large clumps of salt or herb, which can create uneven seasoning pockets.
- Rub the beef roast with olive oil, then coat it evenly with the herb and spice mixture.: Rubbing the olive oil over the roast creates a sheen and helps the herb mix adhere; you should see a light, even coating. As you press the seasoning into the meat, the herbs release aroma and small particles cling to the surface, which will toast and deepen in flavor. The sensory cue to look for is an even, tacky surface rather than wet or patchy spots. Overdoing the oil makes the basket messy and can smoke, so apply just enough to coat the surface evenly.
- Place the roast in the air fryer basket. Cook at 400°F (200°C) for 15 minutes, then reduce the temperature to 360°F (180°C) and continue cooking for another 15-17 minutes, or until the internal temperature reaches 130°F (54°C) for medium-rare (adjust cook time for desired doneness). Mine was done at 16 minutes.: As you lay the roast in the basket, listen for a faint hiss when it makes contact with the hot surface, and position it so air can circulate on all sides. The visual cue is that the roast sits elevated and not jammed against the sides, which ensures even browning. This positioning matters because pockets against the basket can cook at different rates, leaving uneven doneness. A common misstep is overcrowding the basket, which reduces airflow and yields a softer, less caramelized exterior.
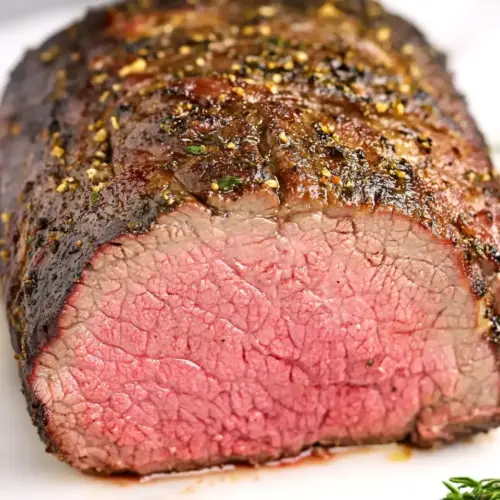
- Remove the roast from the air fryer and let it rest for 10 minutes before slicing.: You will notice after the first 15 minutes the roast has developed color and a fragrant crust, sometimes with a darker edge where seasonings toasted. Reducing the temperature calms the cooking so the interior gently comes to the desired doneness without overshooting. The internal temperature is the real signal to trust, not the clock, because roast size and starting temperature vary. A frequent error is relying solely on time, which can lead to overcooked meat, so use a thermometer and check towards the end of the listed window. The roast in my kitchen hit the medium-rare point at about 16 minutes during the lower temperature phase.
- Remove the roast from the air fryer and let it rest for 10 minutes before slicing.: Resting allows the juices to migrate back into the meat, so when you slice, the juices stay put and the texture is tender instead of dry. The room should smell of roasted herbs and concentrated beef aroma as the roast rests. Cutting too soon makes the juices run out and leaves the slices drier, so patience here yields the best plate presentation and mouthfeel. Use this time to prepare any sides and gather a sharp knife for clean, thin slices.
Notes
- Temper the Roast Pull the beef out of the fridge about 30 minutes before air frying so it cooks more evenly and reduces the risk of a cold center.
- Size Matters If your roast is larger than 2 pounds, increase the cooking time in small increments and monitor with a meat thermometer to avoid overcooking.
- Herb Swaps Try thyme or oregano in place of rosemary for a different herbal profile that still pairs well with beef.
- Umami Boost A small splash of Worcestershire sauce added to the oil and rub can deepen the savory character without overpowering the herbs.
- Smoky Option Use the smoked paprika sparingly to add a gentle smoky color and flavor if you want a slightly charred, barbecue like note.