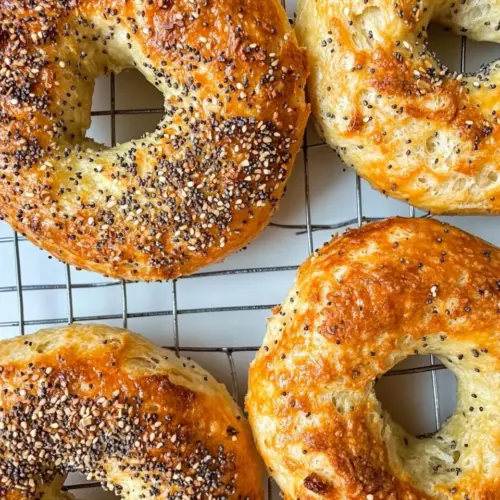
Air Fryer Protein Bagels
Air Fryer Protein Bagels deliver a tender, slightly chewy interior and a crisp, golden crust with added protein from Greek yogurt. These easy weeknight breakfast bagels are quick to mix and crisp in the air fryer, perfect for busy mornings or a make ahead brunch. Try savory everything seeds or a sweet cinnamon sugar for an adaptable, delicious reason to bake at home.
Equipment
- Air Fryer
- Mixing Bowl
- Wire Rack
- Parchment Paper
Ingredients
- 1/2 cup all-purpose flour Provides structure and lightness by combining with liquids and other dry ingredients; use to create a tender bagel crumb while maintaining a soft interior.
- 1/2 cup whole wheat flour or additional all-purpose flour Adds nuttiness and extra fiber when used as a substitute or in combination; contributes to a slightly denser texture and whole-grain flavor.
- 1 teaspoon baking powder Leavens the dough by producing carbon dioxide when heated, ensuring the bagels rise slightly and develop a lighter texture during air frying.
- 1/4 teaspoon kosher salt Enhances overall flavor balance by bringing mild salinity; helps strengthen gluten slightly and accentuate other savory notes in the dough.
- 1 cup plain Greek yogurt I used non-fat Offers moisture and richness while also supplying protein; helps bind the dough and creates a tender, slightly tangy base for these protein-forward bagels.
- 1 egg beaten with 1 tablespoon water to create an egg wash Creates a glossy, golden exterior when brushed on before cooking; helps toppings adhere and promotes an appealing browned finish.
- everything bagel seasoning Provides a bold, savory topping blend that adds crunchy texture and a burst of sesame, poppy, garlic, and onion flavors to the bagel crust.
- cinnamon sugar Introduces a sweet, aromatic crust option that caramelizes lightly during cooking and complements sweeter or spiced variations of the bagel.
- rosemary Parmesan Delivers an herby and umami-packed topping option with aromatic rosemary and salty Parmesan for a savory, fragrant crust layer.
- shredded cheese such as cheddar or Asiago Melts into pockets of savory, gooey flavor when used as a topping or mixed in; offers richness and a satisfying cheesy bite to the bagels.
Instructions
- In a mixing bowl, whisk together the flour(s), baking powder, and salt.: Close your eyes and smell the dry ingredients; there is a clean, faintly toasty scent from the flours and a mineral brightness from the kosher salt . Whisking aerates the mixture, which helps the baking powder distribute evenly so every bite rises consistently. A common mistake is to skip thorough whisking, which can leave pockets of leavener that create uneven texture. If you see clumps, break them up with the whisk or a fork so the dough mixes uniformly.
- Make a hole in the center, then add the Greek yogurt. With a spoon or small rubber spatula, stir until the mixture forms a shaggy dough.: As you press the Greek yogurt into the well, notice how it binds the dry mix into a shaggy mass, glossy where the dairy meets flour. Using a spatula keeps your hands cleaner and prevents overworking the dough, which could make it tough. The why is simple, the yogurt hydrates without excess liquid, giving protein and a tender crumb. Avoid adding extra yogurt unless the mixture is crumbly and refuses to come together, which would indicate your flours are unusually dry.
- Turn the dough out onto a lightly floured work surface. Knead it for 1 to 2 minutes, until it forms a smooth dough (add a light dusting of flour to your hands and the counter if the dough is too sticky to handle).: Feel the transformation under your palms as the shaggy mass becomes cohesive and smooth, slightly tacky but not sticky. Gentle kneading develops enough gluten to give chew, while keeping the interior tender. A common pitfall is overflouring; adding too much all-purpose flour will dry the dough and make the final bagels dense. Instead, sprinkle flour sparingly and stop kneading once the surface looks even and springs back when pressed.
- Divide the dough into 4 equal sections. Roll each piece into a ball, then out into a rope that is about 8 to 9 inches long and 3/4-inch thick. Connect the ends of the rope to form a bagel shape, pressing lightly to seal. Repeat with the remaining sections.: Rolling the dough into ropes lets you gauge consistency; a smooth rope with an even thickness will bake uniformly. When you join the ends, press lightly so the seam holds during cooking but does not create a hard ridge. You should hear a soft squeak as you shape them, and the surface will look taut. If seams open during shaping, dampen the edges slightly with water and press again. Avoid over stretching which can cause thin spots that puff unevenly.
- If using toppings, place the bagels on a parchment lined baking sheet, then brush the tops with the egg wash so the seasonings stick. Sprinkle with your desired toppings.: The egg wash creates a glossy, brown finish and acts like glue for toppings. Brush with a light hand to avoid saturating the dough, then sprinkle seasonings so they adhere evenly. You will notice the toppings sink slightly into the wash, which helps them toast rather than blow off in the Air Fryer . A mistake to avoid is overloading toppings, which can prevent the crust from browning and make the surface soggy.
- Arrange the bagels in a single layer in the air fryer basket, ensuring they do not touch (you may need to cook in batches)—for easy transfer, I remove my air fryer basket insert, place two bagels on top, then lower them in (note this only works with the first batch, as the insert will be super hot later on). Air fry at 350°F for 8 to 10 minutes, until the bagels are golden brown on top and at the sides.: In the hot Air Fryer you will hear a faint sizzle as moisture kisses the hot metal and begins to evaporate, and a warm, toasty aroma emerges. Cook time creates a golden crust while keeping the interior tender, so spacing matters for even airflow. If they brown too quickly on top, reduce the temperature slightly or shorten the time, because overbrowning leads to a dry interior. A common error is stacking bagels or crowding the basket, which yields uneven cooking and soft spots where they touch.
- Let the bagels cool slightly on a wire rack. Enjoy warm.: Cooling for a few minutes lets steam escape so the interior sets, preventing a gummy texture. The crust will firm up and the crumb will relax into a pleasant chew. Enjoying them warm highlights that contrast between crisp outside and tender inside. Resist cutting into them right away if you want neat slices, because rushing can compress the crumb. If you prefer a softer crust, cover them gently with a tea towel while they cool.
Notes
- Storage: Store cooled bagels in an airtight container at room temperature for two to three days to keep them soft. For longer storage freeze wrapped tightly and toast from frozen to refresh.
- Bake in oven option: If you do not have an Air Fryer, bake at 375°F in a preheated oven. Check at twenty minutes and continue until golden, as ovens vary in how they brown.
- Batch cooking: Cook in batches to avoid crowding the Air Fryer basket. Let the basket cool slightly between batches if you are using an insert trick to place bagels easily.
- Topping adhesion: Use the beaten egg wash and press seasonings gently into the surface so they do not fall off during handling.
- Cheese option: Sprinkle shredded cheese near the end of cooking if you want it melted but not overly browned, watching closely to prevent burning.