Air Fryer Fried Shrimp Sandwich
Air Fryer Fried Shrimp Sandwich is a crispy, juicy seafood sandwich with a creamy, tangy tartar sauce. The air fryer gives you golden crunchy breading without deep frying, making this an easy weeknight dinner that still feels indulgent. Light whole wheat buns and butter lettuce keep it balanced, so it is perfect for casual meals or relaxed entertaining.
Equipment
- Air Fryer
- Mixing Bowls
- Fork
- Plate
Ingredients
- 20 about 14 to 16 oz raw peeled and deveined jumbo shrimp, tails removed Use raw peeled and deveined jumbo shrimp for the main protein, providing a meaty, seafood-forward bite and substantial texture once cooked; ensure shrimp are thoroughly patted dry to promote even breading adhesion and crisping in the air fryer. Select 14 to 16 oz roughly to yield about 20 shrimp, which balances sandwich filling and cooking time for consistent results. Handle gently to avoid tearing the flesh and to maintain plumpness during high-heat air frying.
- 1 large egg beaten Beat a large egg to create a cohesive binding liquid that helps breadcrumbs adhere to the shrimp, forming a uniform crust when air fried. Whisk until smooth and slightly aerated to promote even coating and to help the breading brown. Use immediately to avoid separation and maintain optimal adhesion.
- 1/3 cup dry seasoned panko crumbs Provide dry seasoned panko crumbs to add a light, airy, and extra-crispy outer layer that yields a tender interior and crunchy exterior in the air fryer. Combine with other breadcrumbs for a balanced texture and flavor; panko’s flaky structure traps hot air for superior crispness. Measure accurately to maintain coating proportions and avoid soggy results.
- 1/2 cup whole wheat seasoned breadcrumbs Provide whole wheat seasoned breadcrumbs to contribute heartier texture, nutty flavor, and additional seasoning to the breading mix, complementing the panko’s crispness. Blend with panko to create a stable, flavorful coating that browns evenly in the air fryer. Use measured quantity to control seasoning intensity and caloric content.
- olive oil spray Lightly coat shrimp or the air fryer basket with olive oil spray to promote browning and prevent sticking while keeping added fat minimal. Apply evenly to encourage the breadcrumbs to crisp and achieve a golden finish without deep frying. Use sparingly to avoid sogginess.
- 1 head butter lettuce, leaves separated Separate butter lettuce leaves to supply fresh, tender, and cool crunch as a contrast to the hot, crispy shrimp, helping balance textures and flavors in the sandwich. Rinse and pat dry to remove moisture that could make the breading soggy, and arrange leaves for structural support and mouthfeel. Use the largest leaves for better coverage.
- 4 whole wheat 100 calorie potato buns, (round or long) I like Martins Select whole wheat 100 calorie potato buns to serve as the sandwich vehicle, offering portion control and a denser, slightly sweet base that complements the savory shrimp. Choose round or long buns depending on desired sandwich format and lightly toast to improve structure and prevent sogginess. Ensure buns are sturdy enough to hold the filling without tearing.
- 1/4 cup reduced fat sour cream Mix reduced fat sour cream to add creamy tang and moisture to the sandwich spread while keeping calories and fat lowered compared to full-fat alternatives. Whisk with mayonnaise and seasonings to create a cohesive sauce that enhances flavor and mouthfeel. Chill briefly to meld flavors before assembling.
- 3 tablespoons light mayonnaise Combine light mayonnaise to contribute richness and emulsified texture to the sandwich sauce without excessive calories, helping bind chopped pickles and herbs into a spreadable consistency. Use measured amount to balance creaminess with other flavor components and prevent overwhelming the shrimp. Stir thoroughly for a smooth, even sauce.
- 1/3 cup finely chopped dill pickles Finely chop dill pickles to introduce bright acid, crunch, and briny flavor that cuts through the richness of the fried shrimp and sauce, adding essential contrast to each bite. Finely chopping ensures even distribution throughout the spread and consistent flavor in every mouthful. Drain excess pickle juice to avoid thinning the sauce.
- 1 tablespoon fresh chopped dill Chop fresh dill to deliver aromatic, herbaceous notes that enhance the seafood flavor and brighten the sandwich without overpowering it. Add just enough to complement the pickles and sauce, distributing uniformly for balanced herb presence. Use fresh dill for best fragrance and flavor intensity.
- 1 teaspoon fresh lemon juice Add fresh lemon juice to provide sharp acidity that lifts the overall flavor and balances the richness of the fried shrimp and creamy sauce, making the sandwich taste fresher. Squeeze immediately before use to retain bright citrus notes and avoid bitterness. Adjust amount slightly to taste for optimal brightness.
- 1/8 teaspoon kosher salt Season with kosher salt to enhance and balance the natural flavors of the shrimp and the sauce components, promoting a more savory and satisfying sandwich. Sprinkle into the coating or sauce as directed to ensure even seasoning throughout. Use measured quantity to avoid over-salting.
- 1/8 teaspoon black pepper Grind black pepper to add subtle heat and aromatic spice that complements seafood and creamy elements, providing depth without overwhelming other flavors. Incorporate into the sauce or seasoning mix for a balanced kick. Freshly ground pepper offers stronger, more complex flavor than pre-ground.
Instructions
- Combine the ingredients for the tartar sauce and refrigerate until ready to serve.: The aroma of chopped pickles and fresh dill folded into creamy sour cream and light mayonnaise will be bright and slightly tangy, with a gentle pickle perfume that signals the sauce is coming alive. Chilling the sauce lets the flavors meld, smoothing the edges of acidity and letting the herbs marry the creamy base, which is why I always make this first. If you rush this step by serving the tartar immediately, it will taste sharper and more disjointed, so give it at least a short rest in the refrigerator. A common error is chopping the pickles too coarsely, which can overwhelm bites; aim for a fine dice for even distribution.
- Crack the egg into a bowl and beat it. Combine panko and breadcrumbs in a second bowl.: When you beat the egg , it should be frothy and uniform, ready to form a sticky layer for the coating. Mixing the airy seasoned panko with whole wheat seasoned breadcrumbs creates a textural marriage that browns and flakes. The scent at this point is neutral but expect a faint savory note from the seasoned crumbs. Room temperature ingredients adhere better, so let cold shrimp sit briefly if they are straight from the fridge. One common mistake is under beating the egg , leaving streaks that cause uneven breading adhesion.
- Using a fork, place shrimp 1 at a time into the egg, then into the crumbs, then onto a plate in a single layer while breading the rest.: You'll hear the soft plop of the shrimp as it hits the bowl and notice the crumbs clinging with a satisfying textural change, creating a slightly rough coating that will crisp. Laying the breaded shrimp in a single layer on a plate prevents them from sticking together and helps the coating set. This layering also lets you inspect each piece for full coverage. A trap to avoid is stacking breaded shrimp which leads to uneven coating and soggy spots.
- Spray the top of the shrimp generously with oil then transfer oil side down to the fryer basket in a single layer in batches.: The light mist of olive oil creates a glossy sheen and helps the crumbs brown in the hot circulating air. Placing the oil coated side down first ensures the side that touches the basket gets an immediate sear, locking in moisture and flavor. You should smell a toasty, warming aroma as the oil hits heat, but avoid heavy saturations that can cause smoking. Overcrowding the basket is a common mistake because it traps steam and prevents crisping, so cook in batches for consistent results.
- Spray the other side with oil and air fry 400 F 4 minutes.: Once the shrimp are in the basket, a quick spray on the exposed side readies them to brown evenly. At 400 F the air fryer creates aggressive convection that crisps the coating; after about 4 minutes you will see the edges turn golden and smell a nutty toasted scent from the crumbs. This stage sets the crust, so resist opening the basket too frequently as that lets heat escape. If you open repeatedly you'll extend cook time and risk soggy crust.
- Shake the basket and cook 2 more minutes, or until golden. Repeat with the remaining shrimp.: Shaking redistributes the pieces so they brown uniformly, and those last 2 minutes deepen color and give the final crunch. You may hear a delicate crackle from the coating as moisture evaporates, and visually you should see a rich golden color. Use this moment to check for doneness, because shrimp can become firm and rubbery if overcooked; they should be opaque and slightly springy. A common error is leaving them in too long which dries the shrimp and ruins the tender interior.
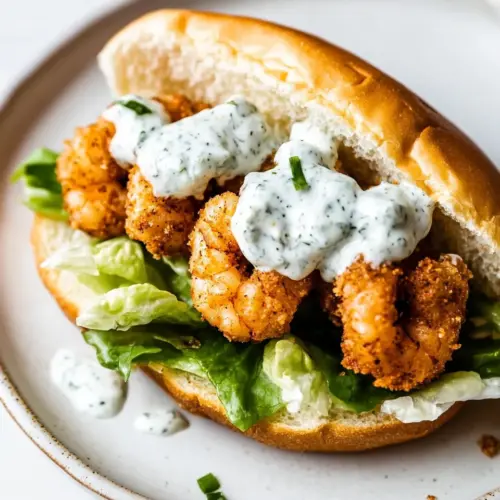
- On 4 buns, divide the shrimp on each, top with lettuce and 2 1/2 tablespoons tartar sauce on the top side of the bun.: As you finish each batch, you will notice a steady rhythm, and the kitchen will fill with warm toasted aromas from the breadcrumbs. Keeping completed batches on a warm plate or low oven helps maintain crispness until assembly. Avoid stacking the cooked shrimp directly on top of one another which will trap steam and soften the crust.
- On 4 buns, divide the shrimp on each, top with lettuce and 2 1/2 tablespoons tartar sauce on the top side of the bun: The final assembly bursts with contrast, the soft toasted whole wheat potato buns absorbing a hint of sauce while the crisp shrimp snap against the tender butter lettuce . The tartar should be cool and creamy, providing a bright foil to the warm fried coating. Spoon the sauce so each bite has a balanced amount; too much will make the bun soggy, and too little will leave the sandwich dry. A frequent mistake is adding sauce to the bottom bun only, which can make the sandwich unsteady; spread it on the top side for better distribution and stability.
Notes
- Prep the tartar first so it has time to chill and meld, which softens the acid edge and blends the herbs into a cohesive, creamy sauce.
- Pat the shrimp dry before breading to help the egg and crumbs adhere evenly, preventing clumpy or bare spots in the coating.
- Use two bowls for breading to maintain a clean workflow, one for the beaten egg and one for the combined crumbs, which speeds up assembly and keeps everything tidy.
- Cook in batches to avoid steam buildup in the air fryer, which is the main culprit for limp coatings instead of crisp results.
- Keep finished batches warm on a wire rack in a low oven so they stay crisp and do not steam on a plate before serving.