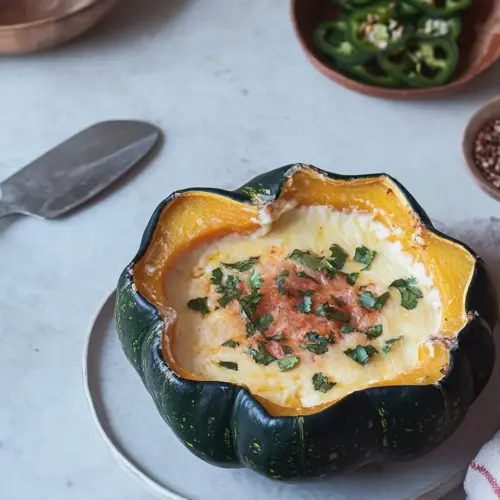
Acorn Squash Pasilla Chile Queso Fundido
Acorn Squash Pasilla Chile Queso Fundido is a creamy, cheesy fall dish that combines roasted acorn squash with smoky pasilla and stringy mozzarella. It makes an easy weeknight dinner or a showy appetizer for gatherings, offering caramelized sweetness, mild heat, and irresistible pull. Make it for cozy evenings or when you want a crowd pleasing dip that still feels thoughtful and seasonal.
Equipment
- Sheet pan lined with parchment paper
- Small Saucepan
Ingredients
- 2 large acorn squash Roast until tender and slightly caramelized; provides a sweet, nutty base and serves as the main bulk of the dish when scooped or pureed.
- 1 teaspoon oil Heat briefly to sauté aromatics or coat squash halves; helps prevent sticking and promotes even browning without dominating flavor.
- 1 pinch Salt Season lightly to enhance natural squash sweetness and balance richness; sprinkled during cooking to build layers of savory contrast.
- 1 small shallot, peeled and minced Sweat gently until translucent to add a delicate oniony sweetness and subtle texture; contributes depth without overpowering the other flavors.
- 1 garlic clove, peeled and minced Cook briefly to release pungent, savory aromas and deepen overall flavor; minced form distributes garlicky notes uniformly through the filling.
- 1 pasilla, halved and deseeded OR you can use 1 jalapeño (if you like spice) Char or sauté until softened to introduce smoky, mildly spicy complexity; contributes bright pepper flavor and optional heat when using jalapeño.
- 1 pinch Salt Add sparingly to taste to lift and balance the combined flavors; used again for seasoning during assembly or finishing touches.
- 2 cups shredded mozzarella cheese or Oaxacan cheese Melt evenly to create a gooey, stretchy topping that binds components and provides creamy, milky richness characteristic of queso fundido.
- 1 teaspoon minced cilantro Fold in at the end to add fresh herbal brightness and a hint of citrusy-green finish; sprinkled sparingly to brighten the rich cheese and squash.
Instructions
- You’re going to start by slice off the top of the acorn squash, taking off about 2 inches from the top. Peel the top and dice it up. I ended up about 1/2 cup of squash and that was the perfect amount. Slice off just enough from the bottom end so it can stand up nice and sturdy. Scoop out the seeds from the inside of the squash and discard. Place the squash on a parchment-lined baking sheet and preheat the oven to 350 degrees F.: As you cut, notice the firm resistance of the squash skin giving way to denser flesh, and the fresh, slightly nutty scent that signals a good squash. The removed top becomes a lid, and dicing it to small cubes gives you additional roasted bits to sauté for the filling. Use a sharp knife and steady pressure, cutting on a stable board to maintain control. A key sensory cue is the clean, matte cut surface that should not ooze moisture, and if the skin slips under your knife you likely need a firmer grip. Avoid trimming too much from the base or the squash may not stand; instead, shave just enough so it sits steady on the pan. If you encounter resistance, rotate and cut from a different angle to prevent slipping.
- To a small saucepan, set over medium heat, add the oil. When hot, add the squash and a pinch of salt. Allow to cook, stirring frequently, for about 5 minutes. Next, add the shallot, garlic and pasilla chile. Cook for an additional 3 to 5 minutes. Remove from heat and set aside.: The small diced pieces will caramelize quickly, giving a concentrated, sweet note when sautéed. When you add them to the hot pan, listen for a soft sizzle and watch for edges to turn golden brown in about two to three minutes, that is when sugars begin to caramelize. If they steam instead of browning, the pan may be overcrowded or not hot enough, so increase heat slightly and spread pieces out. Avoid burning by stirring occasionally, and remove them the moment they show deep color because that bitterness will carry through the filling.
- To the squash, add a spoonful of the chile/squash mixture and then top with a handful of cheese. Repeat this until you’ve worked your way through all of the cheese and squash filling. Press the cheese all the way down into the squash and add any more you can to the top—you want this to be cheesy!: Measuring by eye can work, but aiming for about a half cup ensures balanced texture in each stuffed squash. The diced pieces should feel tender when pierced with a fork, giving a gentle resistance but not collapsing. If you have more than a half cup, adjust the quantity of cheese slightly to maintain the cheesy ratio. A common misstep is adding too much squash which dilutes the creaminess, so taste and balance as you combine ingredients.
- Transfer to the oven to bake for 15 minutes. Remove it from the oven and using a teaspoon, give it a stir. (I know this sounds weird but you really need to do this so it’s all melty.) And then return it to the oven to bake for an additional 10 minutes.: Making the squash stable sets you up for safe scooping and even baking. The bottom should be flat but not overly shaved, aim for a small, even slice. Place it on a parchment lined sheet so it does not catch and to ease cleanup. If it still wobbles slightly, shave off a tiny bit more until it stands secure; instability during baking can cause uneven roasting and messy filling spills.
- Serve with chips or crackers. I topped mine with some cilantro and a squeeze of lime.: Removing seeds opens the cavity for filling and concentrates roasted flavor. Use a sturdy spoon to scrape the fibrous strands until the walls are clean, and you may notice a nutty aroma as inner flesh is exposed. If small bits of stringy fibers remain they will soften while roasting, but getting most of the seeds out ensures room for luxuriant cheese. Avoid gouging too deep into the flesh while scraping, you want to preserve a layer of squash for structure.
- Place the squash on a parchment-lined baking sheet and preheat the oven to 350 degrees F: The oven should be fully up to temperature so the squash roasts evenly. Slide the sheet in and the dry heat will coax caramelization on exposed flesh, bringing out a richer sweetness. A clear visual cue is gentle browning around the cavity edges after roasting, and the aroma becomes warm and almost chestnut like. If the oven is not preheated the squash will take longer and may steam instead of roast, losing that concentrated flavor.
- To a small saucepan, set over medium heat, add the oil: When the oil shimmers slightly, it is hot enough to begin sautéing, and you will notice a faint scent rather than smoke. This moderate temperature allows for controlled browning of the diced squash and aromatics without scorching. If the oil smokes, lower the heat to prevent unpleasant burnt notes. Keep a wooden spoon handy to stir gently and maintain even contact with the pan surface.
- When hot, add the squash and a pinch of salt: As the squash hits the pan listen for a bright sizzle, and watch as edges start to take on a golden tone in minutes. Salt helps draw out moisture and accelerates caramelization, deepening the flavor. Stir frequently to promote even color and prevent sticking. A common error is to add too much salt early, which can make the filling overly seasoned once cheese is incorporated, so keep it light at this stage.
- Allow to cook, stirring frequently, for about 5 minutes: You should see golden spots develop and feel more pronounced aroma as the natural sugars heat. Stirring often releases steam and encourages even browning, while the gentle softening is a sign the pieces are approaching tenderness. If pieces are browning unevenly, adjust the heat slightly or move hotter pieces to a cooler part of the pan. Overcooking here will make the squash too soft and reduce textural contrast in the final dish.
- Next, add the shallot, garlic and pasilla chile: When you introduce the shallot and garlic , the pan will bloom with fragrant steam and a savory lift, while the pasilla contributes a toasty, almost raisin like aroma if using dried or a green heat if using jalapeño. Stir to combine and let the aromatics soften for three to five minutes, until the shallot is translucent and the garlic fragrant. Be attentive because garlic can go from golden to bitter quickly; reduce heat if you notice browning too fast. This step layers flavors that the cheese will later marry with, so take care not to rush it.
- Cook for an additional 3 to 5 minutes: The mix should smell deeply savory with a hint of sweetness from the squash and a gentle chile warmth. Texturally, everything will coalesce, and the pan should carry a glossy coating from the oil. If there is excess moisture pooling, increase heat briefly to evaporate it, otherwise the filling can become watery and prevent the cheese from forming a luscious, cohesive melt.
- Remove from heat and set aside: Allowing the mixture to cool slightly prevents the cheese from becoming oily when combined and helps you manage assembly with comfortable hands. The residual heat will keep flavors melded, but cooling for a few minutes preserves the cheese texture. A frequent oversight is adding cheese to boiling hot filling which can lead to separation, so patience here pays off.
- To the squash, add a spoonful of the chile/squash mixture and then top with a handful of cheese: Layering in this way distributes pockets of flavor, and you will notice the contrast between warm filling and cooler cheese as you assemble. The hand pressed cheese sinks into crevices and begins to warm from contact, creating strings when the squash returns to the oven. If you press the cheese too firmly you can compact the layers and hinder even melting, so nestle rather than cram.
- Repeat this until you’ve worked your way through all of the cheese and squash filling: Building multiple layers ensures every spoonful blends molten cheese with savory-sweet filling. Visually, the top should look generously covered in cheese, not sparse. As you layer, be mindful of balance; more cheese yields a richer dip, but you want the squash flavor to remain present. One mistake is to skimp on filling, leaving the cheese dominant and the squash underrepresented.
- Press the cheese all the way down into the squash and add any more you can to the top—you want this to be cheesy: Pressing encourages the cheese to nestle into pockets, which results in satisfying stretch when served. The exposed top layer will develop a bubbling, lightly browned crust in the oven, while embedded cheese melts into the filling. Avoid compacting to the point the squash walls bulge or split, which could cause leaks during baking.
- Transfer to the oven to bake for 15 minutes: During this first bake the cheese will soften and begin to melt through the layers, and the squash will continue to roast and become fully tender. You should hear a gentle bubbling sound and see the cheese glisten; that means proteins are beginning to relax and oil may start separating, which is natural. If the top browns too quickly, tent with foil to allow internal melting without overcoloring the surface.
- Remove it from the oven and using a teaspoon, give it a stir: Stirring at this point helps redistribute heat and encourages uniform texture so the center does not remain cool while the edges are molten. You will notice a change in viscosity, with pockets of silkier melted cheese integrating into the filling. Be careful as steam escapes when you stir, and avoid vigorous mixing which can deflate the structure; gentle folding is best. Not stirring can leave cold pockets that feel undercooked when served.
- And then return it to the oven to bake for an additional 10 minutes: The second bake finishes melting, encourages a lightly browned top, and ensures the filling is uniformly warm. Look for an even golden hue on the cheese and a bubbling perimeter; these are reliable visual cues that everything is ready. If the cheese is not bubbling after ten minutes, extend by a few minutes while watching closely to avoid burning.
- Serve with chips or crackers: Hot from the oven, the dish will release a warm, savory steam and the texture will be luscious. Use sturdy chips or thin slices of bread to scoop without tearing the squash shell. Garnish with the minced cilantro and a squeeze of lime if you like a bright contrast. A common serving mistake is to let it cool too long which causes the cheese to firm up, so plan to serve as soon as it comes out of the oven.
- I topped mine with some cilantro and a squeeze of lime: Fresh cilantro adds herbaceous brightness while a touch of lime introduces acidity that cuts through richness. Add these final touches just before serving so they stay vibrant. Overdoing lime can overwhelm gentle flavors, so a light squeeze is typically all you need.
Notes
- Perfect Roast Roasting the acorn squash until tender and caramelized brings out deeper flavor; check for a fork tender texture without collapsing the shell.
- Cheese Matters Use freshly grated mozzarella or Oaxacan cheese for a smoother melt; avoid pre shredded varieties for best consistency.
- Spice it Up If you like more heat, keep the seeds in your pasilla or substitute with a fresh pepper to increase brightness and warmth.
- Alternate Baking Vessel If you prefer not to serve in the squash, assemble in an 8 inch baking dish and bake the same way for an easy crowd friendly option.
- Dipping Delights Serve with sturdy tortilla chips or slices of crusty baguette to scoop up melty cheese and squash in every bite.
- Keep it Warm Transfer leftovers to a fondue pot or small slow cooker on low when serving at a party to maintain that just melted texture throughout the evening.