2 ingredient Pupsicles
2 ingredient Pupsicles are creamy frozen treats made with ripe bananas and plain yogurt, creating a naturally sweet, cool snack for dogs. Variations with peanut butter, berries, or pumpkin add texture and flavor, making them ideal for summer outings or training rewards. Easy to make and budget friendly, this simple recipe is perfect for busy pet parents who want a safe homemade treat.
Equipment
- Silicone mold or ice cube tray
- Baking Sheet
- Small microwave safe bowl
- Knife
- Air tight freezer bag
Ingredients
- Silicone treat molds or ice cub tray Provide flexible cavity shapes for freezing mixtures into individual servings; enable easy removal of frozen treats and consistent portion sizes. Ensure safe, non-reactive surfaces for cold storage and simple cleaning between batches.
- 2 very ripe bananas, smashed Serve as the primary natural sweetener and binding agent when mashed; add creamy texture and help hold frozen treats together. Contribute potassium and a smooth mouthfeel that complements other mix-ins.
- 2 to 4 tablespoons peanut butter Add rich, nutty flavor and healthy fats to enhance creaminess and caloric density in frozen treats. Help bind softer ingredients and improve scoopability once partially thawed.
- 1/2 cup chopped strawberries, blackberries or raspberries, pureed, or whole blueberries Contribute bright fruity flavor, natural sweetness, and varying texture depending on whether pureed or whole. Provide antioxidants, moisture, and a refreshing contrast to creamy components.
- 25 -ounce container plain yogurt Deliver tangy creaminess and a smooth base that freezes well while supplying protein and probiotics if live cultures are present. Balance sweetness and contribute a rich, dairy-like texture to the pupsicles.
- 2 very ripe bananas, smashed Provide additional natural sweetness and binding properties when mashed; improve texture and help hold frozen mixtures together. Complement other flavors and increase nutritional value with fiber and minerals.
- 1/4 cup pumpkin puree, not pumpkin pie filling Supply dense moisture and mild flavor while adding fiber and vitamins; act as a thickening agent to stabilize mixtures. Enhance smoothness and provide a nutrient-rich alternative to dairy or sweet additions.
Instructions
- If using floppy silicone molds, place them on a baking sheet or cutting board that will fit in your freezer, and clear enough space in your freezer for the molds to lay flat.: The moment you set the filled molds down you want a perfectly level surface, because uneven molds will spill and mix flavors, so a baking sheet gives you stability. You should feel the slight give of the silicone as you press it onto the tray, and the surface noise is a soft thud rather than a thunk when it sits flat. Doing this prevents leaks and keeps your freezer tidy. One common mistake is guessing that molds will hold their shape when they are still floppy, which leads to a sticky cleanup and misshapen treats.
- In a small, microwave-safe bowl, microwave peanut butter for 10 to 20 seconds and stir until pourable. To each mold, add a spoonful of peanut butter and enough mashed banana to fill the mold. Use a knife to swirl in the peanut butter if desired.: Warmed peanut butter becomes glossy and runny, making it easy to portion into molds and swirl with mashed bananas . You will notice an aromatic nutty steam rise when it is warmed, and a slow ribbon of peanut butter when you stir shows the right consistency. Overheating will make it too thin and separate oils, so short bursts of 10 seconds with stirring are safe. A typical slip is overheating and creating oil slicks, which can ruin the texture.
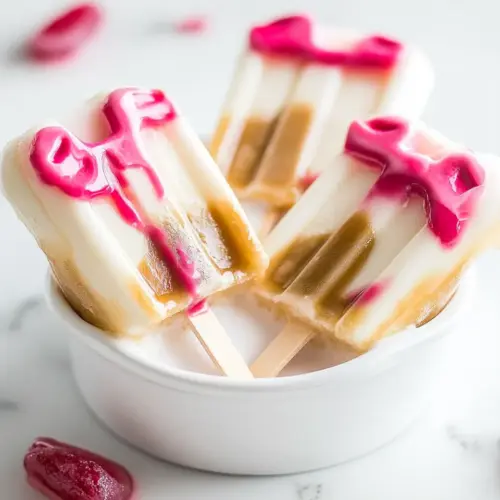
- Combine spoonfuls of berries and yogurt until molds are filled.: As you layer, press the mashed bananas down so there are no air pockets, and watch how the textures nestle together, the matte banana contrasting with the shiny peanut butter . The sound is subtle, a soft plop as the spoon drops the mixture in, and visually you want the mold nearly full but with a small gap at the top for expansion. If air pockets remain, treats may crack when frozen, so tamp gently to compact. Avoid overfilling which leads to messy seals when frozen.
- Combine spoonfuls of pumpkin and mashed banana until molds are filled.: The swirl technique creates marbled visual interest and small streaks of concentrated flavor, and you will see thin ribbons of peanut butter through the pale banana base. A gentle twisting motion with a knife is better than vigorous mixing, which would blend them fully and lose the visual contrast. The sensory clue is a glossy line that holds its shape without sinking immediately. A common mistake is over swirling and turning the distinct layers into a single color and texture.
- Freeze until solid, 3 to 4 hours. Remove treats from molds/trays and store in an air-tight freezer bag for up to 3 months.: When making the berry version, the yogurt should be smooth and slightly thick, and as you add mashed or pureed berries you will see color streaks or a rosy hue spreading through the white. The smell is bright and slightly tart, and the spoon makes a soft plopping sound as each portion lands. Aim for even distribution so each treat has fruit throughout; uneven scooping creates some treats that are all yogurt and others that are all fruit. Avoid overfilling and be mindful of seeds if using seeded berries.
- Combine spoonfuls of pumpkin and mashed banana until molds are filled: For the pumpkin variation, the mixture should be uniformly orange flecked with banana, with a rich, earthy scent that is subtler than a spiced dessert, because you are using plain pumpkin puree. The texture is thicker, so press portions down to remove air and create a compact treat that freezes evenly. You will notice a firm hand is helpful here because pumpkin can sit on top rather than blend if not pressed. A mistake to avoid is using spiced pumpkin pie filling, which contains ingredients that are not dog safe.
- Freeze until solid, 3 to 4 hours: As the trays chill, you will observe condensation on the exterior then a hard, frosty surface forming; the treats go from soft and glossy to matte and firm. The ambient freezer hum is the only sound, and the timeline ensures the interior is fully set so treats pop cleanly from molds. Rushing this step results in partially frozen centers that can collapse when removed, so give them the full time.
- Remove treats from molds/trays and store in an air-tight freezer bag for up to 3 months: When fully frozen the pupsicles should release with a soft push, and the edges will be crisp to the touch. Transfer them quickly to an air-tight bag to prevent freezer burn and off flavors, and label the bag with the date. A common error is leaving them exposed on a tray where they pick up freezer odors or become icy, which changes texture and appeal.
Notes
- Check labels carefully Always choose plain, unsweetened yogurt and a peanut butter that does not contain xylitol; read ingredient lists to avoid artificial sweeteners that harm dogs.
- Control portion size Small molds or ice cube trays create bite size treats that are easier to manage for small breeds and help prevent gulping.
- Mix textures Try pureeing berries for a smooth swirl or leaving blueberries whole for little pockets of juice and a burst of flavor in each bite.
- Freeze on a flat surface Use a baking sheet to stabilize floppy molds, this prevents spills and keeps the molds level while the pupsicles set.
- Label and date Put the date on the storage bag so you use the oldest pupsicles first and avoid freezer burn over time.
- Test new ingredients Introduce one new mix in small amounts to check your dog's reaction before making large batches.