
Twice Baked Honeynut Squash with Brown Butter
Twice Baked Honeynut Squash with Brown Butter is one of those recipes I reach for when I want comfort with a little showmanship.
Years ago I brought a tray of this to a small dinner party and watched it disappear faster than I expected. The first time I caramelized the squash flesh and stirred in unsalted butter browned until it smelled nutty, someone asked for the recipe before the plate was empty. That night taught me that simple ingredients, handled with care, can feel luxurious.
Every time I make Twice Baked Honeynut Squash with Brown Butter I think about the small choices that add up. Roasting the honeynut squash cut side down makes the skin tender and concentrates the sweetness. Browning the unsalted butter and simmering the fresh rosemary and fresh sage briefly unlocks aroma oils that a raw herb never will. Then a quick crisp from breadcrumbs gives contrast to the pillowy filling. It feels rustic, yet thoughtful.
Recipe Snapshot
60 mins
15 mins
45 mins
Medium
180 kcal
American
Gluten-Free, Paleo
Side Dishes
Oven, Sheet tray, Parchment paper, Skillet, Mixing bowl
What We Adore About This Twice Baked Honeynut Squash with Brown Butter
Layered Autumn Flavor
I love how Twice Baked Honeynut Squash with Brown Butter layers flavors. Roasting intensifies the squash, browning the unsalted butter adds toasty notes, and the herbs bring an evergreen lift. These elements balance each other so the dish never feels one dimensional.
Simple Techniques, Big Impact
There is elegance in straightforward method. A roast, a mash, and a quick re bake deliver a polished dish without fuss. I find this approach frees up time to focus on seasoning and texture, instead of overcomplicating steps.
Textural Contrast
The contrast between the creamy squash and the crisp breadcrumbs is what keeps people coming back for seconds. I like how the fried sage leaves add a brittle, savory crunch that plays against the smooth filling.
Seasonal and Approachable
This recipe highlights the small, sweet honeynut squash that seems tailor made for cozy evenings. It is a dish that reads as special but remains entirely approachable for weeknight meals or holiday spreads.
Versatility for Serving
I appreciate that this recipe works solo as a vegetarian main or as a standout side. The flavors are familiar, so it pairs well with many menus, and it keeps well for making ahead, which is a helpful practical detail when hosting.
What Goes Into Twice Baked Honeynut Squash with Brown Butter
Think of these ingredients as a small team where each player has a clear job. The honeynut squash brings natural sweetness and creamy texture, the unsalted butter becomes nutty and aromatic when browned, and the fresh rosemary and fresh sage lift the profile with herbaceous notes. Breadcrumbs and the fried sage leaves supply contrast, while the salt ties everything together.
- 2 to 3 small honeynut squash: Roast and scoop to develop a sweet, concentrated flesh that forms the creamy base for the twice-baked filling; its skins provide sturdy shells for returning the mixture to the oven. Cut and bake until tender, then mash with other flavorful components to balance sweetness and savory notes across the dish.
- 3 tablespoons unsalted butter: Brown gently to introduce nutty, caramelized flavors that deepen the overall savory profile; use the foaming butter to coat and bind the filling components. Monitor closely to avoid burning, as browned butter adds an aromatic richness that complements roasted squash.
- 1 tablespoon minced fresh rosemary: Chop finely to release fragrant, piney notes that brighten the filling and cut through richness; fold into the mashed squash for aromatic lift. Use sparingly so rosemary’s resinous flavor enhances rather than overwhelms the delicate sweetness.
- 1 tablespoons fresh minced sage: Mince finely to contribute an earthy, slightly peppery flavor that layers with rosemary and brown butter; integrate into the filling for complex herbal depth. Its softer, rounder character helps balance the sharper herb while adding savory warmth to each bite.
- 1/2 teaspoons salt: Season judiciously to enhance all flavors and balance sweetness and fat; sprinkle into the filling and adjust to taste before stuffing the shells. Salt helps draw out moisture and amplify the natural flavors of honey nut squash and browned butter.
- 1/2 to 3/4 cup breadcrumbs: Toast or mix in to provide crunchy texture and absorb excess moisture, preventing a soggy filling while adding toasty flavor notes. Adjust quantity between the range to achieve desired crumbly texture that contrasts the creamy squash interior.
- 5 sage leaves (fried): Fry until crisp to create a final crunchy, aromatic garnish that delivers concentrated sage flavor and visual contrast when sprinkled over the finished dish. Use as a finishing touch to add texture and an herbaceous, savory accent to each serving.
Directions for Twice Baked Honeynut Squash with Brown Butter
These directions are approachable, and I talk you through what to watch for at every moment. Expect tactile cues and aroma changes to guide your timing, and rely on the sensory descriptions to know when things are just right.
- Heat your oven to 425˚F. Slice the butternut squash in half, lengthwise, and place cut-side down on a sheet tray covered with parchment paper. Bake until the squash is tender, 25 to 40 minutes, depending on the size of your squash. Remove from the oven, remove the seeds, and scoop the remaining squash into a bowl.: You will notice the oven warming, and that dry, hot air is what concentrates the natural sugars in the honeynut squash , creating deep caramelized notes. As the oven approaches temperature the fan or elements will hum and the initial blast of heat will help the skin relax. A common mistake is starting at a lower temperature, which leads to steamed, not roasted, flesh. If your squash is uneven in size, place similar sized halves together so they roast evenly.
- While the squash bake, place butter in a warm skillet. Let the butter melt and continue stirring while butter foams up. Once brown flecks appear at the bottom of the pan, remove from the heat and stir in the rosemary and sage. Let rest for a few minutes then stir into the bowl of squash. Add the salt and stir to combine everything.: Placing the cut side down directs heat to the skin and encourages the flesh to roast rather than dry out, yielding a tender interior with concentrated sweetness. You may hear a faint sizzle as any trapped juices contact the hot tray. Avoid overcrowding the pan, since close placement can create steam and prevent proper caramelization.
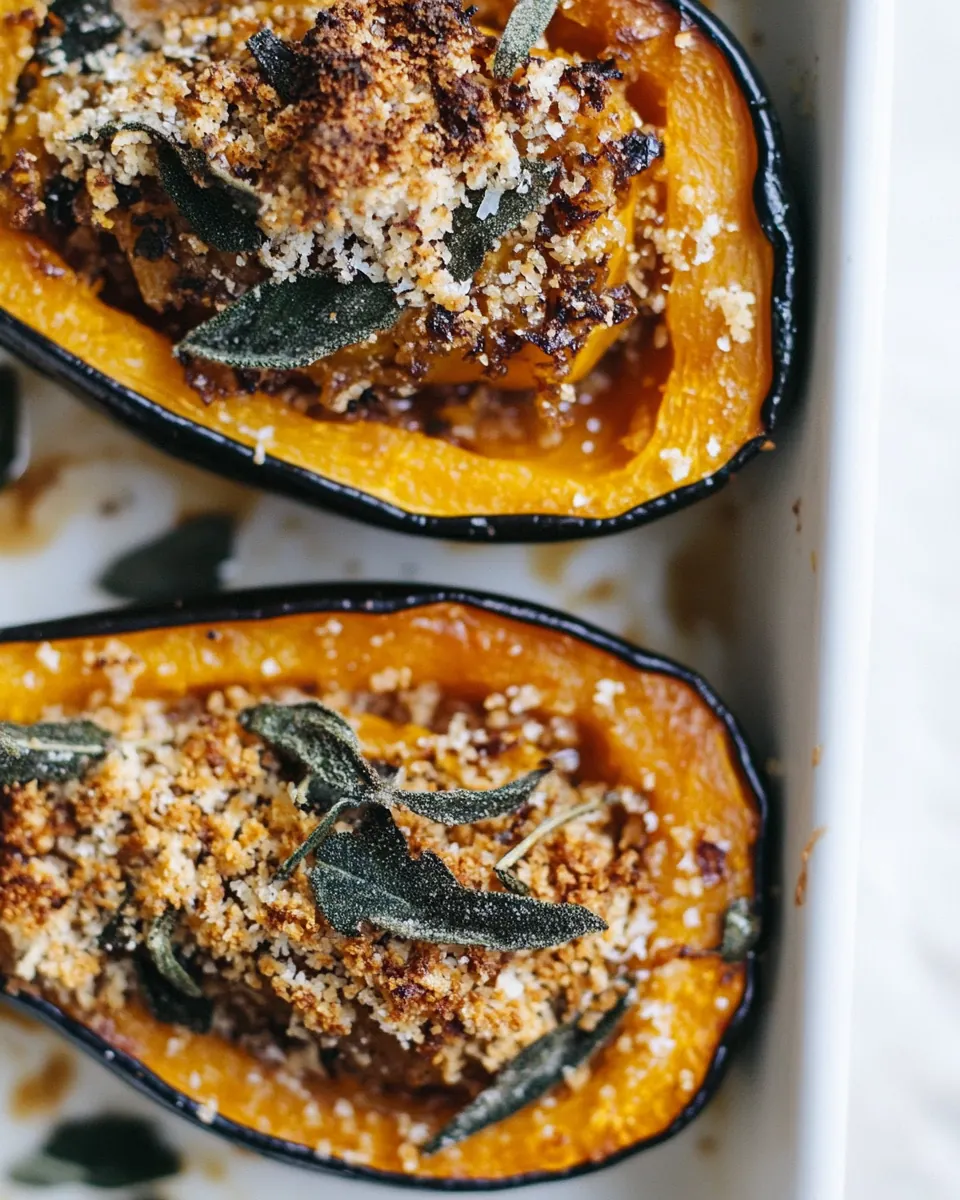
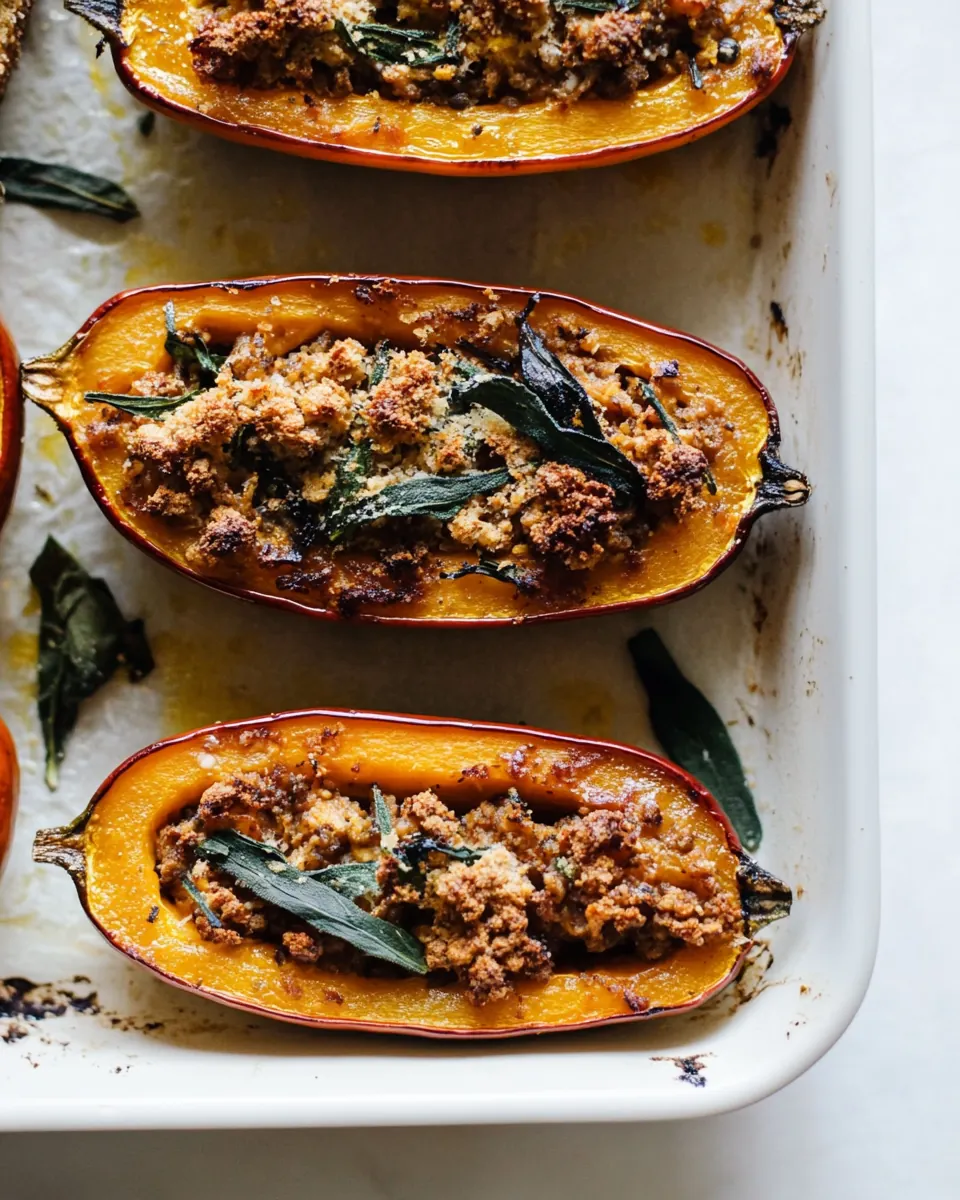
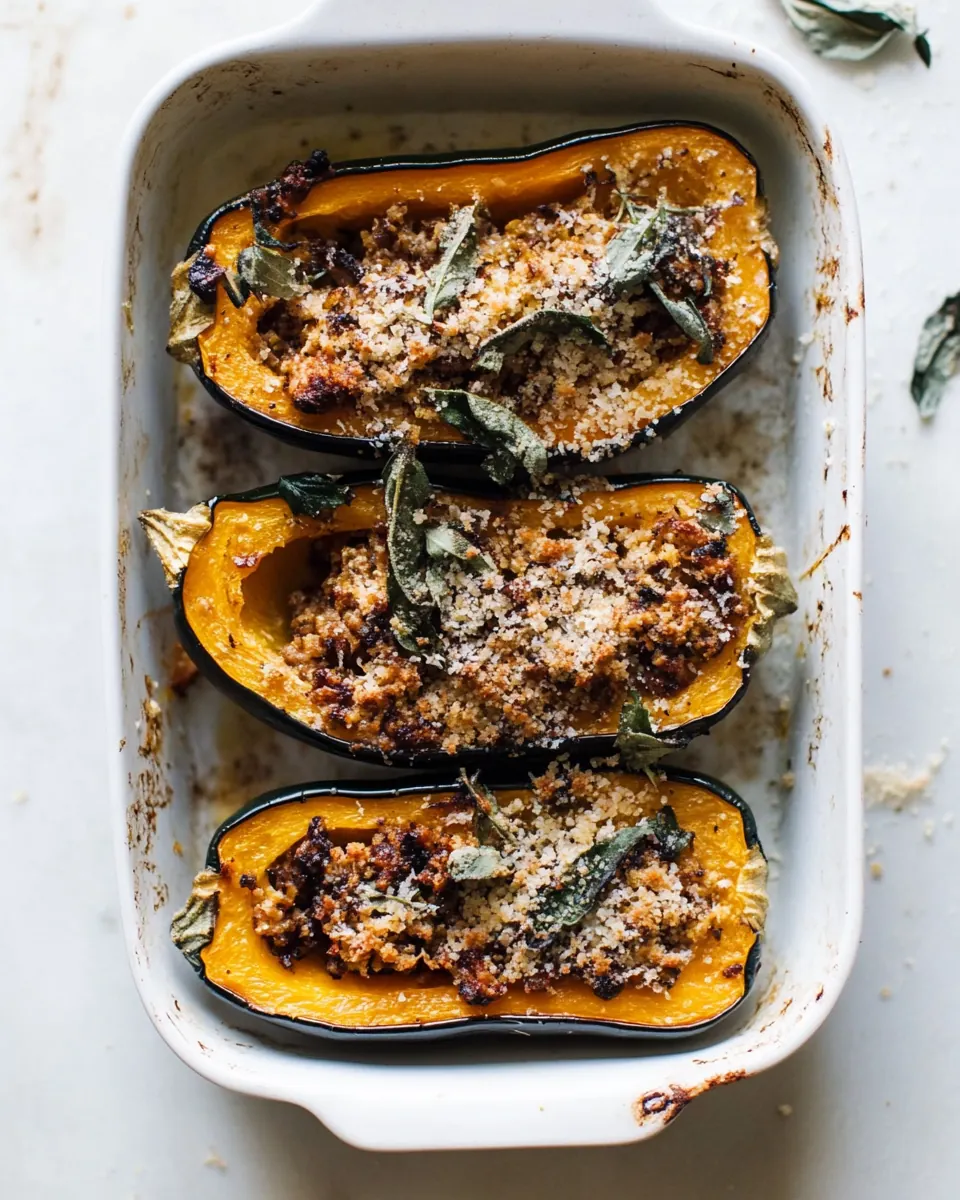
- Transfer the butternut squash filling back into the squash shells. Sprinkle with the breadcrumbs and return the pan to the oven. Bake for 10 to 12 minutes, just enough to brown the tops. Remove from oven and sprinkle with crushed fried sage.: You will see the edges darken and the flesh will give when you press the skin gently with a fork. The aroma shifts from raw squash to a richer, almost toasted scent, signaling readiness. A common error is relying strictly on the clock rather than feeling for tenderness; test with a fork to be sure the center yields easily.
- Remove from the oven, remove the seeds, and scoop the remaining squash into a bowl: The warm, silky flesh will slide away from the skin and collecting it while hot makes mashing effortless. The tactile warmth in your hands and the sweet steam rising are good indicators. Be cautious not to burn yourself on the hot pan or steam, and discard the seeds or reserve them for another use if desired.
- While the squash bake, place butter in a warm skillet: As the unsalted butter melts you will hear a soft sizzle and see it foam, which means moisture is evaporating and the milk solids are browning. Stirring consistently helps distribute heat and avoid localized scorching. The mistake to avoid is walking away; browned butter transforms quickly from golden to burnt, so stay attentive and remove it at the first sign of brown flecks.
- Let the butter melt and continue stirring while butter foams up: The foaming phase releases a toasty aroma that is unmistakable, signaling that the butter is developing depth. The sound becomes quieter as the foaming subsides and brown flecks appear, which is the moment to act. Do not rush this step, since underbrowned butter lacks the same complexity, but also avoid over browning which tastes bitter.
- Once brown flecks appear at the bottom of the pan, remove from the heat and stir in the rosemary and sage: Introducing the fresh rosemary and fresh sage off heat allows their oils to infuse without wilting or cooking harshly, preserving bright herbal notes that complement the toasted butter. You will notice a fragrant steam rise as the herbs release aroma into the warm fat. A pitfall is adding herbs too early on high heat, which can crisp them in a way that makes them bitter instead of fragrant.
- Let rest for a few minutes then stir into the bowl of squash: Resting lets the flavors meld and the butter cool just enough so it coats rather than separates. When you stir, the mixture should feel velvety, and the aroma should deepen into savory, slightly sweet layers. If you add hot fat immediately it can make the squash greasy, so give it a moment to temper.
- Add the salt and stir to combine everything: Adding salt at this stage allows you to taste and balance sweetness and richness. The sound of a wooden spoon scraping the bowl and the glossy sheen forming on the mixture are good visual cues that it is well combined. Over salting is a common error, so taste as you go and adjust conservatively.
- Transfer the butternut squash filling back into the squash shells: Spoon the silky filling back into the roasted shells, pressing gently so each half is generously filled. The contrast between the warm skin and the smooth filling is part of the charm. Avoid packing too tightly, which can prevent the breadcrumbs from crisping properly on top.
- Sprinkle with the breadcrumbs and return the pan to the oven: The breadcrumbs will toast and form a golden crust that provides the necessary textural contrast. You should hear a faint toasting sound and see the topping take on color within minutes. A common oversight is using wet or oily breadcrumbs which prevent crisping; use dry crumbs for the best crunch.
- Bake for 10 to 12 minutes, just enough to brown the tops: Watch for the crust to turn golden and fragrant; the oven will emit a warm, toasty smell. Pulling too early leaves the topping pale and soft, while overbaking can dry the filling. Keep a close eye during this short window so you catch the ideal finish.
- Remove from oven and sprinkle with crushed fried sage: The finishing touch of crisp, fried sage leaves adds sonic crunch and a punch of herbaceous flavor. The crisp leaves will crack under a fork and release an intense aroma with each bite. Be careful not to let the fried sage get soggy by adding it while the topping is still steaming; wait just a moment so it remains crisp.
Pro Tips and Tweaks
I like to share concise, practical tweaks that elevate the dish without changing its heart. Below are focused tips that address timing, texture, and presentation to get the best results.
- Use even sized squash for consistent roasting times and even tenderness across halves.
- Bread crumb texture matters, choose dry crumbs for a snappy finish, and pulse them slightly if you want finer coverage.
- Brown the butter carefully and remove it at the first brown flecks to capture the sweet toasted notes rather than bitter char.
- Infuse herbs off heat to avoid burning, stir them into the warm butter so they release aroma without becoming bitter.
- Dry fried sage on paper towel so it stays crisp when used as a garnish right before serving.
What to Serve Alongside Twice Baked Honeynut Squash with Brown Butter
This dish works in many contexts, from cozy dinners to festive spreads. Below are pairing ideas that consider texture, seasonality, and occasion so you can craft a balanced plate.
- Roasted root vegetables such as carrots and parsnips provide earthy contrast and complement the squash‘s sweetness, ideal for a fall dinner.
- Green salad with lemon vinaigrette cuts through the richness with brightness, offering a refreshing counterpoint and keeping the meal lively.
- Grain pilaf like farro or barley adds chew and makes the meal more substantial for a vegetarian main course.
- Light soup starter such as a clear vegetable broth prefaces the meal gently and keeps the menu balanced for a holiday lunch or dinner.
- Make ahead and reheat by assembling and chilling, then finishing under the oven to crisp the topping, which is handy for entertaining or Ramadan iftar meals.
- Seasonal presentation on a platter with extra fried sage leaves and scattered herbs makes it feel festive for family gatherings or weekend dinners.
FAQ
Conclusion
This recipe shines because it combines the natural sweetness of the squash with the toasty complexity of brown butter and the crisp contrast of breadcrumbs and fried sage. The result is both comforting and elegant, fitting for weeknight dinners or special gatherings alike. Give it a try and notice how small technique changes make a big difference in flavor and texture. I hope you enjoy serving it as much as I do, and that it becomes a dependable favorite in your seasonal repertoire.

Twice Baked Honeynut Squash with Brown Butter
Equipment
- Oven
- Sheet tray
- Parchment Paper
- Skillet
- Mixing Bowl
Ingredients
- 2 to 3 small honeynut squash Roast and scoop to develop a sweet, concentrated flesh that forms the creamy base for the twice-baked filling; its skins provide sturdy shells for returning the mixture to the oven. Cut and bake until tender, then mash with other flavorful components to balance sweetness and savory notes across the dish.
- 3 tablespoons unsalted butter Brown gently to introduce nutty, caramelized flavors that deepen the overall savory profile; use the foaming butter to coat and bind the filling components. Monitor closely to avoid burning, as browned butter adds an aromatic richness that complements roasted squash.
- 1 tablespoon minced fresh rosemary Chop finely to release fragrant, piney notes that brighten the filling and cut through richness; fold into the mashed squash for aromatic lift. Use sparingly so rosemary’s resinous flavor enhances rather than overwhelms the delicate sweetness.
- 1 tablespoons fresh minced sage Mince finely to contribute an earthy, slightly peppery flavor that layers with rosemary and brown butter; integrate into the filling for complex herbal depth. Its softer, rounder character helps balance the sharper herb while adding savory warmth to each bite.
- 1/2 teaspoons salt Season judiciously to enhance all flavors and balance sweetness and fat; sprinkle into the filling and adjust to taste before stuffing the shells. Salt helps draw out moisture and amplify the natural flavors of honey nut squash and browned butter.
- 1/2 to 3/4 cup breadcrumbs Toast or mix in to provide crunchy texture and absorb excess moisture, preventing a soggy filling while adding toasty flavor notes. Adjust quantity between the range to achieve desired crumbly texture that contrasts the creamy squash interior.
- 5 sage leaves (fried) Fry until crisp to create a final crunchy, aromatic garnish that delivers concentrated sage flavor and visual contrast when sprinkled over the finished dish. Use as a finishing touch to add texture and an herbaceous, savory accent to each serving.
Instructions
- Heat your oven to 425˚F. Slice the butternut squash in half, lengthwise, and place cut-side down on a sheet tray covered with parchment paper. Bake until the squash is tender, 25 to 40 minutes, depending on the size of your squash. Remove from the oven, remove the seeds, and scoop the remaining squash into a bowl.: You will notice the oven warming, and that dry, hot air is what concentrates the natural sugars in the honeynut squash , creating deep caramelized notes. As the oven approaches temperature the fan or elements will hum and the initial blast of heat will help the skin relax. A common mistake is starting at a lower temperature, which leads to steamed, not roasted, flesh. If your squash is uneven in size, place similar sized halves together so they roast evenly.
- While the squash bake, place butter in a warm skillet. Let the butter melt and continue stirring while butter foams up. Once brown flecks appear at the bottom of the pan, remove from the heat and stir in the rosemary and sage. Let rest for a few minutes then stir into the bowl of squash. Add the salt and stir to combine everything.: Placing the cut side down directs heat to the skin and encourages the flesh to roast rather than dry out, yielding a tender interior with concentrated sweetness. You may hear a faint sizzle as any trapped juices contact the hot tray. Avoid overcrowding the pan, since close placement can create steam and prevent proper caramelization.
- Transfer the butternut squash filling back into the squash shells. Sprinkle with the breadcrumbs and return the pan to the oven. Bake for 10 to 12 minutes, just enough to brown the tops. Remove from oven and sprinkle with crushed fried sage.: You will see the edges darken and the flesh will give when you press the skin gently with a fork. The aroma shifts from raw squash to a richer, almost toasted scent, signaling readiness. A common error is relying strictly on the clock rather than feeling for tenderness; test with a fork to be sure the center yields easily.
- Remove from the oven, remove the seeds, and scoop the remaining squash into a bowl: The warm, silky flesh will slide away from the skin and collecting it while hot makes mashing effortless. The tactile warmth in your hands and the sweet steam rising are good indicators. Be cautious not to burn yourself on the hot pan or steam, and discard the seeds or reserve them for another use if desired.
- While the squash bake, place butter in a warm skillet: As the unsalted butter melts you will hear a soft sizzle and see it foam, which means moisture is evaporating and the milk solids are browning. Stirring consistently helps distribute heat and avoid localized scorching. The mistake to avoid is walking away; browned butter transforms quickly from golden to burnt, so stay attentive and remove it at the first sign of brown flecks.
- Let the butter melt and continue stirring while butter foams up: The foaming phase releases a toasty aroma that is unmistakable, signaling that the butter is developing depth. The sound becomes quieter as the foaming subsides and brown flecks appear, which is the moment to act. Do not rush this step, since underbrowned butter lacks the same complexity, but also avoid over browning which tastes bitter.
- Once brown flecks appear at the bottom of the pan, remove from the heat and stir in the rosemary and sage: Introducing the fresh rosemary and fresh sage off heat allows their oils to infuse without wilting or cooking harshly, preserving bright herbal notes that complement the toasted butter. You will notice a fragrant steam rise as the herbs release aroma into the warm fat. A pitfall is adding herbs too early on high heat, which can crisp them in a way that makes them bitter instead of fragrant.
- Let rest for a few minutes then stir into the bowl of squash: Resting lets the flavors meld and the butter cool just enough so it coats rather than separates. When you stir, the mixture should feel velvety, and the aroma should deepen into savory, slightly sweet layers. If you add hot fat immediately it can make the squash greasy, so give it a moment to temper.
- Add the salt and stir to combine everything: Adding salt at this stage allows you to taste and balance sweetness and richness. The sound of a wooden spoon scraping the bowl and the glossy sheen forming on the mixture are good visual cues that it is well combined. Over salting is a common error, so taste as you go and adjust conservatively.
- Transfer the butternut squash filling back into the squash shells: Spoon the silky filling back into the roasted shells, pressing gently so each half is generously filled. The contrast between the warm skin and the smooth filling is part of the charm. Avoid packing too tightly, which can prevent the breadcrumbs from crisping properly on top.
- Sprinkle with the breadcrumbs and return the pan to the oven: The breadcrumbs will toast and form a golden crust that provides the necessary textural contrast. You should hear a faint toasting sound and see the topping take on color within minutes. A common oversight is using wet or oily breadcrumbs which prevent crisping; use dry crumbs for the best crunch.
- Bake for 10 to 12 minutes, just enough to brown the tops: Watch for the crust to turn golden and fragrant; the oven will emit a warm, toasty smell. Pulling too early leaves the topping pale and soft, while overbaking can dry the filling. Keep a close eye during this short window so you catch the ideal finish.
- Remove from oven and sprinkle with crushed fried sage: The finishing touch of crisp, fried sage leaves adds sonic crunch and a punch of herbaceous flavor. The crisp leaves will crack under a fork and release an intense aroma with each bite. Be careful not to let the fried sage get soggy by adding it while the topping is still steaming; wait just a moment so it remains crisp.
Notes
- Use even sized squash for consistent roasting times and even tenderness across halves.
- Bread crumb texture matters, choose dry crumbs for a snappy finish, and pulse them slightly if you want finer coverage.
- Brown the butter carefully and remove it at the first brown flecks to capture the sweet toasted notes rather than bitter char.
- Infuse herbs off heat to avoid burning, stir them into the warm butter so they release aroma without becoming bitter.
- Dry fried sage on paper towel so it stays crisp when used as a garnish right before serving.