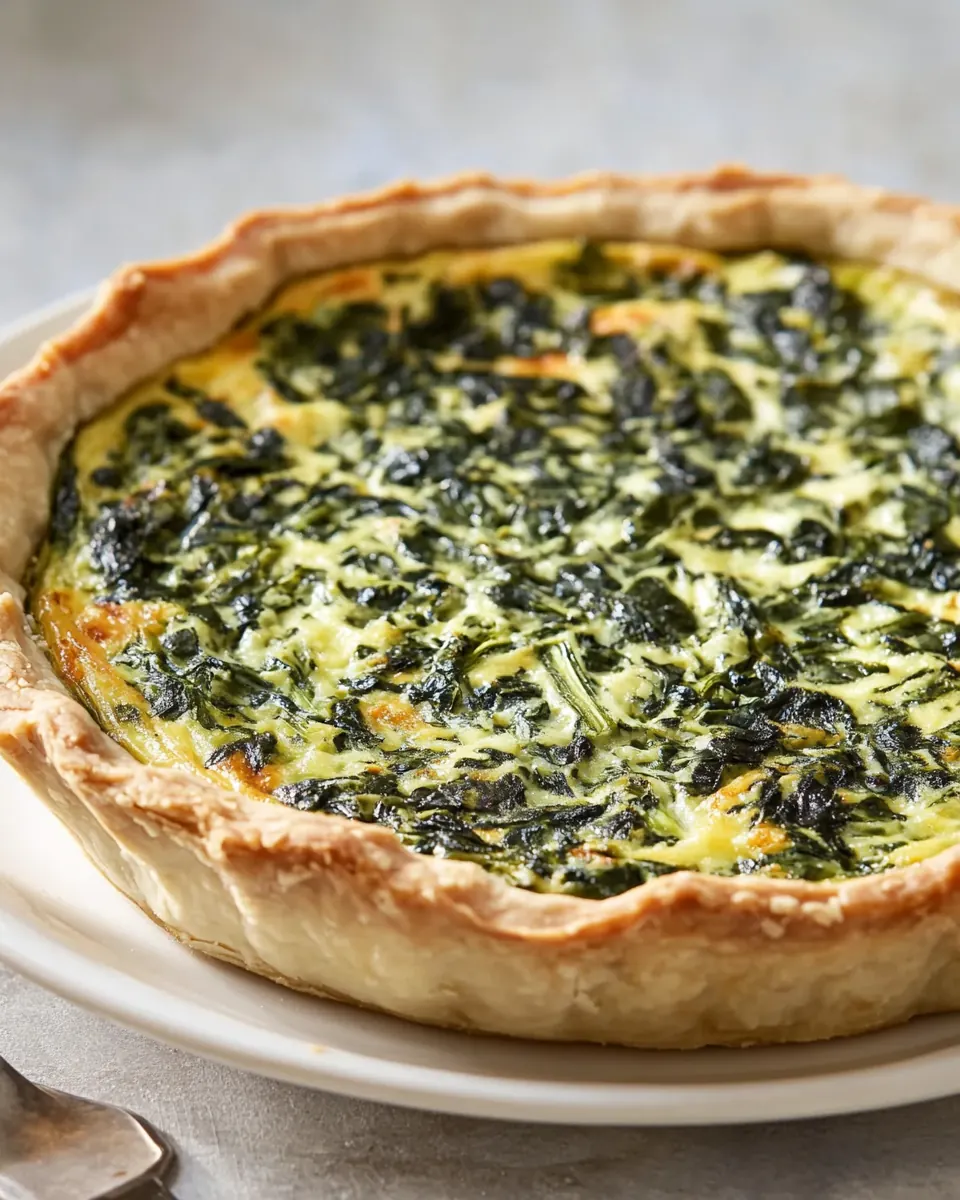
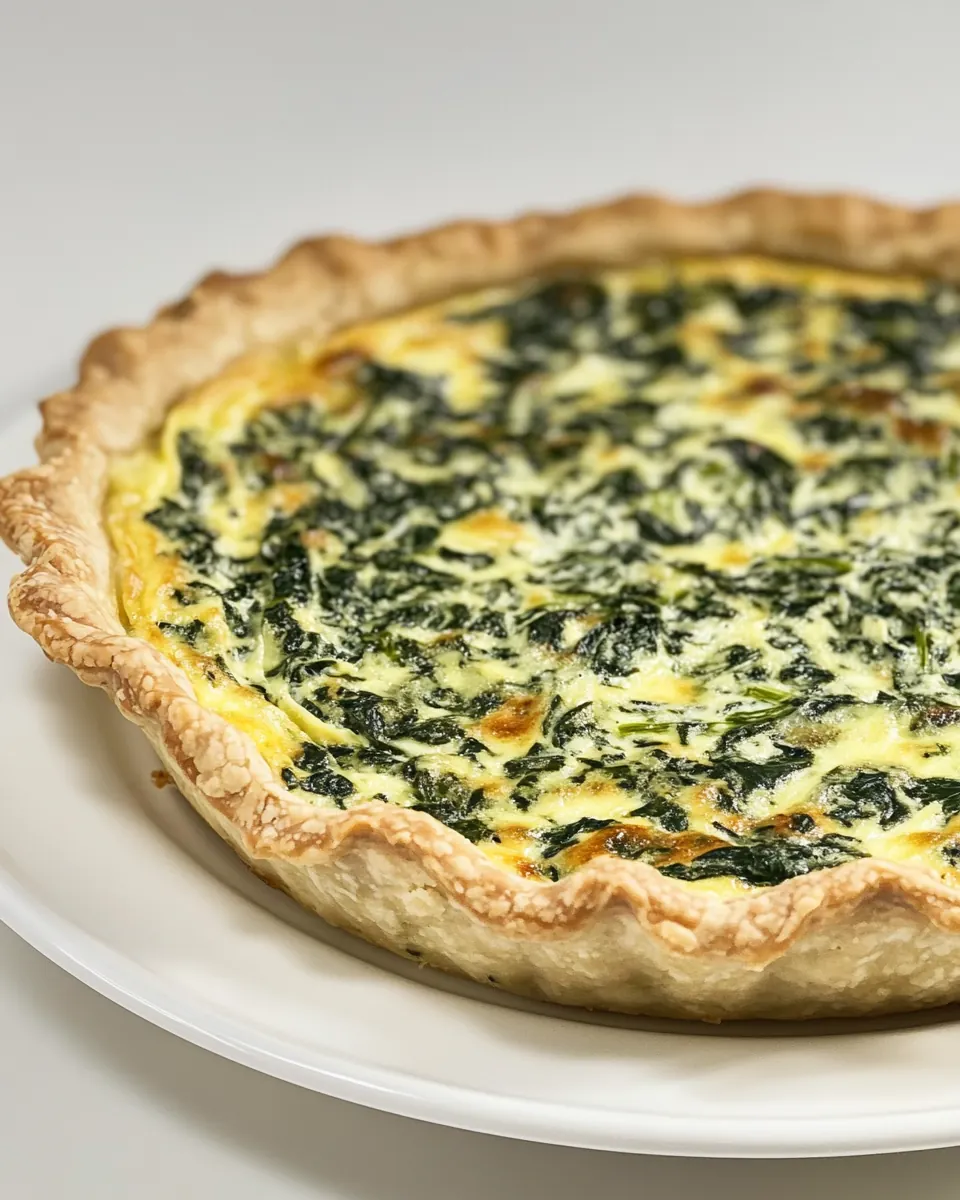
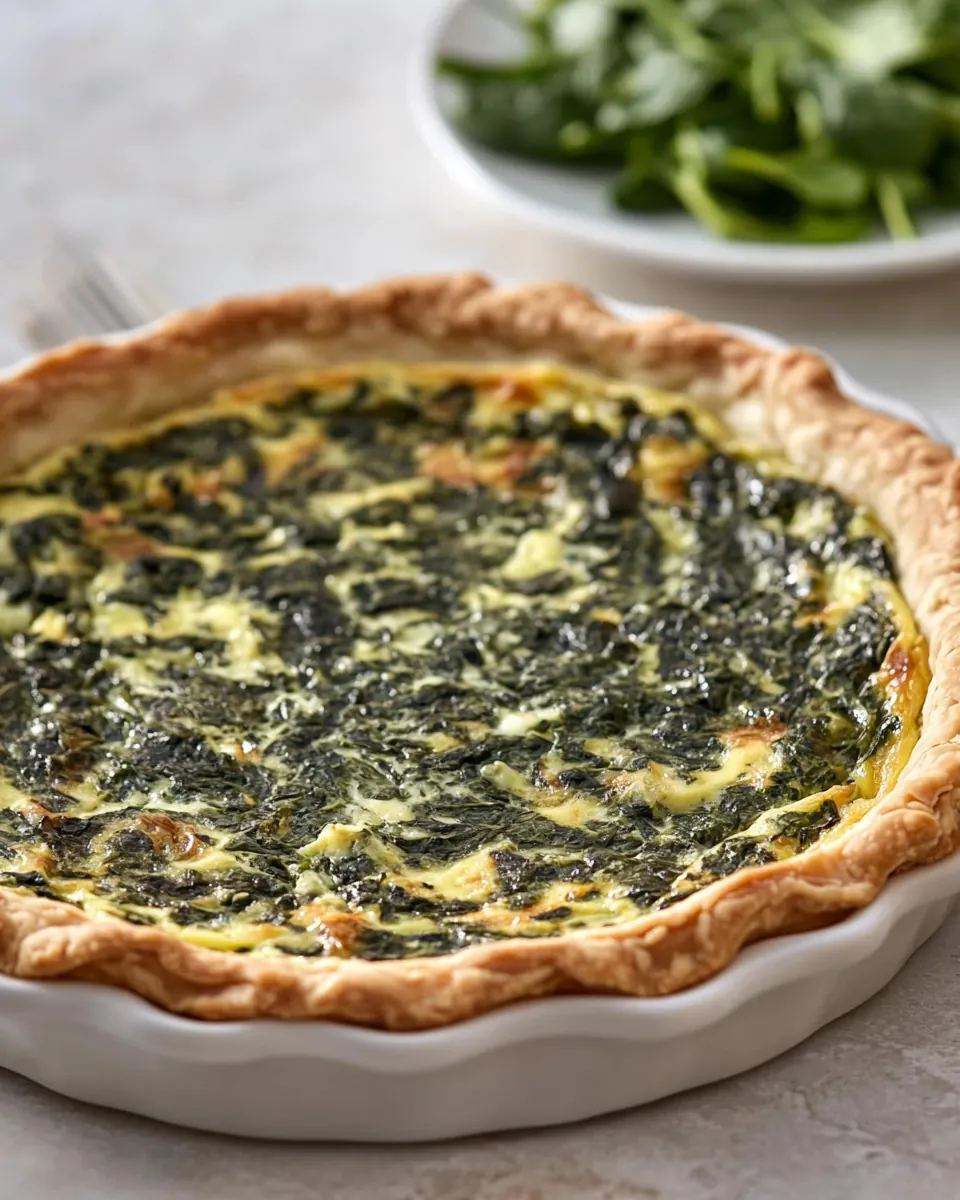
Spinach Quiche
Spinach Quiche has been my go to when guests arrive unexpectedly, because it feels both comforting and a little fancy without much fuss.
One rainy Saturday I found myself digging through the fridge for something that would feed a group yet still feel homemade. I wanted a dish that filled the kitchen with warm, savory aromas while letting me chat with my guests instead of hovering over a stove. That afternoon I made a version of Spinach Quiche that combined a flaky crust, a custardy filling, and nutty melted cheese. As the quiche baked, the house filled with the scent of sautéed onion and the faint warmth of nutmeg, and I knew I had struck the right balance between rustic and elegant.
I learned that a chilled crust is non negotiable for a tender base, and that squeezing excess water from the spinach prevents a soggy center. Over time I adjusted the seasoning, adding a whisper of cayenne pepper to wake up the eggs and cream, and folding in the grated Gruyère cheese for creaminess and depth. Friends started asking for the recipe, and I began bringing it to potlucks where it always disappears first. Making Spinach Quiche became more than cooking, it became a way to slow down and create a shared moment around the table.
Recipe Snapshot
3 hr 10 mins
120 mins
70 mins
Hard
350 kcal
American
Gluten-Free, Low FODMAP
Dinner
Mixing bowl, Pastry cutter, Rolling pin, 10 inch tart or pie pan, Skillet, Fine mesh strainer, Wire rack, Baking sheet
What You’ll Enjoy About This Spinach Quiche
Comforting yet elegant
I love that Spinach Quiche feels like company food, it looks special on the table but eats like a comforting weekday dish. The flaky crust provides a familiar crunch against a smooth, savory custard, which makes every bite interesting.
Make ahead friendly
I often make parts of this quiche the day before, chilling the crust and prepping the filling in advance. That lets me relax on the day of serving, and the flavors often meld together overnight for a more cohesive taste.
Vegetable forward without being bland
The combination of well drained spinach and gently cooked onion means you get bright vegetable flavor without watery texture. Folding the greens into a rich custard transforms them into something indulgent yet light.
Textural contrast
Crisp edges from the parbaked crust, a creamy center, and the melting strands of Gruyère cheese create a satisfying mouthfeel. This variety keeps each forkful balanced and never monotonous.
Flexible for many occasions
I appreciate how versatile Spinach Quiche is, it can be served warm at brunch or room temperature at a picnic. Its simplicity makes it easy to pair with salads or soups, and it scales well when feeding a crowd.
Spinach Quiche Shopping List
These ingredients come together to build a classic quiche where every component plays a clear role. The crust gives structure, the custard of eggs and heavy cream forms a silky interior, and the Gruyère cheese provides savory richness. The aromatics and spices are small in quantity but essential, lifting the overall flavor without overpowering the main players.
- 2 and 1/2 cups (300 g) all-purpose flour: Combine into a flaky crust by cutting cold fat into flour; provides structure and tenderness for the pastry. Sift or whisk to ensure even hydration and avoid dense spots in the dough.
- 2 teaspoons granulated sugar: Add a touch of sweetness to balance savory flavors and enhance browning of the crust. Dissolve with the dry ingredients for even distribution throughout the pastry dough.
- 1/2 teaspoons salt: Season the dough lightly to bring out flavor and counterbalance the butter's richness. Measure precisely to avoid oversalting which would dominate the final quiche.
- 1 cup (227 g) unsalted butter very cold, cut into cubes: Incorporate as very cold cubes to create flakes in the crust; solid fat yields a tender, layered texture when baked. Keep chilled until mixing to prevent overworking and melting into the flour.
- 1/2 cup (113 ml) ice water: Add gradually to hydrate the dough and form a cohesive pastry without overworking; ice water helps control temperature. Chill the dough after mixing to relax gluten and maintain a flaky crust.
- 10 ounce package frozen chopped spinach: Thaw and squeeze dry to remove excess moisture before cooking; contributes spinach flavor and volume to the filling. Fold into the sautéed mixture or directly into the custard after proper draining to avoid a watery quiche.
- 2 tablespoons (28 ml) olive oil divided: Use for sautéing and flavor development, splitting between stages to build aroma and prevent sticking. Opt for quality oil to add subtle fruity notes and help soften aromatics.
- 1 small white onion finely chopped: Sauté until translucent and fragrant to build a savory base for the filling; finely chopping ensures even distribution and quick cooking. Cook gently to avoid browning excessively, which can alter the quiche's delicate flavor.
- 6 large eggs room temperature: Whisk until uniform to create a stable custard base that sets when baked; room temperature eggs blend more smoothly with cream. Beat just enough to combine yolks and whites without incorporating excess air that can cause holes.
- 1 and 1/4 cups (284 ml) heavy cream: Whisk into eggs to create a rich, creamy custard that binds the filling and lends a silky texture. Use heavy cream for richness and stable set; adjust slightly for a firmer or softer quiche.
- 2 teaspoons cornstarch: Stabilize the custard by thickening liquids slightly, helping the filling hold together when sliced. Mix cornstarch with a small amount of liquid before adding to avoid lumps and ensure even thickening.
- 1/2 teaspoons salt: Season the custard to enhance overall flavor and provide balance to the dairy and spinach. Add carefully since the recipe already includes salt earlier in the dough.
- 1/4 teaspoon cayenne pepper: Add a touch of heat to highlight other flavors without overpowering; use sparingly for subtle warmth. Dissolve into the custard evenly to avoid spicy pockets in the quiche.
- 1/8 teaspoon ground nutmeg: Introduce warm, nutty aromatics to complement the cheese and spinach; a small amount elevates the custard's complexity. Grate or measure precisely because nutmeg is potent and can quickly dominate.
- 6 ounces Gruyère cheese finely grated: Melt into the custard to add nutty, savory richness and a smooth, elastic texture when baked. Grate finely for even distribution and sprinkle some on top for a golden, flavorful finish.
Making Spinach Quiche

Working through this quiche is a satisfying process that rewards patience. I like to organize my mise en place so each component moves smoothly from one step to the next. Below I translate the original directions into detailed, sensory driven guidance so you can achieve a reliably tender crust and a creamy, set filling.
- In a large bowl, mix together the flour, sugar, and salt. Add in the cubed butter and toss with a spatula to coat the butter in the flour.: The moment you touch the cold butter to the dry flour , you should feel its coldness bite into your fingertips, and the mixture will look dusty and slightly clumpy. Tossing instantly prevents the butter cubes from sticking together and helps the flour coat each cube evenly, which promotes even pockets of steam during baking. A useful sensory cue is the temperature shift, the bowl will feel cooler as the butter distributes. Why this matters, keep the butter cold so it creates layers during baking. Troubleshooting tip, if the butter clumps into large masses, chill the bowl for a few minutes and try again, because warm hands or warm kitchen air can soften the butter too quickly.
- Using a pastry cutter, work the butter into the flour until the mixture is a coarse meal. The butter should be about the size of peas.: As you work, listen for a faint change in texture, the mixture will go from powdery to grainy, and visually you will see pea sized flecks of butter . These bits are key for a flaky crust, they create tiny steam pockets when baked. The why is straightforward, those pockets make the dough layered instead of flat. A common mistake is overworking the dough so the butter disappears; stop once you see coarse crumbs and pea sized pieces to avoid a dense crust.
- Using a silicone spatula, slowly blend in just enough ice water to form moist clumps.: Add the ice water gradually and fold gently so you only moisten the dry parts where needed. The dough should not become sticky, it will come together into moist clumps that hold when pressed. Sensory cues include a cool tackiness and a matte sheen where the water has been incorporated. This step matters because too much water activates gluten, making the crust tough. If the dough feels sticky, sprinkle a touch more flour and chill before rolling to avoid overworking.
- Pour the shaggy dough out onto a clean surface and knead it gently, until it comes together in a ball, adding more ice water only if absolutely needed.: When you bring the dough onto your surface, use very light kneading motions just to unify it; you want to preserve the butter pieces. The dough will feel cool and slightly tacky, and it should hold its shape without tearing. Gentle handling keeps the final texture tender, because aggressive kneading activates gluten. If the dough resists coming together, press it into a disk and chill, that is preferable to adding excessive water which ruins flakiness.
- Form the dough into a neat ball and gently flatten into a disk.: Shaping the dough into a flat disk helps it chill evenly. Press with your palms until you have a smooth, even thickness, and the surface will look less shaggy and more cohesive. This matters for rolling, because an evenly chilled disk rolls without tearing. Mistake to avoid, making the disk too thick means you will struggle to roll it to the correct diameter later.
- Wrap the disk in plastic wrap and place in the refrigerator to chill for at least 1 hour, or up to 48 hours.: Chilling firms up the butter , relaxes the gluten, and deepens the flavor. After an hour the dough will feel solid and cool, which makes it far easier to roll without shrinking back. The why is all about temperature control; a warm crust will slump and lose its shape in the oven. If you skip this step or under chill, expect a tougher, less flaky crust.
- Remove the crust from the refrigerator and let it rest for 15 minutes. Lightly flour a rolling pin and a large clean work surface.: Letting the dough sit briefly at room temperature prevents cracking while rolling. When you dust the surface and pin, use just enough flour to prevent sticking, you want the dough to glide. The dough will feel pliable but still cool to the touch. Over flouring can alter the dough's hydration, so dust sparingly.
- Set the dough in the middle of the work surface and – beginning from the center of the disc – roll the dough away from you in one firm and even stroke. After each stroke, rotate the disc a quarter turn clockwise and roll again. Lightly sprinkle more flour on the work surface, pie dough, and rolling pin as needed. You want to use just enough to prevent the dough from sticking. As your disc of dough becomes larger, be sure not to overstretch the center of the dough. Continue rolling until the dough is about 16-inches in diameter, and around a 1/4" in thickness.: Rolling is rhythmic, you will hear a consistent soft drag as the pin moves. Rotate after each stroke to maintain an even circle and avoid thinning the center too much. Visual cues include a uniform thickness and a near translucent edge when held to light. This technique ensures even baking and prevents holes. If the center thins or tears, patch with chilled bits of dough and chill before proceeding.
- Press the crust into a 10" tart or pie pan, firmly pressing it into the bottom and ridges.: As you fit the dough, press gently to settle it into every curve, and you will hear a faint suction as the dough conforms to the pan. This step secures the crust against slumping during baking, and helps create crisp edges. Avoid stretching the dough outward while pressing, which causes shrinkage during baking. If you notice folds, tuck them neatly rather than pulling, to preserve texture.
- Trim excess dough, leaving a 1/4” of overhang. Roll the overhang underneath the rim of the pie plate and crimp. Refrigerate for 20 minutes.: Trimming and tucking creates a neat rim and prevents excess dough from burning. The crimped edge will brown attractively and provide a sturdy lip for slicing. Chilling again firms the sealed edge so it holds shape in the oven. A common mistake is leaving large overhangs which can burn or puff unevenly.
- Preheat the oven to 375 degrees (F). Remove the crust from the fridge. Line the crust with parchment paper and fill with pie weights or dry beans.: Preheating ensures the oven springs the crust into flakiness immediately. Lining with parchment and weights prevents bubbling and keeps the crust flat. The crust should feel very cold when you place it into the oven, which helps create crisp layers. If you bake without weights, the bottom can puff and bake unevenly.
- Bake in the lower third of the oven for 20 minutes. Remove from the oven. Carefully remove the pie weights and parchment paper and prick the bottom of the crust all over with a fork.: Parbaking in the lower oven concentrates heat at the bottom for a crisp base. After removing weights, pricking the bottom releases trapped steam, keeping the center from puffing. The crust will smell toasty and appear set. Avoid skipping the docking step, or the base can blister during the final bake.
- Place back in the oven and bake for 15 more minutes. Set aside until needed. Reduce the oven temperature to 350 degrees (F).: The second bake deepens color and ensures the crust is fully cooked without browning too much. Once out, let it cool slightly to avoid a soggy interface when adding the filling. Reducing the oven temperature sets you up for a gentler final bake of the custard. If the crust seems underbaked, return it briefly rather than proceeding with a soggy base.
- Place the frozen spinach in a large skillet or saucepan and cook over medium heat, stirring occasionally, until thawed, about 3 to 5 minutes. Remove pan from heat and drain spinach in a fine mesh strainer, removing as much excess liquid as possible. Set aside until needed.: As the frozen spinach heats, it will liquefy and steam, and you will want to agitate it until it becomes soft. Transfer it to a strainer and press firmly to expel water, the less moisture the better for a non soggy quiche. The drained spinach should feel pliable but not dripping. A frequent error is under draining, which leaves a watery filling that prevents the custard from setting properly.
- Place the skillet back on the stovetop over medium heat. Add the olive oil and white onion and cook, stirring occasionally, until the onion has softened and is becoming translucent, about 6 to 8 minutes. Do not let the onion brown. Transfer the cooked onion to a small bowl and set aside until needed.: The onion will soften and release a sweet aroma as it sweats in the olive oil , turning translucent without color. This gentle cooking preserves a mild onion flavor that blends with the custard. If the onion starts to brown, lower the heat immediately, because caramelization will change the intended flavor profile. Set aside so it cools slightly before adding to the egg mixture.
- In a large bowl whisk together the eggs, heavy cream, cornstarch, salt, cayenne pepper, and nutmeg. Using a rubber spatula, fold in the cheese, about 3/4 of the spinach, and the cooked onions.: When you whisk the eggs and heavy cream , aim for a smooth, slightly frothy mixture; it should smell rich and milky with a hint of spice from the nutmeg and cayenne pepper . Folding in the grated Gruyère cheese , most of the spinach , and the softened onion should create a uniform filling with flecks of green and browned onion. This step ensures even distribution so every slice has balance. If ingredients clump, stir gently to recombine, because over mixing can introduce air pockets that affect texture.
- Pour the filling into the partially baked crust placed on a large baking sheet. Sprinkle the remaining spinach on top of the egg mixture, spreading it evenly on top of the quiche.: As you pour, watch the filling settle smoothly into the crust, and the surface should look glossy and even. Scattering the remaining spinach on top adds visual contrast and a little textural lift. The baking sheet catches any spills and makes transport in and out of the oven safer. Avoid overfilling, which can cause spills and uneven baking.
- Place the pan in the oven and bake for 45 minutes, or until the center is set and the crust is golden-brown.: During baking you will notice the edges take on a warm golden hue and the center gently rise, then settle as it cools. A set center will no longer wobble when nudged and will feel springy to the touch. This is important to achieve a custardy but sliceable quiche. If the top browns too quickly, tent with foil to prevent burning while the center finishes cooking.
- Remove from the oven and cool on a wire rack for at least 30 minutes before serving.: Cooling allows the custard to finish setting and makes slicing neater, the aroma will mellow and the texture will become silkier. If you cut it too soon, the filling can spill and the slices will not hold. Patience here improves presentation and eating experience.
Helpful Hints
These practical tips reflect my tested experience with this quiche. Each one is focused on a single change you can make to improve texture, flavor, or ease of preparation.
- Keep everything cold for a flaky crust, especially the butter and the dough; warmth is the enemy of flakiness because it causes the butter to merge with the flour instead of creating pockets that steam during baking.
- Drain the spinach thoroughly by squeezing it in a clean kitchen towel or pressing in a fine mesh strainer; any retained water will make the filling loose and may prevent the custard from setting.
- Parbake the crust on a baking sheet with pie weights so the bottom cooks evenly and you avoid a soggy center once the wet filling is added.
- Use room temperature eggs to ensure the custard blends smoothly with the heavy cream, creating a uniform texture without cold spots that can affect setting.
- Tent with foil if the top browns too quickly, this protects the crust and cheese while allowing the center to finish gently without burning the surface.
Serving Ideas for Spinach Quiche
This section outlines thoughtful ways to present and pair the quiche for different occasions. Serving temperature, complementary sides, and storage tips all help you maximize the dish’s appeal.
- Brunch centerpiece: Serve slices of Spinach Quiche warm alongside a simple green salad dressed with lemon and olive oil for contrast, creating a balanced brunch spread that feels indulgent yet approachable.
- Lunch plate: Pair a wedge with roasted vegetables or a grain salad; the creamy custard pairs well with bright, acidic sides that cut through the richness.
- Picnic friendly: The quiche holds up well at room temperature, making it a great option for outdoor meals; pack it with sliced fruit and crusty bread for a relaxed picnic experience.
- Holiday or gathering: Bring a whole quiche to a potluck, it scales easily and is universally liked; serve with pickled vegetables or a tangy chutney to offer contrast.
- Storage tips: Wrap cooled quiche tightly and refrigerate for up to three days; reheat gently in a low oven to revive the crust, or serve cold for a different texture and flavor profile.
- Seasonal pairing: In spring, complement the quiche with fresh herbs and young lettuces; their brightness complements the richness of the Gruyère cheese and custard.
FAQ
Conclusion
Spinach Quiche stands out for its blend of flaky crust, creamy egg and cream custard, and the savory depth of grated Gruyère. It is adaptable, make ahead friendly, and works as a centerpiece for brunch or an easy dinner that feels special. Give it a try the next time you want a dish that is both comforting and refined, and enjoy how it brings people together with minimal fuss.

Spinach Quiche
Equipment
- Mixing Bowl
- Pastry Cutter
- Rolling Pin
- 10 inch tart or pie pan
- Skillet
- Fine-mesh strainer
- Wire Rack
- Baking Sheet
Ingredients
- 2 and 1/2 cups (300 g) all-purpose flour Combine into a flaky crust by cutting cold fat into flour; provides structure and tenderness for the pastry. Sift or whisk to ensure even hydration and avoid dense spots in the dough.
- 2 teaspoons granulated sugar Add a touch of sweetness to balance savory flavors and enhance browning of the crust. Dissolve with the dry ingredients for even distribution throughout the pastry dough.
- 1/2 teaspoons salt Season the dough lightly to bring out flavor and counterbalance the butter's richness. Measure precisely to avoid oversalting which would dominate the final quiche.
- 1 cup (227 g) unsalted butter very cold, cut into cubes Incorporate as very cold cubes to create flakes in the crust; solid fat yields a tender, layered texture when baked. Keep chilled until mixing to prevent overworking and melting into the flour.
- 1/2 cup (113 ml) ice water Add gradually to hydrate the dough and form a cohesive pastry without overworking; ice water helps control temperature. Chill the dough after mixing to relax gluten and maintain a flaky crust.
- 10 ounce package frozen chopped spinach Thaw and squeeze dry to remove excess moisture before cooking; contributes spinach flavor and volume to the filling. Fold into the sautéed mixture or directly into the custard after proper draining to avoid a watery quiche.
- 2 tablespoons (28 ml) olive oil divided Use for sautéing and flavor development, splitting between stages to build aroma and prevent sticking. Opt for quality oil to add subtle fruity notes and help soften aromatics.
- 1 small white onion finely chopped Sauté until translucent and fragrant to build a savory base for the filling; finely chopping ensures even distribution and quick cooking. Cook gently to avoid browning excessively, which can alter the quiche's delicate flavor.
- 6 large eggs room temperature Whisk until uniform to create a stable custard base that sets when baked; room temperature eggs blend more smoothly with cream. Beat just enough to combine yolks and whites without incorporating excess air that can cause holes.
- 1 and 1/4 cups (284 ml) heavy cream Whisk into eggs to create a rich, creamy custard that binds the filling and lends a silky texture. Use heavy cream for richness and stable set; adjust slightly for a firmer or softer quiche.
- 2 teaspoons cornstarch Stabilize the custard by thickening liquids slightly, helping the filling hold together when sliced. Mix cornstarch with a small amount of liquid before adding to avoid lumps and ensure even thickening.
- 1/2 teaspoons salt Season the custard to enhance overall flavor and provide balance to the dairy and spinach. Add carefully since the recipe already includes salt earlier in the dough.
- 1/4 teaspoon cayenne pepper Add a touch of heat to highlight other flavors without overpowering; use sparingly for subtle warmth. Dissolve into the custard evenly to avoid spicy pockets in the quiche.
- 1/8 teaspoon ground nutmeg Introduce warm, nutty aromatics to complement the cheese and spinach; a small amount elevates the custard's complexity. Grate or measure precisely because nutmeg is potent and can quickly dominate.
- 6 ounces Gruyère cheese finely grated Melt into the custard to add nutty, savory richness and a smooth, elastic texture when baked. Grate finely for even distribution and sprinkle some on top for a golden, flavorful finish.
Instructions
- In a large bowl, mix together the flour, sugar, and salt. Add in the cubed butter and toss with a spatula to coat the butter in the flour.: The moment you touch the cold butter to the dry flour , you should feel its coldness bite into your fingertips, and the mixture will look dusty and slightly clumpy. Tossing instantly prevents the butter cubes from sticking together and helps the flour coat each cube evenly, which promotes even pockets of steam during baking. A useful sensory cue is the temperature shift, the bowl will feel cooler as the butter distributes. Why this matters, keep the butter cold so it creates layers during baking. Troubleshooting tip, if the butter clumps into large masses, chill the bowl for a few minutes and try again, because warm hands or warm kitchen air can soften the butter too quickly.
- Using a pastry cutter, work the butter into the flour until the mixture is a coarse meal. The butter should be about the size of peas.: As you work, listen for a faint change in texture, the mixture will go from powdery to grainy, and visually you will see pea sized flecks of butter . These bits are key for a flaky crust, they create tiny steam pockets when baked. The why is straightforward, those pockets make the dough layered instead of flat. A common mistake is overworking the dough so the butter disappears; stop once you see coarse crumbs and pea sized pieces to avoid a dense crust.
- Using a silicone spatula, slowly blend in just enough ice water to form moist clumps.: Add the ice water gradually and fold gently so you only moisten the dry parts where needed. The dough should not become sticky, it will come together into moist clumps that hold when pressed. Sensory cues include a cool tackiness and a matte sheen where the water has been incorporated. This step matters because too much water activates gluten, making the crust tough. If the dough feels sticky, sprinkle a touch more flour and chill before rolling to avoid overworking.
- Pour the shaggy dough out onto a clean surface and knead it gently, until it comes together in a ball, adding more ice water only if absolutely needed.: When you bring the dough onto your surface, use very light kneading motions just to unify it; you want to preserve the butter pieces. The dough will feel cool and slightly tacky, and it should hold its shape without tearing. Gentle handling keeps the final texture tender, because aggressive kneading activates gluten. If the dough resists coming together, press it into a disk and chill, that is preferable to adding excessive water which ruins flakiness.
- Form the dough into a neat ball and gently flatten into a disk.: Shaping the dough into a flat disk helps it chill evenly. Press with your palms until you have a smooth, even thickness, and the surface will look less shaggy and more cohesive. This matters for rolling, because an evenly chilled disk rolls without tearing. Mistake to avoid, making the disk too thick means you will struggle to roll it to the correct diameter later.
- Wrap the disk in plastic wrap and place in the refrigerator to chill for at least 1 hour, or up to 48 hours.: Chilling firms up the butter , relaxes the gluten, and deepens the flavor. After an hour the dough will feel solid and cool, which makes it far easier to roll without shrinking back. The why is all about temperature control; a warm crust will slump and lose its shape in the oven. If you skip this step or under chill, expect a tougher, less flaky crust.
- Remove the crust from the refrigerator and let it rest for 15 minutes. Lightly flour a rolling pin and a large clean work surface.: Letting the dough sit briefly at room temperature prevents cracking while rolling. When you dust the surface and pin, use just enough flour to prevent sticking, you want the dough to glide. The dough will feel pliable but still cool to the touch. Over flouring can alter the dough's hydration, so dust sparingly.
- Set the dough in the middle of the work surface and – beginning from the center of the disc – roll the dough away from you in one firm and even stroke. After each stroke, rotate the disc a quarter turn clockwise and roll again. Lightly sprinkle more flour on the work surface, pie dough, and rolling pin as needed. You want to use just enough to prevent the dough from sticking. As your disc of dough becomes larger, be sure not to overstretch the center of the dough. Continue rolling until the dough is about 16-inches in diameter, and around a 1/4" in thickness.: Rolling is rhythmic, you will hear a consistent soft drag as the pin moves. Rotate after each stroke to maintain an even circle and avoid thinning the center too much. Visual cues include a uniform thickness and a near translucent edge when held to light. This technique ensures even baking and prevents holes. If the center thins or tears, patch with chilled bits of dough and chill before proceeding.
- Press the crust into a 10" tart or pie pan, firmly pressing it into the bottom and ridges.: As you fit the dough, press gently to settle it into every curve, and you will hear a faint suction as the dough conforms to the pan. This step secures the crust against slumping during baking, and helps create crisp edges. Avoid stretching the dough outward while pressing, which causes shrinkage during baking. If you notice folds, tuck them neatly rather than pulling, to preserve texture.
- Trim excess dough, leaving a 1/4” of overhang. Roll the overhang underneath the rim of the pie plate and crimp. Refrigerate for 20 minutes.: Trimming and tucking creates a neat rim and prevents excess dough from burning. The crimped edge will brown attractively and provide a sturdy lip for slicing. Chilling again firms the sealed edge so it holds shape in the oven. A common mistake is leaving large overhangs which can burn or puff unevenly.
- Preheat the oven to 375 degrees (F). Remove the crust from the fridge. Line the crust with parchment paper and fill with pie weights or dry beans.: Preheating ensures the oven springs the crust into flakiness immediately. Lining with parchment and weights prevents bubbling and keeps the crust flat. The crust should feel very cold when you place it into the oven, which helps create crisp layers. If you bake without weights, the bottom can puff and bake unevenly.
- Bake in the lower third of the oven for 20 minutes. Remove from the oven. Carefully remove the pie weights and parchment paper and prick the bottom of the crust all over with a fork.: Parbaking in the lower oven concentrates heat at the bottom for a crisp base. After removing weights, pricking the bottom releases trapped steam, keeping the center from puffing. The crust will smell toasty and appear set. Avoid skipping the docking step, or the base can blister during the final bake.
- Place back in the oven and bake for 15 more minutes. Set aside until needed. Reduce the oven temperature to 350 degrees (F).: The second bake deepens color and ensures the crust is fully cooked without browning too much. Once out, let it cool slightly to avoid a soggy interface when adding the filling. Reducing the oven temperature sets you up for a gentler final bake of the custard. If the crust seems underbaked, return it briefly rather than proceeding with a soggy base.
- Place the frozen spinach in a large skillet or saucepan and cook over medium heat, stirring occasionally, until thawed, about 3 to 5 minutes. Remove pan from heat and drain spinach in a fine mesh strainer, removing as much excess liquid as possible. Set aside until needed.: As the frozen spinach heats, it will liquefy and steam, and you will want to agitate it until it becomes soft. Transfer it to a strainer and press firmly to expel water, the less moisture the better for a non soggy quiche. The drained spinach should feel pliable but not dripping. A frequent error is under draining, which leaves a watery filling that prevents the custard from setting properly.
- Place the skillet back on the stovetop over medium heat. Add the olive oil and white onion and cook, stirring occasionally, until the onion has softened and is becoming translucent, about 6 to 8 minutes. Do not let the onion brown. Transfer the cooked onion to a small bowl and set aside until needed.: The onion will soften and release a sweet aroma as it sweats in the olive oil , turning translucent without color. This gentle cooking preserves a mild onion flavor that blends with the custard. If the onion starts to brown, lower the heat immediately, because caramelization will change the intended flavor profile. Set aside so it cools slightly before adding to the egg mixture.
- In a large bowl whisk together the eggs, heavy cream, cornstarch, salt, cayenne pepper, and nutmeg. Using a rubber spatula, fold in the cheese, about 3/4 of the spinach, and the cooked onions.: When you whisk the eggs and heavy cream , aim for a smooth, slightly frothy mixture; it should smell rich and milky with a hint of spice from the nutmeg and cayenne pepper . Folding in the grated Gruyère cheese , most of the spinach , and the softened onion should create a uniform filling with flecks of green and browned onion. This step ensures even distribution so every slice has balance. If ingredients clump, stir gently to recombine, because over mixing can introduce air pockets that affect texture.
- Pour the filling into the partially baked crust placed on a large baking sheet. Sprinkle the remaining spinach on top of the egg mixture, spreading it evenly on top of the quiche.: As you pour, watch the filling settle smoothly into the crust, and the surface should look glossy and even. Scattering the remaining spinach on top adds visual contrast and a little textural lift. The baking sheet catches any spills and makes transport in and out of the oven safer. Avoid overfilling, which can cause spills and uneven baking.
- Place the pan in the oven and bake for 45 minutes, or until the center is set and the crust is golden-brown.: During baking you will notice the edges take on a warm golden hue and the center gently rise, then settle as it cools. A set center will no longer wobble when nudged and will feel springy to the touch. This is important to achieve a custardy but sliceable quiche. If the top browns too quickly, tent with foil to prevent burning while the center finishes cooking.
- Remove from the oven and cool on a wire rack for at least 30 minutes before serving.: Cooling allows the custard to finish setting and makes slicing neater, the aroma will mellow and the texture will become silkier. If you cut it too soon, the filling can spill and the slices will not hold. Patience here improves presentation and eating experience.
Notes
- Keep everything cold for a flaky crust, especially the butter and the dough; warmth is the enemy of flakiness because it causes the butter to merge with the flour instead of creating pockets that steam during baking.
- Drain the spinach thoroughly by squeezing it in a clean kitchen towel or pressing in a fine mesh strainer; any retained water will make the filling loose and may prevent the custard from setting.
- Parbake the crust on a baking sheet with pie weights so the bottom cooks evenly and you avoid a soggy center once the wet filling is added.
- Use room temperature eggs to ensure the custard blends smoothly with the heavy cream, creating a uniform texture without cold spots that can affect setting.
- Tent with foil if the top browns too quickly, this protects the crust and cheese while allowing the center to finish gently without burning the surface.