
S’mores Blondies
S’mores Blondies have been my go to for backyard evenings when I want something that tastes nostalgic but feels just a little grown up. The first time I made these I was chasing a memory of campfire sweetness, and the crackly top combined with gooey marshmallow pockets instantly transported me. I still remember pulling a warm bar from the pan and passing it around, watching the chocolate melt into ribbons, while friends argued over who got the corner piece.
Every time I bake S’mores Blondies I tweak tiny details, because texture matters to me. I like the contrast between a slightly chewy interior and a crisp, almost glassy top, and that balance is what keeps me coming back. I also love how simple the ingredient list is, yet how dramatic the result feels when you pull it from the oven and broil the marshmallows to a toasted finish.
Recipe Snapshot
45 mins
15 mins
30 mins
Medium
250 kcal
American
Gluten-Free, Low FODMAP
Desserts
Oven, 13 x 9-inch baking pan, Parchment paper, Mixing bowl, Whisk, Wire rack
The Charm of This S’mores Blondies
Campfire nostalgia meets easy home baking
I adore how S’mores Blondies capture that toasted, melty campfire vibe, while staying practical for a kitchen. I can recreate the s’more ritual without a fire, and that convenience makes it a go to for gatherings.
Texture play that’s impossible to resist
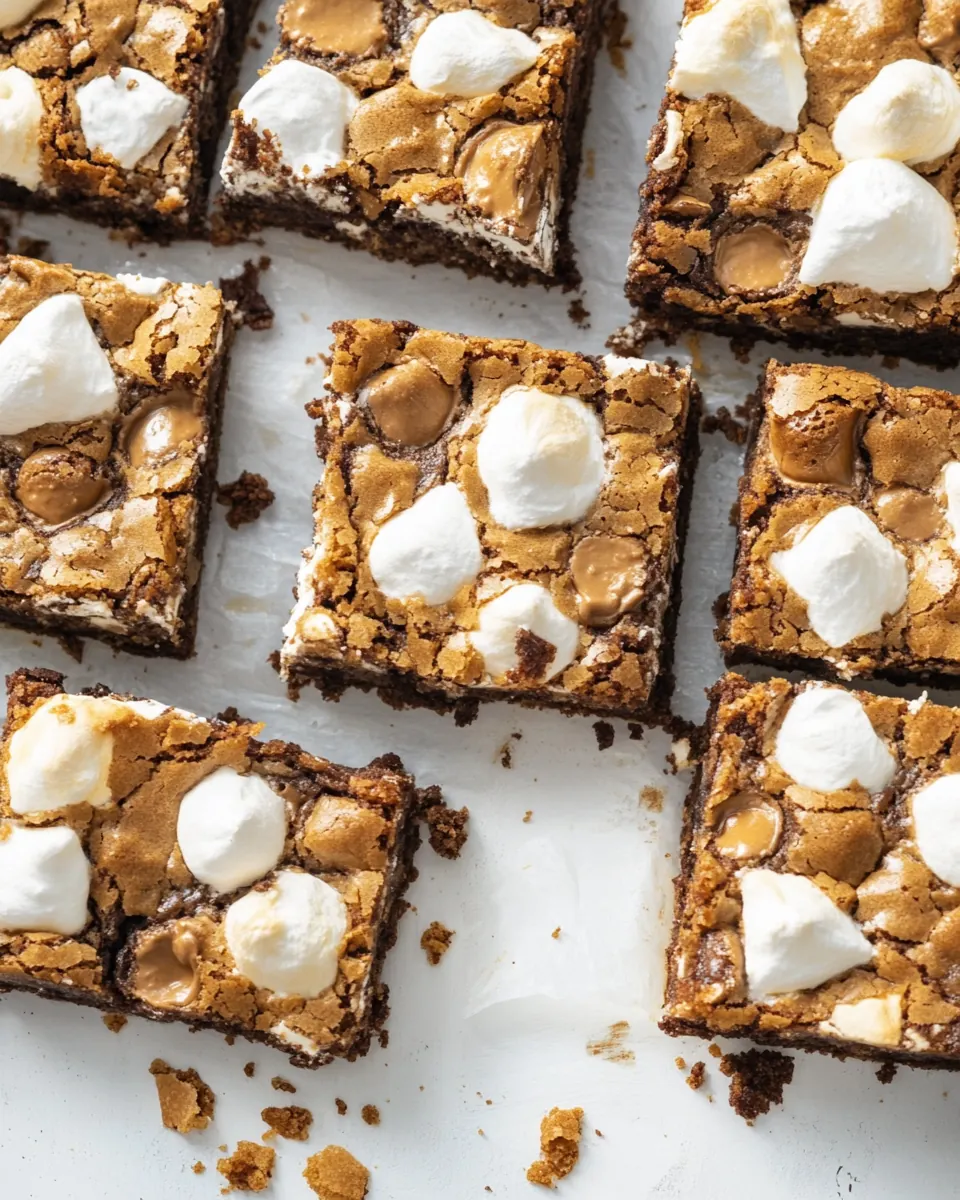
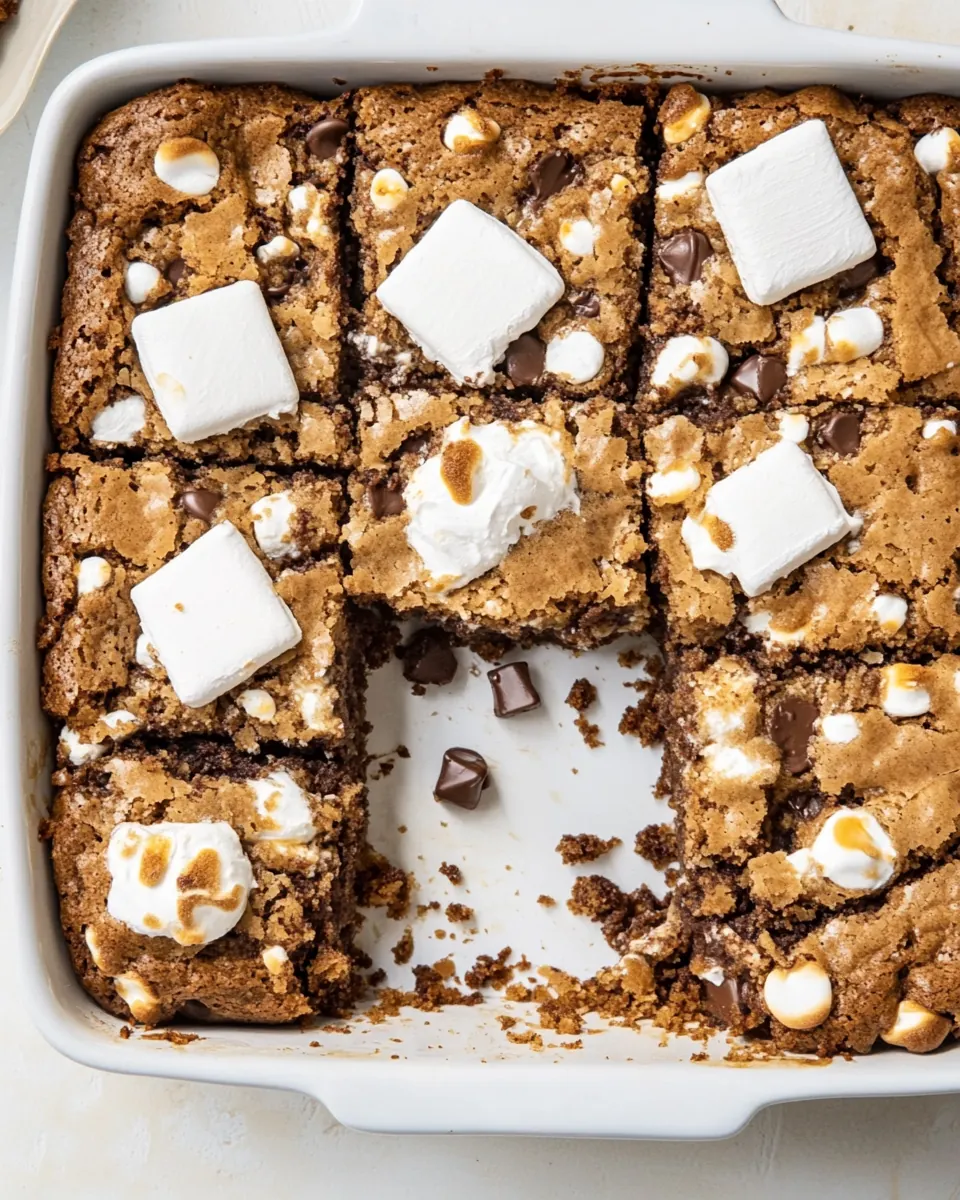
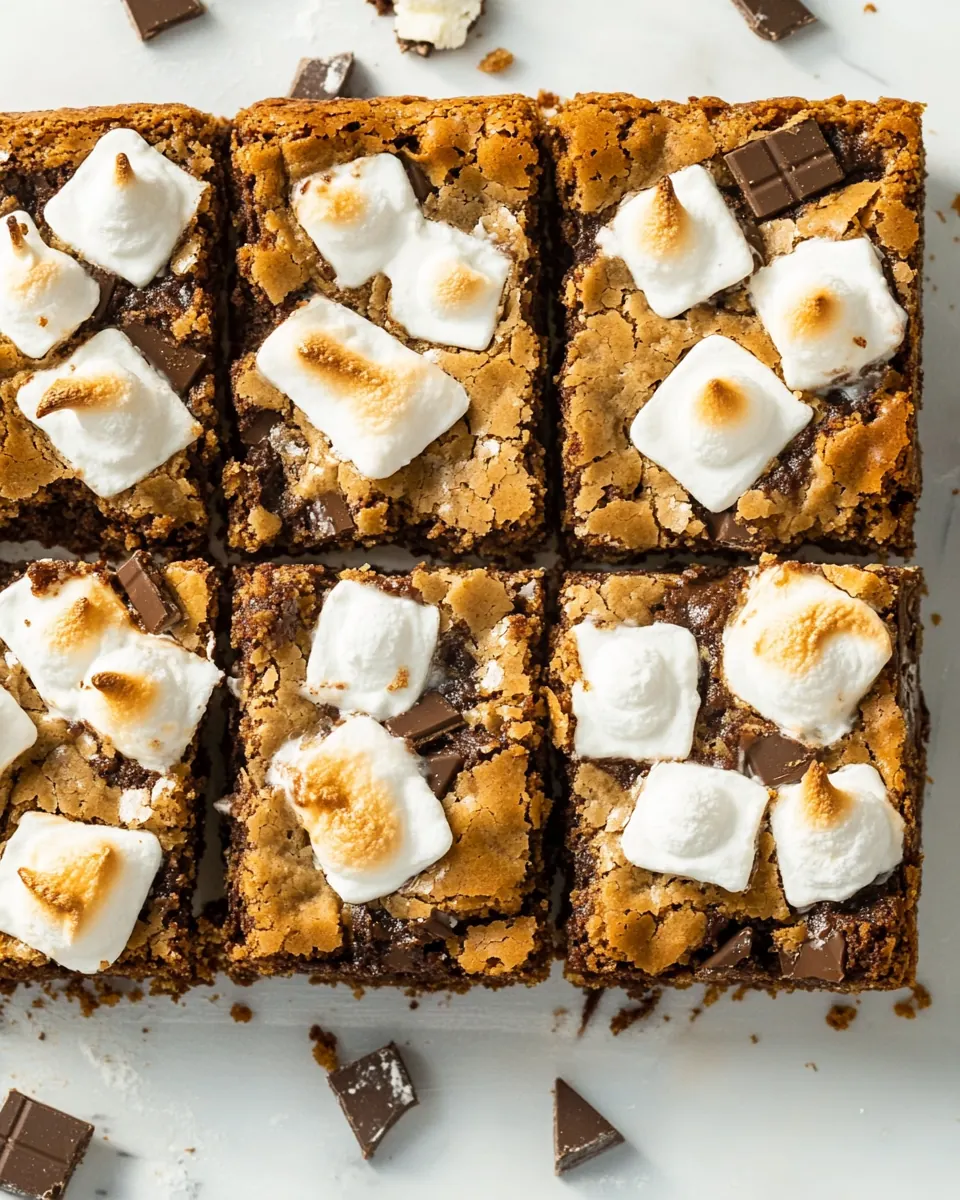
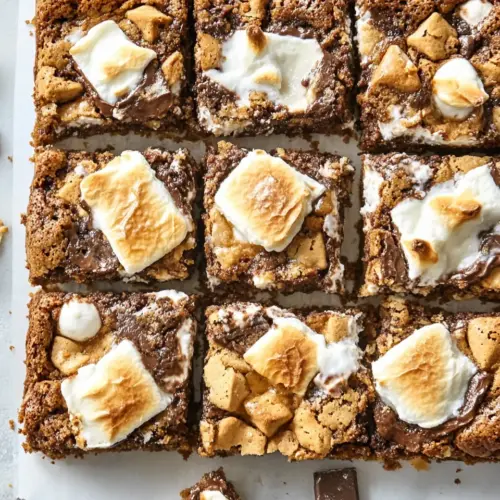
These bars deliver a crackly, browned top, a tender, chewy crumb, and pockets of molten chocolate and toasted marshmallow. I savor the contrast, and my guests always comment on how satisfying each bite feels.
Simple ingredients, bold payoff
I like that the recipe uses pantry staples like brown sugar, butter, and graham cracker crumbs. The combined flavors are layered, yet the list is straightforward, which means I can whip these up on a whim and still impress people.
Flexible and shareable
I find these bars ideal for potlucks and casual get togethers because they cut into handheld pieces and travel well. They hold up at room temperature for a few hours, and that makes them reliable for parties or lazy weekend treats.
Built in finishing showstopper
The broil step is theatrical, and I enjoy that little moment when the marshmallow browns and the chocolate softens. It adds a finishing flourish without extra fuss, and it makes the baking experience feel like an event.
What You Need for S’mores Blondies
These ingredients read like a short love letter to toasted sweetness. Each component plays a clear role: the sugars and butter create a tender, chewy base, the graham cracker crumbs and all purpose flour provide structure and that classic s’mores flavor, and the divided chocolate plus marshmallow build pockets of gooeyness and toasted crunch on top. Together they produce bars that are both familiar and exciting.
- 1 3/4 cup s (385 grams) firmly packed light brown sugar: Provides deep caramel-like sweetness and moisture to the blondies while helping create a tender crumb; pack firmly to ensure accurate measurement and even baking results.
- 1 cup (227 grams) unsalted butter, melted and cooled: Adds rich butterfat flavor and contributes to a fudgy, dense texture when melted and cooled; cool before mixing to prevent scrambling the eggs.
- 1 tablespoon (13 grams) vanilla extract: Imparts aromatic warmth and enhances the overall sweetness while balancing flavors; measure precisely to avoid overpowering the other components.
- 2 large eggs (100 grams): Binds ingredients together, contributes structure and lift, and adds richness; use large eggs at the specified weight for consistent texture.
- 1 teaspoon (5 grams) baking powder: Leavens mildly to give a light lift and slight rise without making the blondies cake-like; mix in with dry ingredients for even distribution.
- 1 1/4 teaspoon s (3.75 grams) kosher salt: Balances sweetness, enhances flavor, and strengthens gluten slightly to control tenderness; use kosher salt measured by weight for accuracy.
- 1 1/2 cup s (195 grams) finely ground graham cracker crumbs (about 1 1/2 sleeves): Provides a toasty, graham flavor and tender texture while acting as part of the dry structure; finely ground crumbs distribute evenly throughout the batter.
- 1 cup (125 grams) all-purpose flour: Supplies structure and body through gluten and starch, helping blondies hold together while maintaining tenderness; spoon and level for an accurate cup.
- 6 ounces s (170 grams) milk or semisweet chocolate, coarsely chopped and divided: Contributes concentrated chocolate flavor and pockets of melty chocolate; chop coarsely and reserve part for mixing in and sprinkling on top for texture contrast.
- 2 cups s (90 grams) mini marshmallows: Adds chewiness, sweet marshmallow pockets, and classic s'mores character; distribute evenly on top and in the batter to create gooey bits after baking.
Recipe Directions for S’mores Blondies
These directions are straightforward but the magic is in the timing and finishing. Take your time with mixing and watch the bake closely so you get that crackly top and gooey interior we all love. When broiling, stay nearby and check frequently to avoid burning.
- Preheat oven to 350°F (180°C). Spray a 13 x 9-inch baking pan with cooking spray. Line pan with parchment paper, letting excess extend over sides of pan.: As the oven warms you will smell a faint warmth from the heating elements, which signals readiness; this consistent heat helps the batter rise evenly, setting the edges while allowing the center to stay chewy. A well greased, parchment lined pan prevents sticking and makes removal effortless, so don't skip that step. Common mistakes include not preheating fully, which can cause uneven baking and a dense center, and failing to line the pan, which can tear the bars when removed.
- In a large bowl, whisk together brown sugar, melted butter, and vanilla for 30 seconds. Add eggs, one at a time, whisking until combined after each addition. Sprinkle baking powder onto mixture, and vigorously whisk until combined; repeat procedure with salt. Gently stir in graham cracker crumbs, flour, and 3/4 cup (127 grams) chocolate just until combined. (Do not overmix.) Spread batter into prepared pan.: The mixture will feel glossy and slightly thick after whisking, with the brown sugar dissolving into the butter to form a caramel scented base; this aroma is a good cue that you are on track. Adding eggs one at a time creates a smooth emulsion which helps the final texture. When you fold in the dry ingredients, you should see speckles of graham cracker crumbs and small streaks of flour disappear quickly; stop mixing as soon as the batter is homogeneous to avoid toughness. A frequent error is overmixing at this stage, which develops gluten and yields gummy bars.
- Bake until top is browned and crackly, edges are set, and a wooden pick inserted in center comes out with a few moist crumbs, about 30 minutes. Increase oven temperature to broil. Sprinkle marshmallows and remaining chocolate onto blondie.: During baking you'll notice the surface developing a glossy, crackled sheen and the kitchen filling with a toasty, caramel aroma; those are indicators the sugars are caramelizing properly. The edges will firm first, pulling slightly away from the pan, while the center should wiggle a touch when nudged, leaving moist crumbs on a tester. This stage locks in chew while letting the top form a desirable snap. A typical pitfall is baking too long which dries the bars and removes the gooey center; rely on the wooden pick test rather than clock time alone.
- Broil on top rack until chocolate is melted and marshmallows are toasted, about 30 seconds, checking every 10 seconds. Using a wooden pick, swirl marshmallows and chocolate on top, if desired. Let cool completely in pan on a wire rack. Using excess parchment as handles, remove from pan, and cut into bars. Store in an airtight container for up to 3 days.: The broiler step elevates the texture by quickly charring the marshmallow surface and melting the reserved chocolate , creating striations of glossy chocolate and toasted sugar. The scent will shift to a toasty, slightly smoky note that feels indulgent. Distribute the toppings evenly so each square gets a mix of toasted marshmallow and melted chocolate. One mistake to avoid is piling too many marshmallows in one spot, which can create overly gooey islands rather than an even toasted layer.
- Broil on top rack until chocolate is melted and marshmallows are toasted, about 30 seconds, checking every 10 seconds. Using a wooden pick, swirl marshmallows and chocolate on top, if desired. Let cool completely in pan on a wire rack. Using excess parchment as handles, remove from pan, and cut into bars. Store in an airtight container for up to 3 days.: The broiler action is dramatic and fast; you'll hear slight crackles as the marshmallow surface browns and you will see the chocolate gloss melt into pools. Keep the oven door open or watch through the window, because the change happens quickly; checking every 10 seconds prevents burning. Swirling with a wooden pick creates marbled patterns and helps the toppings integrate with the top layer. Cooling fully firms the bars so they cut cleanly, and using the parchment helps you lift the whole slab without squishing it. A common error is cutting while warm, which leads to squashed pieces; patience pays off here.
Helpful Notes about S’mores Blondies
These notes cover small but impactful choices that improve the final bars. They focus on texture control, timing, and presentation so your tray disappears quickly and your guests ask for the recipe.
- Room temperature eggs help the batter emulsify smoothly with melted butter, producing a more even crumb and reducing the chance of a greasy mouthfeel.
- Do not overmix once you add the graham cracker crumbs and flour, because overworking the batter develops gluten and yields tougher bars instead of tender, chewy ones.
- Divide the chocolate so some melts into the batter and some finishes on top, creating pockets of gooey richness and glossy swirls when broiled.
- Check the broiler frequently, particularly during the last 30 seconds, since the marshmallow and chocolate can transform visually in moments and you want a golden toast not burnt black edges.
- Cool fully before slicing to allow the structure to set; this yields neat bars and prevents the toppings from smearing during cutting.
Serving Ideas for S’mores Blondies
These bars are wonderfully flexible for casual occasions, and they pair well with simple accompaniments that highlight the toasted sweetness. Serve them warm for maximum gooeyness, or room temperature for easy transport and sharing.
- Party platters: Arrange cut bars on a large board with small bowls of extra chocolate chips and extra marshmallows so guests can add toppings.
- Picnic friendly: Pack bars in an airtight container and keep them shaded; they travel well for outdoor gatherings and are a favorite at summer picnics.
- After dinner treat: Serve a warm bar with a scoop of plain ice cream for contrast, the cold and creamy element pairing nicely with the toasted top.
- Family dessert: These bars are easy to cut into kid friendly portions for school events or family movie nights, and they hold up reasonably well at room temperature.
- Storage tips: Keep bars in an airtight container at room temperature for up to three days; for longer storage, freeze wrapped slices and thaw at room temperature before serving.
FAQ
Conclusion
S’mores Blondies stand out because they take the best parts of a classic campfire treat and translate them into a simple, shareable bar. The combination of a chewy, buttery base with pockets of melted chocolate and a toasted marshmallow topping creates contrast and comfort in every bite. I encourage you to give them a try the next time you want a dessert that feels celebratory but is effortless to make. Invite friends, pull the slab from the pan, and enjoy the little moment of warmth and nostalgia these bars bring to the table.
S'mores Blondies
Equipment
- Oven
- 13 x 9-inch baking pan
- Parchment Paper
- Mixing Bowl
- Whisk
- Wire Rack
Ingredients
- 1 3/4 cup s (385 grams) firmly packed light brown sugar Provides deep caramel-like sweetness and moisture to the blondies while helping create a tender crumb; pack firmly to ensure accurate measurement and even baking results.
- 1 cup (227 grams) unsalted butter, melted and cooled Adds rich butterfat flavor and contributes to a fudgy, dense texture when melted and cooled; cool before mixing to prevent scrambling the eggs.
- 1 tablespoon (13 grams) vanilla extract Imparts aromatic warmth and enhances the overall sweetness while balancing flavors; measure precisely to avoid overpowering the other components.
- 2 large eggs (100 grams) Binds ingredients together, contributes structure and lift, and adds richness; use large eggs at the specified weight for consistent texture.
- 1 teaspoon (5 grams) baking powder Leavens mildly to give a light lift and slight rise without making the blondies cake-like; mix in with dry ingredients for even distribution.
- 1 1/4 teaspoon s (3.75 grams) kosher salt Balances sweetness, enhances flavor, and strengthens gluten slightly to control tenderness; use kosher salt measured by weight for accuracy.
- 1 1/2 cup s (195 grams) finely ground graham cracker crumbs (about 1 1/2 sleeves) Provides a toasty, graham flavor and tender texture while acting as part of the dry structure; finely ground crumbs distribute evenly throughout the batter.
- 1 cup (125 grams) all-purpose flour Supplies structure and body through gluten and starch, helping blondies hold together while maintaining tenderness; spoon and level for an accurate cup.
- 6 ounces s (170 grams) milk or semisweet chocolate, coarsely chopped and divided Contributes concentrated chocolate flavor and pockets of melty chocolate; chop coarsely and reserve part for mixing in and sprinkling on top for texture contrast.
- 2 cups s (90 grams) mini marshmallows Adds chewiness, sweet marshmallow pockets, and classic s'mores character; distribute evenly on top and in the batter to create gooey bits after baking.
Instructions
- Preheat oven to 350°F (180°C). Spray a 13 x 9-inch baking pan with cooking spray. Line pan with parchment paper, letting excess extend over sides of pan.: As the oven warms you will smell a faint warmth from the heating elements, which signals readiness; this consistent heat helps the batter rise evenly, setting the edges while allowing the center to stay chewy. A well greased, parchment lined pan prevents sticking and makes removal effortless, so don't skip that step. Common mistakes include not preheating fully, which can cause uneven baking and a dense center, and failing to line the pan, which can tear the bars when removed.
- In a large bowl, whisk together brown sugar, melted butter, and vanilla for 30 seconds. Add eggs, one at a time, whisking until combined after each addition. Sprinkle baking powder onto mixture, and vigorously whisk until combined; repeat procedure with salt. Gently stir in graham cracker crumbs, flour, and 3/4 cup (127 grams) chocolate just until combined. (Do not overmix.) Spread batter into prepared pan.: The mixture will feel glossy and slightly thick after whisking, with the brown sugar dissolving into the butter to form a caramel scented base; this aroma is a good cue that you are on track. Adding eggs one at a time creates a smooth emulsion which helps the final texture. When you fold in the dry ingredients, you should see speckles of graham cracker crumbs and small streaks of flour disappear quickly; stop mixing as soon as the batter is homogeneous to avoid toughness. A frequent error is overmixing at this stage, which develops gluten and yields gummy bars.
- Bake until top is browned and crackly, edges are set, and a wooden pick inserted in center comes out with a few moist crumbs, about 30 minutes. Increase oven temperature to broil. Sprinkle marshmallows and remaining chocolate onto blondie.: During baking you'll notice the surface developing a glossy, crackled sheen and the kitchen filling with a toasty, caramel aroma; those are indicators the sugars are caramelizing properly. The edges will firm first, pulling slightly away from the pan, while the center should wiggle a touch when nudged, leaving moist crumbs on a tester. This stage locks in chew while letting the top form a desirable snap. A typical pitfall is baking too long which dries the bars and removes the gooey center; rely on the wooden pick test rather than clock time alone.
- Broil on top rack until chocolate is melted and marshmallows are toasted, about 30 seconds, checking every 10 seconds. Using a wooden pick, swirl marshmallows and chocolate on top, if desired. Let cool completely in pan on a wire rack. Using excess parchment as handles, remove from pan, and cut into bars. Store in an airtight container for up to 3 days.: The broiler step elevates the texture by quickly charring the marshmallow surface and melting the reserved chocolate , creating striations of glossy chocolate and toasted sugar. The scent will shift to a toasty, slightly smoky note that feels indulgent. Distribute the toppings evenly so each square gets a mix of toasted marshmallow and melted chocolate. One mistake to avoid is piling too many marshmallows in one spot, which can create overly gooey islands rather than an even toasted layer.
- Broil on top rack until chocolate is melted and marshmallows are toasted, about 30 seconds, checking every 10 seconds. Using a wooden pick, swirl marshmallows and chocolate on top, if desired. Let cool completely in pan on a wire rack. Using excess parchment as handles, remove from pan, and cut into bars. Store in an airtight container for up to 3 days.: The broiler action is dramatic and fast; you'll hear slight crackles as the marshmallow surface browns and you will see the chocolate gloss melt into pools. Keep the oven door open or watch through the window, because the change happens quickly; checking every 10 seconds prevents burning. Swirling with a wooden pick creates marbled patterns and helps the toppings integrate with the top layer. Cooling fully firms the bars so they cut cleanly, and using the parchment helps you lift the whole slab without squishing it. A common error is cutting while warm, which leads to squashed pieces; patience pays off here.
Notes
- Room temperature eggs help the batter emulsify smoothly with melted butter, producing a more even crumb and reducing the chance of a greasy mouthfeel.
- Do not overmix once you add the graham cracker crumbs and flour, because overworking the batter develops gluten and yields tougher bars instead of tender, chewy ones.
- Divide the chocolate so some melts into the batter and some finishes on top, creating pockets of gooey richness and glossy swirls when broiled.
- Check the broiler frequently, particularly during the last 30 seconds, since the marshmallow and chocolate can transform visually in moments and you want a golden toast not burnt black edges.
- Cool fully before slicing to allow the structure to set; this yields neat bars and prevents the toppings from smearing during cutting.