
Recipe 4 of 7302
Peach Thyme Skillet Cake
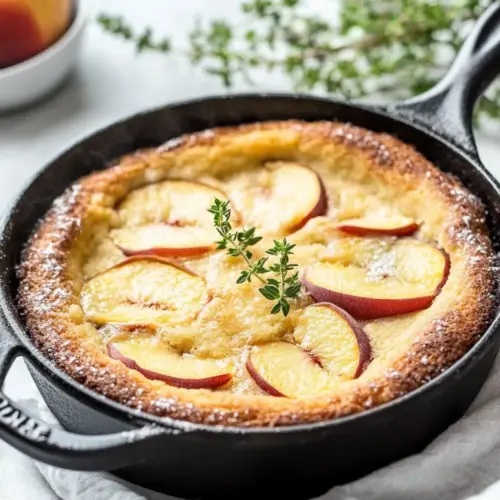
Peach Thyme Skillet Cake
Peach Thyme Skillet Cake is a tender, fruity summer dessert with a delicate herbaceous lift, golden caramelized top, and soft, moist crumb. This easy one pan cake bakes right in a skillet for minimal mess and maximum rustic charm, perfect for an easy weeknight dessert or a casual gathering. Make it when peaches are ripe for a simple yet impressive treat.
Equipment
- Cast-Iron Skillet
- Electric Mixer
- Mixing Bowls
- Offset Spatula
Ingredients
- 4 tablespoons unsalted butter, room temperature, plus more for skillet 1 cup all-purpose flour, plus more for skillet 1/2 teaspoon baking powder 1/4 teaspoon baking soda 1 1/2 teaspoons chopped fresh thyme leaves 1/2 teaspoon coarse salt 3/4 cup plus 2 tablespoons sugar 1 large egg 1/2 cup low-fat buttermilk 2 small ripe peaches (or 1 large), thinly sliced Cream and enrich the batter by adding fat and moisture; room-temperature unsalted butter helps create a tender, velvety crumb, aids in aeration when creamed with sugar, and can be used to grease the skillet to promote even browning and prevent sticking. Combine with the additional instruction to butter the skillet for best results.
Instructions
- Preheat oven to 375 degrees. Butter and flour an 8 inch cast iron skillet (or other oven safe skillet) and set aside.: Warm, dry heat is crucial here, you will smell the faint warmth as the oven comes to temperature and that steady heat helps the cake rise evenly and the top caramelize, creating a golden crust that contrasts the tender crumb. Why this matters, the 375 degrees setting helps the edges set quickly while the center continues to cook, reducing the chance of a collapsed middle. Sensory cues include a faint warm wave when you open the oven and an even glow on the racks. Troubleshooting tip, if your oven runs hot or cold, an oven thermometer will save you from under or over baking; avoid opening the oven door repeatedly during the first part of baking, which can cause uneven rise.
- In a medium bowl, whisk together flour, baking powder, baking soda, thyme and salt. In the bowl of an electric mixer, cream together butter and 3/4 cup of sugar until light and fluffy. Beat in egg. With the mixer on low, add flour mixture in three additions, alternating with the buttermilk. Be sure to start and end with the flour mixture.: The combination of butter and a dusting of flour creates a thin release layer so the cake slips out cleanly and the edges get a delicate crust. You should feel the skillet warm to the touch after a minute in the oven if you like a head start, but it is not required. Visual cues include a thin, even coating of flour and no excess clumps. Why this technique matters, butter adds flavor and helps toast the edges while flour prevents sticking. Troubleshooting tip, if flour clumps, tap out the excess so you do not end up with dry pockets on the cake exterior.
- Pour batter into prepared skillet and smooth with an offset spatula. Spread 3/4 of the peach slices over the top of the cake. Sprinkle the top of the cake with 2 tablespoons of sugar.: You will see the pale tan of the all purpose flour flecked with green from the thyme , and the whisking distributes the leaveners evenly so pockets of baking powder do not create uneven bubbles. This is all about even distribution, which yields a smooth rise and uniform crumb. Smell the faint herbal aroma that emerges as you mix, it is subtle but important. Troubleshooting tip, be sure the baking powder and baking soda are fresh, old leavening can give weak rise and dense texture.
- Bake for 35-40 minutes or until toothpick inserted into the cake comes out clean. Add remaining peach slices to the top of the cake in the last 25 minutes of baking. Allow cake to cool slightly before slicing.: As you beat, watch the color shift from pale to slightly more yellow and the texture change to light and airy, almost cloudlike, because the butter is trapping air that helps leaven the cake. The sound will be a steady whir, and when it is ready the beater ribbons will leave a small trail in the butter. This step matters because it builds structure and tenderness. Troubleshooting tip, if your butter is too warm and greasy, chill briefly and start again, as overly soft butter will not hold air and the cake will be dense.
- Enjoy!: The egg should be at room temperature so it mixes smoothly into the creamed butter and sugar , creating a satin batter. I notice a glossy sheen once it is incorporated. The egg adds moisture and binding power. Troubleshooting tip, add the egg slowly and scrape down the bowl to avoid pockets of unmixed egg, which can cause uneven texture.
- With the mixer on low, add flour mixture in three additions, alternating with the buttermilk: This staged mixing keeps the batter tender by minimizing gluten development while ensuring everything blends. After each addition, the batter will seem to tighten and then loosen when you add the buttermilk , creating a smooth, slightly thick batter. The reason this matters is that alternating prevents overmixing and yields a delicate crumb. Troubleshooting tip, do not over beat after the last flour addition, a few quick pulses are enough to combine.
- Be sure to start and end with the flour mixture: Beginning and finishing with dry ingredients helps control moisture and keeps the batter from becoming too loose. You will feel the batter gain body after the final flour addition and it should hold a gentle mound on the spatula. This technique ensures structure without toughness. Troubleshooting tip, if the batter appears overly stiff, a tablespoon of extra buttermilk can smooth it out without thinning too much.
- Pour batter into prepared skillet and smooth with an offset spatula: As the batter hits the warm, buttered skillet you will hear a soft faint thud and see it spread, then smoothing with an offset spatula gives an even surface so the peaches sit uniformly on top. The visual cue is a glossy, leveled top. This matters because an even surface bakes uniformly and prevents one side from overcooking. Troubleshooting tip, if the batter is lumpy, gently tap the skillet on the counter to settle air bubbles before adding fruit.
- Spread 3/4 of the peach slices over the top of the cake: Arrange most of the peach slices into an attractive pattern, slightly overlapping so they sink into the top and create pockets of jammy fruit as they bake. You will see juices beginning to settle around the fruit as it settles. This placement matters for even distribution and elegant presentation. Troubleshooting tip, avoid piling slices too thickly in the center which can slow baking and leave a soggy spot.
- Sprinkle the top of the cake with 2 tablespoons of sugar: The extra granulated sugar caramelizes during baking, producing tiny crisped crystals that add contrast to the tender crumb. You may hear a faint crackle as the sugar melts and browns. This finish layer is why the edges develop a pleasing crunch. Troubleshooting tip, if your sugar clumps, sift it lightly so it distributes evenly.
- Bake for 35 to 40 minutes or until toothpick inserted into the cake comes out clean: During baking you will notice the aroma shift from raw batter to caramel and peach, and the top will become golden and slightly blistered. A clean toothpick indicates the crumb is set, but be mindful that a few moist crumbs from the fruit are normal. This timing ensures a fully cooked center without drying the edges. Troubleshooting tip, if the top browns too quickly, tent with foil for the remaining time to avoid overbrowning.
- Add remaining peach slices to the top of the cake in the last 25 minutes of baking: Placing the remaining slices later preserves their shape and fresh peach character, so they soften without completely disintegrating. You will see them warm and glossy but not fully collapsed. This timing gives a pleasing contrast between deeply baked peaches and fresher slices. Troubleshooting tip, insert the slices gently into small spaces on top rather than pressing deeply, which can disturb the crumb.
- Allow cake to cool slightly before slicing: Cooling lets the crumb set and the juices redistribute, so each slice holds together. You should notice steam easing away and the cake firming at the edges. This rest is essential for neat slices and better texture. Troubleshooting tip, slicing while too hot can produce a gummy center and messy presentation.
- Enjoy: Sit down and savor the warm mix of tender cake, slightly caramelized top, and aromatic thyme . Sharing this with friends is one of my favorite endings to a summer meal. Troubleshooting tip, if the cake seems dense on the first slice, allow it to cool a bit longer, as the texture often improves with a short rest.
Notes
- Switch up the fruit by using nectarines in place of peaches for a slightly firmer texture and a hint of tartness while preserving the overall flavor profile.
- Play with the herb modestly, adding a touch more thyme if you want a pronounced savory note, but be careful as too much can edge into bitterness.
- Upgrade the finish by sprinkling a mix of coarse sugar and a pinch of cinnamon on top for a warm aromatic crunch that complements the peaches.
- Make it dairy friendly by using a plant based milk cultured product in place of buttermilk if you need a non dairy option, but expect a slightly different crumb.
- Serve warm or room temperature, the cake holds its texture well and can be reheated gently for that fresh baked feeling when serving later.