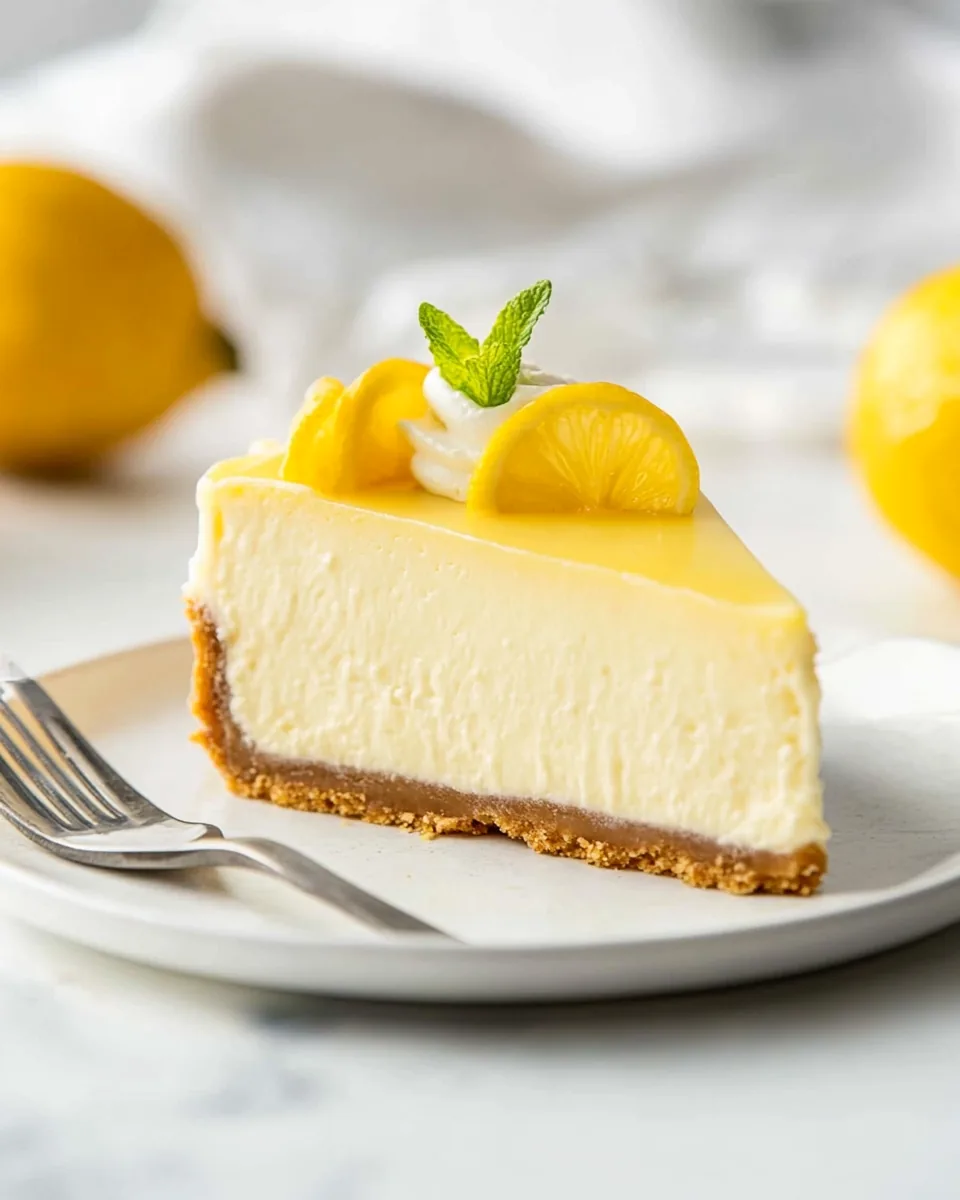
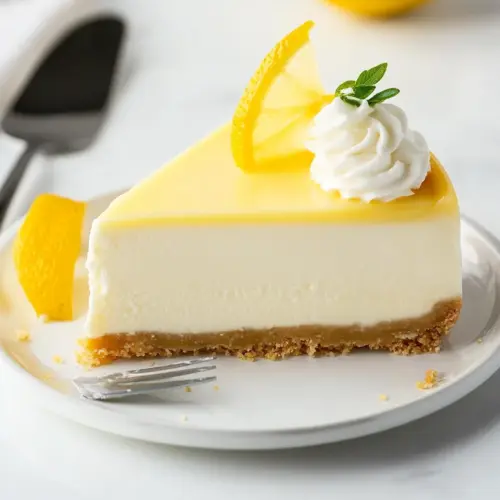
Lemon Cheesecake
There’s something incredibly special about a slice of Lemon Cheesecake. I remember when I first tasted it at a family gathering; the tangy, creamy filling perfectly balanced with a crisp, buttery crust. It was the kind of dessert that made me feel like spring had sprung, even in the middle of winter. Every bite was a burst of sunshine, and I knew I had to recreate it. Over time, I perfected my version of Lemon Cheesecake, and now it’s a staple at every celebration. This dessert isn’t just about satisfying a sweet tooth; it’s about sharing joy and memories with loved ones. Whether it’s a birthday, a holiday, or just a casual dinner, this cheesecake knows how to bring people together.
Recipe Snapshot
1 hr 25 mins
20 mins
65 mins
Medium
400 kcal
6 g
Keto, Paleo, Gluten-Free
28 g
KitchenAid 9-Speed Digital Hand Mixer
Why This Lemon Cheesecake Is a Winner
Rich and Creamy Texture
One of the things I absolutely adore about Lemon Cheesecake is its rich and creamy texture. The combination of cream cheese and heavy cream creates a velvety consistency that melts in your mouth. It’s the kind of dessert that feels indulgent, yet light enough to enjoy after a hearty meal.
Bright and Tangy Flavor
The bright flavor of lemons in this cheesecake is a game changer. It cuts through the richness and adds a refreshing twist that makes each bite exciting. Using freshly squeezed lemon juice and zest ensures that the flavor is vibrant and fragrant, elevating the entire dessert.
Perfect for Any Occasion
What I love most about Lemon Cheesecake is its versatility. It’s perfect for fancy dinner parties, casual get-togethers, or even a quiet night in. You can dress it up with toppings like whipped cream and lemon slices for a special occasion, or keep it simple for a weeknight treat. Regardless of the setting, it never fails to impress.
Easy to Prepare
Don’t let the dreamy appearance fool you; making Lemon Cheesecake is surprisingly easy! The steps are straightforward, and while it does require some chilling time, the hands-on effort is minimal. This recipe allows you to showcase your culinary skills without spending hours in the kitchen.
A Crowd Favorite
I can’t recall a single gathering where Lemon Cheesecake didn’t steal the show. Friends and family rave about its flavor, and it’s always one of the first desserts to disappear. There’s something universally appealing about it, and I think it’s because it’s the perfect balance of sweet and tart.
Shopping List for Lemon Cheesecake
When it comes to the ingredients for Lemon Cheesecake, each one plays a vital role in achieving that delightful balance of flavors and textures. Think of this as a symphony where every ingredient contributes to the overall masterpiece. From the base of graham cracker crumbs to the luscious filling made of cream cheese and lemons, they all harmonize beautifully to create something memorable.
- 1 ½ cups graham cracker crumbs – These form the perfect crunchy base for your cheesecake, adding flavor and texture.
- ½ cup Bob’s Red Mill® Super-Fine Natural Almond Flour – This adds a subtle nuttiness to the crust and aids in achieving the right consistency.
- 3 tablespoons sugar – Just a touch of sweetness to balance the flavors in the crust.
- 6 tablespoons butter, melted – The key to holding your crust together while adding richness.
- 1 cup granulated sugar – Essential for sweetening the cheesecake filling while allowing the lemon flavor to shine.
- Zest of 2 lemons – Adds a burst of bright citrus aroma and flavor.
- 32 ounces cream cheese, room temperature (4 [8-ounce] packages) – The star of your cheesecake, providing creaminess and body.
- 4 large eggs, room temperature – These help bind everything together and give structure to the cheesecake.
- 2 teaspoons pure vanilla extract – Enhances the flavors and adds depth.
- ¼ cup freshly squeezed lemon juice – The zingy element that brings everything to life.
- ⅓ cup heavy cream – This adds a luxurious creaminess to the filling.
- 1 cup lemon curd – A delicious topping that elevates the flavors of the cheesecake.
- Whipped cream (optional) – For serving, adds a light, airy texture.
- Lemon slices (optional) – A decorative touch that adds visual appeal.
Making This Lemon Cheesecake
Creating your own Lemon Cheesecake is a rewarding experience that fills your kitchen with delightful scents. With just a few simple steps, you’ll have a dessert that’s bound to impress. Let’s dive into the process and see how it all comes together.
- Preheat your oven to 350°F (175°C). This is crucial for ensuring your cheesecake bakes evenly. While the oven is heating, take a 9-inch springform pan and separate it into two pieces. I find it helpful to line the bottom of the pan with foil, which prevents leaks. After lining, you can fasten the side piece back on and spray the inside with nonstick cooking spray.
- Tightly wrap the bottom and sides of the springform pan with two layers of heavy-duty foil. This step is essential for using a water bath during baking, which helps prevent the cheesecake from cracking. To add an extra layer of protection, you could place the foil-wrapped springform pan inside an oven bag – but this is completely optional.
- In a medium bowl, combine the crust ingredients: graham cracker crumbs, almond flour, sugar, and melted butter. Stir until the mixture is evenly distributed and resembles wet sand.
- Next, spoon the crumb mixture into the prepared pan. Press it evenly across the bottom and up the sides to form a nice crust layer. This layer will provide a flavorful base for your cheesecake. Bake the crust in the preheated oven for 10 minutes, then remove it to a cooling rack to cool.
- While the crust cools, bring a kettle of water to boil for the water bath. This step helps maintain moisture in the oven, resulting in a creamier cheesecake.
- In a medium bowl, use your fingertips to combine the granulated sugar and lemon zest. This will release the oils from the zest, enhancing the flavor of the sugar. The fragrant mixture is key to achieving a well-flavored filling.
- In the bowl of a stand mixer fitted with a paddle attachment, or in a large bowl using an electric mixer, beat the cream cheese with the lemon-sugar mixture for about 2 minutes. Scrape down the sides of the bowl and continue mixing for an additional 30 seconds until smooth and creamy.
- Add in the eggs, one at a time, mixing well after each addition. It’s important to scrape down the sides of the bowl after adding the second and fourth eggs to ensure everything is well-combined.
- Once all the eggs are incorporated, mix for another 30 seconds until the filling is smooth. Next, gently blend in the vanilla, lemon juice, and heavy cream. This creamy mixture should be rich and velvety.
- Pour the cheesecake filling over the cooled crust, smoothing it out with a spatula. Now, place the springform pan into a larger pan (I usually use a roasting pan). Carefully pour the boiling water into the larger pan until it reaches halfway up the sides of the cheesecake pan. This water bath technique is key for a smooth texture.
- Cover the cheesecake pan loosely with a piece of foil, allowing air to circulate while it bakes. Bake for 55 to 65 minutes. The edges should appear set, but the center should still jiggle slightly. When the time is up, turn off the oven and leave the door cracked. This helps the cheesecake cool gradually.
- After one hour, carefully remove the cheesecake from the water bath and place it on a cooling rack to cool completely. Once it has cooled, transfer it to the refrigerator for at least 8 hours, or overnight if possible. This chilling time allows the flavors to meld and the texture to firm up.
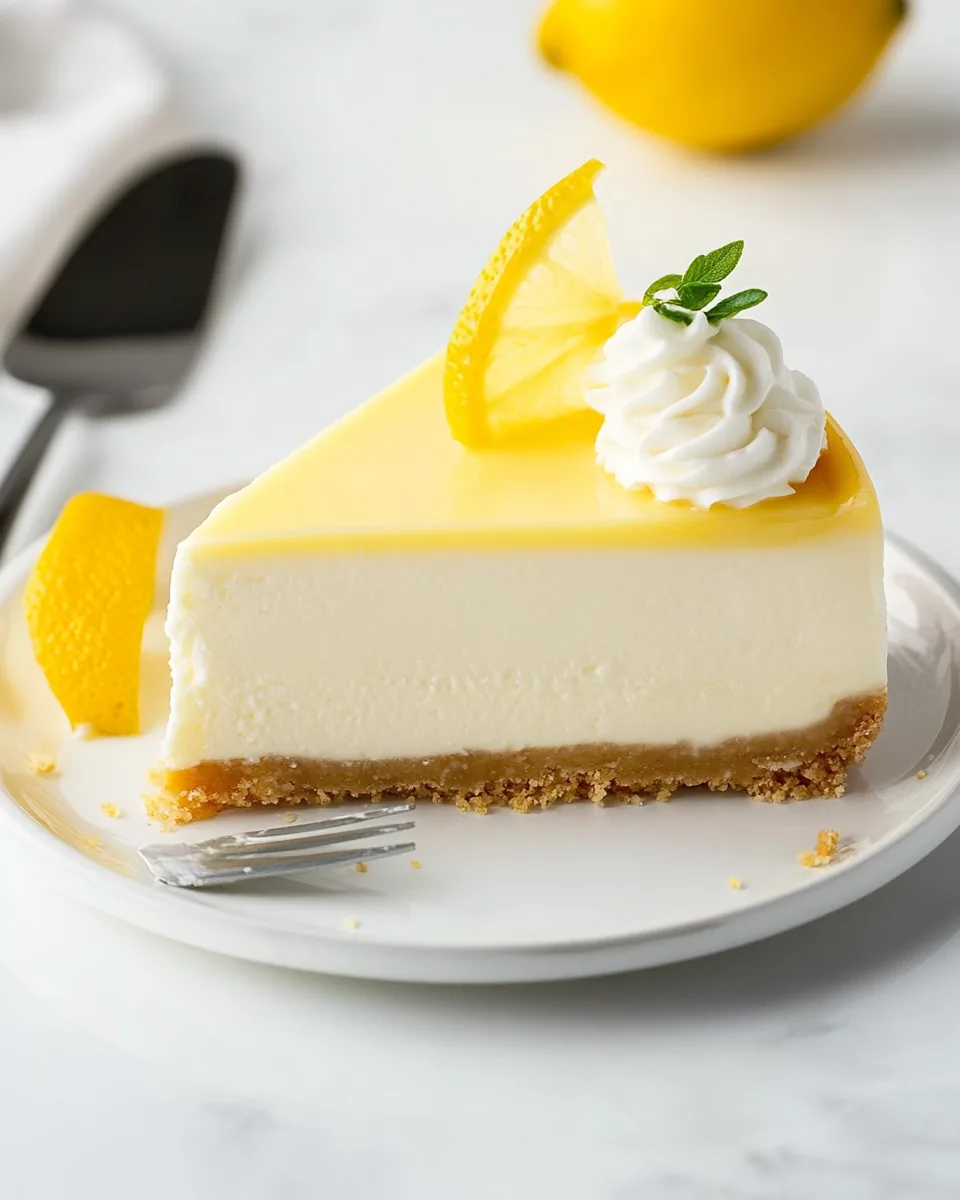
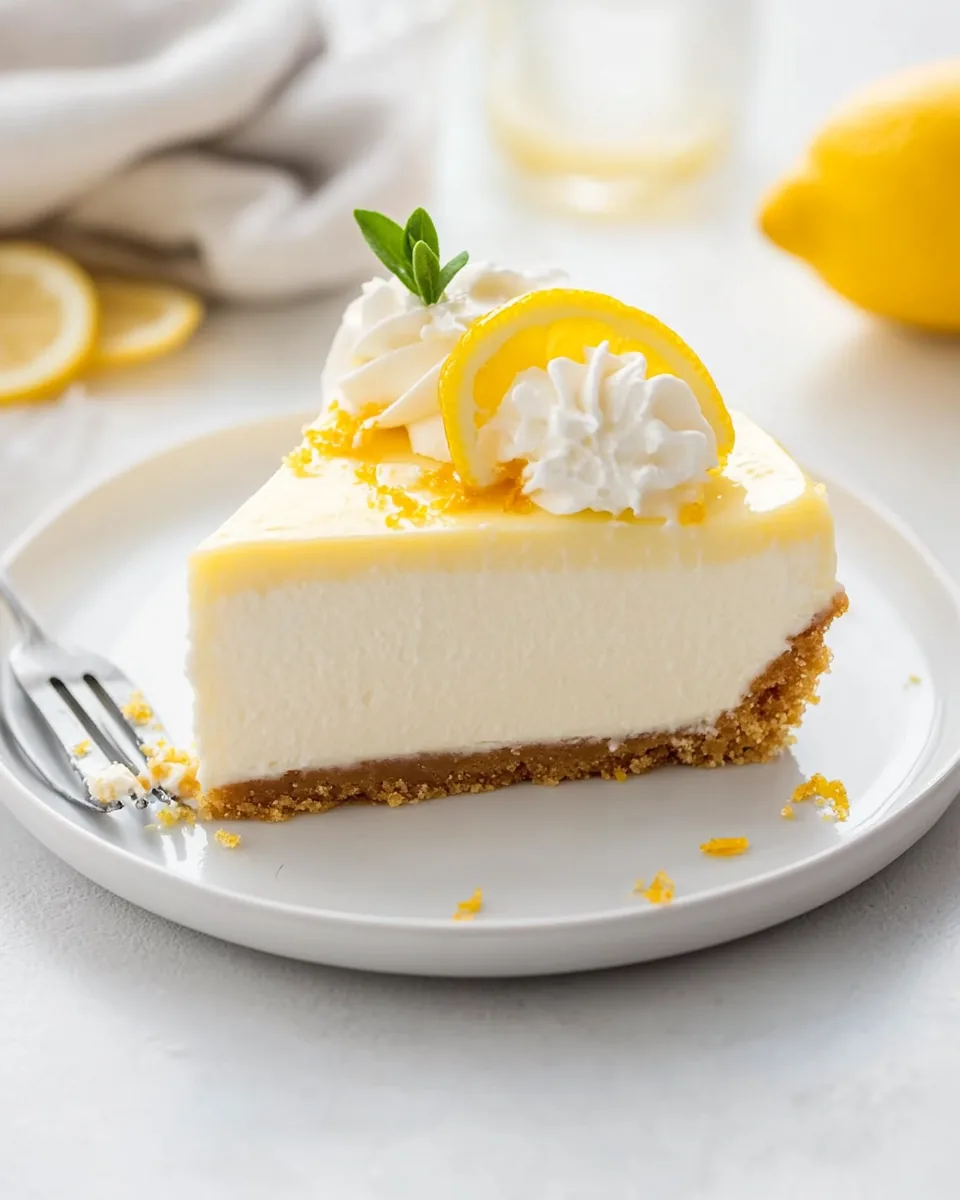
- Before serving, top your cheesecake with lemon curd, whipped cream, and lemon slices for a stunning presentation. Enjoy this delightful homemade Lemon Cheesecake with friends and family!
Things Worth Knowing
- Always use room temperature ingredients: This ensures a smoother batter and avoids lumps in your cheesecake.
- Wrap your springform pan tightly: This prevents leaks and keeps your cheesecake intact during baking.
- Check for doneness carefully: The edges should be firm, while the center should retain a slight jiggle. It will continue to set as it cools.
- Chill overnight for best results: Allowing your cheesecake to rest overnight allows the flavors to develop and the texture to set perfectly.
Making Adjustments

Sometimes, you might want to tweak the recipe to suit your taste or dietary needs. Here are some tips for making adjustments to your Lemon Cheesecake.
- Storage: After making your Lemon Cheesecake, store leftovers in the refrigerator, covered tightly with plastic wrap or in an airtight container. It’s best enjoyed within 3 to 4 days.
- Freezing: You can freeze the cheesecake before adding any toppings. Wrap it securely in plastic wrap and then in aluminum foil. It can last up to 2 months in the freezer. When you’re ready to enjoy it, thaw it in the refrigerator overnight.
- Pairing: Serve your cheesecake with fresh fruits like strawberries or blueberries for a pop of color and flavor. They complement the tartness of the lemon beautifully.
- Variations: Feel free to play around with flavors! You can substitute with other citrus fruits like lime or orange for a different twist on this classic recipe.
- Serving Tips: Allow the cheesecake to sit at room temperature for about 15 minutes before serving to enhance its creaminess.
Serve This Lemon Cheesecake With
When it comes to serving Lemon Cheesecake, there are endless possibilities to enhance the experience. Here are some ideas:
- Seasonal Fruits: Pair your cheesecake with a fresh fruit salad or a side of mixed berries to add a burst of color and flavor.
- Special Occasions: It makes a stunning centerpiece for celebrations like birthdays, anniversaries, and holiday dinners. Serve alongside a glass of sparkling beverage for a festive touch.
- Garnishes: Consider adding a sprig of mint or a dusting of powdered sugar on top for an elegant finish.
- Picnics and Potlucks: This cheesecake travels well. Slice it into portions and serve it at gatherings to impress your guests.
- Complementary Sides: Serve with a light salad or a refreshing sorbet to cleanse the palate between bites.
- Storage Tips: If you have any leftovers, store them in the fridge. A well-stored cheesecake will maintain its flavor and texture for several days.
FAQ
Conclusion
This Lemon Cheesecake is not just a dessert; it’s a celebration of flavors that captures the essence of sunshine in every bite. With its creamy texture and zesty flavor, it’s bound to become a star at your table. I encourage you to try this recipe at your next gathering or simply as a treat for yourself. You won’t regret it!
Lemon Cheesecake
Equipment
- KitchenAid 9-Speed Digital Hand Mixer
Ingredients
- 1.5 cups Graham cracker crumbs
- 0.5 cups Bob’s Red Mill® Super-Fine Natural Almond Flour
- 3 tablespoons Sugar
- 6 tablespoons Butter (melted)
- 1 cup Granulated sugar
- Zest of 2 lemons Lemons
- 32 ounces Cream cheese (room temperature, 4 [8-ounce] packages)
- 4 large eggs Eggs (room temperature)
- 2 teaspoons Pure vanilla extract
- 0.25 cups Freshly squeezed lemon juice
- 0.333 cups Heavy cream
- 1 cup Lemon curd
- Whipped cream (optional)
- Lemon slices (optional)
Instructions
- Preheat your oven to 350°F (175°C). This is crucial for ensuring your cheesecake bakes evenly. While the oven is heating, take a 9-inch springform pan and separate it into two pieces. I find it helpful to line the bottom of the pan with foil, which prevents leaks. After lining, you can fasten the side piece back on and spray the inside with nonstick cooking spray.
- Tightly wrap the bottom and sides of the springform pan with two layers of heavy-duty foil. This step is essential for using a water bath during baking, which helps prevent the cheesecake from cracking. To add an extra layer of protection, you could place the foil-wrapped springform pan inside an oven bag – but this is completely optional.
- In a medium bowl, combine the crust ingredients: graham cracker crumbs, almond flour, sugar, and melted butter. Stir until the mixture is evenly distributed and resembles wet sand.
- Next, spoon the crumb mixture into the prepared pan. Press it evenly across the bottom and up the sides to form a nice crust layer. This layer will provide a flavorful base for your cheesecake. Bake the crust in the preheated oven for 10 minutes, then remove it to a cooling rack to cool.
- While the crust cools, bring a kettle of water to boil for the water bath. This step helps maintain moisture in the oven, resulting in a creamier cheesecake.
- In a medium bowl, use your fingertips to combine the granulated sugar and lemon zest. This will release the oils from the zest, enhancing the flavor of the sugar. The fragrant mixture is key to achieving a well-flavored filling.
- In the bowl of a stand mixer fitted with a paddle attachment, or in a large bowl using an electric mixer, beat the cream cheese with the lemon-sugar mixture for about 2 minutes. Scrape down the sides of the bowl and continue mixing for an additional 30 seconds until smooth and creamy.
- Add in the eggs, one at a time, mixing well after each addition. It’s important to scrape down the sides of the bowl after adding the second and fourth eggs to ensure everything is well-combined.
- Once all the eggs are incorporated, mix for another 30 seconds until the filling is smooth. Next, gently blend in the vanilla, lemon juice, and heavy cream. This creamy mixture should be rich and velvety.
- Pour the cheesecake filling over the cooled crust, smoothing it out with a spatula. Now, place the springform pan into a larger pan (I usually use a roasting pan). Carefully pour the boiling water into the larger pan until it reaches halfway up the sides of the cheesecake pan. This water bath technique is key for a smooth texture.
- Cover the cheesecake pan loosely with a piece of foil, allowing air to circulate while it bakes. Bake for 55 to 65 minutes. The edges should appear set, but the center should still jiggle slightly. When the time is up, turn off the oven and leave the door cracked. This helps the cheesecake cool gradually.
- After one hour, carefully remove the cheesecake from the water bath and place it on a cooling rack to cool completely. Once it has cooled, transfer it to the refrigerator for at least 8 hours, or overnight if possible. This chilling time allows the flavors to meld and the texture to firm up.
- Before serving, top your cheesecake with lemon curd, whipped cream, and lemon slices for a stunning presentation. Enjoy this delightful homemade Lemon Cheesecake with friends and family!
Notes
- Tip 1: After making your Lemon Cheesecake, store leftovers in the refrigerator, covered tightly with plastic wrap or in an airtight container. It’s best enjoyed within 3 to 4 days.
- Tip 2: You can freeze the cheesecake before adding any toppings. Wrap it securely in plastic wrap and then in aluminum foil. It can last up to 2 months in the freezer. When you're ready to enjoy it, thaw it in the refrigerator overnight.
- Tip 3: Serve your cheesecake with fresh fruits like strawberries or blueberries for a pop of color and flavor. They complement the tartness of the lemon beautifully.
- Tip 4: Feel free to play around with flavors! You can substitute with other citrus fruits like lime or orange for a different twist on this classic recipe.
- Tip 5: Allow the cheesecake to sit at room temperature for about 15 minutes before serving to enhance its creaminess.