Homemade Pancake Mix
Homemade Pancake Mix is the little ritual that brings weekend mornings alive in my kitchen, a jar of ready-to-go batter base that smells like childhood and makes breakfast feel effortless.
Years ago I started mixing a big batch on a rainy morning because I wanted pancakes without the fuss, and that single jar has saved more lazy Sundays than I can count. I love the way the dry ingredients store neatly, waiting for a splash of milk and an egg to transform into steaming, golden griddles. When guests wander into the kitchen with sleepy smiles, I reach for the container and they always ask if I made something special. The truth is, the magic is in the simplicity and the rhythm, measuring and whisking until the flour clouds drift like tiny celebratory confetti.
I learned a few practical tricks along the way that keep the pancakes tender and consistent, like gently folding the wet into the dry so the batter stays slightly lumpy, or letting the batter rest when I want extra fluff. There is something comforting about having a pantry staple that doubles as a gift, mixed and labeled, ready for a housewarming or a quick treat. Over time I’ve adjusted amounts and techniques to suit my family, but the core idea remains the same: a reliable mix makes mornings calmer and the pancakes happier.
Recipe Snapshot
20 mins
5 mins
15 mins
Easy
200 kcal
American
Gluten-Free, Low FODMAP
Breakfast
mixing bowls
What Sets This Homemade Pancake Mix Apart
Convenience that actually saves time
I swear by how much simpler mornings feel when a jar of Homemade Pancake Mix sits on the shelf. You open the container, add a few pantry staples, and within minutes the sizzle of batter on the griddle replaces frantic scrambling. I treasure this kind of time economy because it means more moments at the table and fewer burned breakfasts.
Consistent results
Mixing the dry ingredients in one go gives you dependable texture every time. I notice the batter comes together the same way whether I am making a quick two pancake snack or a stack for company, and that predictability builds confidence. You will get the same tender crumb, and that reliability is what keeps me using the mix week after week.
Versatility for different mornings
What I love is how adaptable the mix is. On weekdays I keep things simple, on weekends I might let the batter rest for extra fluff, and for celebrations I can scale up without fuss. The mix is a flexible foundation that responds well to small adjustments, which is something I always mention to friends who ask for my secret.
Pantry-friendly and long lasting
Storing the dry mix in an airtight jar makes it a pantry hero. I can portion it for gifting, stash it for busy weeks, or freeze it for extended storage. That durability means less waste and more convenience, and I count on it for last minute hosting or unexpected guests.
Simple, clean ingredient list
I appreciate recipes that don’t overcomplicate things, and Homemade Pancake Mix uses familiar pantry staples that combine to create a gentle, balanced batter. There is comfort in a recipe that uses what you already have, and I find that minimalism often yields the most satisfying results.
Shopping List for Homemade Pancake Mix

These pantry essentials are chosen to create a balanced, reliable base. The dry ingredients provide structure and lift, while the wet additions turn the mix into a tender, golden pancake. I focus on quality for the key players because they dictate texture, flavor, and how the batter behaves on a hot griddle.
- 4 cups all-purpose flour: Provide structure and bulk to the mix, creating the base for pancakes and determining texture; sifted or spooned into the cup ensures accurate measurements and avoids dense results.
- 1/4 cups sugar: Add sweetness and help brown the pancakes, balancing flavors without overpowering; adjust quantity for dietary preferences or to control caramelization during cooking.
- 2 tablespoons baking powder: Leaven the batter by releasing carbon dioxide when heated, producing a light, fluffy crumb; distribute evenly through dry ingredients to prevent uneven rising or pockets of metallic taste.
- 2 teaspoons baking soda: Activate additional lift and react with acidic components to enhance tenderness and rise; measure precisely to avoid a soapy or bitter aftertaste while contributing to golden color.
- 1 teaspoon salt: Enhance overall flavor balance and strengthen gluten development control, making other flavors pop while preventing blandness; dissolved evenly into the dry mix for consistent seasoning.
- 1 cup pancake mix, from above recipe: Serve as a ready-made base component when preparing pancakes from the mix, concentrating dry ingredients for easy storage and quick use; incorporate at recipe time to achieve consistent results.
- 3/4 cup milk: Provide moisture and dissolve dry ingredients, creating the batter's fluid consistency and contributing to tenderness; temperature can be adjusted to influence batter readiness and cook time.
- 1 egg: Bind ingredients together, add richness and improve texture while contributing to browning; beaten lightly before adding to ensure even distribution throughout the batter.
- 1 tablespoon unsalted butter, melted: Add richness, flavor, and moisture while contributing to a tender crumb; melted before mixing to prevent cold spots that might inhibit batter emulsification.
- 1 splash vanilla: Impart aromatic sweetness and deepen flavor profile with floral or vanilla notes; add sparingly to enhance overall taste without overwhelming the pancake mix.
Cooking Instructions for Homemade Pancake Mix
Working with the mix is straightforward and gratifying. I like to think of it as a short ritual: combine, rest if desired, preheat, and watch the batter transform on the hot surface into golden rounds. The steps below translate the original directions into sensory rich guidance so you can get perfect pancakes every time.
- In a large bowl, whisk flour, sugar, baking powder, baking soda, and salt.: The air should smell faintly of warm grain and baking minerals as you whisk; this step ensures even distribution of the leaveners so pockets of raw soda or powder do not create odd flavors or uneven rise. A vigorous whisk will produce a light, slightly floury scent and a uniform pale mixture. The reason this matters is that uneven mixing causes inconsistent bubbling and spotted browning on the griddle, which affects texture and appearance. A common mistake is rushing this step and leaving clumps, so take an extra few breaths to swipe the sides of the bowl and rewhisk any settled bits. You will notice the powder disperse and the mixture lighten visually, a good cue that you are ready for the next step.
- Transfer to an airtight container and store up to 6 months at room temperature or up to 1 year in the freezer.: The dry mix should be cool and completely dry before sealing, otherwise trapped moisture will degrade its performance and invite stale odors. Packing it into a clean jar gives you a quiet, reassuring clink when you set it on the shelf, and the sealed environment keeps the leavening fresh longer. Store in a dark, cool space to slow oxidation; sunlight and heat will prematurely age the baking powder and soda. A frequent error is leaving the lid loose, which leads to stale flour and weaker rise, so double check the seal after filling.
- Lightly grease your griddle or pan and preheat to medium-high heat (about 375°F).: As the pan warms you will hear a faint settling sound and see a subtle shimmer of oil, both signs the surface is ready. The correct temperature creates an immediate sizzle when batter hits the surface, which is crucial for forming a crisp edge and encouraging even browning. If the pan is too cool the pancakes will soak up fat and become pale and dense; if too hot they will brown too quickly on the exterior while remaining raw inside. Use a thermometer if you want precision, or test with a small drop of batter to check that it bubbles actively but does not burn right away.
- To make pancakes, combine 1 cup of pancake mix with milk, egg, butter, and vanilla. Mix until just combined. (For fluffier pancakes, let batter rest for 10 minutes).: As you whisk the wet ingredients into the mix, the aroma will shift from dry flour to a creamy, sweet scent as the vanilla blooms and the butter melds. The batter should be slightly lumpy, with visible pockets of flour still softening; this texture protects tenderness and prevents a gluey result. Whisk just until combined and stop, because overmixing activates gluten and yields a chewier pancake. A common pitfall is trying to over-smooth the batter for uniformity; instead, accept small lumps and give the batter a brief rest when you want fluffier pancakes so the leavening can start working and the flour can hydrate.
- Pour 1/4 cup batter onto hot griddle and cook until bubbly and lightly browned (about 3 minutes). Flip and cook for 2 minutes more until browned on the second side. Serve hot with your favorite toppings.: You will feel the batter thicken and notice tiny air bubbles forming as the chemical leaveners begin reacting. This step is about developing the right viscosity so the batter spreads slowly but holds shape on the griddle. The reason this matters is that batter that is too thin will run and create a thin, fragile pancake, while batter that is too thick will resist expansion and yield a dense result. Avoid the common mistake of adding too much milk to fix perceived dryness; instead, gently fold and assess before adjusting. A good tactile cue is that the batter should drop from the spoon in a slightly ribboned stream.
- For fluffier pancakes, let batter rest for 10 minutes: As the batter rests you will notice the texture relax and small bubbles appear, a sign the leaveners are doing their work and the flour is fully hydrating. This pause yields a lighter interior and a more tender crumb because it reduces the urge to overmix while allowing trapped gas to form pockets. I often use this time to heat the griddle and tidy the prep area. The mistake to avoid is skipping the rest when you want maximum lift; rushed batter tends to produce flatter pancakes.
- Pour 1/4 cup batter onto hot griddle and cook until bubbly and lightly browned (about 3 minutes): When the batter hits the hot surface you will hear a lively sizzle and see the edges set quickly, followed by bubbles forming across the top. These bubbles are a visual cue that the interior is cooking and the underside is developing golden color. Cook until the surface shows numerous bubbles that have begun to pop and leave small holes, indicating the pancake is ready to flip. A common error is flipping too early when only a few bubbles have formed, which results in a dense center and uneven cooking.
- Flip and cook for 2 minutes more until browned on the second side: After flipping, the second side will take a shorter time to finish and should develop an even, amber hue. You will notice the aroma deepen to a toasty, buttery note and the pancake will feel springy when gently pressed. This stage seals in moisture and sets the crumb, making the pancake tender yet structured. Avoid pressing down with the spatula, as that squeezes moisture out and yields a drier pancake.
- Serve hot with your favorite toppings: Immediately after cooking, the pancakes radiate warmth and a soft steam; stacking them will help retain heat but I often separate layers with parchment if I am storing some for later. The fresh pancakes have a crisp edge and pillowy interior, a contrast that makes each bite satisfying. A frequent mistake is letting pancakes sit uncovered too long, which causes them to dry and lose their glossy appeal, so serve promptly for the best texture.
Substitutions and Tips
Here are my favorite practical tips and clarifications for working with Homemade Pancake Mix. These expanded pointers come from repeated breakfasts and a few kitchen experiments, so they are the sort of real world advice I share with friends.
- Store properly, keep the dry mix in an airtight jar in a cool dark place to preserve the potency of the baking powder and baking soda for up to six months.
- Measure with care, spoon and level the all-purpose flour into the cup instead of scooping to avoid packing and dense pancakes.
- Room temperature liquids, bring your milk and egg to room temperature for faster hydration and smoother batter integration.
- Butter technique, melt then cool the unsalted butter slightly before mixing so it blends without cooking the egg if combined too warm.
- Batch making, if you double the mix for gifts, label jars with date and instructions so recipients know how much pancake mix to combine per batch.
Serving Suggestions
I like to think about serving as part practical and part presentation, and pancakes invite playful pairings. The right accompaniments and serving method can turn a simple stack into a celebratory breakfast or a cozy weeknight treat. Here are ways I often present Homemade Pancake Mix pancakes.
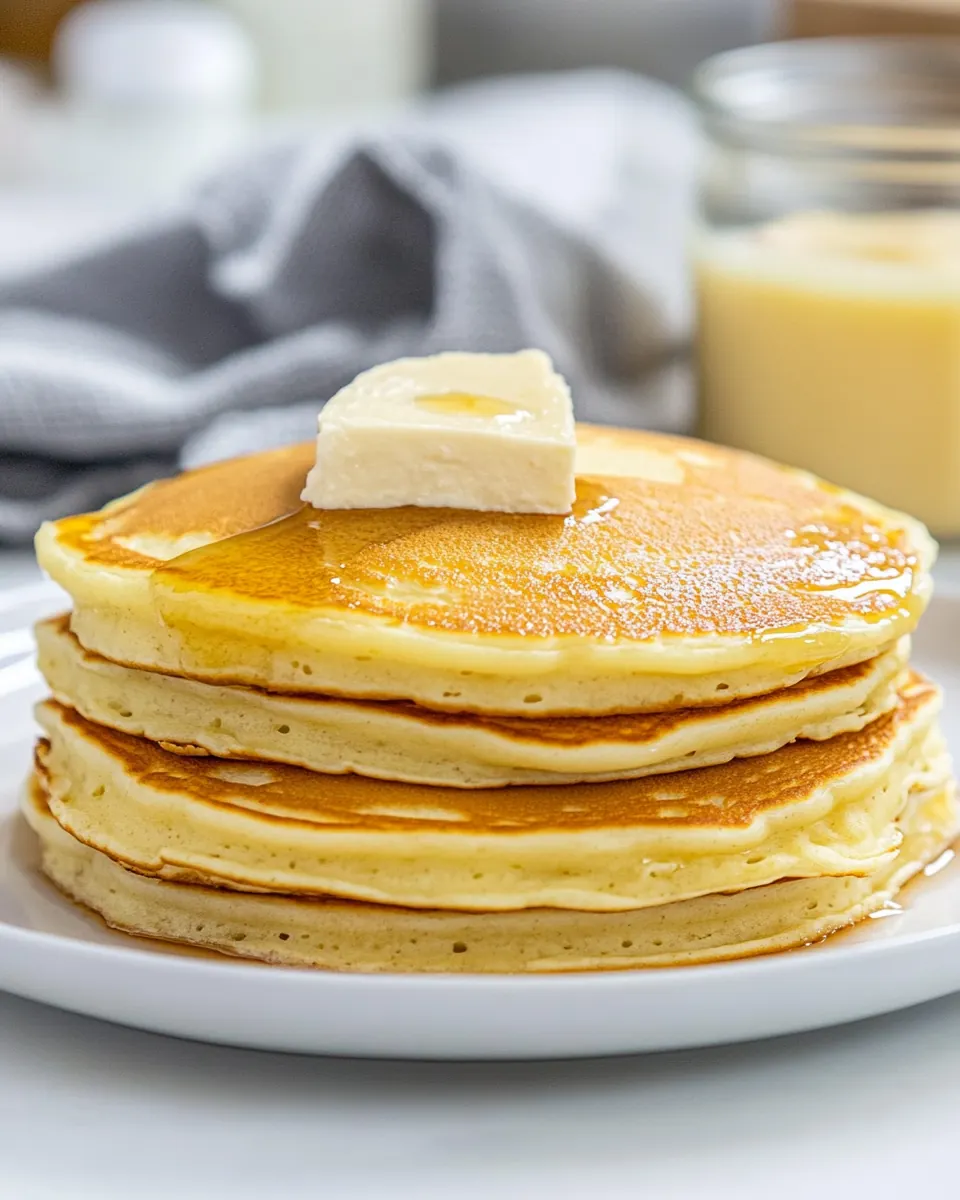
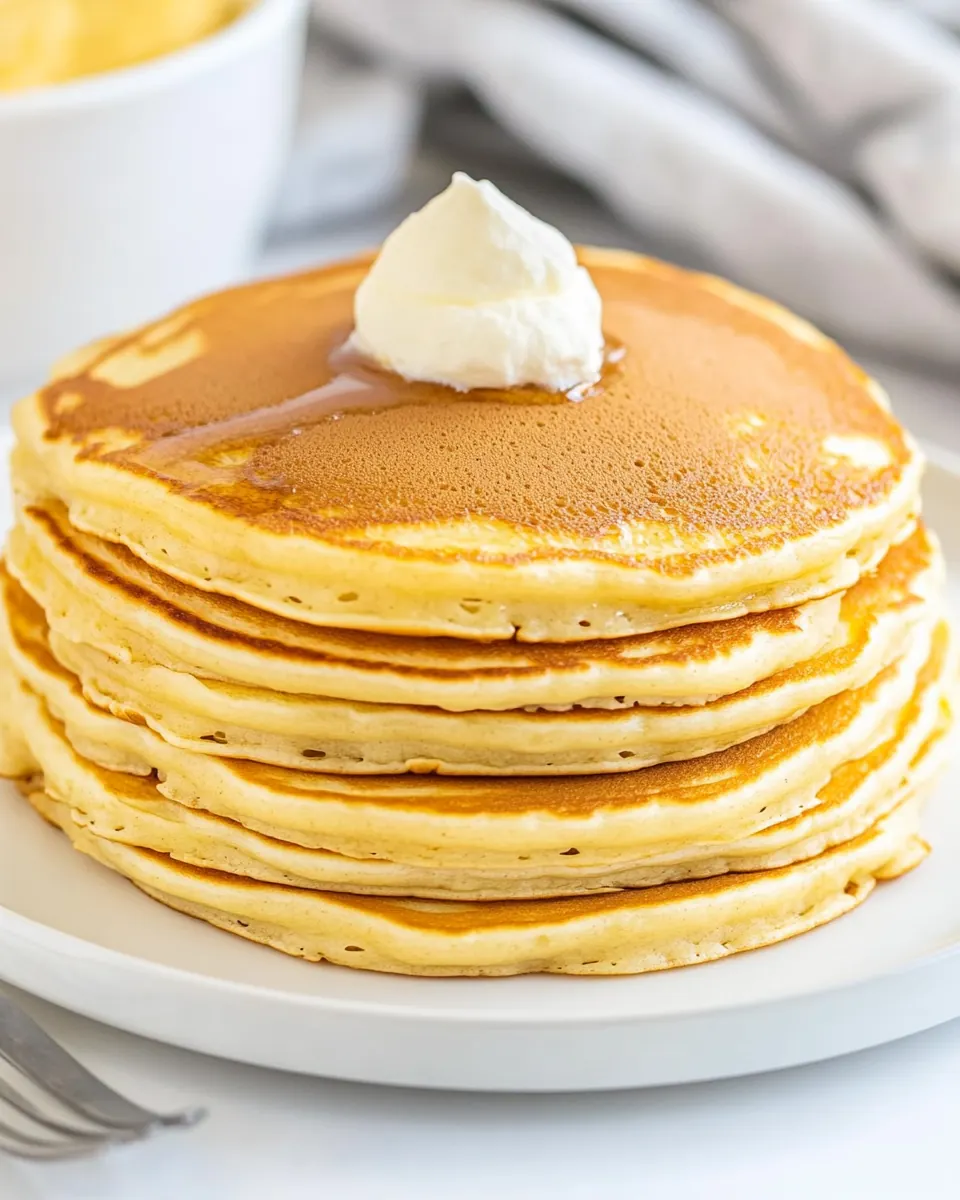
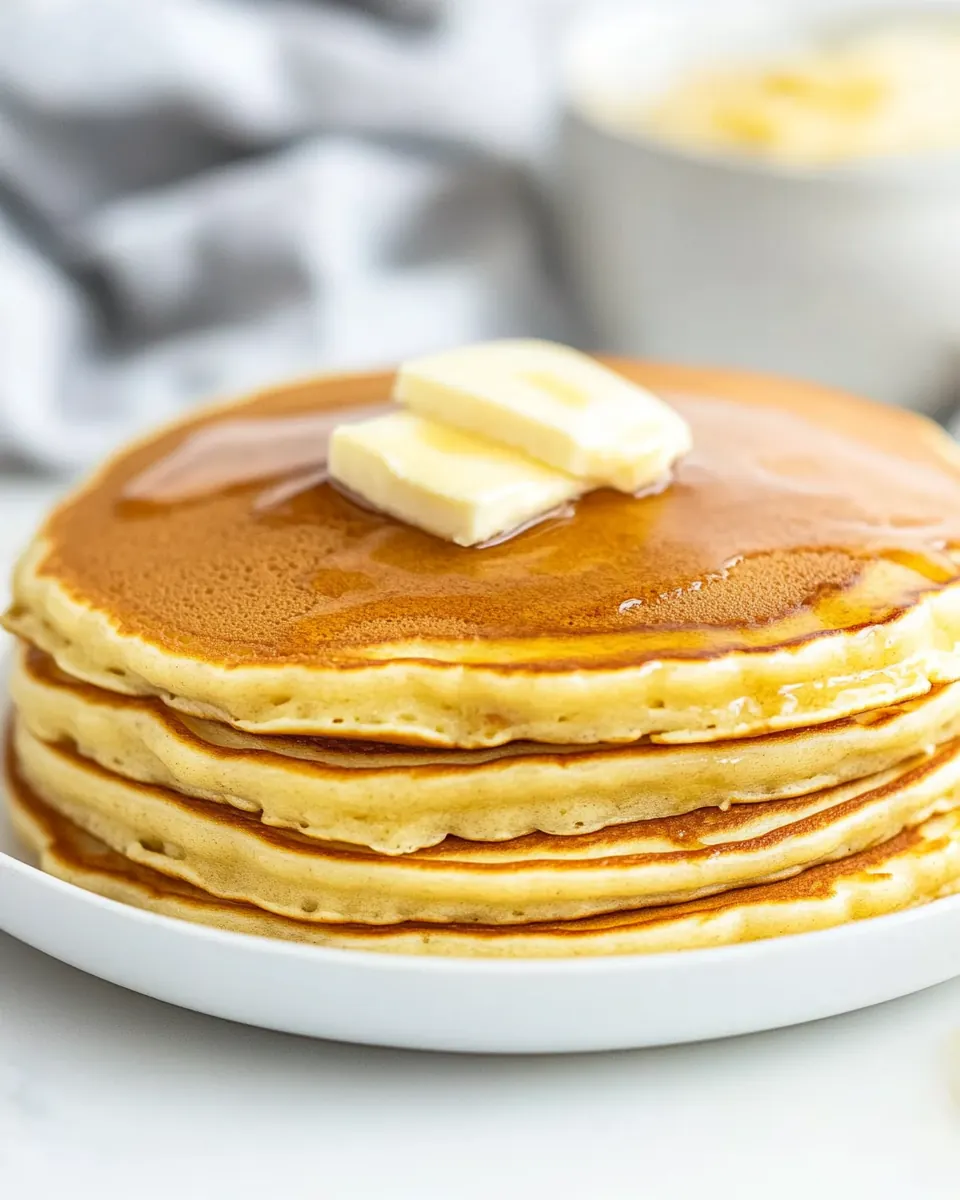
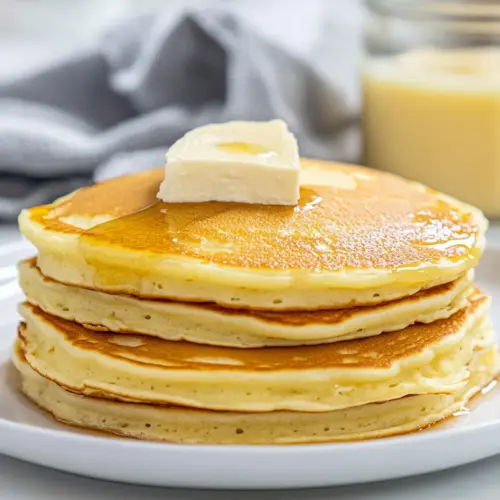
- Classic stack, serve warm pancakes stacked with a pat of butter and a drizzle of syrup for a timeless breakfast that pleasingly steams and melts together.
- Family brunch, keep pancakes warm on a low oven and let everyone choose toppings so the table becomes a DIY station and the meal feels communal.
- Meal occasions, these pancakes work well for weekend brunches, casual gatherings, or Ramadan suhoor when you want something comforting and easy to prepare in batches.
- Storage advice, cool cooked pancakes completely, layer with parchment in an airtight container, refrigerate for up to five to seven days or freeze for longer storage.
- Reheating, reheat frozen pancakes in a toaster or warmed oven to restore crisp edges while keeping the center soft and tender.
- Presentation, sprinkle powdered sugar or add a few berries for color contrast; small touches make the plate feel special without extra effort.
FAQ
Conclusion
What makes this recipe special is its blend of simplicity and reliability, turning basic pantry staples into consistently tender, golden pancakes. Give it a try this weekend and you will see how a single jar of mix can streamline mornings and elevate casual breakfasts. It’s an easy way to bring more warmth to the table with minimal effort, and I hope you enjoy the comfort of a perfect stack whenever you want it.
Homemade Pancake Mix
Equipment
- Mixing Bowls
Ingredients
- 4 cups all-purpose flour Provide structure and bulk to the mix, creating the base for pancakes and determining texture; sifted or spooned into the cup ensures accurate measurements and avoids dense results.
- 1/4 cups sugar Add sweetness and help brown the pancakes, balancing flavors without overpowering; adjust quantity for dietary preferences or to control caramelization during cooking.
- 2 tablespoons baking powder Leaven the batter by releasing carbon dioxide when heated, producing a light, fluffy crumb; distribute evenly through dry ingredients to prevent uneven rising or pockets of metallic taste.
- 2 teaspoons baking soda Activate additional lift and react with acidic components to enhance tenderness and rise; measure precisely to avoid a soapy or bitter aftertaste while contributing to golden color.
- 1 teaspoon salt Enhance overall flavor balance and strengthen gluten development control, making other flavors pop while preventing blandness; dissolved evenly into the dry mix for consistent seasoning.
- 1 cup pancake mix, from above recipe Serve as a ready-made base component when preparing pancakes from the mix, concentrating dry ingredients for easy storage and quick use; incorporate at recipe time to achieve consistent results.
- 3/4 cup milk Provide moisture and dissolve dry ingredients, creating the batter's fluid consistency and contributing to tenderness; temperature can be adjusted to influence batter readiness and cook time.
- 1 egg Bind ingredients together, add richness and improve texture while contributing to browning; beaten lightly before adding to ensure even distribution throughout the batter.
- 1 tablespoon unsalted butter, melted Add richness, flavor, and moisture while contributing to a tender crumb; melted before mixing to prevent cold spots that might inhibit batter emulsification.
- 1 splash vanilla Impart aromatic sweetness and deepen flavor profile with floral or vanilla notes; add sparingly to enhance overall taste without overwhelming the pancake mix.
Instructions
- In a large bowl, whisk flour, sugar, baking powder, baking soda, and salt.: The air should smell faintly of warm grain and baking minerals as you whisk; this step ensures even distribution of the leaveners so pockets of raw soda or powder do not create odd flavors or uneven rise. A vigorous whisk will produce a light, slightly floury scent and a uniform pale mixture. The reason this matters is that uneven mixing causes inconsistent bubbling and spotted browning on the griddle, which affects texture and appearance. A common mistake is rushing this step and leaving clumps, so take an extra few breaths to swipe the sides of the bowl and rewhisk any settled bits. You will notice the powder disperse and the mixture lighten visually, a good cue that you are ready for the next step.
- Transfer to an airtight container and store up to 6 months at room temperature or up to 1 year in the freezer.: The dry mix should be cool and completely dry before sealing, otherwise trapped moisture will degrade its performance and invite stale odors. Packing it into a clean jar gives you a quiet, reassuring clink when you set it on the shelf, and the sealed environment keeps the leavening fresh longer. Store in a dark, cool space to slow oxidation; sunlight and heat will prematurely age the baking powder and soda. A frequent error is leaving the lid loose, which leads to stale flour and weaker rise, so double check the seal after filling.
- Lightly grease your griddle or pan and preheat to medium-high heat (about 375°F).: As the pan warms you will hear a faint settling sound and see a subtle shimmer of oil, both signs the surface is ready. The correct temperature creates an immediate sizzle when batter hits the surface, which is crucial for forming a crisp edge and encouraging even browning. If the pan is too cool the pancakes will soak up fat and become pale and dense; if too hot they will brown too quickly on the exterior while remaining raw inside. Use a thermometer if you want precision, or test with a small drop of batter to check that it bubbles actively but does not burn right away.
- To make pancakes, combine 1 cup of pancake mix with milk, egg, butter, and vanilla. Mix until just combined. (For fluffier pancakes, let batter rest for 10 minutes).: As you whisk the wet ingredients into the mix, the aroma will shift from dry flour to a creamy, sweet scent as the vanilla blooms and the butter melds. The batter should be slightly lumpy, with visible pockets of flour still softening; this texture protects tenderness and prevents a gluey result. Whisk just until combined and stop, because overmixing activates gluten and yields a chewier pancake. A common pitfall is trying to over-smooth the batter for uniformity; instead, accept small lumps and give the batter a brief rest when you want fluffier pancakes so the leavening can start working and the flour can hydrate.
- Pour 1/4 cup batter onto hot griddle and cook until bubbly and lightly browned (about 3 minutes). Flip and cook for 2 minutes more until browned on the second side. Serve hot with your favorite toppings.: You will feel the batter thicken and notice tiny air bubbles forming as the chemical leaveners begin reacting. This step is about developing the right viscosity so the batter spreads slowly but holds shape on the griddle. The reason this matters is that batter that is too thin will run and create a thin, fragile pancake, while batter that is too thick will resist expansion and yield a dense result. Avoid the common mistake of adding too much milk to fix perceived dryness; instead, gently fold and assess before adjusting. A good tactile cue is that the batter should drop from the spoon in a slightly ribboned stream.
- For fluffier pancakes, let batter rest for 10 minutes: As the batter rests you will notice the texture relax and small bubbles appear, a sign the leaveners are doing their work and the flour is fully hydrating. This pause yields a lighter interior and a more tender crumb because it reduces the urge to overmix while allowing trapped gas to form pockets. I often use this time to heat the griddle and tidy the prep area. The mistake to avoid is skipping the rest when you want maximum lift; rushed batter tends to produce flatter pancakes.
- Pour 1/4 cup batter onto hot griddle and cook until bubbly and lightly browned (about 3 minutes): When the batter hits the hot surface you will hear a lively sizzle and see the edges set quickly, followed by bubbles forming across the top. These bubbles are a visual cue that the interior is cooking and the underside is developing golden color. Cook until the surface shows numerous bubbles that have begun to pop and leave small holes, indicating the pancake is ready to flip. A common error is flipping too early when only a few bubbles have formed, which results in a dense center and uneven cooking.
- Flip and cook for 2 minutes more until browned on the second side: After flipping, the second side will take a shorter time to finish and should develop an even, amber hue. You will notice the aroma deepen to a toasty, buttery note and the pancake will feel springy when gently pressed. This stage seals in moisture and sets the crumb, making the pancake tender yet structured. Avoid pressing down with the spatula, as that squeezes moisture out and yields a drier pancake.
- Serve hot with your favorite toppings: Immediately after cooking, the pancakes radiate warmth and a soft steam; stacking them will help retain heat but I often separate layers with parchment if I am storing some for later. The fresh pancakes have a crisp edge and pillowy interior, a contrast that makes each bite satisfying. A frequent mistake is letting pancakes sit uncovered too long, which causes them to dry and lose their glossy appeal, so serve promptly for the best texture.
Notes
- Store properly, keep the dry mix in an airtight jar in a cool dark place to preserve the potency of the baking powder and baking soda for up to six months.
- Measure with care, spoon and level the all-purpose flour into the cup instead of scooping to avoid packing and dense pancakes.
- Room temperature liquids, bring your milk and egg to room temperature for faster hydration and smoother batter integration.
- Butter technique, melt then cool the unsalted butter slightly before mixing so it blends without cooking the egg if combined too warm.
- Batch making, if you double the mix for gifts, label jars with date and instructions so recipients know how much pancake mix to combine per batch.