
Halloween Charcuterie Board
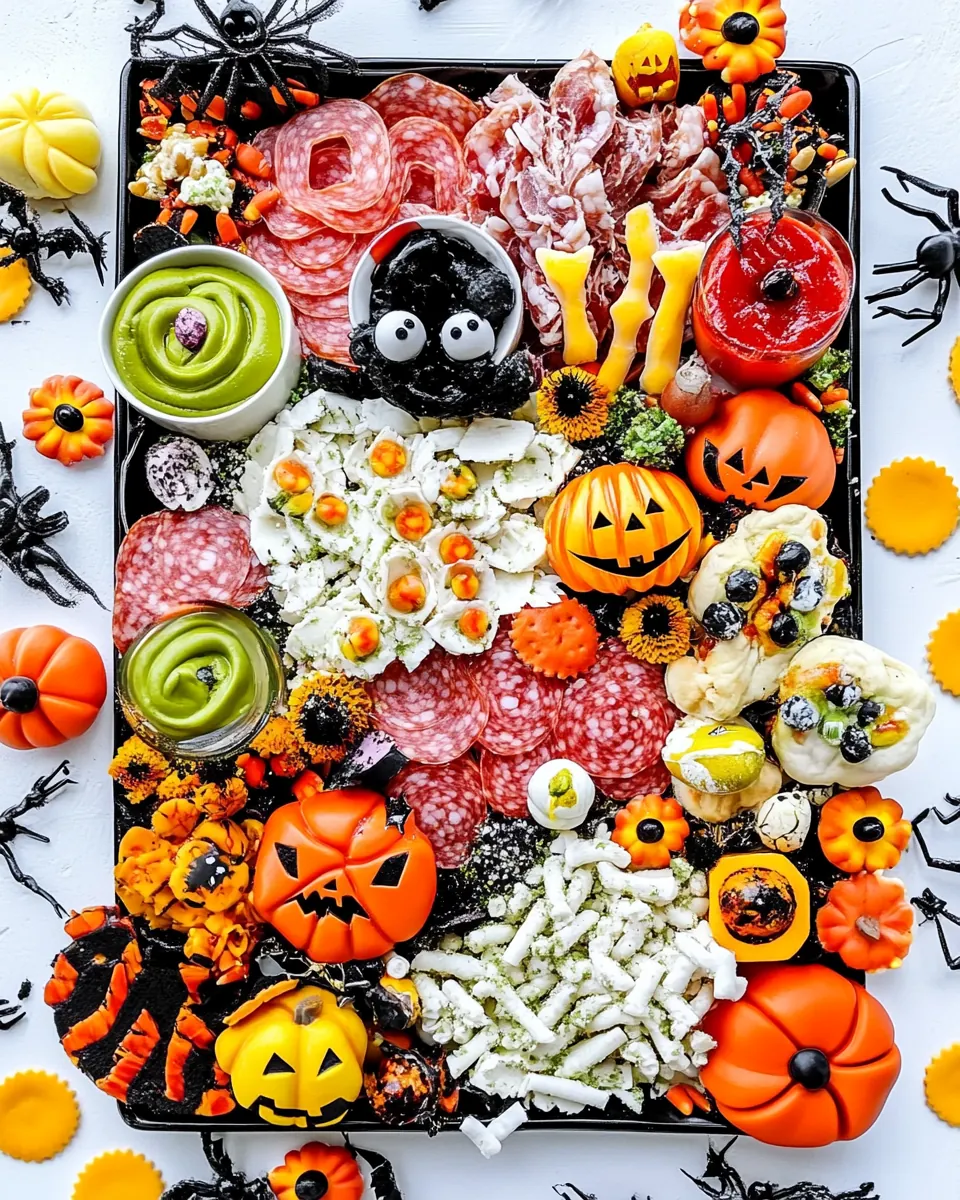
Halloween Charcuterie Board started as a playful experiment one October when I wanted a spread that felt spooky but still welcomed everyone at my table. I was juggling a picky eater, a sweet tooth, and a crowd that loved to graze, so I built a board that balanced crunchy, creamy, salty, and sweet, while leaning into fun seasonal motifs. The first version had more candy than sense, and after a few iterations I learned how to create visual pockets of color and texture so guests naturally moved from one bite to the next.
I remember arranging the roasted red pepper hummus homemade or store bought next to clusters of grapes, and tucking tiny whole peeled mandarin oranges to mimic little pumpkins. That moment when someone lifted a cheese pumpkin and smiled made me realize this spread is really about bringing people together, not just about themed food. Over the years I refined placement, learned which bowls anchor the eye, and which crunchy bites need a softer partner.
Recipe Snapshot
31 mins
30 mins
1 mins
Medium
250 kcal
American
Gluten-Free, Low FODMAP
Appetizers
Tray, board, or container, Bowls, small pumpkin cookie cutter
The Best Thing About This Halloween Charcuterie Board
Visually irresistible for any crowd
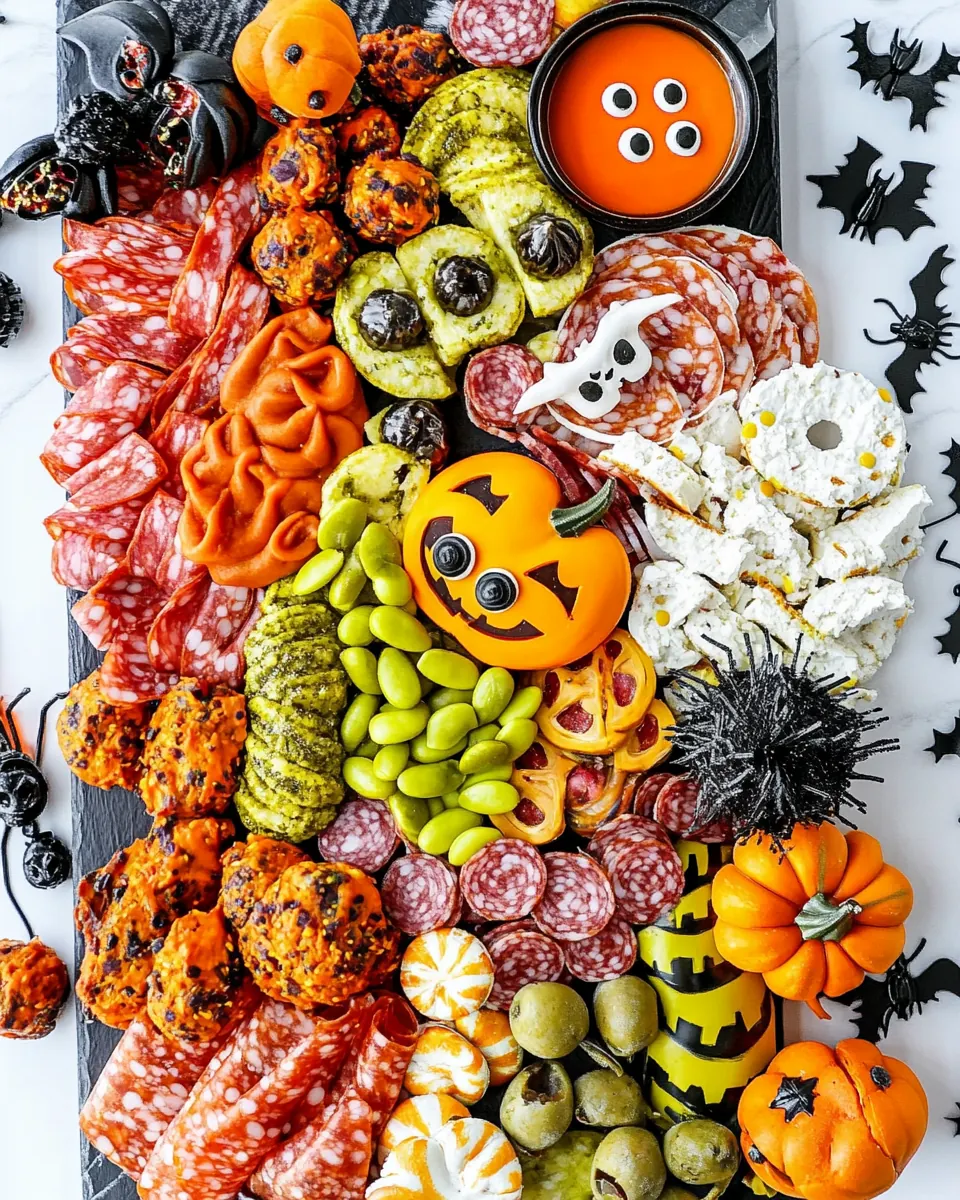
I love how a Halloween Charcuterie Board becomes an instant centerpiece. The mix of colors and shapes draws people in, and I always get comments before anyone even tastes anything. A well arranged board invites guests to explore, and I arrange bold colors like candy pumpkins and red candy melts beside earthy tones so everything pops.
Easy to scale and customize
One of the reasons I keep making this board is flexibility. I can quickly scale it from a small gathering to a party for twelve without changing the concept. Use larger bowls to anchor the design or swap in store bought items when time is short, it’s forgiving and still looks intentional. I often set out extra crackers and meats so hungry friends can graze more freely.
Textures that keep you coming back
The board balances creamy spreads like roasted red pepper hummus homemade or store bought and guacamole homemade or store bought with crunchy elements like your favorite crackers and yogurt covered pretzels (store bought) or make your own white chocolate or almond bark dipped pretzels. That contrast is what makes each bite interesting, it keeps the palate engaged and guests reaching back.
Kid friendly and crowd pleasing
I often make this for family get togethers, and the playful shapes like pumpkin cut cheese make it approachable for kids. Sweet elements such as candy corn and Halloween M&Ms or your favorite M&Ms satisfy younger guests while adults appreciate savory bites like petite dill pickles and sliced cheddar cheese. It’s one of those dishes that makes everyone feel included.
Quick to assemble with big impact
Even with simple shopping, the board looks like you spent hours. A few minutes carving shapes with a cookie cutter, arranging clusters, and adding a themed candy or two elevates the whole spread. I always keep a jar of pickles and a block of cheddar handy for last minute touch ups.
What to Gather for Halloween Charcuterie Board
For a board to sing, you want contrast and harmony. Choose a few creamy centers, crunchy connectors, sweet highlights, and salty anchors. The key players here are the dips, which act as flavor bases, the cheeses and meats that give substance, and the candies that bring seasonal cheer. Together they form a balanced grazing experience where each bite can be mixed and matched.
- roasted red pepper hummus homemade or store bought: Spreadable and savory, perfect for serving as a flavorful base on the board; pairs well with crackers and vegetables and adds a pop of color.
- guacamole homemade or store bought: Creamy and zesty, ideal for scooping with chips or veggies and offers a cooling contrast to spicy or salty bites on the board.
- sour cream to make the spider web on the guacamole instructions included: Thick and tangy, designed to pipe into a spider web on top of guacamole for a festive Halloween look; use a squeeze bottle or piping bag for control.
- candy corn: Sweet and colorful, great for filling little bowls or scattering across the board for visual appeal and quick candy bites for guests.
- sliced cheddar cheese: Mild and creamy, pre-sliced for easy arranging into fan shapes or stacked stacks that guests can grab and enjoy with meats and crackers.
- your favorite deli sliced meat: Savory and flexible, slice or fold for hearty bites that complement cheeses and crackers while offering protein for the board.
- your favorite crackers: Crisp and crunchy, provide a sturdy vehicle for spreads and cheeses and create texture contrast across the assortment.
- petite dill pickles: Tangy and briny, add brightness and a crunchy bite that balances richer items while offering a palate-cleansing option.
- caramel corn store bought or homemade: Sweet and crunchy, perfect for filling gaps on the board and offering an airy caramel snack that contrasts denser cheeses and meats.
- whole peeled mandarin oranges to mimic small pumpkins: Juicy and bright, used whole to resemble small pumpkins, contributing a sweet citrus burst and playful seasonal visual.
- grapes: Fresh and juicy, cluster or scatter around the board to offer bite-sized sweetness and a refreshing palate cleanser.
- Halloween M&Ms or your favorite M&Ms: Colorful and festive, sprinkle or bowl these candies for seasonal color and small sweet bites that appeal to kids and adults alike.
- blood pretzels instructions included: Crunchy and salty, used to create a dramatic 'blood' effect when dipped or decorated; great for adding texture and thematic flair.
- candy pumpkins: Sweet and chewy, shaped like pumpkins to reinforce the Halloween theme and provide nostalgic candy flavor among savory items.
- yogurt covered pretzels (store bought) or make your own white chocolate or almond bark dipped pretzels: Sweet and crunchy, either store–bought or homemade by dipping pretzels in white chocolate or almond bark, adding visual contrast and sweetness.
- red candy melts: Malleable and sweet, used for melting to coat or decorate items like pretzels or cookies with bright red color for dramatic effect.
- 1/4 tsp coconut oil (optional): Light and optional, helps thin melted candy or chocolate for smoother dipping and shinier finishes when decorating treats.
- homemade or store bought guacamole: Creamy and rich, duplicate guacamole entry to ensure ample supply for scooping, layering, or decorating with toppings on the board.
- sour cream: Cool and tangy, simple and versatile for piping decorative accents, mixing into dips, or adding a creamy counterpoint to bold flavors.
Step by Step Instructions for Halloween Charcuterie Board
These instructions focus on assembly and small decorative projects that make the board feel curated rather than thrown together. I walk you through placement, shaping, and the little finishing touches that give the spread its personality. Take your time with the visual balance, and remember the dips and bowls will ground the composition.
- Build the board by adding in groupings of the above ingredients considering varying the different colored items on the board.: The first sensory cue is color contrast, so place bold hues like the Halloween M&Ms or your favorite M&Ms and candy pumpkins opposite earthy tones such as sliced cheddar cheese and your favorite deli sliced meat . Visually, you want clusters that read as islands of flavor, not a single uniform layer. Listen for the light clink of bowls as you place them, and watch how gaps form around larger items so you can fill them later. The why matters because grouping creates easy grab zones for guests, it prevents overcrowding and allows each flavor to shine. A common mistake is scattering everything evenly which flattens the visual impact, so resist the urge to spread ingredients too thinly across the board.
- Roll the lunch meat into small rolls to place on the board.: Rolling meat into rosettes adds height and an inviting texture, and you will notice a slight sheen where the slice overlaps, which looks appetizing under lights. Arrange them in small clusters that are easy to pick up, and tuck them near crackers for convenient pairing. This technique matters because rolled slices keep their shape and look intentional, instead of limp. One troubleshooting note is to avoid overfilling each roll, as bulky rolls can topple or tear, so keep slices thin and even.
- Using the small pumpkin cookie cutter cut the pumpkin shape out of the cheddar cheese slices.: Cutting shapes transforms ordinary cheese into a seasonal graphic element, and the clean edges of the cutter give a crisp silhouette. Press firmly and lift slowly to preserve the shape, then arrange pumpkins in small groups so the orange color becomes a focal point. This technique is important because small, repeated shapes create a theme without overwhelming the board. If the cheese is too cold and cracks, let it sit for a few minutes at room temperature so it becomes more pliable, that will help maintain smooth edges.
- In a small bowl, melt the red candy melts per package instructions along with the 1/4 tsp of coconut oil.: When melting, stir consistently so the texture becomes glossy and smooth, you will notice a uniform sheen and a slightly sweet aroma. The added 1/4 tsp coconut oil optional thins the candy and yields a shinier finish which helps with splatter techniques. Melting slowly prevents seizing, which is crucial for a fluid consistency. A common pitfall is overheating which can cause graininess, so use short intervals and stir between each burst of heat.
- Spread the pretzels out on a large piece of waxed paper with some space in between.: Laying pretzels with space prevents them from sticking once decorated, and you will hear a gentle rustle as you space them out. This step is practical, it allows the red candy to set cleanly, and you can visually inspect each pretzel for full coverage. Avoid crowding them, as adjacent pieces can bond together when the candy dries, making separation messy and difficult.
- There are a few ways to sprinkle the “blood”. You can use a small paint brush and dip it into the candy melt and kind of splatter it onto the pretzels. I found the best way was to use a straw, dip the straw into the melted red candy and gently blow it onto the pretzels. Blowing the melted red candy onto the pretzels gives you a small dot splatter. You can also do some small drizzles by dipping the straw into the red candy melts and kind of flinging it across the pretzels for some lines of “blood” on the pretzels.: The sensory detail here is the glossy red droplets that contrast with the pretzel's matte twist, and the slight snap when you lift a splattered pretzel. This method creates an eerie but playful finish and allows you to vary intensity from speckles to streaks. The why is simple, visual drama elevates a basic snack into a themed element. One mistake is using candy that is too cool or too thick, which leads to uneven splatters, so keep it fluid and test on scrap paper first.
- Allow the pretzel “blood” to dry at room temperature or can chill in the refrigerator.: Drying reveals a firm, slightly glossy shell that holds shape and won’t smudge; you may notice a faint sweet aroma as the candy sets. Chilling speeds the process and gives a firmer surface, but rapid chilling can sometimes cause tiny condensation if moved to a warmer room, so handle with care. The reason this matters is that fully set candy prevents transfer to other board items and preserves the look. Avoid stacking pretzels before they are completely set or you risk ruining the design.
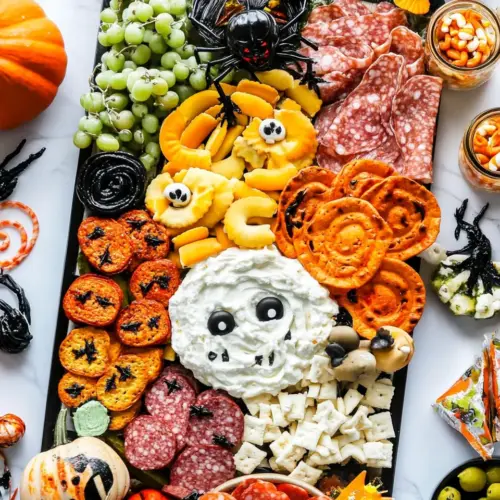
- Place the guacamole in a new round container if desired or leave it in the container it came in if using store-bought.: Using a fresh round bowl creates a clean canvas for the spider web decoration and makes dipping easier for guests, while keeping it in the original container saves cleanup. You will see how the green surface becomes a focal point, and the bowl's rim frames where you will pipe the sour cream web. The why is practical, presentation affects usability; a shallow bowl showcases the decoration better. A common error is choosing too deep a container which makes dipping awkward and hides surface decoration.
- Place about 2 Tablespoons of sour cream into a sandwich-size resealable plastic bag. With scissors, snip off just a little bit at one of the corners, the smaller the snip the thinner the spider web line will be.: The small cut creates a precise piping tip, and you will feel control when you squeeze the bag, producing thin, elegant lines. This approach is quick and gives a delicate look without special tools. The purpose is to create a fine line for the web, thicker cuts will create chunky lines that lose the spider web effect, so test the snip on paper before piping on the guacamole.
- To make the web, pipe out a cross shape onto the guacamole.: Start with a steady hand to draw two crossing lines, the white contrasts sharply against the green and immediately reads as a base for the web. The visual anchor of the cross helps guide the next steps, and you will notice how the white stands out against the creamy texture. This matters because even spacing in the cross ensures the subsequent arcs look balanced. A common misstep is piping too quickly which makes uneven lines, so go slow and steady.
- Next, make diagonals across the cross shape.: Adding diagonals creates the spider web grid, and you will see the pattern begin to emerge as neat segments. The rhythm of short, even strokes makes the web look polished and intentional, and these lines define the spaces for the curved connections. The reason this technique matters is it forms the visual scaffolding for the final web curves, and uneven diagonals can make the web look lopsided, so check symmetry as you go.
- Next pipe small curves between the lines leaving some space as you move out toward the edge of the bowl.: The final curved rings bring the web to life, and the slight pressure changes as you pipe create delicate arches that read as a web at a glance. These curves should be spaced progressively wider as you move outward to mimic a natural web. This finishing touch gives a playful spooky detail that elevates the guacamole visually and texturally. Avoid crowding the curves too closely which can create a messy look, keep consistent spacing for the best result.
Variations to Try
If you want to personalize this board, small swaps create big impact. Use different colored candies, try alternative pickles, or make the pretzel blood more dramatic. Below are several detailed suggestions to inspire your next assembly.
- Play with color palette by choosing M&M colors that match your party theme. Swap in darker candies or metallics for an elevated look, and place them in small bowls to create focal points rather than scattering them randomly.
- Make pretzel art ahead by preparing blood pretzels a day early. Store them in a single layer in an airtight container to preserve crispness and avoid smudging the candy decoration when arranging the board.
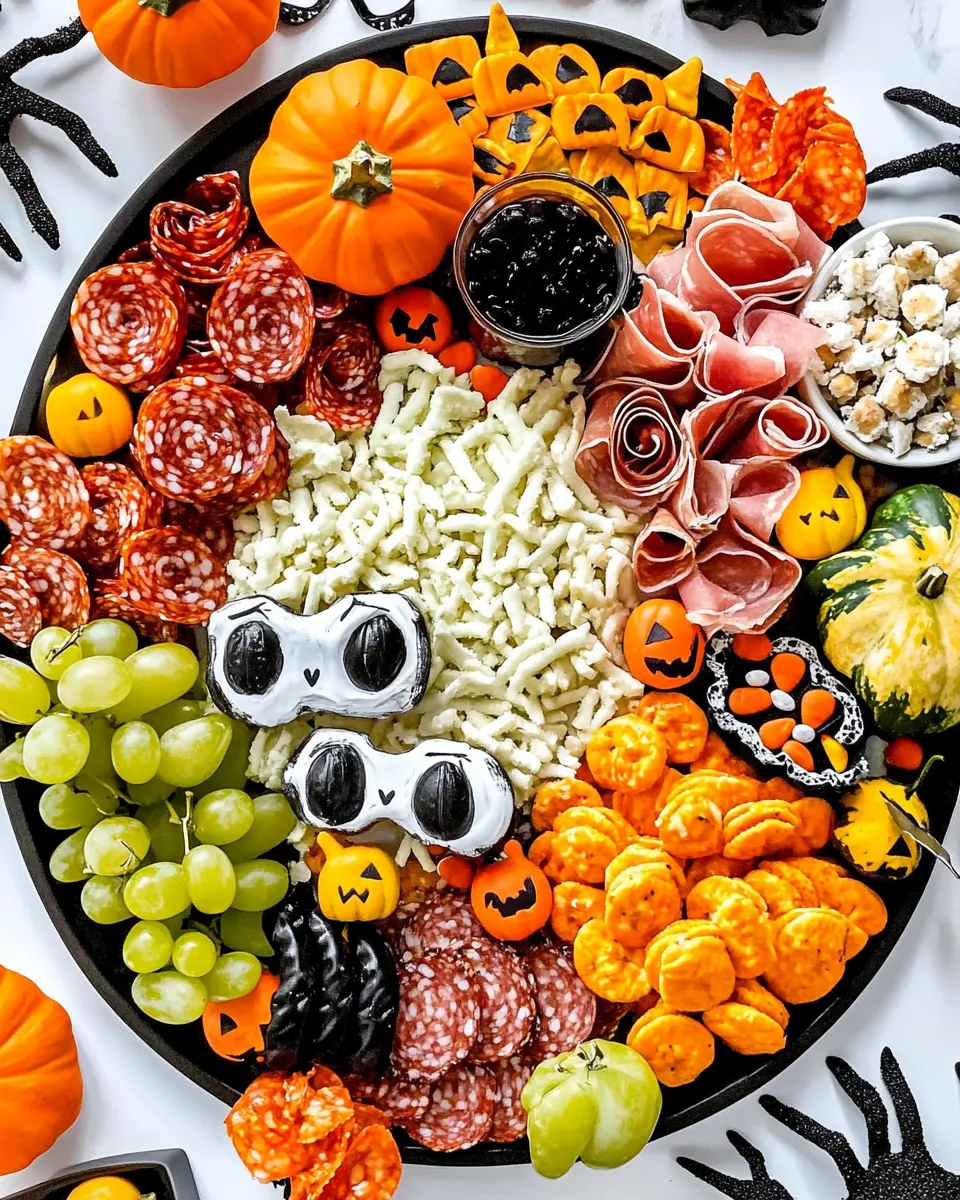
- Change the presentation vessel by using a long wooden board for a rustic vibe or a round tray for a more formal centerpiece. The shape influences flow, so use a rectangular board for directional grazing or a round layout for even access.
- Offer dipping stations by setting small bowls of roasted red pepper hummus homemade or store bought and guacamole homemade or store bought at multiple points on a long board to avoid crowding, guests can pick up from the nearest bowl with ease.
- Vary the cheese textures by adding soft spreadable cheese next time you make it. Spreadable cheese creates a different mouthfeel and pairs superbly with sweeter candies and salty pretzels.
- Use themed picks to mark items that are allergen friendly or vegetarian. Decorative picks add to the aesthetic while also guiding guests to choices that suit them.
Serving This Halloween Charcuterie Board
This board shines at parties, casual gatherings, and holiday events where grazing is the plan. Think about flow, seating, and how guests will approach the table. Keep napkins and small plates nearby so people can move easily and return for seconds.
- Serve at room temperature for best flavor. Remove cheeses and dips from the refrigerator about 20 to 30 minutes before serving so aromatics and textures open up, making flavors more pronounced and easier to enjoy.
- Place bowls strategically to anchor the board. Position the guacamole and hummus opposite each other to create balance, and fill remaining spaces with clusters of candy pumpkins, grapes, and crackers for ease of access.
- Provide serving utensils like small spoons for dips, tongs for meats, and toothpicks for candy clusters. This helps guests serve themselves cleanly and preserves the board appearance throughout the event.
- Offer labeling for any items that may have strong flavors or allergens. Small cards help guests identify pickles, dips, and candies so everyone can make choices that suit their tastes or dietary needs.
- Storage tips include wrapping leftover cheese and meat separately and refrigerating dips in airtight containers. Sweet items like candy can be stored at room temperature, while decorated pretzels are best kept in a single layer to avoid sticking.
- Occasions such as Halloween parties, family gatherings, or casual get togethers benefit from this board. It also works well for school friendly events if you avoid sharp or allergy prone items, and it scales nicely for weekday entertaining without fuss.
FAQ
Conclusion
This Halloween Charcuterie Board stands out for its playful combination of textures, seasonal motifs, and crowd pleasing flavors. It brings together creamy dips, crunchy pretzels, savory meats and cheeses, and colorful candies to create a grazing experience that feels festive yet effortless. Give it a try at your next gathering to enjoy the smiles it invites and the easy conversation it sparks. Have fun arranging it, and don’t be afraid to make it your own with small swaps that reflect your personal taste.
Halloween Charcuterie Board
Equipment
- Tray, board, or container
- Bowls
- small pumpkin cookie cutter
Ingredients
- roasted red pepper hummus homemade or store bought Spreadable and savory, perfect for serving as a flavorful base on the board; pairs well with crackers and vegetables and adds a pop of color.
- guacamole homemade or store bought Creamy and zesty, ideal for scooping with chips or veggies and offers a cooling contrast to spicy or salty bites on the board.
- sour cream to make the spider web on the guacamole instructions included Thick and tangy, designed to pipe into a spider web on top of guacamole for a festive Halloween look; use a squeeze bottle or piping bag for control.
- candy corn Sweet and colorful, great for filling little bowls or scattering across the board for visual appeal and quick candy bites for guests.
- sliced cheddar cheese Mild and creamy, pre-sliced for easy arranging into fan shapes or stacked stacks that guests can grab and enjoy with meats and crackers.
- your favorite deli sliced meat Savory and flexible, slice or fold for hearty bites that complement cheeses and crackers while offering protein for the board.
- your favorite crackers Crisp and crunchy, provide a sturdy vehicle for spreads and cheeses and create texture contrast across the assortment.
- petite dill pickles Tangy and briny, add brightness and a crunchy bite that balances richer items while offering a palate-cleansing option.
- caramel corn store bought or homemade Sweet and crunchy, perfect for filling gaps on the board and offering an airy caramel snack that contrasts denser cheeses and meats.
- whole peeled mandarin oranges to mimic small pumpkins Juicy and bright, used whole to resemble small pumpkins, contributing a sweet citrus burst and playful seasonal visual.
- grapes Fresh and juicy, cluster or scatter around the board to offer bite-sized sweetness and a refreshing palate cleanser.
- Halloween M&Ms or your favorite M&Ms Colorful and festive, sprinkle or bowl these candies for seasonal color and small sweet bites that appeal to kids and adults alike.
- blood pretzels instructions included Crunchy and salty, used to create a dramatic 'blood' effect when dipped or decorated; great for adding texture and thematic flair.
- candy pumpkins Sweet and chewy, shaped like pumpkins to reinforce the Halloween theme and provide nostalgic candy flavor among savory items.
- yogurt covered pretzels (store bought) or make your own white chocolate or almond bark dipped pretzels Sweet and crunchy, either store-bought or homemade by dipping pretzels in white chocolate or almond bark, adding visual contrast and sweetness.
- red candy melts Malleable and sweet, used for melting to coat or decorate items like pretzels or cookies with bright red color for dramatic effect.
- 1/4 tsp coconut oil optional Light and optional, helps thin melted candy or chocolate for smoother dipping and shinier finishes when decorating treats.
- homemade or store bought guacamole Creamy and rich, duplicate guacamole entry to ensure ample supply for scooping, layering, or decorating with toppings on the board.
- sour cream Cool and tangy, simple and versatile for piping decorative accents, mixing into dips, or adding a creamy counterpoint to bold flavors.
Instructions
- Build the board by adding in groupings of the above ingredients considering varying the different colored items on the board.: The first sensory cue is color contrast, so place bold hues like the Halloween M&Ms or your favorite M&Ms and candy pumpkins opposite earthy tones such as sliced cheddar cheese and your favorite deli sliced meat . Visually, you want clusters that read as islands of flavor, not a single uniform layer. Listen for the light clink of bowls as you place them, and watch how gaps form around larger items so you can fill them later. The why matters because grouping creates easy grab zones for guests, it prevents overcrowding and allows each flavor to shine. A common mistake is scattering everything evenly which flattens the visual impact, so resist the urge to spread ingredients too thinly across the board.
- Roll the lunch meat into small rolls to place on the board.: Rolling meat into rosettes adds height and an inviting texture, and you will notice a slight sheen where the slice overlaps, which looks appetizing under lights. Arrange them in small clusters that are easy to pick up, and tuck them near crackers for convenient pairing. This technique matters because rolled slices keep their shape and look intentional, instead of limp. One troubleshooting note is to avoid overfilling each roll, as bulky rolls can topple or tear, so keep slices thin and even.
- Using the small pumpkin cookie cutter cut the pumpkin shape out of the cheddar cheese slices.: Cutting shapes transforms ordinary cheese into a seasonal graphic element, and the clean edges of the cutter give a crisp silhouette. Press firmly and lift slowly to preserve the shape, then arrange pumpkins in small groups so the orange color becomes a focal point. This technique is important because small, repeated shapes create a theme without overwhelming the board. If the cheese is too cold and cracks, let it sit for a few minutes at room temperature so it becomes more pliable, that will help maintain smooth edges.
- In a small bowl, melt the red candy melts per package instructions along with the 1/4 tsp of coconut oil.: When melting, stir consistently so the texture becomes glossy and smooth, you will notice a uniform sheen and a slightly sweet aroma. The added 1/4 tsp coconut oil optional thins the candy and yields a shinier finish which helps with splatter techniques. Melting slowly prevents seizing, which is crucial for a fluid consistency. A common pitfall is overheating which can cause graininess, so use short intervals and stir between each burst of heat.
- Spread the pretzels out on a large piece of waxed paper with some space in between.: Laying pretzels with space prevents them from sticking once decorated, and you will hear a gentle rustle as you space them out. This step is practical, it allows the red candy to set cleanly, and you can visually inspect each pretzel for full coverage. Avoid crowding them, as adjacent pieces can bond together when the candy dries, making separation messy and difficult.
- There are a few ways to sprinkle the “blood”. You can use a small paint brush and dip it into the candy melt and kind of splatter it onto the pretzels. I found the best way was to use a straw, dip the straw into the melted red candy and gently blow it onto the pretzels. Blowing the melted red candy onto the pretzels gives you a small dot splatter. You can also do some small drizzles by dipping the straw into the red candy melts and kind of flinging it across the pretzels for some lines of “blood” on the pretzels.: The sensory detail here is the glossy red droplets that contrast with the pretzel's matte twist, and the slight snap when you lift a splattered pretzel. This method creates an eerie but playful finish and allows you to vary intensity from speckles to streaks. The why is simple, visual drama elevates a basic snack into a themed element. One mistake is using candy that is too cool or too thick, which leads to uneven splatters, so keep it fluid and test on scrap paper first.
- Allow the pretzel “blood” to dry at room temperature or can chill in the refrigerator.: Drying reveals a firm, slightly glossy shell that holds shape and won’t smudge; you may notice a faint sweet aroma as the candy sets. Chilling speeds the process and gives a firmer surface, but rapid chilling can sometimes cause tiny condensation if moved to a warmer room, so handle with care. The reason this matters is that fully set candy prevents transfer to other board items and preserves the look. Avoid stacking pretzels before they are completely set or you risk ruining the design.
- Place the guacamole in a new round container if desired or leave it in the container it came in if using store-bought.: Using a fresh round bowl creates a clean canvas for the spider web decoration and makes dipping easier for guests, while keeping it in the original container saves cleanup. You will see how the green surface becomes a focal point, and the bowl's rim frames where you will pipe the sour cream web. The why is practical, presentation affects usability; a shallow bowl showcases the decoration better. A common error is choosing too deep a container which makes dipping awkward and hides surface decoration.
- Place about 2 Tablespoons of sour cream into a sandwich-size resealable plastic bag. With scissors, snip off just a little bit at one of the corners, the smaller the snip the thinner the spider web line will be.: The small cut creates a precise piping tip, and you will feel control when you squeeze the bag, producing thin, elegant lines. This approach is quick and gives a delicate look without special tools. The purpose is to create a fine line for the web, thicker cuts will create chunky lines that lose the spider web effect, so test the snip on paper before piping on the guacamole.
- To make the web, pipe out a cross shape onto the guacamole.: Start with a steady hand to draw two crossing lines, the white contrasts sharply against the green and immediately reads as a base for the web. The visual anchor of the cross helps guide the next steps, and you will notice how the white stands out against the creamy texture. This matters because even spacing in the cross ensures the subsequent arcs look balanced. A common misstep is piping too quickly which makes uneven lines, so go slow and steady.
- Next, make diagonals across the cross shape.: Adding diagonals creates the spider web grid, and you will see the pattern begin to emerge as neat segments. The rhythm of short, even strokes makes the web look polished and intentional, and these lines define the spaces for the curved connections. The reason this technique matters is it forms the visual scaffolding for the final web curves, and uneven diagonals can make the web look lopsided, so check symmetry as you go.
- Next pipe small curves between the lines leaving some space as you move out toward the edge of the bowl.: The final curved rings bring the web to life, and the slight pressure changes as you pipe create delicate arches that read as a web at a glance. These curves should be spaced progressively wider as you move outward to mimic a natural web. This finishing touch gives a playful spooky detail that elevates the guacamole visually and texturally. Avoid crowding the curves too closely which can create a messy look, keep consistent spacing for the best result.
Notes
- Play with color palette by choosing M&M colors that match your party theme. Swap in darker candies or metallics for an elevated look, and place them in small bowls to create focal points rather than scattering them randomly.
- Make pretzel art ahead by preparing blood pretzels a day early. Store them in a single layer in an airtight container to preserve crispness and avoid smudging the candy decoration when arranging the board.
- Change the presentation vessel by using a long wooden board for a rustic vibe or a round tray for a more formal centerpiece. The shape influences flow, so use a rectangular board for directional grazing or a round layout for even access.
- Offer dipping stations by setting small bowls of roasted red pepper hummus homemade or store bought and guacamole homemade or store bought at multiple points on a long board to avoid crowding, guests can pick up from the nearest bowl with ease.
- Vary the cheese textures by adding soft spreadable cheese next time you make it. Spreadable cheese creates a different mouthfeel and pairs superbly with sweeter candies and salty pretzels.
- Use themed picks to mark items that are allergen friendly or vegetarian. Decorative picks add to the aesthetic while also guiding guests to choices that suit them.