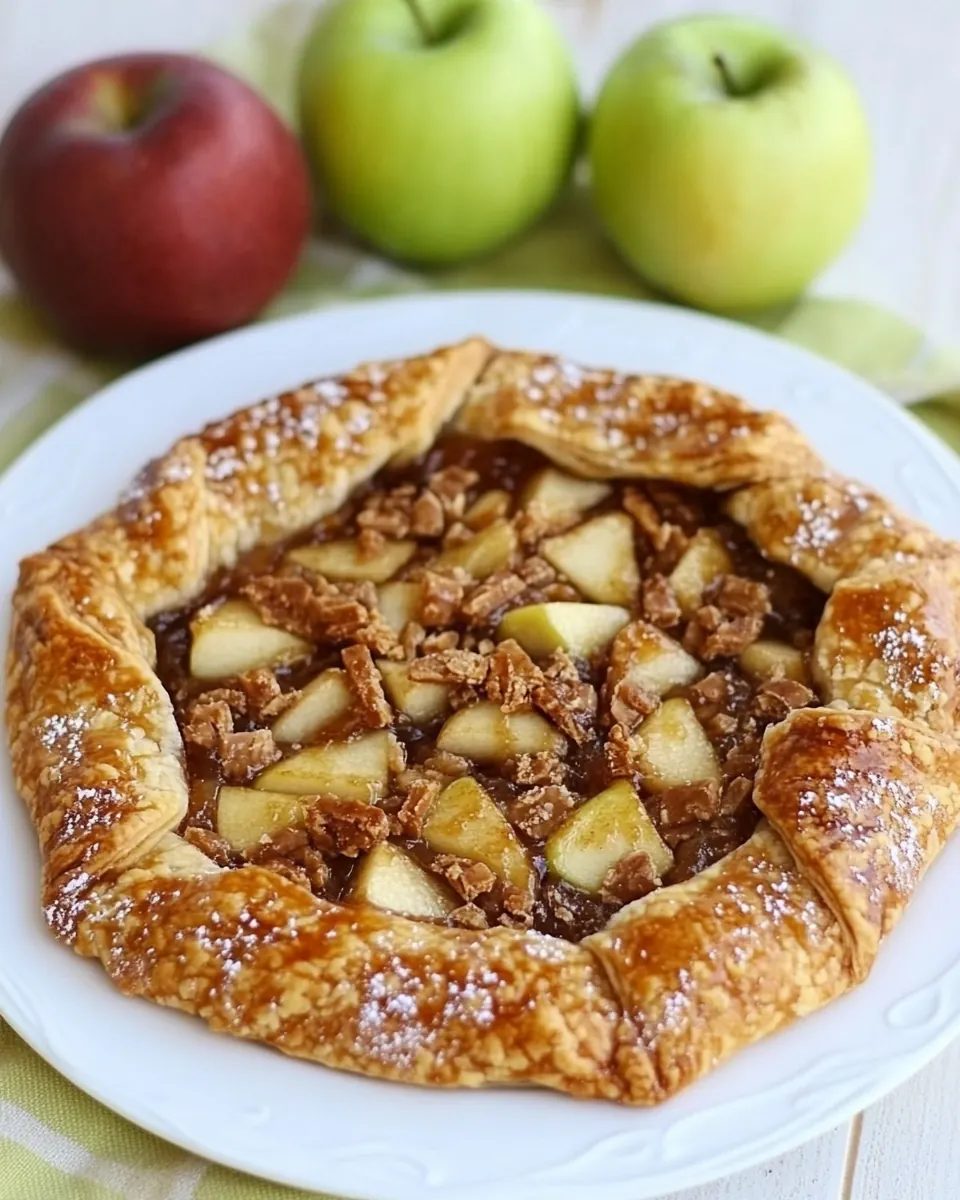
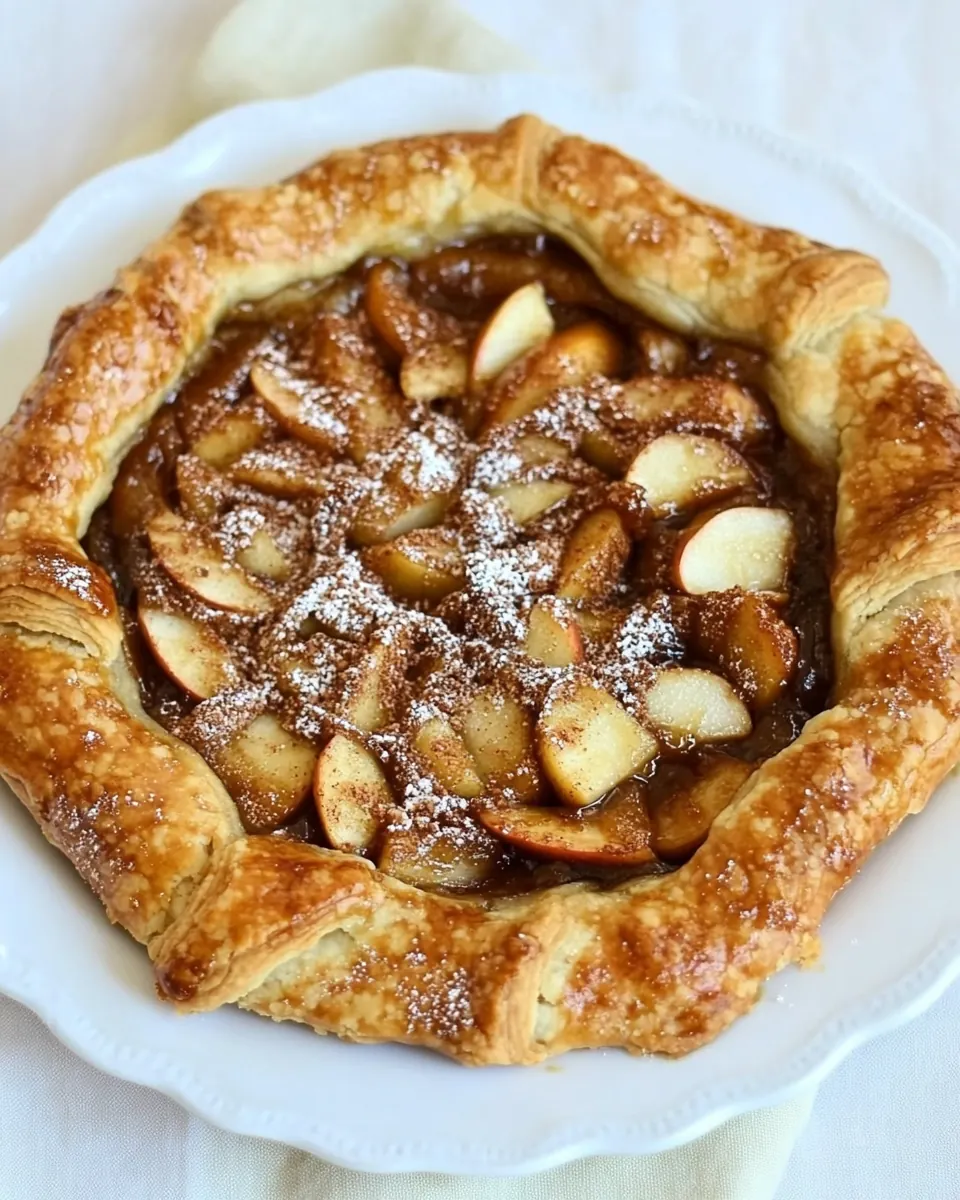
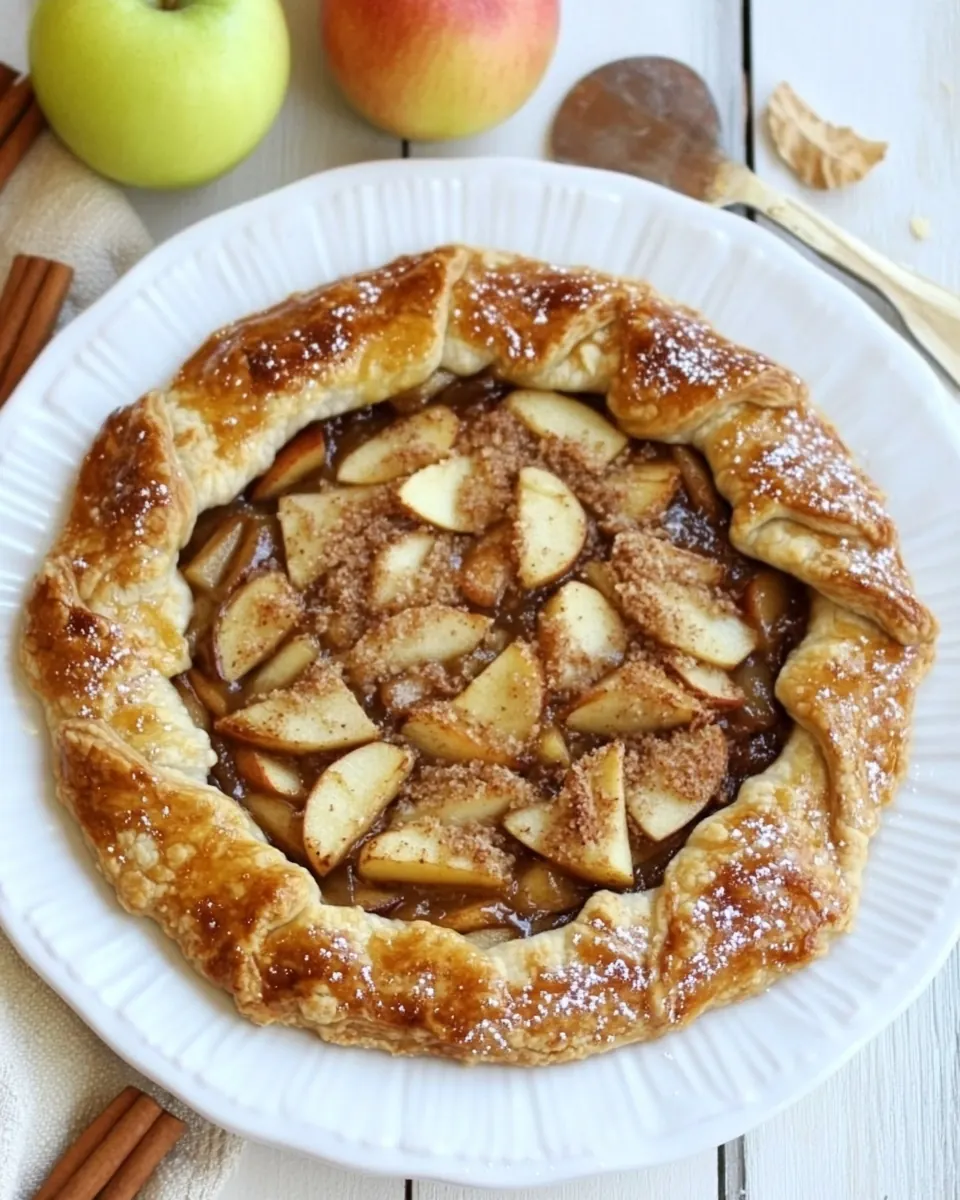
Apple Toffee Galette
Apple Toffee Galette is the kind of rustic pastry I fall back on when I want something that feels both effortless and a little indulgent. The first time I made this galette, I was racing the waning light of an October afternoon, stacking thin apple slices into a loose spiral, and thinking about how toffee always seems to make simple fruit feel celebratory. I remember the dough — cool and slightly grainy from the cornmeal — letting me work with it without fuss, and the sound of the toffee pieces settling among the apples like hidden treasures.
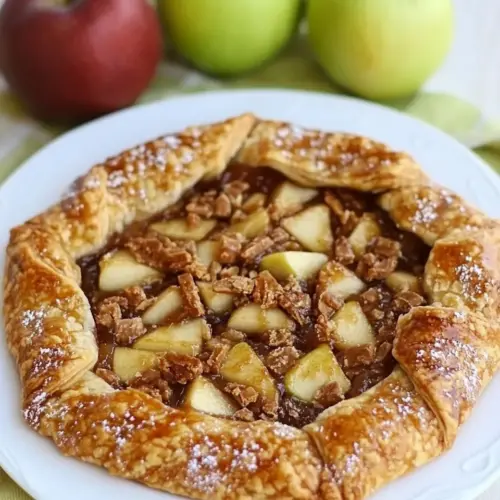
That autumn day, the kitchen filled with the warm scent of baked apples and browned butter from the crust. I sliced into the still warm galette, and the toffee offered a little crackle against the tender apple, while the crust had that perfect balance of crisp and tender. Friends gathered around the counter, eager for a wedge, and the galette vanished faster than I expected. Since then, this version has become my go to for weekend gatherings because it requires modest skills and yields a pastry that looks much more elaborate than the effort suggests.
Recipe Snapshot
1 hr 35 mins
45 mins
50 mins
Medium
250 kcal
American
Gluten-Free, Vegan
Desserts
Food processor, Baking sheet, Parchment paper, Wire rack, Pastry brush
The Magic of This Apple Toffee Galette
1. Simple, Honest Ingredients
I love that Apple Toffee Galette uses pantry staples you probably already have. The pairing of all purpose flour and coarse cornmeal in the crust gives texture and a faint, nutty crunch that complements the tender apple slices. When I shop, I look for crisp apples and good quality toffee, because those small choices make a big sensory difference.
2. Texture That Keeps You Coming Back
The interplay between the flaky butter enriched crust and the chewy, caramelized toffee is what sells this recipe for me. You get a satisfying contrast in every bite, a little crisp from the crust, soft apple, and bursts of sweet toffee. I often find that people ask how I got that toffee to stay pleasantly chewy instead of melting into nothing, which is why I rely on coarsely chopped bits added just before baking.
3. Low Fuss, High Reward
I appreciate recipes that let you look like a hero with minimal stress. Apple Toffee Galette lets you skip formal pie tins and lattice work, and instead encourages a relaxed folding approach. That relaxed assembly still yields an elegant, freeform tart that holds up well on a dessert table, and I tend to make it when I want something quick to plate that still reads special.
4. Adaptable and Seasonal
I reach for this galette as the weather cools, since fall apples are at their peak. You can scale it for a small dinner or make multiple galettes for a crowd, and the technique translates well if you want to swap apples for other firm fruits. I love how the recipe highlights the fruit, while the toffee adds a nostalgic twist that reminds many of childhood treats.
5. Comforting Presentation
There is something very comforting about serving a warm slice of Apple Toffee Galette straight from the oven. It invites conversation, and because it slices into generous wedges, it feels communal. I always tell guests to give it a few minutes to settle so the juices calm down, and then serve with simple accompaniments for an easy, memorable dessert.
Recipe Ingredients for Apple Toffee Galette
These ingredients are curated to achieve a balanced galette where the crust supports, but does not overpower, the fruit and toffee filling. The crust players, like all purpose flour, coarse cornmeal, and butter, create a tender, flaky base with subtle crunch. The apples bring acid and texture, while the toffee adds concentrated caramelized sweetness. Little touches like turbinado sugar and the egg wash help with color and crunch, turning simple elements into a cohesive, delicious whole.
- 1 3/4 cups all-purpose flour: Provide structure and body to the galette dough, creating a tender yet sturdy crust; combine with fats and liquids to form a cohesive pastry that holds the filling during baking.
- 1/3 cup granulated sugar: Add subtle sweetness and help with browning on the crust and apples; dissolve into the dough and sprinkle on fruit for extra caramelized flavor and texture.
- 1/4 cup coarse cornmeal: Contribute a slight crunch and rustic texture to the dough while absorbing moisture; help create a flaky crumb and balance tenderness in the pastry.
- 1/4 teaspoons salt: Enhance overall flavor by balancing sweetness and highlighting other ingredients; improve gluten behavior slightly to control dough texture and taste.
- 1/2 cup cold butter cut into small pieces: Incorporate cold fat for flakiness and richness; when cut into the flour, create pockets that bake into layers, producing a tender, flaky crust.
- 1/3 cup buttermilk: Provide necessary moisture and mild tang to bring the dough together; the acidity also tenderizes the pastry and enhances flavor complexity.
- 2 large Granny Smith apples thinly sliced: Deliver firm, tart slices that contrast the sweet toffee and sugar; hold their shape when baked, offering texture and bright apple flavor throughout the galette.
- Cinnamon and sugar for sprinkling on the apple slices: Add aromatic spice and additional sweetness to the fruit layers; sprinkle over the apple slices to create a caramelized, lightly spiced topping during baking.
- 1 cup Heath milk chocolate toffee bits or chopped Heath candy bars: Introduce crunchy, buttery toffee and chocolate bursts that elevate sweetness and texture; scatter over the apples to melt slightly and provide decadent bite-sized pockets.
- 1 egg beaten: Seal and glaze the pastry edges for golden color and shine; beaten egg also helps toppings adhere and gives the crust an attractive finish.
- 2 tablespoons turbinado sugar: Provide a coarse, sparkling finish to the crust after brushing with egg; add crunch and a deeper caramel flavor when the galette is baked to a crisp.
Apple Toffee Galette Instructions

I like to walk you through the method in a friendly, kitchen tested way so you can feel confident. The steps below take the original directions and expand them with sensory cues, reasons why each action matters, and troubleshooting tips to help avoid common pitfalls.
- To make the dough, combine flour, sugar, cornmeal, and salt in a processor; pulse 2-3 times. Add butter and pulse 4-5 times, or until mixture resembles coarse meal. With the processor running, slowly pour the buttermilk through the chute, processing until the dough forms a ball. Remove the dough ball and adhere any remaining pieces of dough to it, then wrap in plastic wrap or parchment paper. Refrigerate for at least 45 minutes before rolling out.: The moment you pulse the dry ingredients, you will smell the faint grain of the cornmeal mingling with the neutral wheat scent of the flour . This dry blend sets the tone for the crust, ensuring even seasoning. Work quickly so your food processor blade does not warm the mixture, which can make the butter soften prematurely. A frequent mistake is over processing now, which can lead to a gummy dough later. Aim for a uniform sandy texture, and scrape the bowl if bits cling to the sides to ensure an even distribution before adding butter.
- Center a rack in the oven and preheat to 350 degrees F.: When you add the cold, cubed butter and pulse, watch for pea sized pieces coated in flour. You should be able to see small flecks and crumbs, not a paste. The aroma will shift as the butter disperses, and those visible butter bits are what create flakiness as they steam in the oven. If you overwork the dough, the butter will melt into the flour, producing a dense crust. Stop pulsing as soon as you have that coarse meal texture, and chill sooner rather than later if the kitchen is warm.
- Remove the dough from the refrigerator and place on a sheet of parchment paper. Starting at the center of the dough, roll out, forming a 14-15-inch wide circle. Place the dough with parchment paper on a baking sheet. Generously sprinkle apple slices with cinnamon and sugar. Arrange apple slices in a spoke pattern on the galette dough, leaving a 2-inch border. Sprinkle the toffee bits over the apple slices, making sure all of the slices are covered. Fold the border over the apples, overlapping where necessary and pressing gently to adhere the folds.: As the buttermilk is incorporated, you will notice the mixture start to clump and hold together. The sound changes from a dry buzz to a softer, cohesive thrum. This transformation matters because it signals proper hydration; too little and your dough will be crumbly, too much and it will be sticky. A common misstep is pouring too quickly, which can make the dough overly wet. If that happens, chill the dough and press it together rather than adding extra flour, which risks toughness.
- Lightly brush the edge of the dough with the egg and sprinkle crust with turbinado sugar.: When you lift the dough, it should feel cool and slightly tacky but not sticky. The tactile feedback is important, as it tells you the temperature is right to preserve butter pockets. Press any stray crumbs back onto the ball so nothing is wasted, and wrap it snugly to prevent drying. If you leave it exposed, the surface will develop a dry skin that can crack when rolled. A typical error is over handling while trying to perfect the shape; gentle pressing is enough.
- Bake the galette for 45-50 minutes, or until the apples are tender and the crust is golden brown. Transfer the baking sheet to a wire rack to cool for at least 20 minutes. Serve warm or at room temperature.: Chilling firms the butter and relaxes the gluten, making the dough easier to roll and less likely to shrink while baking. You will feel the difference when you return to roll it; a chilled dough will hold its edges and roll into a smooth circle. Trying to roll too soon often results in a sticky mess or tearing, which leads to patching and uneven baking. If your kitchen is warm, extend the chill time to keep the butter solid.
- Note-you can make the galette dough in advance. It will keep in the refrigerator for 3 days.: A fully preheated oven ensures the crust begins to set and brown immediately. The scent in the kitchen is subtle at this stage, but the heat is doing crucial work for even bake. If the oven is not up to temperature, the crust may become soggy from the fruit juices before it crisps. Use an oven thermometer if you suspect your oven runs cool, as 350 degrees F is the target for achieving that golden exterior.
- Remove the dough from the refrigerator and place on a sheet of parchment paper Starting at the center of the dough roll out forming a 14 15 inch wide circle Place the dough with parchment paper on a baking sheet Generously sprinkle apple slices with cinnamon and sugar Arrange apple slices in a spoke pattern on the galette dough leaving a 2 inch border Sprinkle the toffee bits over the apple slices making sure all of the slices are covered Fold the border over the apples overlapping where necessary and pressing gently to adhere the folds: At this point you will notice the chilled dough yielding evenly as you roll, the parchment preventing sticking and making transfer to the sheet effortless. The thin apple slices should glisten slightly when dusted with the cinnamon and sugar, and arranging them in a spoke pattern creates appealing layers that bake evenly. When you scatter the toffee , listen for the slight clink of pieces as they land, and resist packing them too densely so the apples can breathe. Folding the edge creates a rustic seal and an opportunity for attractive overlapping. One common mistake is overcrowding the apples, which releases excess juice and steams the crust; maintain that 2 inch border and fold neatly to catch the juices.
- Lightly brush the edge of the dough with the egg and sprinkle crust with turbinado sugar: The egg wash imparts a glossy sheen and helps the turbinado sugar adhere and caramelize, adding a crunch to the rim. Brush with a light hand so no pools form, which can burn or drip onto the pan. When the egg hits the warm dough, you may notice a slight tackiness that will resolve in the oven. Over brushing is a frequent issue and causes uneven color, so one thin layer is best.
- Bake the galette for 45 50 minutes or until the apples are tender and the crust is golden brown Transfer the baking sheet to a wire rack to cool for at least 20 minutes Serve warm or at room temperature: During baking you will be able to smell the apples softening and the toffee beginning to melt into fragrant pockets. The crust should turn a deep golden color and the apples will give under the tip of a knife. Allow the galette to rest on a wire rack so steam escapes and the filling firms slightly, which makes slicing easier. Cutting too soon often results in a runny slice, so resist the urge to dig in immediately. If you find juices pooling, a brief additional bake of 5 minutes can help, but avoid overbrowning.
- Note you can make the galette dough in advance It will keep in the refrigerator for 3 days: The ability to make dough ahead is a real time saver, and the crisp chill of the dough will make rolling simpler on busy days. When refrigerated, the flavors meld, and the dough often becomes more manageable. Before rolling, let it sit for a few minutes if it is too stiff to avoid cracking. A common error is storing it unwrapped, which dries the surface; always seal it well to retain moisture.
Ways to Customize
I like to offer thoughtful variations that keep the core technique intact while letting personality shine through. Below are practical customization tips that respect the original ingredient list and aim to elevate texture, flavor, and presentation.
- Boost crust crunch by substituting a portion of the all purpose flour with a light whole grain or adding a tablespoon more coarse cornmeal, which increases texture without overpowering the filling.
- Adjust sweetness by varying the amount of granulated sugar in the crust or the cinnamon sugar sprinkled on the apples, tailoring the final tart to match sweeter or tarter apple varieties.
- Toffee placement matters scatter the toffee under and over the apple slices so some pieces melt into caramel pockets while others remain slightly crunchy and visible on top.
- Make ahead strategy prepare the dough up to three days in advance in the refrigerator, then assemble and bake on the day you want to serve for a fresher crust.
- Egg wash technique use a light touch when brushing the crust with the beaten egg to promote even browning and prevent pooled egg that can darken too quickly.
Best Served With
This galette shines in casual gatherings and cozy dinners. The serving suggestions below focus on pairing textures and temperatures to complement the warm fruit and crunchy toffee. Use the list to plan a balanced presentation for seasons when apples are in peak form.
- Slice warm, serve each wedge on a small plate with a quick fork, and let guests savor both the tender apples and crisp crust.
- Room temperature options are excellent for potlucks, pack the galette on a flat platter and cover lightly for transport so it stays intact.
- Seasonal occasions this is a perfect centerpiece for fall gatherings or holiday brunches, where the flavors of apple and toffee feel festive and familiar.
- Storage tips wrap leftover slices loosely with foil and refrigerate for up to two days; reheat briefly to revive the crust before serving.
- Presentation touch dust a light sprinkle of cinnamon sugar over slices just before serving to refresh the aroma and add a gentle sparkle.
FAQ
Conclusion
What makes this recipe special is its elegant simplicity a rustic, freeform tart that highlights the bright bite of apples alongside buttery crust and crunchy toffee. Give Apple Toffee Galette a try when you want a dessert that feels thoughtfully crafted but is surprisingly easy to assemble. It offers a balanced contrast of textures and flavors that please a crowd, and because it is forgiving to make ahead, it works beautifully for busy gatherings or relaxed weekend baking. When you serve a warm slice, you get the comfort of baked fruit with a playful toffee crunch that feels both familiar and celebratory.
Apple Toffee Galette
Equipment
- Food Processor
- Baking Sheet
- Parchment Paper
- Wire Rack
- Pastry Brush
Ingredients
- 1 3/4 cups all-purpose flour Provide structure and body to the galette dough, creating a tender yet sturdy crust; combine with fats and liquids to form a cohesive pastry that holds the filling during baking.
- 1/3 cup granulated sugar Add subtle sweetness and help with browning on the crust and apples; dissolve into the dough and sprinkle on fruit for extra caramelized flavor and texture.
- 1/4 cup coarse cornmeal Contribute a slight crunch and rustic texture to the dough while absorbing moisture; help create a flaky crumb and balance tenderness in the pastry.
- 1/4 teaspoons salt Enhance overall flavor by balancing sweetness and highlighting other ingredients; improve gluten behavior slightly to control dough texture and taste.
- 1/2 cup cold butter cut into small pieces Incorporate cold fat for flakiness and richness; when cut into the flour, create pockets that bake into layers, producing a tender, flaky crust.
- 1/3 cup buttermilk Provide necessary moisture and mild tang to bring the dough together; the acidity also tenderizes the pastry and enhances flavor complexity.
- 2 large Granny Smith apples thinly sliced Deliver firm, tart slices that contrast the sweet toffee and sugar; hold their shape when baked, offering texture and bright apple flavor throughout the galette.
- Cinnamon and sugar for sprinkling on the apple slices Add aromatic spice and additional sweetness to the fruit layers; sprinkle over the apple slices to create a caramelized, lightly spiced topping during baking.
- 1 cup Heath milk chocolate toffee bits or chopped Heath candy bars Introduce crunchy, buttery toffee and chocolate bursts that elevate sweetness and texture; scatter over the apples to melt slightly and provide decadent bite-sized pockets.
- 1 egg beaten Seal and glaze the pastry edges for golden color and shine; beaten egg also helps toppings adhere and gives the crust an attractive finish.
- 2 tablespoons turbinado sugar Provide a coarse, sparkling finish to the crust after brushing with egg; add crunch and a deeper caramel flavor when the galette is baked to a crisp.
Instructions
- To make the dough, combine flour, sugar, cornmeal, and salt in a processor; pulse 2-3 times. Add butter and pulse 4-5 times, or until mixture resembles coarse meal. With the processor running, slowly pour the buttermilk through the chute, processing until the dough forms a ball. Remove the dough ball and adhere any remaining pieces of dough to it, then wrap in plastic wrap or parchment paper. Refrigerate for at least 45 minutes before rolling out.: The moment you pulse the dry ingredients, you will smell the faint grain of the cornmeal mingling with the neutral wheat scent of the flour . This dry blend sets the tone for the crust, ensuring even seasoning. Work quickly so your food processor blade does not warm the mixture, which can make the butter soften prematurely. A frequent mistake is over processing now, which can lead to a gummy dough later. Aim for a uniform sandy texture, and scrape the bowl if bits cling to the sides to ensure an even distribution before adding butter.
- Center a rack in the oven and preheat to 350 degrees F.: When you add the cold, cubed butter and pulse, watch for pea sized pieces coated in flour. You should be able to see small flecks and crumbs, not a paste. The aroma will shift as the butter disperses, and those visible butter bits are what create flakiness as they steam in the oven. If you overwork the dough, the butter will melt into the flour, producing a dense crust. Stop pulsing as soon as you have that coarse meal texture, and chill sooner rather than later if the kitchen is warm.
- Remove the dough from the refrigerator and place on a sheet of parchment paper. Starting at the center of the dough, roll out, forming a 14-15-inch wide circle. Place the dough with parchment paper on a baking sheet. Generously sprinkle apple slices with cinnamon and sugar. Arrange apple slices in a spoke pattern on the galette dough, leaving a 2-inch border. Sprinkle the toffee bits over the apple slices, making sure all of the slices are covered. Fold the border over the apples, overlapping where necessary and pressing gently to adhere the folds.: As the buttermilk is incorporated, you will notice the mixture start to clump and hold together. The sound changes from a dry buzz to a softer, cohesive thrum. This transformation matters because it signals proper hydration; too little and your dough will be crumbly, too much and it will be sticky. A common misstep is pouring too quickly, which can make the dough overly wet. If that happens, chill the dough and press it together rather than adding extra flour, which risks toughness.
- Lightly brush the edge of the dough with the egg and sprinkle crust with turbinado sugar.: When you lift the dough, it should feel cool and slightly tacky but not sticky. The tactile feedback is important, as it tells you the temperature is right to preserve butter pockets. Press any stray crumbs back onto the ball so nothing is wasted, and wrap it snugly to prevent drying. If you leave it exposed, the surface will develop a dry skin that can crack when rolled. A typical error is over handling while trying to perfect the shape; gentle pressing is enough.
- Bake the galette for 45-50 minutes, or until the apples are tender and the crust is golden brown. Transfer the baking sheet to a wire rack to cool for at least 20 minutes. Serve warm or at room temperature.: Chilling firms the butter and relaxes the gluten, making the dough easier to roll and less likely to shrink while baking. You will feel the difference when you return to roll it; a chilled dough will hold its edges and roll into a smooth circle. Trying to roll too soon often results in a sticky mess or tearing, which leads to patching and uneven baking. If your kitchen is warm, extend the chill time to keep the butter solid.
- Note-you can make the galette dough in advance. It will keep in the refrigerator for 3 days.: A fully preheated oven ensures the crust begins to set and brown immediately. The scent in the kitchen is subtle at this stage, but the heat is doing crucial work for even bake. If the oven is not up to temperature, the crust may become soggy from the fruit juices before it crisps. Use an oven thermometer if you suspect your oven runs cool, as 350 degrees F is the target for achieving that golden exterior.
- Remove the dough from the refrigerator and place on a sheet of parchment paper Starting at the center of the dough roll out forming a 14 15 inch wide circle Place the dough with parchment paper on a baking sheet Generously sprinkle apple slices with cinnamon and sugar Arrange apple slices in a spoke pattern on the galette dough leaving a 2 inch border Sprinkle the toffee bits over the apple slices making sure all of the slices are covered Fold the border over the apples overlapping where necessary and pressing gently to adhere the folds: At this point you will notice the chilled dough yielding evenly as you roll, the parchment preventing sticking and making transfer to the sheet effortless. The thin apple slices should glisten slightly when dusted with the cinnamon and sugar, and arranging them in a spoke pattern creates appealing layers that bake evenly. When you scatter the toffee , listen for the slight clink of pieces as they land, and resist packing them too densely so the apples can breathe. Folding the edge creates a rustic seal and an opportunity for attractive overlapping. One common mistake is overcrowding the apples, which releases excess juice and steams the crust; maintain that 2 inch border and fold neatly to catch the juices.
- Lightly brush the edge of the dough with the egg and sprinkle crust with turbinado sugar: The egg wash imparts a glossy sheen and helps the turbinado sugar adhere and caramelize, adding a crunch to the rim. Brush with a light hand so no pools form, which can burn or drip onto the pan. When the egg hits the warm dough, you may notice a slight tackiness that will resolve in the oven. Over brushing is a frequent issue and causes uneven color, so one thin layer is best.
- Bake the galette for 45 50 minutes or until the apples are tender and the crust is golden brown Transfer the baking sheet to a wire rack to cool for at least 20 minutes Serve warm or at room temperature: During baking you will be able to smell the apples softening and the toffee beginning to melt into fragrant pockets. The crust should turn a deep golden color and the apples will give under the tip of a knife. Allow the galette to rest on a wire rack so steam escapes and the filling firms slightly, which makes slicing easier. Cutting too soon often results in a runny slice, so resist the urge to dig in immediately. If you find juices pooling, a brief additional bake of 5 minutes can help, but avoid overbrowning.
- Note you can make the galette dough in advance It will keep in the refrigerator for 3 days: The ability to make dough ahead is a real time saver, and the crisp chill of the dough will make rolling simpler on busy days. When refrigerated, the flavors meld, and the dough often becomes more manageable. Before rolling, let it sit for a few minutes if it is too stiff to avoid cracking. A common error is storing it unwrapped, which dries the surface; always seal it well to retain moisture.
Notes
- Boost crust crunch by substituting a portion of the all purpose flour with a light whole grain or adding a tablespoon more coarse cornmeal, which increases texture without overpowering the filling.
- Adjust sweetness by varying the amount of granulated sugar in the crust or the cinnamon sugar sprinkled on the apples, tailoring the final tart to match sweeter or tarter apple varieties.
- Toffee placement matters scatter the toffee under and over the apple slices so some pieces melt into caramel pockets while others remain slightly crunchy and visible on top.
- Make ahead strategy prepare the dough up to three days in advance in the refrigerator, then assemble and bake on the day you want to serve for a fresher crust.
- Egg wash technique use a light touch when brushing the crust with the beaten egg to promote even browning and prevent pooled egg that can darken too quickly.