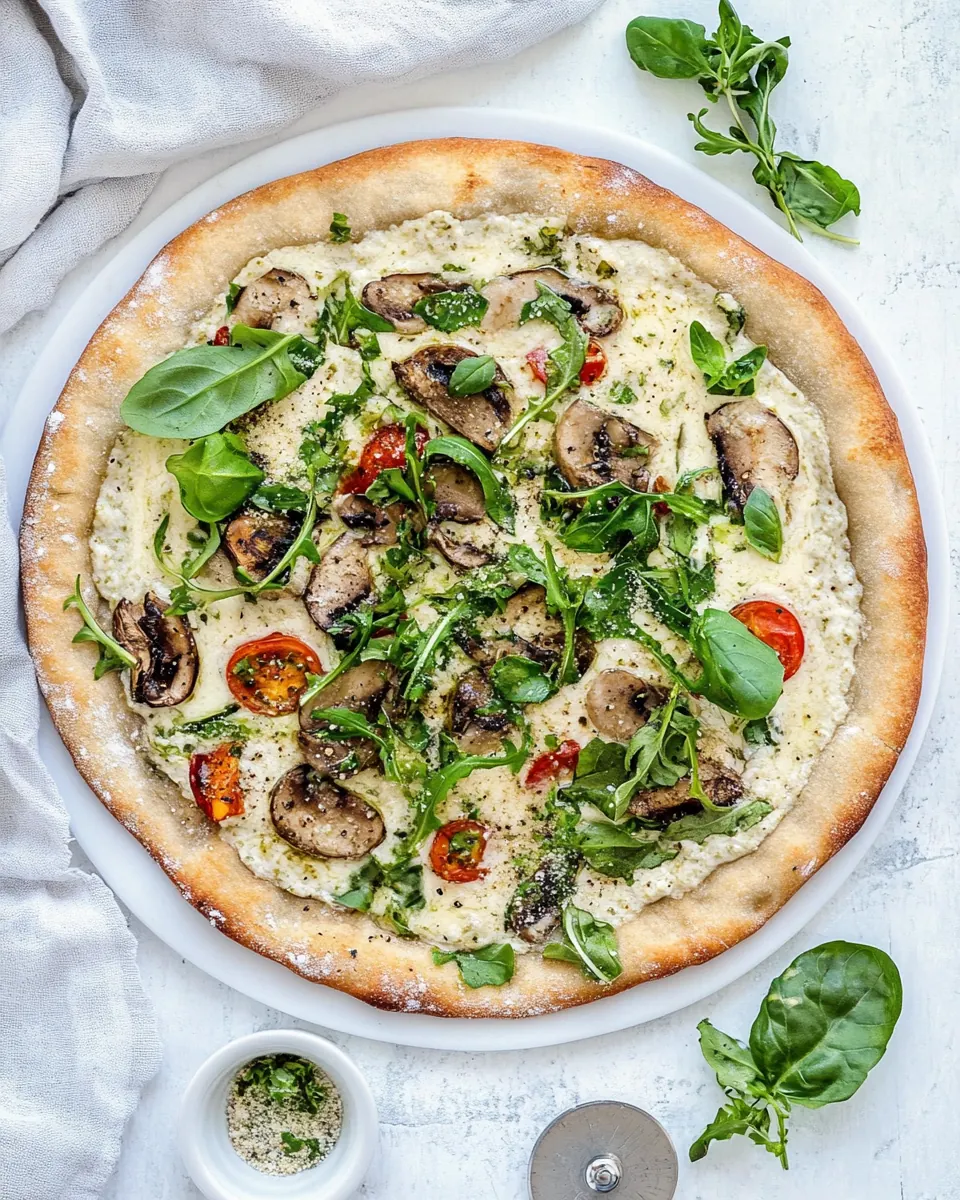
Vegan White Sauce Pizza
Vegan White Sauce Pizza always feels like the kind of recipe that shows up on a calm Sunday afternoon, when I want something a little fancy without the fuss. The first time I made this, I was juggling a sleepy oven and a hungry friend who kept stealing zucchini slices while I arranged toppings. I remember the kitchen filling with a warm, nutty aroma from the blended cashews, and how the crust crisped just so when it hit the hot stone, making everyone at the table go quiet for a moment.
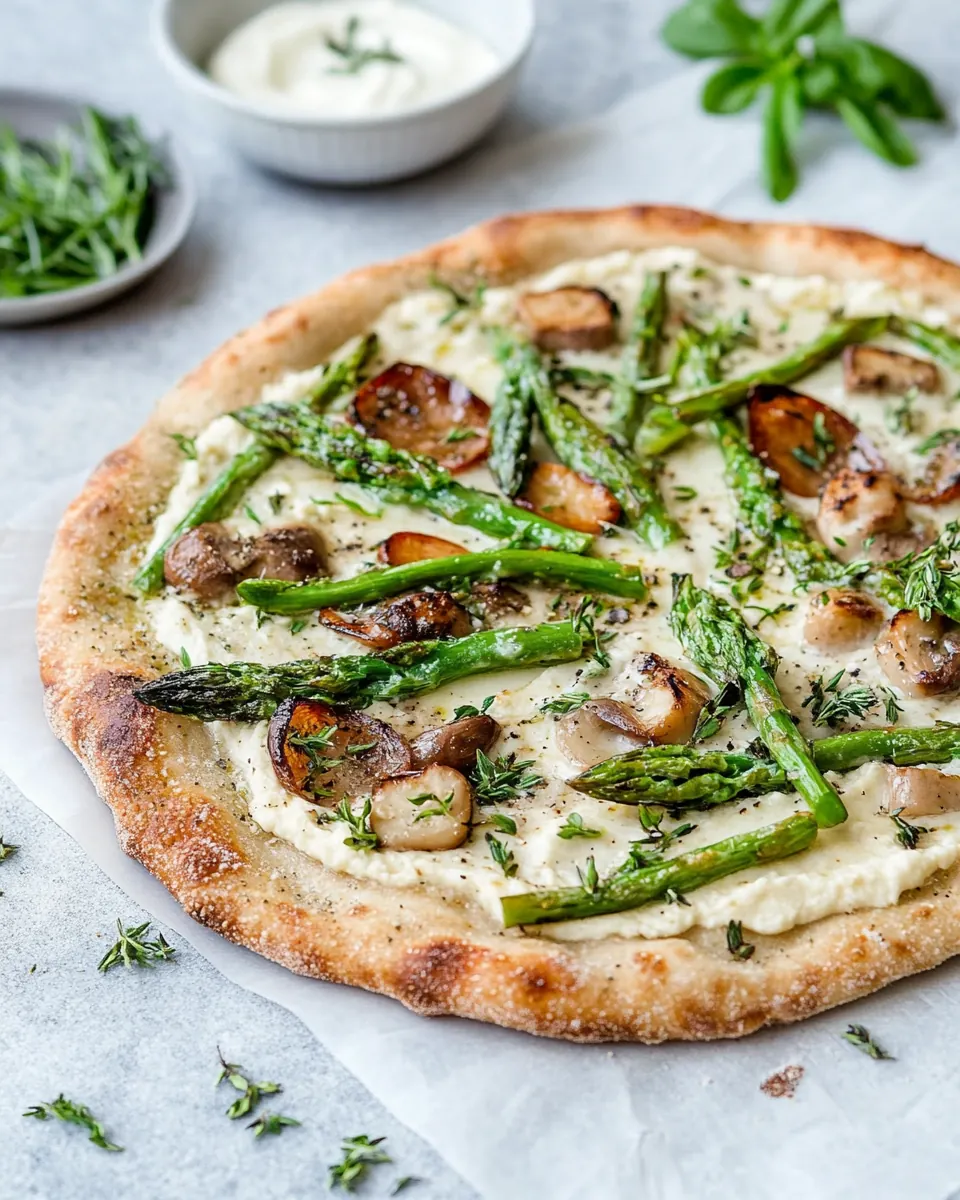
There is a quiet satisfaction in slicing through a pizza and seeing the pale cream of the sauce studded with bright green asparagus and florets of broccoli. I love how the gentle nutmeg whispers under the surface, keeping everything delicate yet interesting. Over the years I have tweaked amounts, learned which mandolin settings spare fingers, and discovered that a good semolina dust makes a huge difference in transfer to the oven. When friends ask for a vegan option, this is the recipe I reach for because it feels generous, seasonal, and uncomplicated.
Recipe Snapshot
35 mins
15 mins
20 mins
Medium
300 kcal
Italian
Vegan, Gluten-Free
Dinner
Pizza peel, Pizza stone, Pizza oven
The Magic of This Vegan White Sauce Pizza
Comfort without compromise
I adore how Vegan White Sauce Pizza offers the creaminess you crave without dairy. The cashew based sauce has a rounded mouthfeel that stands in for cheese, but it never overwhelms the fresh vegetables. I find that this makes the pizza both comforting and surprisingly light.
Vegetable forward and seasonal
I make this when zucchini and asparagus are at their peak, because their textures and colors transform the pizza into something celebratory. The broccoli gives a satisfying bite, and the combination is perfect for spring, when produce tastes bright and tender.
Simple techniques, big payoff
There are no tricky steps here, just a few thoughtful techniques that change everything. Soaking the cashews briefly and using a high power blender creates that velvety sauce, and a hot pizza stone produces the crisp base I love. These small moves elevate the final plate immensely.
Flexible and crowd friendly
Whether I bake one pizza for a cozy night or two for friends, this recipe scales well. The components are forgiving, so I can adapt toppings and still end up with a satisfying result. It is a reliable choice when entertaining because you can prepare elements ahead and assemble quickly.
Healthy without being preachy
This pizza feels like a treat yet is rooted in whole ingredients. The sauce brings healthy fats from Cashew nuts, and the veg adds fiber and freshness. For me, that balance is why I keep coming back, and why guests often ask for seconds.
What You Need for Vegan White Sauce Pizza
These ingredients are intentionally simple and synergistic. The sauce relies on softening and blending, while the vegetables provide texture and bright flavors. The dough and semolina form the structural foundation, and the small seasoning notes like Nutmeg and White pepper lift the overall profile. I treat the cashews as the creamy backbone, the dairy free milk as the thinning element, and the vegetables as the finishing flourish.
- 1/2 cup Cashew nuts: Soak and blend to create a creamy base; provides healthy fats and a rich texture that mimics dairy in white sauce, helping to thicken and lend a smooth mouthfeel when combined with dairy–free milk and flour.
- 1/2 cup Dairy-free milk: Heat and whisk with blended cashews to form the sauce; supplies the liquid foundation and helps achieve a pourable consistency while keeping the recipe vegan.
- 1 tbsp Nutritional yeast: Add and stir into the cashew–milk mixture for a savory, umami boost; enhances cheesy flavor without dairy and complements the sauce’s richness.
- 1 tbsp All-purpose flour: Whisk in to help thicken the sauce and provide structure; acts as a binder and creates a velvety consistency when cooked gently with the nut-milk base.
- 1/4 tsp Nutmeg: Grate sparingly to add warm, aromatic depth; contributes a subtle nutty, sweet spice that elevates the overall flavor profile of the white sauce.
- 1/2 tsp Salt: Season adequately to balance flavors; brings out sweetness in vegetables and rounds the sauce, ensuring the pizza is well-seasoned.
- 1/8 tsp White pepper: Season lightly to add a mild, peppery heat; gives a clean, delicate spice that enhances the savory notes without overpowering the sauce.
- 2 Pizza dough homemade classic or gluten-free: Roll out and bake as the foundation; supplies the vehicle for toppings and white sauce, offering chew and structure whether classic or gluten–free.
- 1 Zucchini: Slice thinly and roast or grill to add tender, slightly sweet vegetable topping; brings moisture and mild flavor that pairs well with the creamy sauce.
- 5 oz Asparagus: Trim and blanch or roast to add tender-crisp green bites; provides fresh, grassy notes and textural contrast among the pizza toppings.
- 5 oz Broccoli: Cut into small florets and briefly roast or steam for a hearty topping; offers earthiness and pleasant bite that complements the creamy sauce and other vegetables.
- Semolina flour for dusting: Dust lightly to prevent sticking when rolling out dough; supplies a coarse texture that helps achieve a crisp bottom and easy handling of the pizza crust.
Cooking Instructions for Vegan White Sauce Pizza
I like to work methodically while assembling this pizza because the rhythm makes the process relaxing. Take your time with the sauce and the veg prep, and preheat the oven early so the stone becomes truly hot. Keep small bowls ready for the prepped toppings so the final assembly is fast and confident.
- Soak cashew nuts in piping hot water for 5-10 minutes. You can do overnight soaking, but if you are in a hurry, boil water in a kettle and soak the cashew nuts for only 5-10 minutes.: The moment you submerge the Cashew nuts into very hot water you will notice they soften quickly, which matters because a well softened nut blends into a gorgeously smooth sauce with a creamy mouthfeel. As the nuts absorb heat, they become plump and lose that raw crunch, making the blender work far less hard. Smell wise, there is a subtle nutty sweetness that emerges during soaking, and you will not want to skip this step if you expect a velvety finish. If you try to blend under soaked nuts, the texture can be grainy, so avoid that common mistake by timing the soak. A troubleshooting tip is to test one nut by pressing it between your fingers to ensure it yields easily before blending.
- Add soaked cashews, dairy-free milk, all-purpose flour, nutritional yeast, nutmeg, salt, and white pepper to a high-power blender, and blend them until smooth.: As you blend, listen for a steady hum that indicates the blades are smoothly emulsifying the ingredients into a cohesive cream; visually, you want a pale, glossy batter that pours slowly like thick cream. The warmth of the blended mixture should feel slightly higher than room temperature because the hot water from soaking carries through, which helps the flavors bloom. This technique is crucial for a sauce that spreads evenly and sets lightly when baked. Watch out for under blending which leaves tiny cashew bits, and over blending that can warm the mix too much and thin it excessively; pulse and scrape the jar as needed to ensure uniformity. If the sauce looks too thick, drizzle in a touch more Dairy–free milk until it reaches a spreadable texture.
- Wash and slice zucchini thinly (with a mandolin if you have). Wash and cut asparagus into 3-inch long sticks. Wash broccoli and cut into florets. Then cut the florets in half since it will be easier to place them on the pizza if they have one smooth side.: Thin, even slices of Zucchini will cook through quickly and develop a delicate caramelization at the edges, giving the pizza pleasant contrasts of texture. The mandolin is a timesaver and creates uniformity so no slice remains raw while another is crisp. Smell and taste remain fresh and mild, which lets the sauce shine. A safety note is to use the guard on the mandolin, and a common error is slicing too thickly which results in underdone pieces after the pizza bakes; if you lack a mandolin, use a very sharp knife and steady pressure to match thickness across the slices.
- Pan-fry zucchini and asparagus with your chosen seasonings. We usually only use a dash of salt and pepper, and a bit of garlic powder.: After trimming, the Asparagus should snap cleanly, a sensory cue that it is fresh and ready. When cooked briefly in a pan the tips become tender while the stalks keep a satisfying bite, and the aroma turns herbaceous and green. This step matters because raw asparagus can remain fibrous on a quickly baked pizza. Avoid overcrowding during the quick pan fry, because crowding creates steam and you lose the seared notes that add flavor.
- Blanche broccoli. Boil water in a stockpot and cook broccoli for 5 minutes. Set aside.: Smaller halves of Broccoli will nestle neatly on the pie and expose a flat surface that browns attractively. After blanching the color should be a vivid green, and the texture should still have some resistance to the bite so it does not become mushy. I like to halve florets so they sit flush on the crust, which helps even cooking and presentation. A common misstep is leaving large florets intact that fail to cook through in the short bake time, so trim them small for best results.
- If you use our homemade pizza dough recipe, make the dough and proof it according to the instructions there. Then continue from here.: In the pan you will hear a gentle sizzle as the vegetables hit hot oil or a nonstick surface, and the edges will begin to brown and smell slightly sweet and toasty, which enhances their depth on the pizza. A quick toss with a bit of Salt and White pepper and a sprinkle of garlic powder if you like will season them without overpowering the sauce. This technique softens the veg and concentrates flavors, which matters because the oven bake is brief. The mistake to avoid here is overcooking, which leaves limp, flavorless vegetables; keep them al dente so they finish perfectly on the pizza.
- Transfer one ball of dough to a flat surface dusted with semolina or cornmeal. Sprinkle the top with flour if needed (or simply just turn the dough upside-down). Use your fingertips to gently depress the round, stretching and pulling the dough gently into a circle. For a bubbly outer crust, don't depress the outer circumference.: When you drop the Broccoli into boiling water you will see the color jump to a bright green within minutes, a visual sign that the fibers have relaxed just enough. After roughly five minutes in the stockpot, plunge the florets into cold water or set aside to stop cooking and preserve that vivid hue. Blanching also removes any faint bitterness and gives the broccoli a pleasant tender crispness, which plays well against the creamy sauce. Overcooking will dull both color and texture, so time it carefully and watch the clock.
- Preheat the oven to 390 Fahrenheit (200 degrees Celsius).: A properly proofed Pizza dough should feel puffy and slightly springy, full of small air bubbles that promise a light crust. This resting period develops flavor and structure, so resist the urge to rush through it. Visually, you will notice the dough almost double in size and the surface will rip slightly when poked gently. A common error is under proofing which yields a dense bite, so allow adequate time and keep the dough in a warm, draft free spot.
- Add parchment paper to a baking tray, and transfer the pizza crust with your hand to the tray. Gently arrange the crust back to a circle shape.: When you gently press and stretch the dough you will feel it relax and form a soft ring for the crust, with a slightly tacky surface that benefits from a dusting of Semolina flour . The semolina prevents sticking and gives a crunchy underside once baked, which I love for texture contrast. Use your fingertips to coax the dough outward but leave the outer circumference puffier for a bubbly edge. A common mistake is pressing the outer edge flat, which prevents a puffy rim; preserve that outer ring for the best crust.
- Spread white sauce evenly on the crust. Top it with zucchini, asparagus, and broccoli.: Allow the oven to reach a true, consistent heat so the Pizza stone or tray can store enough thermal energy to produce a crisp bottom crust. When the oven is fully heated you will notice the air becomes markedly warmer and the stone should feel hot if handled carefully with mitts. This step matters because an underheated oven will lead to a soggy base and poorly risen edges. Avoid opening the door frequently, which releases heat and lengthens the bake time.
- Bake it for 10-15 minutes or until the outer crust gets some color.: The parchment acts like a gentle bridge so you can move the assembled pie onto the hot stone or tray without the crust tearing, and arranging the dough back to a neat circle ensures even baking. As you smooth the crust you will feel the dough settle and hear the faint rustle of the parchment, which helps keep the surface clean. One troubleshooting tip is to dust lightly with Semolina flour so the crust slides easily; otherwise it can stick and stretch awkwardly when you try to move it.
- Spread white sauce evenly on the crust: The sauce should glide across the dough in a thin, even layer, creating a pale, glossy canvas for the vegetables. When spread properly, the surface will look cohesive and slightly sheened, helping the toppings adhere during the bake. This even layer matters because uneven application can lead to soggy pockets or dry spots. A common error is applying too much sauce which weighs down the dough, so aim for a balanced coating that complements the toppings.
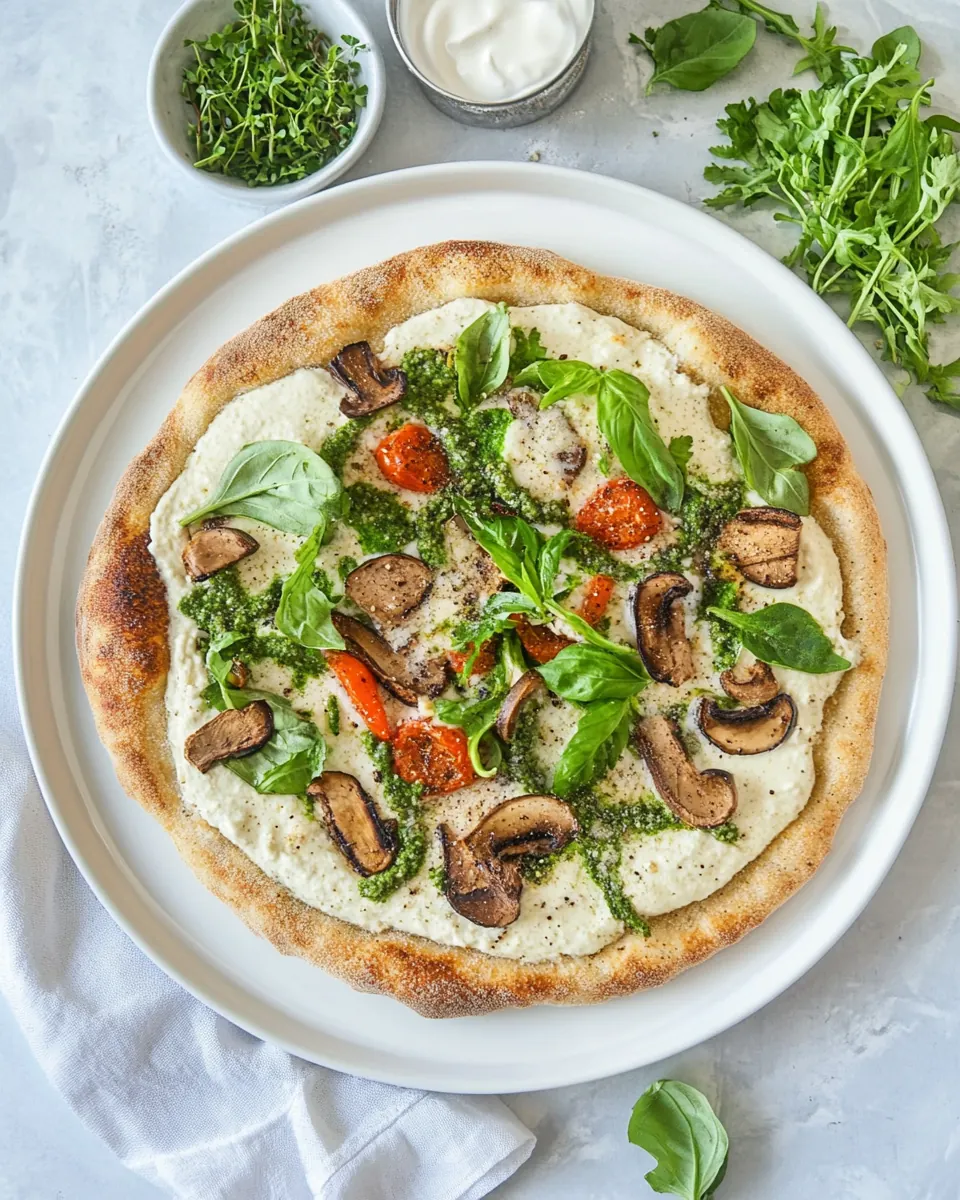
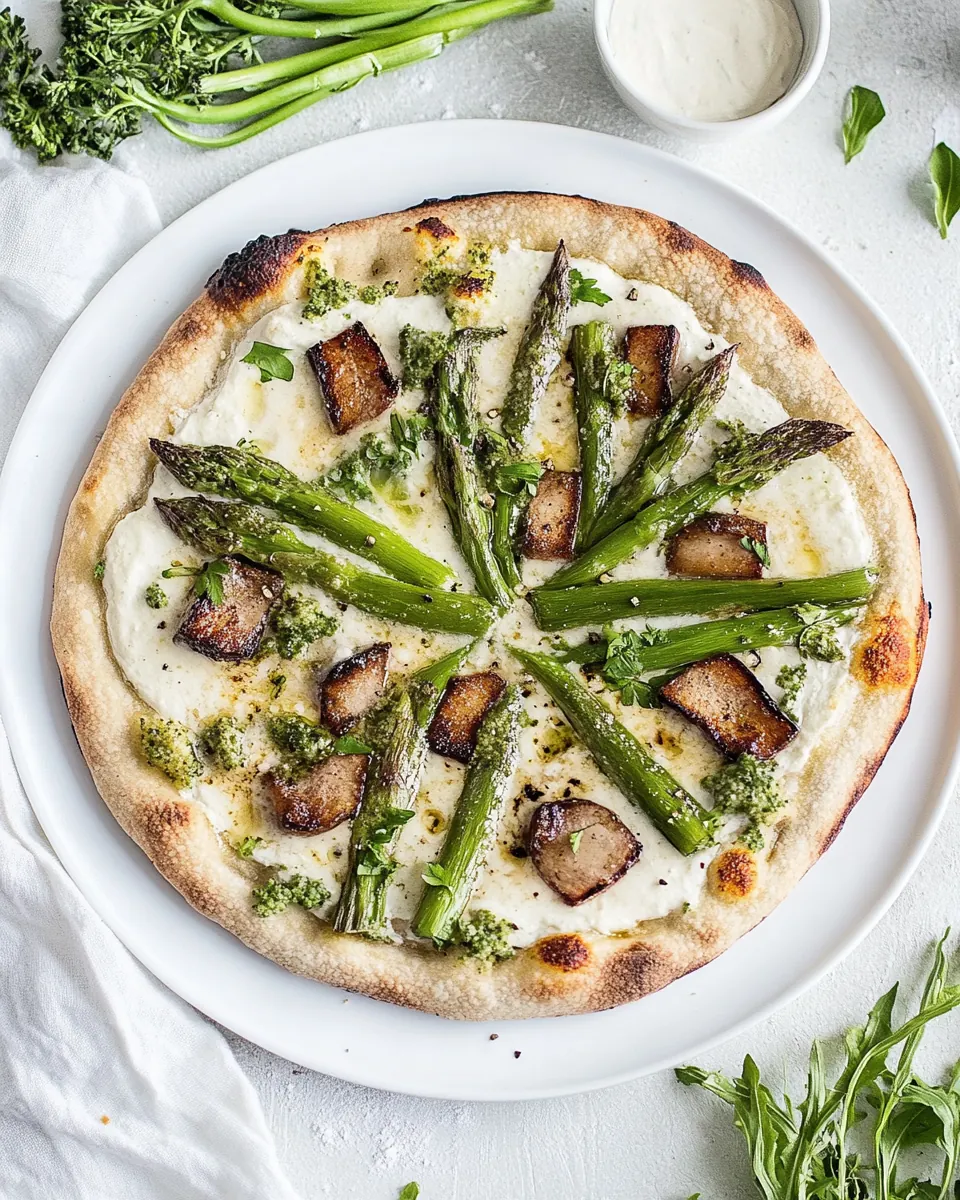
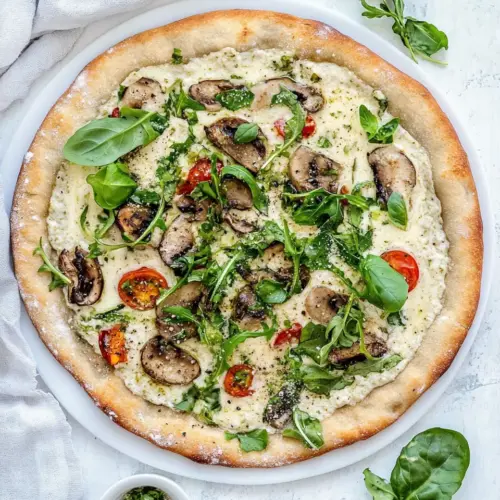
- Top it with zucchini asparagus and broccoli: Arrange the prepped Zucchini , Asparagus , and Broccoli in a single layer so each bite offers a mix of textures and flavors; visually, the pie will look like a spring garden with pops of green. The pre cooked vegetables should sizzle lightly as they bake, and you will see the edges caramelize and the sauce bubble gently. This placement matters because crowded layers can steam rather than roast. Avoid piling toppings too thickly or the center may remain underdone.
- Bake it for 10 to 15 minutes or until the outer crust gets some color: In the oven the crust should puff and develop golden spots, and the sauce will set while the vegetables gain toasty hints at the edges, signaling readiness. Listen for a faint crackle from the crust as it browns and trust visual cues over exact minutes, since oven performance varies. This timing is crucial to balance a crisp base with perfect veggie texture. A common mistake is leaving the pizza in too long which dries the sauce and makes the crust overly hard; monitor closely in the final minutes.
Making Adjustments
I often adapt small things depending on mood, but I keep the core technique intact. Here are practical adjustments that have proven reliable in my kitchen, each described so you can choose what fits your pantry and schedule.
- Swap dough style: If you prefer a thinner crust, roll the Pizza dough out more thinly and reduce bake time slightly, checking for a golden rim to avoid over crisping.
- Sauce thickness: If the blended sauce seems too thin, chill it briefly to let it firm up, or add a touch more All-purpose flour when blending for a silkier set after baking.
- Vegetable prep timing: For a less hands on approach, blanche the Broccoli and pan fry the Zucchini and Asparagus ahead of time, storing them in the fridge until assembly to speed the final bake.
- Heat control: If your oven runs hot, move the stone down one rack so the top does not overbrown before the crust cooks, keeping an eye on color development.
- Semolina alternative: If you do not have Semolina flour, use cornmeal for a similar nonstick effect and crunchy texture under the base.
- Blender power: If you do not own a high power blender, soak the Cashew nuts longer and blend in short bursts, scraping frequently for a smoother outcome.
- Make ahead: Prepare the white sauce up to two days in advance and store in the fridge, which allows flavors to meld and saves time on the day you bake.
Serving This Vegan White Sauce Pizza
This pizza makes a welcoming centerpiece for casual dinners and light celebrations alike. I enjoy serving it warm from the oven with just a few finishing touches to highlight the textures. The following list covers practical serving ideas, pairings, and storage tips to keep your meal versatile and delicious.
- Slice hot: Serve the pizza immediately so the crust is crisp and the sauce is pleasantly warm, which provides the best contrast between crunchy rim and tender interior.
- Light salads: A crisp green salad dressed simply complements the creamy sauce and keeps the meal balanced, ideal for lunch or a light dinner.
- Occasions: This pizza works well for casual weeknight dinners, spring gatherings, or observant festive meals that need a vegan main course.
- Storage: Refrigerate leftovers in an airtight container, and reheat in a hot oven to revive the crust’s texture rather than in the microwave which can make it soggy.
- Presentation: Garnish slices with a light drizzle of olive oil or a sprinkle of extra Nutritional yeast just before serving for a subtle sheen and added savoriness.
- Make ahead assembly: You can prepare vegetables and sauce a day ahead and assemble right before baking to reduce day of stress while keeping flavors fresh.
- Seasonal pairing: Highlight seasonal asparagus and zucchini in spring when they are at peak flavor and texture, making the pizza feel timely and vibrant.
FAQ
Conclusion
This pizza stands out for its creamy cashew based sauce and bright, seasonal vegetables that combine into a satisfying vegan meal. I hope the approachable techniques and little chef tricks encourage you to try it, whether for a quiet weeknight or a small gathering. Give the sauce a good blend, pre cook the vegetables slightly, and heat your oven fully for the best results. When you pull a golden slice from the oven, that moment of steam and aroma makes the whole process feel worthwhile, and I think you will want to make it again.
Vegan White Sauce Pizza
Equipment
- Pizza Peel
- Pizza Stone
- Pizza oven
Ingredients
- 1/2 cup Cashew nuts Soak and blend to create a creamy base; provides healthy fats and a rich texture that mimics dairy in white sauce, helping to thicken and lend a smooth mouthfeel when combined with dairy-free milk and flour.
- 1/2 cup Dairy-free milk Heat and whisk with blended cashews to form the sauce; supplies the liquid foundation and helps achieve a pourable consistency while keeping the recipe vegan.
- 1 tbsp Nutritional yeast Add and stir into the cashew-milk mixture for a savory, umami boost; enhances cheesy flavor without dairy and complements the sauce’s richness.
- 1 tbsp All-purpose flour Whisk in to help thicken the sauce and provide structure; acts as a binder and creates a velvety consistency when cooked gently with the nut-milk base.
- 1/4 tsp Nutmeg Grate sparingly to add warm, aromatic depth; contributes a subtle nutty, sweet spice that elevates the overall flavor profile of the white sauce.
- 1/2 tsp Salt Season adequately to balance flavors; brings out sweetness in vegetables and rounds the sauce, ensuring the pizza is well-seasoned.
- 1/8 tsp White pepper Season lightly to add a mild, peppery heat; gives a clean, delicate spice that enhances the savory notes without overpowering the sauce.
- 2 Pizza dough homemade classic or gluten-free Roll out and bake as the foundation; supplies the vehicle for toppings and white sauce, offering chew and structure whether classic or gluten-free.
- 1 Zucchini Slice thinly and roast or grill to add tender, slightly sweet vegetable topping; brings moisture and mild flavor that pairs well with the creamy sauce.
- 5 oz Asparagus Trim and blanch or roast to add tender-crisp green bites; provides fresh, grassy notes and textural contrast among the pizza toppings.
- 5 oz Broccoli Cut into small florets and briefly roast or steam for a hearty topping; offers earthiness and pleasant bite that complements the creamy sauce and other vegetables.
- Semolina flour for dusting Dust lightly to prevent sticking when rolling out dough; supplies a coarse texture that helps achieve a crisp bottom and easy handling of the pizza crust.
Instructions
- Soak cashew nuts in piping hot water for 5-10 minutes. You can do overnight soaking, but if you are in a hurry, boil water in a kettle and soak the cashew nuts for only 5-10 minutes.: The moment you submerge the Cashew nuts into very hot water you will notice they soften quickly, which matters because a well softened nut blends into a gorgeously smooth sauce with a creamy mouthfeel. As the nuts absorb heat, they become plump and lose that raw crunch, making the blender work far less hard. Smell wise, there is a subtle nutty sweetness that emerges during soaking, and you will not want to skip this step if you expect a velvety finish. If you try to blend under soaked nuts, the texture can be grainy, so avoid that common mistake by timing the soak. A troubleshooting tip is to test one nut by pressing it between your fingers to ensure it yields easily before blending.
- Add soaked cashews, dairy-free milk, all-purpose flour, nutritional yeast, nutmeg, salt, and white pepper to a high-power blender, and blend them until smooth.: As you blend, listen for a steady hum that indicates the blades are smoothly emulsifying the ingredients into a cohesive cream; visually, you want a pale, glossy batter that pours slowly like thick cream. The warmth of the blended mixture should feel slightly higher than room temperature because the hot water from soaking carries through, which helps the flavors bloom. This technique is crucial for a sauce that spreads evenly and sets lightly when baked. Watch out for under blending which leaves tiny cashew bits, and over blending that can warm the mix too much and thin it excessively; pulse and scrape the jar as needed to ensure uniformity. If the sauce looks too thick, drizzle in a touch more Dairy-free milk until it reaches a spreadable texture.
- Wash and slice zucchini thinly (with a mandolin if you have). Wash and cut asparagus into 3-inch long sticks. Wash broccoli and cut into florets. Then cut the florets in half since it will be easier to place them on the pizza if they have one smooth side.: Thin, even slices of Zucchini will cook through quickly and develop a delicate caramelization at the edges, giving the pizza pleasant contrasts of texture. The mandolin is a timesaver and creates uniformity so no slice remains raw while another is crisp. Smell and taste remain fresh and mild, which lets the sauce shine. A safety note is to use the guard on the mandolin, and a common error is slicing too thickly which results in underdone pieces after the pizza bakes; if you lack a mandolin, use a very sharp knife and steady pressure to match thickness across the slices.
- Pan-fry zucchini and asparagus with your chosen seasonings. We usually only use a dash of salt and pepper, and a bit of garlic powder.: After trimming, the Asparagus should snap cleanly, a sensory cue that it is fresh and ready. When cooked briefly in a pan the tips become tender while the stalks keep a satisfying bite, and the aroma turns herbaceous and green. This step matters because raw asparagus can remain fibrous on a quickly baked pizza. Avoid overcrowding during the quick pan fry, because crowding creates steam and you lose the seared notes that add flavor.
- Blanche broccoli. Boil water in a stockpot and cook broccoli for 5 minutes. Set aside.: Smaller halves of Broccoli will nestle neatly on the pie and expose a flat surface that browns attractively. After blanching the color should be a vivid green, and the texture should still have some resistance to the bite so it does not become mushy. I like to halve florets so they sit flush on the crust, which helps even cooking and presentation. A common misstep is leaving large florets intact that fail to cook through in the short bake time, so trim them small for best results.
- If you use our homemade pizza dough recipe, make the dough and proof it according to the instructions there. Then continue from here.: In the pan you will hear a gentle sizzle as the vegetables hit hot oil or a nonstick surface, and the edges will begin to brown and smell slightly sweet and toasty, which enhances their depth on the pizza. A quick toss with a bit of Salt and White pepper and a sprinkle of garlic powder if you like will season them without overpowering the sauce. This technique softens the veg and concentrates flavors, which matters because the oven bake is brief. The mistake to avoid here is overcooking, which leaves limp, flavorless vegetables; keep them al dente so they finish perfectly on the pizza.
- Transfer one ball of dough to a flat surface dusted with semolina or cornmeal. Sprinkle the top with flour if needed (or simply just turn the dough upside-down). Use your fingertips to gently depress the round, stretching and pulling the dough gently into a circle. For a bubbly outer crust, don't depress the outer circumference.: When you drop the Broccoli into boiling water you will see the color jump to a bright green within minutes, a visual sign that the fibers have relaxed just enough. After roughly five minutes in the stockpot, plunge the florets into cold water or set aside to stop cooking and preserve that vivid hue. Blanching also removes any faint bitterness and gives the broccoli a pleasant tender crispness, which plays well against the creamy sauce. Overcooking will dull both color and texture, so time it carefully and watch the clock.
- Preheat the oven to 390 Fahrenheit (200 degrees Celsius).: A properly proofed Pizza dough should feel puffy and slightly springy, full of small air bubbles that promise a light crust. This resting period develops flavor and structure, so resist the urge to rush through it. Visually, you will notice the dough almost double in size and the surface will rip slightly when poked gently. A common error is under proofing which yields a dense bite, so allow adequate time and keep the dough in a warm, draft free spot.
- Add parchment paper to a baking tray, and transfer the pizza crust with your hand to the tray. Gently arrange the crust back to a circle shape.: When you gently press and stretch the dough you will feel it relax and form a soft ring for the crust, with a slightly tacky surface that benefits from a dusting of Semolina flour . The semolina prevents sticking and gives a crunchy underside once baked, which I love for texture contrast. Use your fingertips to coax the dough outward but leave the outer circumference puffier for a bubbly edge. A common mistake is pressing the outer edge flat, which prevents a puffy rim; preserve that outer ring for the best crust.
- Spread white sauce evenly on the crust. Top it with zucchini, asparagus, and broccoli.: Allow the oven to reach a true, consistent heat so the Pizza stone or tray can store enough thermal energy to produce a crisp bottom crust. When the oven is fully heated you will notice the air becomes markedly warmer and the stone should feel hot if handled carefully with mitts. This step matters because an underheated oven will lead to a soggy base and poorly risen edges. Avoid opening the door frequently, which releases heat and lengthens the bake time.
- Bake it for 10-15 minutes or until the outer crust gets some color.: The parchment acts like a gentle bridge so you can move the assembled pie onto the hot stone or tray without the crust tearing, and arranging the dough back to a neat circle ensures even baking. As you smooth the crust you will feel the dough settle and hear the faint rustle of the parchment, which helps keep the surface clean. One troubleshooting tip is to dust lightly with Semolina flour so the crust slides easily; otherwise it can stick and stretch awkwardly when you try to move it.
- Spread white sauce evenly on the crust: The sauce should glide across the dough in a thin, even layer, creating a pale, glossy canvas for the vegetables. When spread properly, the surface will look cohesive and slightly sheened, helping the toppings adhere during the bake. This even layer matters because uneven application can lead to soggy pockets or dry spots. A common error is applying too much sauce which weighs down the dough, so aim for a balanced coating that complements the toppings.
- Top it with zucchini asparagus and broccoli: Arrange the prepped Zucchini , Asparagus , and Broccoli in a single layer so each bite offers a mix of textures and flavors; visually, the pie will look like a spring garden with pops of green. The pre cooked vegetables should sizzle lightly as they bake, and you will see the edges caramelize and the sauce bubble gently. This placement matters because crowded layers can steam rather than roast. Avoid piling toppings too thickly or the center may remain underdone.
- Bake it for 10 to 15 minutes or until the outer crust gets some color: In the oven the crust should puff and develop golden spots, and the sauce will set while the vegetables gain toasty hints at the edges, signaling readiness. Listen for a faint crackle from the crust as it browns and trust visual cues over exact minutes, since oven performance varies. This timing is crucial to balance a crisp base with perfect veggie texture. A common mistake is leaving the pizza in too long which dries the sauce and makes the crust overly hard; monitor closely in the final minutes.
Notes
- Swap dough style: If you prefer a thinner crust, roll the Pizza dough out more thinly and reduce bake time slightly, checking for a golden rim to avoid over crisping.
- Sauce thickness: If the blended sauce seems too thin, chill it briefly to let it firm up, or add a touch more All-purpose flour when blending for a silkier set after baking.
- Vegetable prep timing: For a less hands on approach, blanche the Broccoli and pan fry the Zucchini and Asparagus ahead of time, storing them in the fridge until assembly to speed the final bake.
- Heat control: If your oven runs hot, move the stone down one rack so the top does not overbrown before the crust cooks, keeping an eye on color development.
- Semolina alternative: If you do not have Semolina flour, use cornmeal for a similar nonstick effect and crunchy texture under the base.
- Blender power: If you do not own a high power blender, soak the Cashew nuts longer and blend in short bursts, scraping frequently for a smoother outcome.
- Make ahead: Prepare the white sauce up to two days in advance and store in the fridge, which allows flavors to meld and saves time on the day you bake.