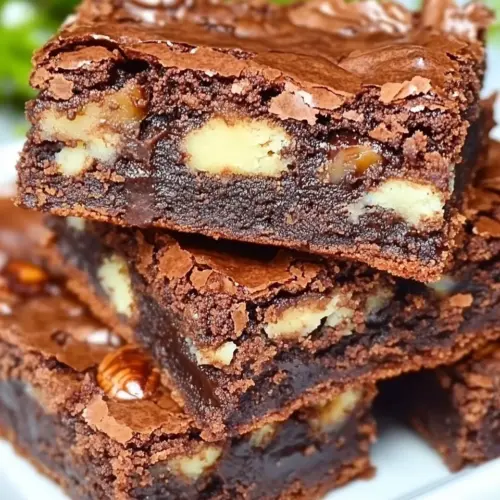
Turtle Brownies
When I think of indulgent desserts, Turtle Brownies always comes to mind. These decadent squares are a rich blend of chocolate, caramel, and nuts, creating a delicious treat that’s hard to resist. I can still recall the first time I made them; the aroma of melting chocolate filled my kitchen, and the moment I took that first bite, I was hooked! Whether I’m hosting friends for a cozy gathering or simply satisfying my sweet tooth, Turtle Brownies never fail to impress. They’re perfect for sharing, but honestly, I often end up keeping them all to myself!
Recipe Snapshot
1 hr 5 mins
30 mins
35 mins
Medium
250 kcal
4 g
Keto, Paleo, Whole30
12 g
Wooden Spoon, Baking Sheet, Oven, Mixing Bowl
Why This Turtle Brownies Shines
Decadent Flavor Combination
One reason I adore Turtle Brownies is the perfect harmony between rich chocolate and the sweet, sticky caramel. The blend of dark chocolate, milk chocolate, and caramel creates a flavor explosion that’s simply irresistible. Each bite is a delightful journey that balances sweetness with a hint of nuttiness from the pecans.
Textures That Tempt
The contrast in textures is another reason I love this dessert. The chewy brownie base pairs beautifully with the gooey caramel and crunchy pecan nuts. When you sink your teeth into one, you experience a gradual shift from the dense brownie to the luscious caramel, followed by the satisfying crunch of nuts. It’s a sensory delight!
Easy to Make
I appreciate how simple these brownies are to whip up. With only a few ingredients, they come together quickly. There’s something rewarding about stirring the melted chocolate and butter, watching it transform into a glossy mixture. The process feels effortless, yet the results are stunning!
Perfect for Any Occasion
Turtle Brownies are versatile. They can be dressed up for special occasions or enjoyed as an everyday treat. I often take them to potlucks, where they vanish in minutes. They also make a great addition to lunchboxes or as a midday snack to lift my spirits.
Share the Joy
What’s a dessert without sharing? Turtle Brownies are perfect for gatherings. Their rich, indulgent nature sparks joy and conversation around the table. The smiles they bring when shared with family and friends are simply priceless. It’s a dessert that not only satisfies cravings but also creates memories.
Customizable Delight
Lastly, I love how adaptable these brownies can be. You can easily swap ingredients based on your preferences. Want a nut-free version? Just omit the pecans. You can even play with different types of chocolates or add a sprinkle of sea salt on top for an extra flavor kick. The possibilities are endless!
Ingredient List for Turtle Brownies

The ingredients in Turtle Brownies come together to create a harmonious blend of flavors and textures. Each element plays a vital role in crafting the perfect bite. The rich chocolates deliver deep cocoa notes, while the caramel adds sweetness and sticky goodness. The pecans provide that necessary crunch, making every mouthful an adventure.
- 150g Butter: The base of the brownie, adding richness and moisture.
- 100g Dark Chocolate: Provides a deep chocolate flavor, balancing sweetness.
- 100g Milk Chocolate: Adds creaminess and smoothness to the brownie mix.
- 4 Large Eggs: These bring structure and help bind the ingredients together.
- 100g Sugar: Sweetens the brownies, creating that perfect dessert experience.
- 100g Caramel: The star ingredient, lending sweetness and a gooey texture.
- 130g Flour: The backbone of the brownie, giving it structure.
- 25g Dark Cocoa Powder: Enhances the chocolate flavor, contributing to the overall richness.
- A Pinch of Salt: A critical element to balance out the sweetness.
- 100g Pecan Nuts: Adds crunch and a lovely nutty flavor to the brownies.
- 1 tsp Vanilla Extract: Enhances the overall flavor profile, making it more aromatic.
- 100g Chocolate Chunks: For those delightful melty pockets of chocolate within the brownies.
Recipe Steps for Turtle Brownies

Making Turtle Brownies is a delightful journey. Each step brings you closer to a rich, chocolatey treat that’s hard to resist. Let’s dive into the steps needed to create this indulgence.
-
Prepare the caramel in advance. You can find a good caramel sauce recipe in various dessert books or online. Just make only half the quantity you’ll need for the brownies, as a little goes a long way!
Take your pecans (or regular walnuts) and cut them coarsely into large pieces. This will give you that lovely crunch in every bite.
In a saucepan, melt the dark chocolate and butter together over low heat. Stir occasionally until the mixture is completely smooth. This creates a luscious base for the brownies.
-
Once melted and smooth, turn off the heat and add in the sugar and dark cocoa powder. Stir well until fully combined. Allow this mixture to cool for about 10 minutes, ensuring it’s not too hot when adding the eggs.
Preheat your oven to 180 °C (356 °F). While it heats, line a 20/30 cm (8×12 inches) baking tray with parchment paper. This prevents sticking and makes for easy removal later.
Now, it’s time to add the eggs into the cooled chocolate mixture, one at a time. Make sure to mix well after each addition. This step helps to incorporate air, ensuring a light texture.
-
Next, gently incorporate the flour along with a pinch of salt and the vanilla extract. Mix at a low intensity to avoid overworking the batter, which can lead to denser brownies.
Pour half of the brownie mixture into the prepared tray. Spread it evenly to create a nice base.
Sprinkle the coarsely cut pecan nuts and drizzle the caramel on top of the brownie base. This layer will add a delightful surprise when you bite into the brownies.
-
Now, pour the remaining brownie mixture over the caramel and pecans. Ensure it covers the toppings completely.
Place the tray in the preheated oven and bake for 15 minutes. After that, remove it from the oven and sprinkle some chocolate chunks and additional pecans on top.
Return the tray to the oven and bake for an additional 15 to 20 minutes. You want a nice crust on the top, but remember, the inside should remain moist. Avoid overbaking!
-
Once baked, transfer the tray to a cooling rack. Once the brownies have cooled completely, cut them into portions. It’s hard not to sample a few before sharing!
Things Worth Knowing
- Watch Your Oven: Every oven is different; keep an eye on the brownies as they bake to avoid overbaking. The perfect texture is key to that ultimate indulgence.
- Cool Completely: Allow the brownies to cool in the pan before cutting. This helps them set and makes slicing easier.
- Check for Doneness: Instead of the toothpick test, use your senses. The top should look set, and a slight jiggle in the center is okay.
- Flavor Variations: Consider adding other nuts or using different types of chocolate for a unique twist on the classic recipe.
- Serving Suggestion: Serve warm with a scoop of vanilla ice cream for a delightful dessert experience!
Helpful Notes about Turtle Brownies

These brownies are a delightful treat, and I want to share some helpful tips to make your experience even better.
- Storage: Store leftover brownies in an airtight container at room temperature for up to five days. You can also refrigerate them for a firmer texture.
- Freezing: Yes, you can freeze these brownies! Cut them into portions and wrap each piece in plastic wrap. They’ll last up to three months in the freezer.
- Pairing: Serve Turtle Brownies with a warm cup of coffee or tea for the perfect afternoon treat.
- Serving Size: These brownies are rich, so small portions go a long way. Consider cutting them into small squares.
- Gifting: These brownies make fantastic gifts! Package them in a decorative box for friends or family.
Serving This Turtle Brownies
When it comes to serving Turtle Brownies, the options are endless! Here are some clever ideas to elevate your dessert experience:
- As a Dessert: Serve warm with a scoop of vanilla ice cream for that perfect chocolate and cold cream contrast.
- For Special Occasions: Bring these brownies to parties, potlucks, or family gatherings. They’re always a hit!
- With a Beverage: Pair with a cup of coffee, hot chocolate, or a glass of milk for a delightful combo.
- Seasonal Treat: These brownies can be dressed up with seasonal toppings, like peppermint for the holidays.
- In Lunchboxes: Slice them small and pack them as a delicious surprise in lunchboxes for kids and adults alike.
- Storage Tips: If you have leftovers, store them in an airtight container. They’re great for a quick snack later!
FAQ
Conclusion
In conclusion, Turtle Brownies are a decadent treat that brings together rich chocolate, sweet caramel, and crunchy nuts in every bite. They are perfect for sharing with friends and family or savoring alone when you want something special. I encourage you to try making these delicious brownies; they’ll surely become a beloved favorite in your home!
Turtle Brownies
Equipment
- Wooden Spoon
- Baking Sheet
- Oven
- Mixing Bowl
Ingredients
- 150 g Butter
- 100 g Dark Chocolate
- 100 g Milk Chocolate
- 4 large Eggs
- 100 g Sugar
- 100 g Caramel
- 130 g Flour
- 25 g Dark Cocoa Powder
- 1 pinch Salt
- 100 g Pecan Nuts
- 1 tsp Vanilla Extract
- 100 g Chocolate Chunks
- 100 g Pecan Nuts
Instructions
- Prepare the caramel in advance. You can find a good caramel sauce recipe in various dessert books or online. Just make only half the quantity you’ll need for the brownies, as a little goes a long way!
- Take your pecans (or regular walnuts) and cut them coarsely into large pieces. This will give you that lovely crunch in every bite.
- In a saucepan, melt the dark chocolate and butter together over low heat. Stir occasionally until the mixture is completely smooth. This creates a luscious base for the brownies.
- Once melted and smooth, turn off the heat and add in the sugar and dark cocoa powder. Stir well until fully combined. Allow this mixture to cool for about 10 minutes, ensuring it’s not too hot when adding the eggs.
- Preheat your oven to 180 °C (356 °F). While it heats, line a 20/30 cm (8×12 inches) baking tray with parchment paper. This prevents sticking and makes for easy removal later.
- Now, it’s time to add the eggs into the cooled chocolate mixture, one at a time. Make sure to mix well after each addition. This step helps to incorporate air, ensuring a light texture.
- Next, gently incorporate the flour along with a pinch of salt and the vanilla extract. Mix at a low intensity to avoid overworking the batter, which can lead to denser brownies.
- Pour half of the brownie mixture into the prepared tray. Spread it evenly to create a nice base.
- Sprinkle the coarsely cut pecan nuts and drizzle the caramel on top of the brownie base. This layer will add a delightful surprise when you bite into the brownies.
- Now, pour the remaining brownie mixture over the caramel and pecans. Ensure it covers the toppings completely.
- Place the tray in the preheated oven and bake for 15 minutes. After that, remove it from the oven and sprinkle some chocolate chunks and additional pecans on top.
- Return the tray to the oven and bake for an additional 15 to 20 minutes. You want a nice crust on the top, but remember, the inside should remain moist. Avoid overbaking!
- Once baked, transfer the tray to a cooling rack. Once the brownies have cooled completely, cut them into portions. It’s hard not to sample a few before sharing!
Notes
- Storage: Store leftover brownies in an airtight container at room temperature for up to five days. You can also refrigerate them for a firmer texture.
- Freezing: Yes, you can freeze these brownies! Cut them into portions and wrap each piece in plastic wrap. They’ll last up to three months in the freezer.
- Pairing: Serve Turtle Brownies with a warm cup of coffee or tea for the perfect afternoon treat.
- Serving Size: These brownies are rich, so small portions go a long way. Consider cutting them into small squares.
- Gifting: These brownies make fantastic gifts! Package them in a decorative box for friends or family.