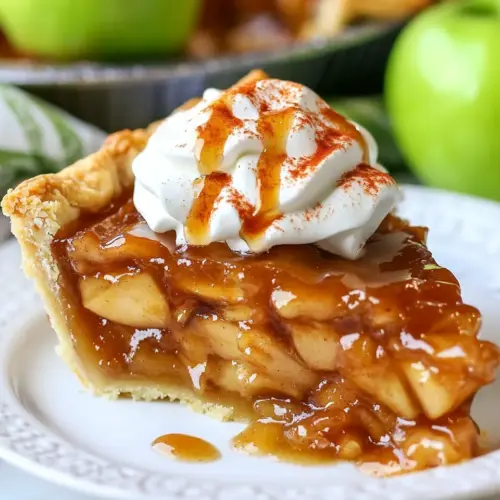
Traditional Apple Pie
Traditional Apple Pie has been my family’s fall ritual for as long as I can remember, a recipe that arrives with buttery warmth and the tiny, unmistakable crunch of a lattice top. The very first time I rolled out dough for this pie, I stood in my grandmother’s kitchen, flour on my forearms, listening to her tell stories about apple trees and neighborhood harvests while the scent of cinnamon filled the air. That memory still guides how I bake today, and it explains why I treat each step as part of a small performance rather than a chore.
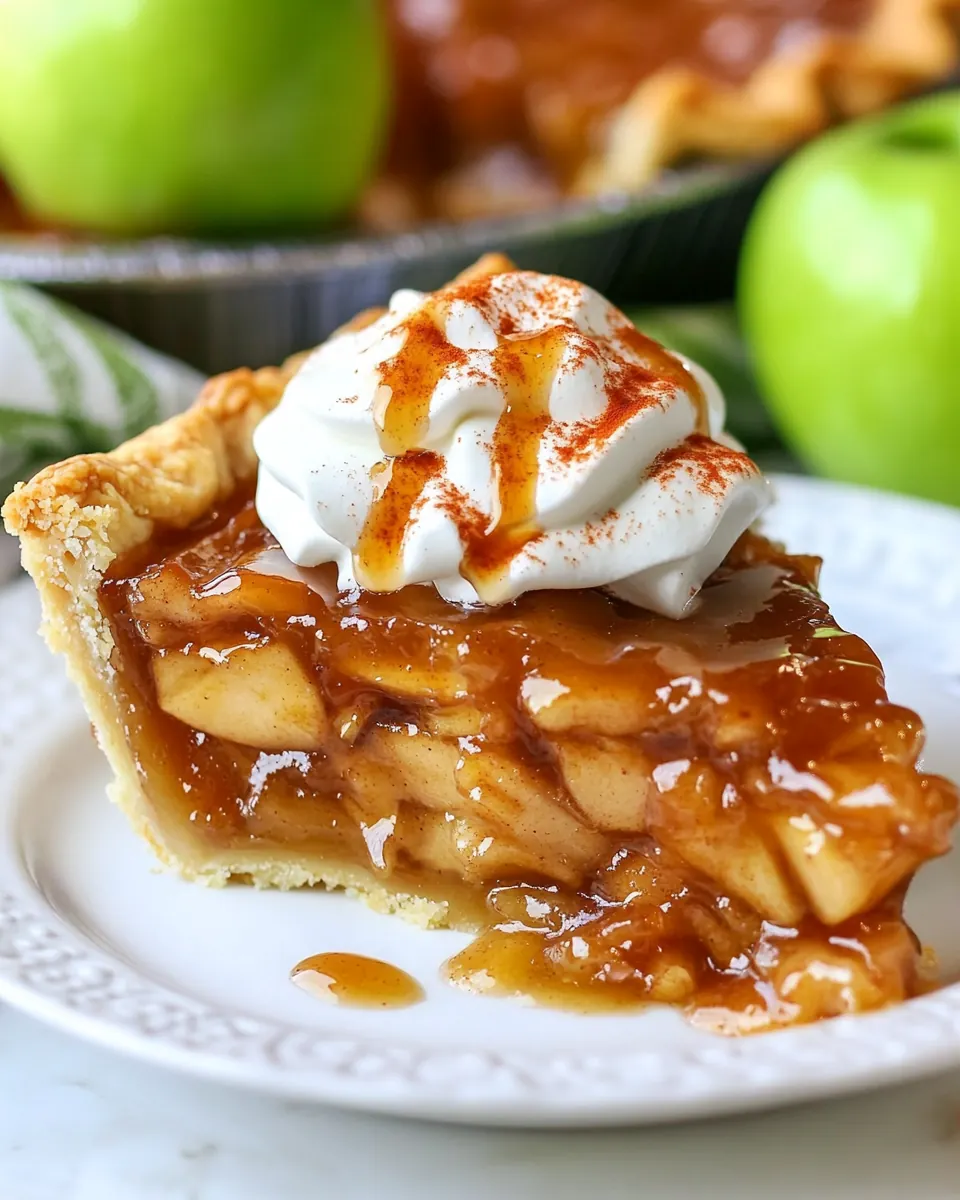
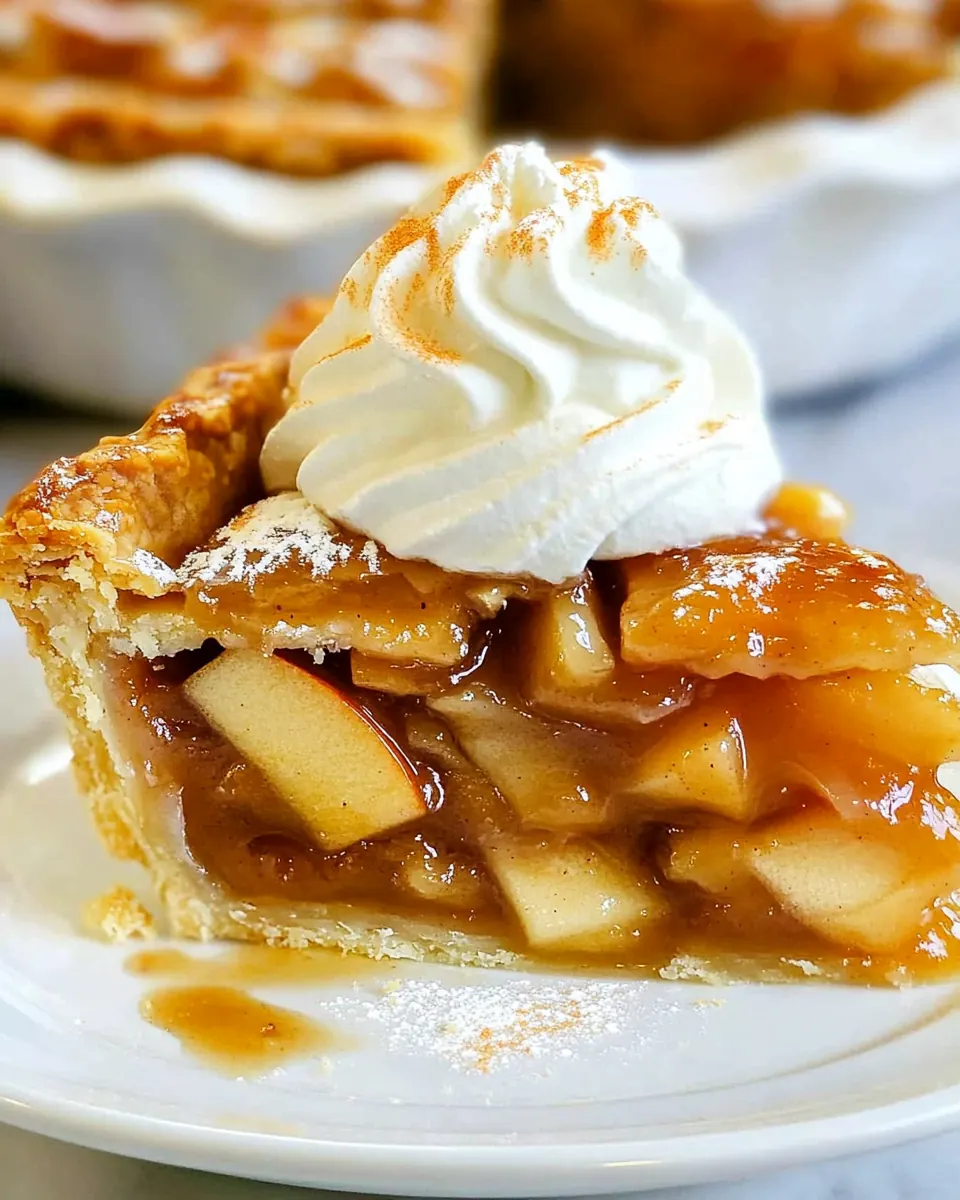
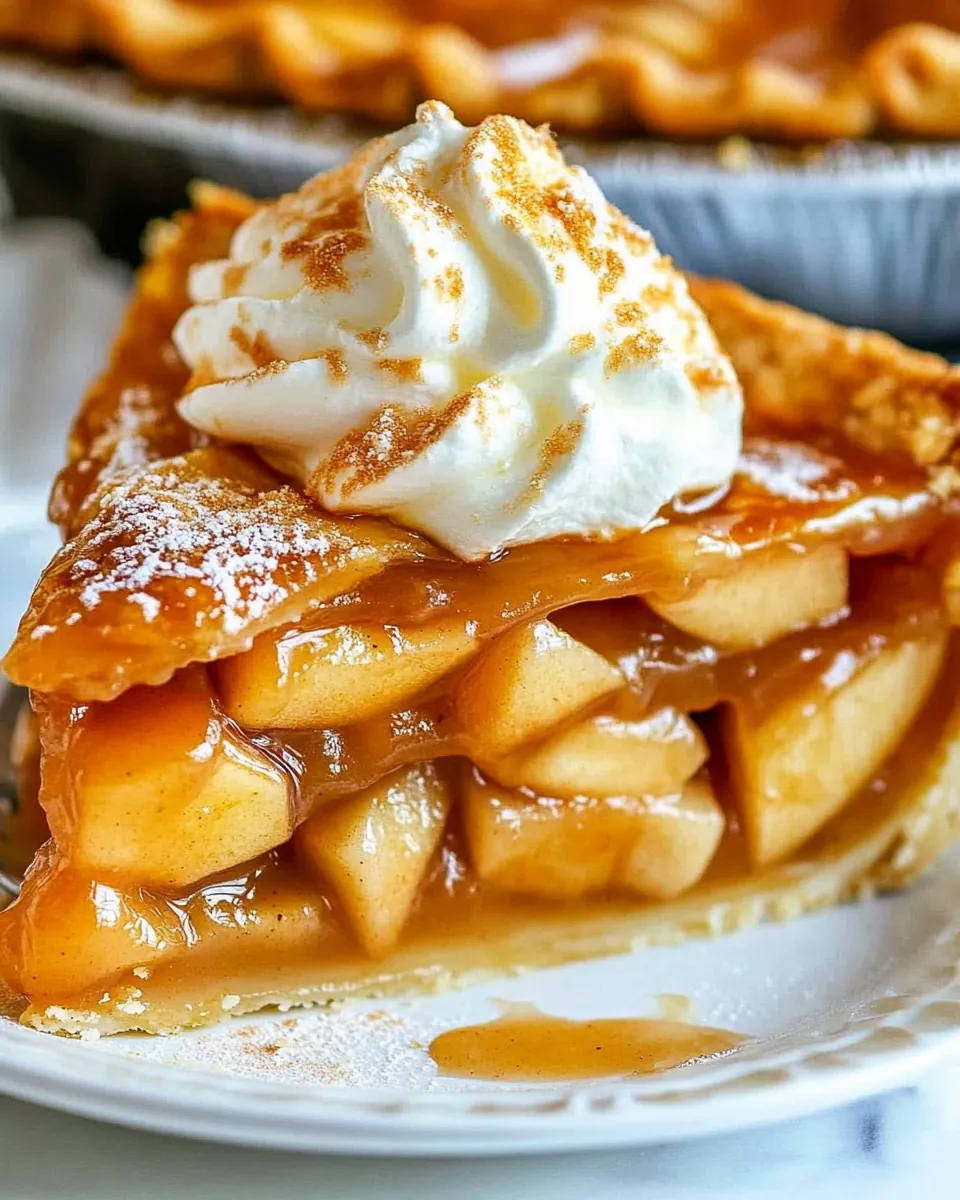
There is a quiet satisfaction in assembling a pie that earns nods and wide smiles around the table. Over the years I learned to treat the process like rehearsing an old song, paying attention to simple details: which apples to choose, how long to chill the dough, how the filling should look when it is just right. Those small choices add up to the flaky crust, the tender apple slices, and the caramel tones in the juices that set this pie apart.
Recipe Snapshot
2 hr 30 mins
60 mins
90 mins
Hard
350 kcal
American
Gluten-Free, Paleo
Desserts
9 to 10 inch pie pan, Dutch oven, Baking sheet, Rolling pin, Pizza cutter or sharp knife
What Sets This Traditional Apple Pie Apart
Flavor that balances sweet and bright
I love that Traditional Apple Pie achieves a perfect harmony between the buttery crust and the bright, slightly tart filling. Using a mix of apple types gives depth, so you get sugary notes and a lively acidity at the same time. This contrast is what keeps each bite interesting, and it makes the pie feel like a complete story rather than a single note.
Reliable texture every time
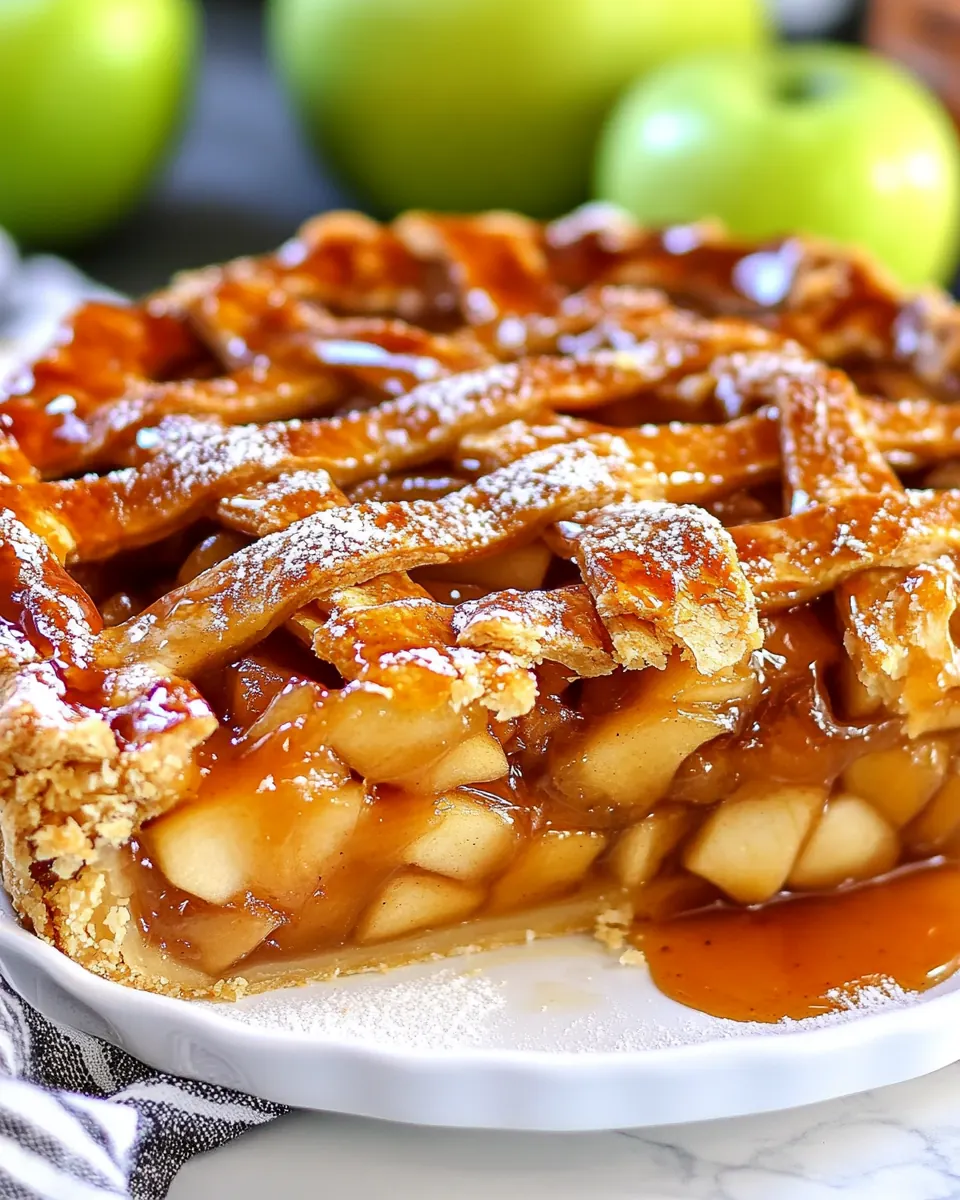
One of the main reasons I return to this recipe is the dependable texture. The filling is pre-cooked so the apples stay fork tender without turning to mush, and the lattice top bakes to a crisp, golden brown. I trust this method when I need a pie that slices cleanly for guests or when I want to bring a reliably beautiful dessert to a gathering.
Make ahead freedom
Preparation flexibility is huge for me. I often make elements ahead, so I can spread the work over a couple of days and avoid last minute stress. The dough, the lattices, or even the filling can be stored, which makes it easy to bake the day of the event and still have a freshly finished pie on the table.
Classic technique with room for personality
This pie follows a traditional approach, yet it invites small personal touches. Whether I choose to sprinkle coarse sugar on the lattice, or shape the edge with a unique crimp, the base method remains the same. That combination of classic structure and personal flourishes keeps me engaged and creatively satisfied every time.
Perfect for gatherings and holidays
I find that Traditional Apple Pie reads as comfort food and a celebration dish at once. It pairs well with a simple coffee or an après-dinner chat. Because it is familiar and broadly loved, it rarely fails to feel appropriate at family dinners, holiday tables, or casual get togethers.
What’s In This Traditional Apple Pie
These ingredients are chosen to work together to build both texture and flavor. The pie depends on sturdy, flavorful apples for structure, sugars and a touch of flour to thicken the juices, and warm spices to round out the profile. The pie crust plays a starring role, creating a flaky shell that contrasts beautifully with the tender filling.
- 2 recipes Homemade Pie Crust (1 for bottom crust and 1 for lattice top): Provide two flaky pie crusts to form the base and lattice top, offering structure and a buttery texture that contrasts the tender apple filling; chill before rolling to maintain layers and prevent shrinking during baking.
- Egg wash: 1 egg beaten with 1 TB heavy cream (may sub milk): Add a glossy egg wash made from beaten egg and heavy cream to promote even browning and help the lattice adhere; brush lightly to avoid seeping into the crust and creating sogginess.
- Coarse raw sugar for sprinkling on lattice topping (optional): Offer optional coarse raw sugar to sprinkle over the lattice for added crunch and sparkling visual appeal; apply just before baking so crystals remain visible and provide a caramelized finish.
- 3 1/2 pounds Honeycrisp apples: Bring sweet, aromatic Honeycrisp apples that contribute juicy, tender slices and vibrant flavor; slice uniformly to ensure even cooking and balance sweetness in the filling.
- 1 1/2 pounds Granny Smith apples: Supply crisp, tart Granny Smith apples to add structure and bright acidity that balances the sweetness of other apples and sugars; choose firm fruit to retain bite after baking.
- 2/3 cup packed light brown sugar: Provide packed light brown sugar for deep, molasses-like sweetness and moisture that enhances caramelization in the filling; mix thoroughly with spices to ensure even flavor distribution.
- 1/2 cup granulated sugar: Contribute granulated sugar to supply clean, straightforward sweetness and assist in macerating the apple slices; adjust slightly to taste depending on apple sweetness.
- 1/3 cup + 1 TB all-purpose flour: Function as a thickening agent with a combination of 1/3 cup plus 1 tablespoon all-purpose flour to absorb excess juices and yield a cohesive, slightly saucy filling; mix well with dry spices before tossing with apples.
- 2 tablespoons lemon juice, divided: Add lemon juice divided to brighten flavors and prevent apple slices from browning; incorporate some into the filling for acidity and brush a little on cut fruit to preserve color.
- 1 1/2 teaspoons ground cinnamon: Provide ground cinnamon to impart warm, classic spice notes that complement apple and sugar; distribute evenly among the slices for consistent aromatic depth.
- 1/2 tsp EACH ground ginger, ground nutmeg, allspice: Supply warm, pungent accents with ground ginger, nutmeg, and allspice measured at half a teaspoon each to create complexity and balance in the spice profile; use sparingly to avoid overpowering the apples.
- 1/8 teaspoons salt: Offer a small amount of salt to enhance overall flavor, heighten sweetness perception, and balance spices; dissolve into the sugar mixture for even seasoning.
- 1 teaspoon vanilla extract: Introduce vanilla extract to add a rounded, sweet aromatic finish that deepens the filling's flavor profile; stir into the filling mixture to integrate its fragrance throughout.
Cooking Method for Traditional Apple Pie
These steps follow a classic workflow from dough to cooling, with careful chilling and baking to ensure the best texture and flavor. I like to take my time with the prep so the final bake goes smoothly and the filling sets properly. Below, each direction from the recipe has been expanded into a rich, sensory guide to help you succeed.
- Note: The Apple Pie Filling can be made at any time and refrigerated until ready to add to the pie pan. See Note/Warning if using a glass pie pan before you begin.: The filling's aroma while cooking will be heady and warm, with steam carrying notes of cinnamon and caramelized sugars. Preparing it ahead lets the flavors meld and the juices cool into a syrup, which makes handling easier and improves the final texture. A frequent mistake is rushing the cooling; if the filling is too warm, it can soften the crust and cause the pie to be messy when sliced. Watch for a gentle simmer and avoid high heat, which can break down the apples too quickly and produce a mushier texture than desired.
- Make the Pie Dough: Prepare one pie crust recipe through step 6 under Make Dough (click HERE for the recipe.) Prepare the second pie crust through step 2 under Roll Dough using a standard 9-10-inch pie pan (1 1/2-inches deep).: While making dough, you should notice a shaggy mass coming together that feels cool from the butter bits, and a faint flour scent turning richer as fat disperses. Chilling at this stage firms the butter, which creates steam pockets when baked, yielding flakiness. A common error is overworking the dough, which warms the butter and develops gluten, causing toughness, so handle it with light, quick motions and rest the dough until firm and cool.
- Make the Bottom Pie Crust: Lightly brush the bottom and sides of the crust in the pan (not edges that will be fluted) with the egg wash. Reserve the egg wash in the refrigerator for later. Tip: I find it easiest to add the egg wash after the pie dough has firmed up a bit, so I place the pie in the freezer for 20 minutes. After adding the egg wash, immediately cover the pie and refrigerate it while you prep the rest of the recipe (at least 45 minutes up to 5 days before baking).: Brushing the shell adds a protective layer so juices are less likely to soak into the crust. You may hear a soft tacky sound as the wash is applied, and visually you should see a thin glossy coating. Many bakers skip chilling before adding the wash, but I find freezing the shell for 20 minutes makes the application cleaner and reduces shrinkage during baking. Avoid adding the wash to the fluted edge at this time if you plan additional crimping, or it may seal too tightly and interfere with decorative edges.
- Roll Out the Dough for the Lattice Top: Place a large piece of parchment paper on a baking sheet and generously dust with flour. Roll the dough disc into a rough 11×11-inch rectangle on the parchment paper. At this point, I cover and freeze the dough (on the baking sheet) for 20-30 minutes for easier/cleaner slices.: Rolling the dough on parchment simplifies transfer and keeps the surface smooth, while the generous dusting prevents sticking and tearing. You'll feel the dough relax under the rolling pin, and the surface should look slightly tacky but not wet. If the dough becomes sticky, pop it in the freezer for 20 to 30 minutes; attempting to force a sticky sheet will cause ragged edges and a less attractive lattice.
- Make the Lattice Strips: After chilling, use a ruler and a pizza cutter, pastry wheel, or sharp knife to cut the dough into 1-inch-wide strips. Cover with plastic wrap and freeze for 30 minutes or refrigerate for up to 24 hours for MUCH easier-to-handle lattices. When you're ready to use the lattices, make the apple pie filling first:: Cutting precise 1 inch strips creates even browning and a tidy weave. The strips should feel firm but flexible; if they crack, let them rest at room temperature briefly to relax. Freezing the strips before weaving reduces stretching and preserves clean edges. A common misstep is trying to stretch strips to cover more area, which leads to thin, fragile pieces that tear during assembly.
- Slice the apples: Peel the apples and make 4 slices around the core to remove it. Lay the 4 remaining apple segments, cut side down, on a cutting board, and slice into 1/8-inch slices. Transfer the apples to a large Dutch oven as you go to keep the workspace clean.: The rhythm of slicing produces thin, uniform pieces that are easy to layer. You will notice the apples releasing a sweet, fruity scent and a slight snap as the knife moves through. Keeping the slices thin and consistent promotes even cooking and texture. A pitfall here is uneven thickness; thicker pieces may not reach the same tenderness and can compromise the mouthfeel of the filling.
- Apple pie filling: Add the sugars, flour, 1 tablespoon of lemon juice, and spices to the sliced apples and set over medium heat. Gently stir until evenly coated. Cover and cook for 15-20 minutes, stirring every couple minutes and replacing the lid. The apples are done when they reach YOUR desired apple pie tenderness – they will not become more tender in the oven. They should be fork-tender but still hold their shape. (They will not become mushy when baked; see the science behind it in the post.) Once tender, stir in the remaining 1 tablespoon of lemon juice and the vanilla.: As the filling cooks, the room will fill with a warm, spiced perfume and the apples will begin to soften, making a gentle bubbling sound in the pot. Stirring helps the sugars dissolve and coat each slice evenly, and the heat releases pectin that will later help the filling set. Avoid high heat, which can caramelize the sugars too fast and leave tough edges on the apples. Stir every couple minutes so nothing sticks and the apples cook uniformly.
- Cool the Apples: Line a rimmed baking sheet with parchment paper or a silicone baking mat for easy cleanup. Transfer the apples and their caramel juices to the baking sheet. Pop the pan in the fridge or freezer to cool to room temperature for about 25 minutes.: Spreading the apples on a cooled surface arrests cooking and concentrates the juices visually into glossy ribbons. Cooling for about 25 minutes brings the filling to a manageable temperature so it will not melt the chilled crust. A common oversight is not cooling enough, which can cause a soggy bottom crust, so allow the full rest time and check that the mixture has come down to room temperature before assembly.
- Assemble: Once the apples have cooled, transfer them and the sauce to the chilled pie shell, rearranging and layering them horizontally to compact.: Layering horizontally compacts the slices and helps the pie slice cleanly, creating a dense but tender interior. You should hear the light settling of apples as they nestle together, and the filling will glisten with syrup. Avoid overfilling the shell, which can cause juice to spill and make the crust soggy; leave a small gap to accommodate bubbling during baking.
- Weave the Lattice Top (See Post for Photos): If the strips become too stiff to work with, let them rest on the counter for 10 minutes. Start by laying five horizontal strips evenly spaced over the pie (center the middle strip). Fold the first, third, and fifth horizontal strips back and place a vertical strip on the left side. Unfold the first, third, and fifth strips over the perpendicular strip and fold the second and fourth strips back. Add a second vertical strip, then unfold the second and fourth strip. Repeat the process for a total of ten strips, five running in each direction.: Weaving a lattice adds texture and vents for steam to escape, and the woven pattern bakes into a crisp grid that contrasts with the soft filling. If strips are cold and too stiff, they will crack, but if too warm they will stretch and lose shape; allow them to temper until flexible. A typical mistake is forcing a stiff strip, which tears, so be patient and let the dough rest if needed.
- Make the Edges: Press the edges of the strips into the edges of the crust to seal. Flute, crimp, or create whatever edge design you prefer. Lightly brush the edges and the lattice top with the egg wash. Sprinkle the lattice top (avoid the edges) with coarse sugar if using.: Sealing the edges prevents leaks and gives the pie a finished look. The edges should feel secure under gentle pressure and the design should look uniform. Brush the top lightly with the reserved egg wash and add coarse sugar if desired for sparkle. Overworking the rim can compress the dough and make the crust dense, so handle edges with a light touch.
- Refrigerate: Chill the unbaked pie for 30 minutes. Don’t skip this step—it will help the crust not shrink unless you have a glass pie pan. Then, bake without chilling, or the pan can shatter (see Notes).: Chilling firms the butter and relaxes the dough, which helps prevent shrinking and keeps the lattice crisp. You may notice the pie feeling colder to the touch and a slight tightening of the dough surface as it rests. Skipping this step often results in a misshapen or shrunken crust, so set a timer and allow the full 30 minutes unless you are using a glass pan that requires a different approach.
- Preheat the Oven: Immediately after transferring the pie to the fridge, place a baking sheet on the bottom rack of your oven and preheat the oven to 425 degrees F so the baking sheet can get very hot.: Preheating the oven and a hot baking sheet jump starts the bottom crust into steam production, promoting flakiness and preventing sogginess. The oven will emit a dry heat smell and the baking sheet will become radiantly hot. A common rookie mistake is putting the pie in a cold oven, which leads to long, soggy bake times and a greasy bottom crust.
- Bake: Transfer the chilled pie to the rimmed baking sheet. Bake at 425 degrees F for 25 minutes (keep an eye on the crust so it doesn't become too brown). Reduce the heat to 375 degrees F and continue to bake for 35-45 minutes or until the filling is bubbling around the edges (if you don’t wait for it to bubble, your filling will be runny). Cover the edges with a pie shield or the top with foil if they are browning too quickly.: During baking you should see the lattice turn golden brown and the filling begin to bubble vigorously at the edges, signaling a properly thickened interior. If the crust darkens too fast cover the edges with foil to prevent burning. Not waiting for the filling to bubble is a common error that results in a runny pie, so watch for active bubbling as your cue to finish the bake.
- Cool: Transfer the pie to a cooling rack and let it rest for 4 hours to cool to room temperature so the filling can set. You can pop the pie in the fridge or freezer to speed up the cooling process. The pie can rest at room temperature for up to 2 days or be refrigerated for up to 5.: Cooling quietly completes the set of the filling and concentrates the flavors, and you will notice the juices thicken and the slices hold shape. Slicing too soon makes the pie sloppy, so patience at this stage is rewarded. If you need to speed things, briefly chill in the fridge or freezer, but avoid cutting while still warm to keep clean slices.
- Reheat: After the pie has cooled, you can reheat/refresh it in the oven. Tent the pie with foil and place it in a cold oven. Turn the oven to 375 degrees F, and when the preheat bell dings, leave the pie in for another 10-15 minutes or until warmed.: Reheating restores warmth and revives crispness in the crust, and you will detect the aromas returning as the pie warms. Leaving it tented keeps the top from overbrowning while the center heats through. A mistake is reheating too long or at too high a temperature which can dry out the filling and toughen the crust.
How to Switch It Up
There are small tweaks that keep the core method intact while allowing you to personalize the pie for texture or flavor. Below are practical, tested variations that retain what makes this recipe reliable, while offering different finishing touches.
- Use different sugar ratios Adjust brown to granulated sugar to emphasize caramel notes or bright sweetness. Increasing brown sugar will lend a deeper molasses tone, while more granulated sugar keeps the filling brighter.
- Try a single crust top Replace the lattice with a full top crust if you prefer simpler assembly and a more uniform appearance. Vent well so steam escapes and reduce the chance of a soggy top.
- Swap apple varieties Experiment with local varieties if Honeycrisp or Granny Smith are not available. Just aim for a balance of sweet and tart apples to maintain texture and flavor harmony.
- Brush edges only with egg wash Apply the egg wash mainly to the lattice and edges to prevent excess browning on thin strips while still achieving that desired sheen and color.
- Freeze unbaked for later Assemble and freeze an unbaked pie for up to three months, then bake from frozen adding extra time. This is great for advanced planning and holiday prep.
What Goes Well With This Traditional Apple Pie
The classic nature of this pie makes it versatile at the table. I like to serve slices with simple accompaniments that either echo the warmth or provide contrast. Below are serving ideas organized for different occasions, plus storage and reheating notes to keep your pie tasting its best.
- With whipped cream A dollop of lightly sweetened whipped cream adds a soft airy contrast to the crisp crust and warm filling, perfect for an elegant dessert course.
- With ice cream A scoop of vanilla ice cream provides cooling creaminess that complements the warm, spiced filling, making it ideal for casual family dinners or celebrations.
- Holiday centerpiece Present the pie on the holiday table as a traditional focal point, and consider making it a day ahead so you can enjoy the event without last minute baking stress.
- Storage tips Store the baked pie at room temperature for up to two days, then refrigerate for up to five days. To reheat slices and keep the crust crisp, warm them in the oven rather than the microwave.
- Seasonal pairings This pie is naturally at home in the fall and for Thanksgiving gatherings, pairing well with warm beverages and hearty mains. It also fares well during cozy winter evenings when you want a familiar dessert.
FAQ
Conclusion
This recipe stands out because it blends a flaky, buttery crust with a reliably set, spiced apple filling that is both comforting and crowd pleasing. It rewards the time you invest in chilling and pre cooking with clean slices, a crisp lattice, and deep autumnal flavors. I encourage you to try the method exactly once, giving yourself time to chill and cool between steps, and you will likely find it becomes your go to pie for family dinners and holiday tables. It is warm, approachable, and wonderfully satisfying to share.
Traditional Apple Pie
Equipment
- 9 to 10 inch pie pan
- Dutch Oven
- Baking Sheet
- Rolling Pin
- Pizza cutter or sharp knife
Ingredients
- 2 recipes Homemade Pie Crust (1 for bottom crust and 1 for lattice top) Provide two flaky pie crusts to form the base and lattice top, offering structure and a buttery texture that contrasts the tender apple filling; chill before rolling to maintain layers and prevent shrinking during baking.
- Egg wash: 1 egg beaten with 1 TB heavy cream (may sub milk) Add a glossy egg wash made from beaten egg and heavy cream to promote even browning and help the lattice adhere; brush lightly to avoid seeping into the crust and creating sogginess.
- Optional: Coarse raw sugar for sprinkling on lattice topping Offer optional coarse raw sugar to sprinkle over the lattice for added crunch and sparkling visual appeal; apply just before baking so crystals remain visible and provide a caramelized finish.
- 3 1/2 pounds Honeycrisp apples Bring sweet, aromatic Honeycrisp apples that contribute juicy, tender slices and vibrant flavor; slice uniformly to ensure even cooking and balance sweetness in the filling.
- 1 1/2 pounds Granny Smith apples Supply crisp, tart Granny Smith apples to add structure and bright acidity that balances the sweetness of other apples and sugars; choose firm fruit to retain bite after baking.
- 2/3 cup packed light brown sugar Provide packed light brown sugar for deep, molasses-like sweetness and moisture that enhances caramelization in the filling; mix thoroughly with spices to ensure even flavor distribution.
- 1/2 cup granulated sugar Contribute granulated sugar to supply clean, straightforward sweetness and assist in macerating the apple slices; adjust slightly to taste depending on apple sweetness.
- 1/3 cup + 1 TB all-purpose flour Function as a thickening agent with a combination of 1/3 cup plus 1 tablespoon all-purpose flour to absorb excess juices and yield a cohesive, slightly saucy filling; mix well with dry spices before tossing with apples.
- 2 tablespoons lemon juice, divided Add lemon juice divided to brighten flavors and prevent apple slices from browning; incorporate some into the filling for acidity and brush a little on cut fruit to preserve color.
- 1 1/2 teaspoons ground cinnamon Provide ground cinnamon to impart warm, classic spice notes that complement apple and sugar; distribute evenly among the slices for consistent aromatic depth.
- 1/2 tsp EACH ground ginger, ground nutmeg, allspice Supply warm, pungent accents with ground ginger, nutmeg, and allspice measured at half a teaspoon each to create complexity and balance in the spice profile; use sparingly to avoid overpowering the apples.
- 1/8 teaspoons salt Offer a small amount of salt to enhance overall flavor, heighten sweetness perception, and balance spices; dissolve into the sugar mixture for even seasoning.
- 1 teaspoon vanilla extract Introduce vanilla extract to add a rounded, sweet aromatic finish that deepens the filling's flavor profile; stir into the filling mixture to integrate its fragrance throughout.
Instructions
- Note: The Apple Pie Filling can be made at any time and refrigerated until ready to add to the pie pan. See Note/Warning if using a glass pie pan before you begin.: The filling's aroma while cooking will be heady and warm, with steam carrying notes of cinnamon and caramelized sugars. Preparing it ahead lets the flavors meld and the juices cool into a syrup, which makes handling easier and improves the final texture. A frequent mistake is rushing the cooling; if the filling is too warm, it can soften the crust and cause the pie to be messy when sliced. Watch for a gentle simmer and avoid high heat, which can break down the apples too quickly and produce a mushier texture than desired.
- Make the Pie Dough: Prepare one pie crust recipe through step 6 under Make Dough (click HERE for the recipe.) Prepare the second pie crust through step 2 under Roll Dough using a standard 9-10-inch pie pan (1 1/2-inches deep).: While making dough, you should notice a shaggy mass coming together that feels cool from the butter bits, and a faint flour scent turning richer as fat disperses. Chilling at this stage firms the butter, which creates steam pockets when baked, yielding flakiness. A common error is overworking the dough, which warms the butter and develops gluten, causing toughness, so handle it with light, quick motions and rest the dough until firm and cool.
- Make the Bottom Pie Crust: Lightly brush the bottom and sides of the crust in the pan (not edges that will be fluted) with the egg wash. Reserve the egg wash in the refrigerator for later. Tip: I find it easiest to add the egg wash after the pie dough has firmed up a bit, so I place the pie in the freezer for 20 minutes. After adding the egg wash, immediately cover the pie and refrigerate it while you prep the rest of the recipe (at least 45 minutes up to 5 days before baking).: Brushing the shell adds a protective layer so juices are less likely to soak into the crust. You may hear a soft tacky sound as the wash is applied, and visually you should see a thin glossy coating. Many bakers skip chilling before adding the wash, but I find freezing the shell for 20 minutes makes the application cleaner and reduces shrinkage during baking. Avoid adding the wash to the fluted edge at this time if you plan additional crimping, or it may seal too tightly and interfere with decorative edges.
- Roll Out the Dough for the Lattice Top: Place a large piece of parchment paper on a baking sheet and generously dust with flour. Roll the dough disc into a rough 11×11-inch rectangle on the parchment paper. At this point, I cover and freeze the dough (on the baking sheet) for 20-30 minutes for easier/cleaner slices.: Rolling the dough on parchment simplifies transfer and keeps the surface smooth, while the generous dusting prevents sticking and tearing. You'll feel the dough relax under the rolling pin, and the surface should look slightly tacky but not wet. If the dough becomes sticky, pop it in the freezer for 20 to 30 minutes; attempting to force a sticky sheet will cause ragged edges and a less attractive lattice.
- Make the Lattice Strips: After chilling, use a ruler and a pizza cutter, pastry wheel, or sharp knife to cut the dough into 1-inch-wide strips. Cover with plastic wrap and freeze for 30 minutes or refrigerate for up to 24 hours for MUCH easier-to-handle lattices. When you're ready to use the lattices, make the apple pie filling first:: Cutting precise 1 inch strips creates even browning and a tidy weave. The strips should feel firm but flexible; if they crack, let them rest at room temperature briefly to relax. Freezing the strips before weaving reduces stretching and preserves clean edges. A common misstep is trying to stretch strips to cover more area, which leads to thin, fragile pieces that tear during assembly.
- Slice the apples: Peel the apples and make 4 slices around the core to remove it. Lay the 4 remaining apple segments, cut side down, on a cutting board, and slice into 1/8-inch slices. Transfer the apples to a large Dutch oven as you go to keep the workspace clean.: The rhythm of slicing produces thin, uniform pieces that are easy to layer. You will notice the apples releasing a sweet, fruity scent and a slight snap as the knife moves through. Keeping the slices thin and consistent promotes even cooking and texture. A pitfall here is uneven thickness; thicker pieces may not reach the same tenderness and can compromise the mouthfeel of the filling.
- Apple pie filling: Add the sugars, flour, 1 tablespoon of lemon juice, and spices to the sliced apples and set over medium heat. Gently stir until evenly coated. Cover and cook for 15-20 minutes, stirring every couple minutes and replacing the lid. The apples are done when they reach YOUR desired apple pie tenderness – they will not become more tender in the oven. They should be fork-tender but still hold their shape. (They will not become mushy when baked; see the science behind it in the post.) Once tender, stir in the remaining 1 tablespoon of lemon juice and the vanilla.: As the filling cooks, the room will fill with a warm, spiced perfume and the apples will begin to soften, making a gentle bubbling sound in the pot. Stirring helps the sugars dissolve and coat each slice evenly, and the heat releases pectin that will later help the filling set. Avoid high heat, which can caramelize the sugars too fast and leave tough edges on the apples. Stir every couple minutes so nothing sticks and the apples cook uniformly.
- Cool the Apples: Line a rimmed baking sheet with parchment paper or a silicone baking mat for easy cleanup. Transfer the apples and their caramel juices to the baking sheet. Pop the pan in the fridge or freezer to cool to room temperature for about 25 minutes.: Spreading the apples on a cooled surface arrests cooking and concentrates the juices visually into glossy ribbons. Cooling for about 25 minutes brings the filling to a manageable temperature so it will not melt the chilled crust. A common oversight is not cooling enough, which can cause a soggy bottom crust, so allow the full rest time and check that the mixture has come down to room temperature before assembly.
- Assemble: Once the apples have cooled, transfer them and the sauce to the chilled pie shell, rearranging and layering them horizontally to compact.: Layering horizontally compacts the slices and helps the pie slice cleanly, creating a dense but tender interior. You should hear the light settling of apples as they nestle together, and the filling will glisten with syrup. Avoid overfilling the shell, which can cause juice to spill and make the crust soggy; leave a small gap to accommodate bubbling during baking.
- Weave the Lattice Top (See Post for Photos): If the strips become too stiff to work with, let them rest on the counter for 10 minutes. Start by laying five horizontal strips evenly spaced over the pie (center the middle strip). Fold the first, third, and fifth horizontal strips back and place a vertical strip on the left side. Unfold the first, third, and fifth strips over the perpendicular strip and fold the second and fourth strips back. Add a second vertical strip, then unfold the second and fourth strip. Repeat the process for a total of ten strips, five running in each direction.: Weaving a lattice adds texture and vents for steam to escape, and the woven pattern bakes into a crisp grid that contrasts with the soft filling. If strips are cold and too stiff, they will crack, but if too warm they will stretch and lose shape; allow them to temper until flexible. A typical mistake is forcing a stiff strip, which tears, so be patient and let the dough rest if needed.
- Make the Edges: Press the edges of the strips into the edges of the crust to seal. Flute, crimp, or create whatever edge design you prefer. Lightly brush the edges and the lattice top with the egg wash. Sprinkle the lattice top (avoid the edges) with coarse sugar if using.: Sealing the edges prevents leaks and gives the pie a finished look. The edges should feel secure under gentle pressure and the design should look uniform. Brush the top lightly with the reserved egg wash and add coarse sugar if desired for sparkle. Overworking the rim can compress the dough and make the crust dense, so handle edges with a light touch.
- Refrigerate: Chill the unbaked pie for 30 minutes. Don’t skip this step—it will help the crust not shrink unless you have a glass pie pan. Then, bake without chilling, or the pan can shatter (see Notes).: Chilling firms the butter and relaxes the dough, which helps prevent shrinking and keeps the lattice crisp. You may notice the pie feeling colder to the touch and a slight tightening of the dough surface as it rests. Skipping this step often results in a misshapen or shrunken crust, so set a timer and allow the full 30 minutes unless you are using a glass pan that requires a different approach.
- Preheat the Oven: Immediately after transferring the pie to the fridge, place a baking sheet on the bottom rack of your oven and preheat the oven to 425 degrees F so the baking sheet can get very hot.: Preheating the oven and a hot baking sheet jump starts the bottom crust into steam production, promoting flakiness and preventing sogginess. The oven will emit a dry heat smell and the baking sheet will become radiantly hot. A common rookie mistake is putting the pie in a cold oven, which leads to long, soggy bake times and a greasy bottom crust.
- Bake: Transfer the chilled pie to the rimmed baking sheet. Bake at 425 degrees F for 25 minutes (keep an eye on the crust so it doesn't become too brown). Reduce the heat to 375 degrees F and continue to bake for 35-45 minutes or until the filling is bubbling around the edges (if you don’t wait for it to bubble, your filling will be runny). Cover the edges with a pie shield or the top with foil if they are browning too quickly.: During baking you should see the lattice turn golden brown and the filling begin to bubble vigorously at the edges, signaling a properly thickened interior. If the crust darkens too fast cover the edges with foil to prevent burning. Not waiting for the filling to bubble is a common error that results in a runny pie, so watch for active bubbling as your cue to finish the bake.
- Cool: Transfer the pie to a cooling rack and let it rest for 4 hours to cool to room temperature so the filling can set. You can pop the pie in the fridge or freezer to speed up the cooling process. The pie can rest at room temperature for up to 2 days or be refrigerated for up to 5.: Cooling quietly completes the set of the filling and concentrates the flavors, and you will notice the juices thicken and the slices hold shape. Slicing too soon makes the pie sloppy, so patience at this stage is rewarded. If you need to speed things, briefly chill in the fridge or freezer, but avoid cutting while still warm to keep clean slices.
- Reheat: After the pie has cooled, you can reheat/refresh it in the oven. Tent the pie with foil and place it in a cold oven. Turn the oven to 375 degrees F, and when the preheat bell dings, leave the pie in for another 10-15 minutes or until warmed.: Reheating restores warmth and revives crispness in the crust, and you will detect the aromas returning as the pie warms. Leaving it tented keeps the top from overbrowning while the center heats through. A mistake is reheating too long or at too high a temperature which can dry out the filling and toughen the crust.
Notes
- Use different sugar ratios Adjust brown to granulated sugar to emphasize caramel notes or bright sweetness. Increasing brown sugar will lend a deeper molasses tone, while more granulated sugar keeps the filling brighter.
- Try a single crust top Replace the lattice with a full top crust if you prefer simpler assembly and a more uniform appearance. Vent well so steam escapes and reduce the chance of a soggy top.
- Swap apple varieties Experiment with local varieties if Honeycrisp or Granny Smith are not available. Just aim for a balance of sweet and tart apples to maintain texture and flavor harmony.
- Brush edges only with egg wash Apply the egg wash mainly to the lattice and edges to prevent excess browning on thin strips while still achieving that desired sheen and color.
- Freeze unbaked for later Assemble and freeze an unbaked pie for up to three months, then bake from frozen adding extra time. This is great for advanced planning and holiday prep.