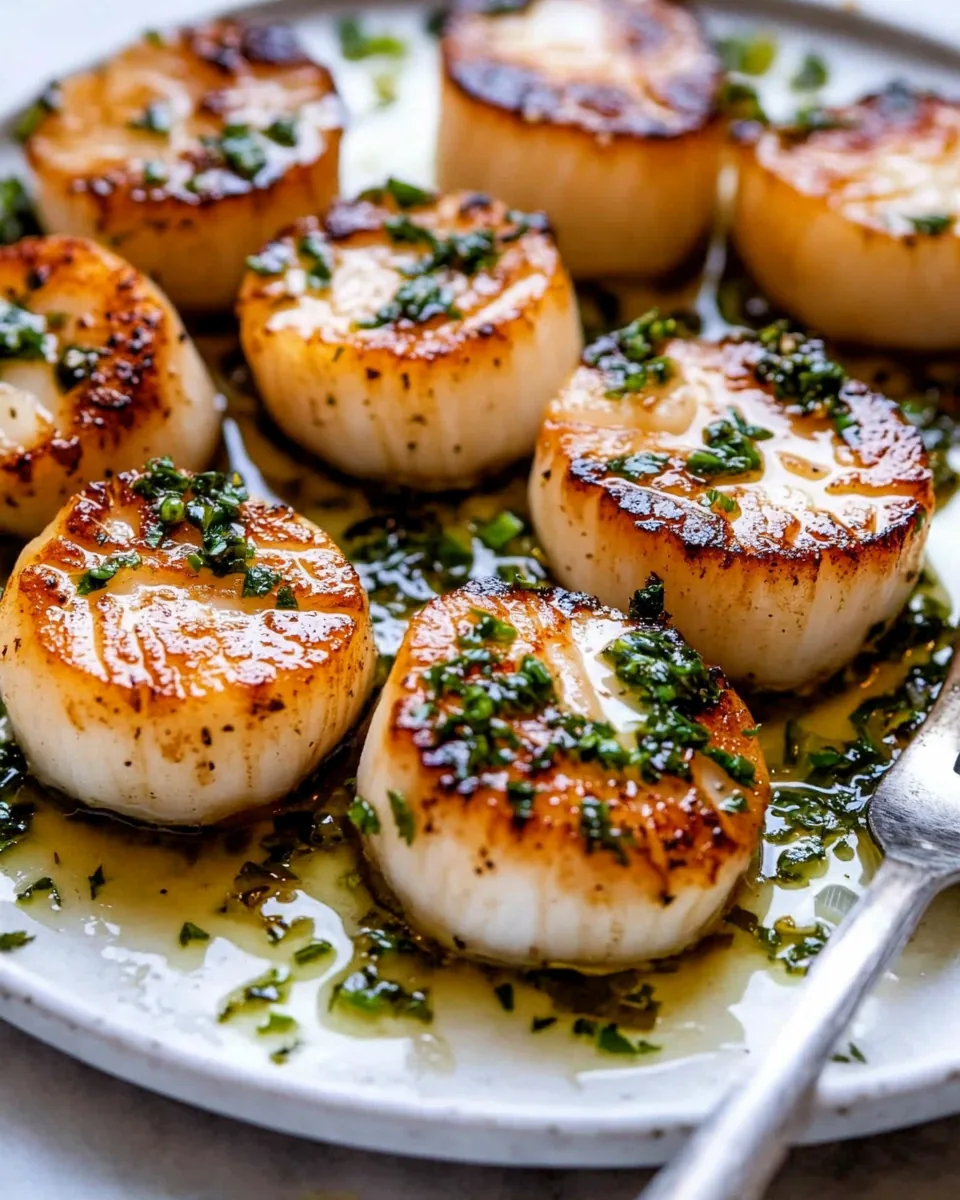
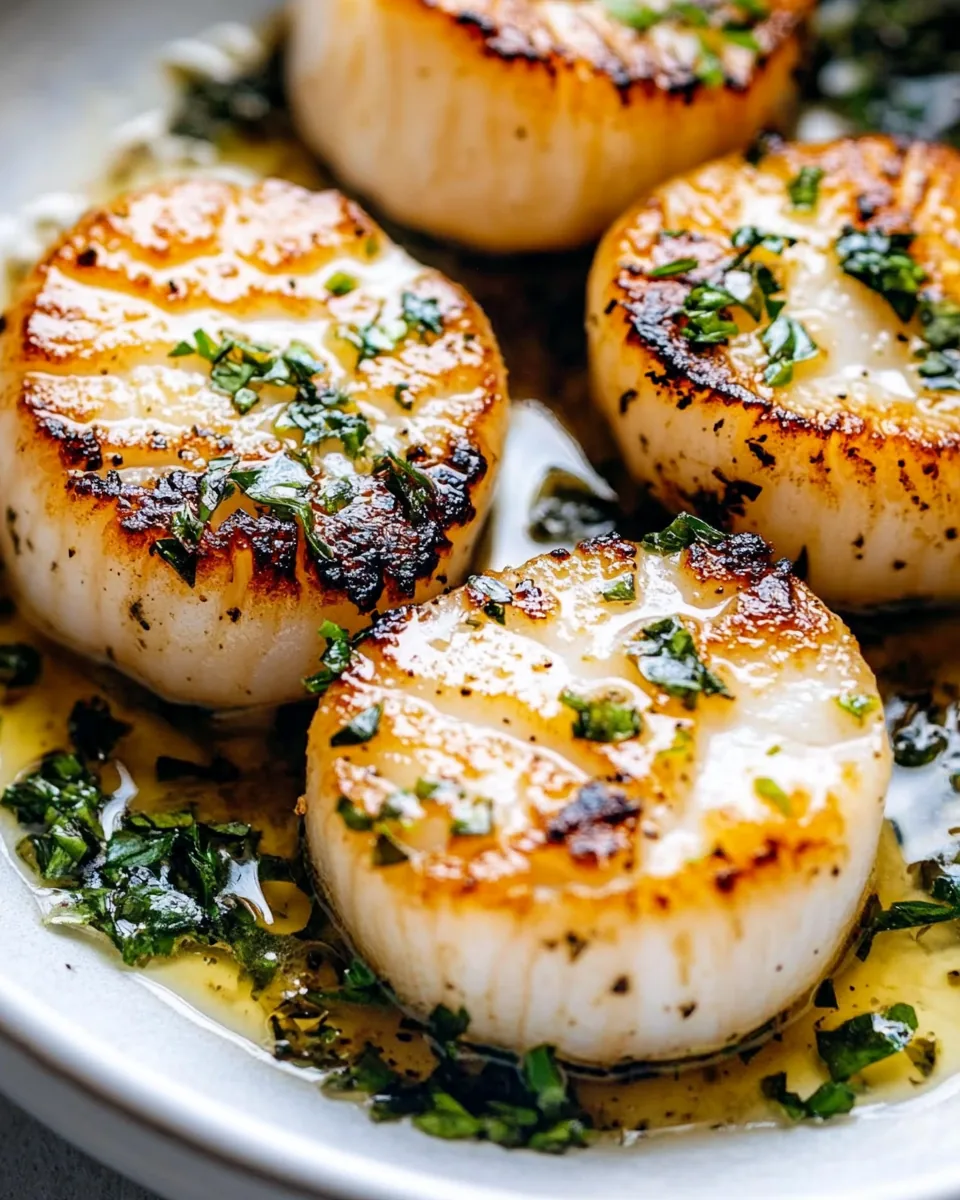
Seared Scallops
There’s something absolutely magical about the simplicity of Seared Scallops. I still remember the first time I had them. It was a crisp evening, and I was visiting a charming seaside restaurant. The scent of the ocean mingled with the aroma of freshly cooked seafood in the air, setting the stage for what would soon become one of my favorite dishes. When the plate arrived, I was captivated by the golden-brown crust of the scallops that glistened under the soft light. The first bite was pure bliss, the delicate flavor of the scallops complemented perfectly by a touch of butter and parsley. Since then, I’ve made it my mission to recreate that unforgettable experience at home, and trust me, it’s easier than you might think!
Recipe Snapshot
7 mins
3 mins
4 mins
Easy
200 kcal
25 g
Keto, Paleo, Whole30
10 g
Skillet, Chef’s Knife
The Beauty of This Seared Scallops
There are so many reasons to fall in love with Seared Scallops. Here are just a few:
Quick and Simple Preparation
One of the main reasons I adore Seared Scallops is how quick and easy they are to prepare. In under thirty minutes, you can have a gourmet dish on your table that looks and tastes like it came from a five-star restaurant. With just a few key ingredients, you can impress guests or enjoy a delightful meal any night of the week.
Versatile Flavor
Whether you’re feeling adventurous or prefer sticking to the classics, Seared Scallops are incredibly adaptable. They pair beautifully with a wide array of flavors, from citrusy sauces to rich, earthy spices. You can serve them as an appetizer or a main course, and they work wonderfully for special occasions or casual weeknight dinners.
Health Benefits
Aside from their delectable taste, scallops are a fantastic addition to your diet. They’re low in calories and high in protein, making them an excellent choice for anyone looking to maintain a healthy lifestyle. With healthy fats and essential nutrients like vitamin B12 and omega-3 fatty acids, there’s no guilt in indulging in this dish!
Impressive Presentation
The stunning appearance of Seared Scallops can elevate any dining experience. Their golden-brown sear, paired with a sprinkle of fresh herbs, makes for a visually appealing plate. Even if you’re just cooking for yourself, there’s something satisfying about plating these perfect morsels with care.
A Taste of the Sea
For those of us who love seafood, Seared Scallops are truly a taste of the ocean. Their sweet, briny flavor transports you to the coast with every bite. This dish encapsulates the essence of fresh seafood, allowing you to enjoy flavors that are both refreshing and rich.
Perfect for Entertaining
Whether it’s a romantic dinner for two or a lively gathering with friends, serving Seared Scallops can make the evening feel special. I love preparing this dish for guests because it’s always a showstopper. Watching their faces light up as they take their first bite is absolutely priceless.
What’s In This Seared Scallops
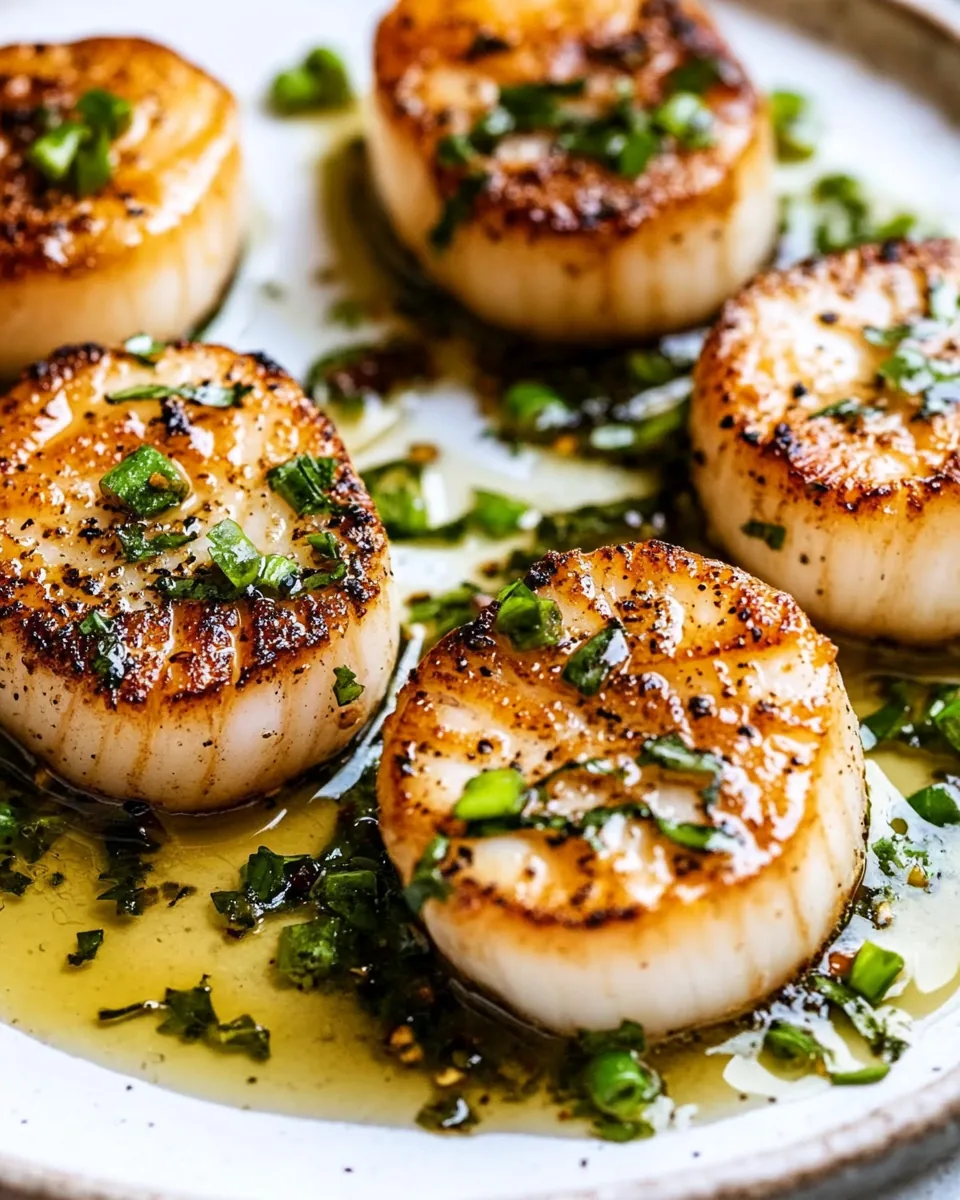
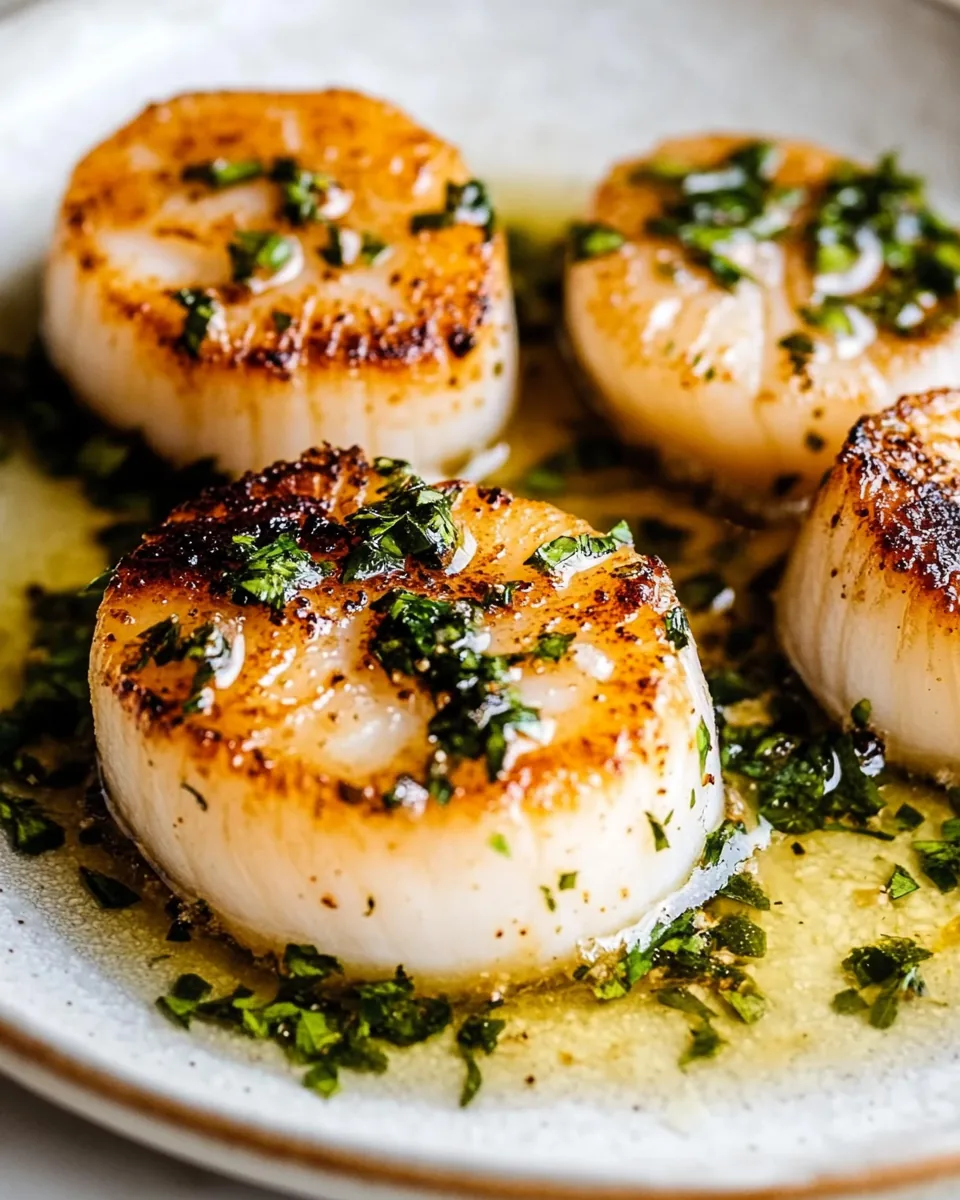
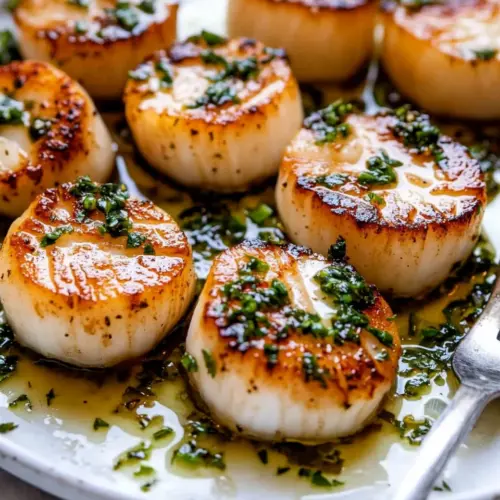
The ingredients for Seared Scallops are minimal, yet they come together to create a symphony of flavors. The key players in this dish are the fresh scallops themselves, which are sweet and tender. The addition of unsalted butter brings richness and depth, while canola oil helps achieve that sought-after golden sear. A sprinkle of Kosher salt enhances the natural flavors, and fresh parsley adds a touch of brightness for an unforgettable finish.
- 1 ½ pounds sea scallops (about 16): Seek out dry pack for the best sear.
- 3 tablespoons unsalted butter (divided): Adds richness and flavor.
- 1 tablespoon canola oil (or similar neutral cooking oil): Helps achieve the perfect sear.
- Kosher salt: Essential for seasoning the scallops.
- 1 tablespoon finely chopped fresh parsley: Adds freshness and color.
Preparation Steps for Seared Scallops
Cooking Seared Scallops might seem intimidating, but I promise it’s as easy as pie! With a little attention to detail and a few simple steps, you’ll be able to serve up perfectly caramelized scallops in no time. Let’s dive into the method together!
- Remove the scallops from the refrigerator about ten minutes before cooking. This helps them cook evenly. Place them on a double layer of paper towels and cover with another layer to blot away excess moisture. Moisture is the enemy of a great sear, so make sure they’re really dry.
- Prepare your cooking space. Heat a cast iron skillet or similar pan over high heat. Add canola oil once the pan is hot enough to make the oil shimmer. That’s when you know it’s time to add the scallops.
- Divide the butter into two pieces and have them ready next to the stove for basting. Set out a spoon for basting, an empty plate for cooked scallops, and a piece of foil large enough to cover the plate.
- Once the oil is shimmering and quite hot (it should be smoking slightly), carefully add half of the scallops to the skillet in a single layer. Remember where you start to keep track of the cooking order. A sprinkle of Kosher salt goes on top of the scallops to season.
- Let the scallops cook undisturbed for about ninety seconds. This is crucial to develop that beautiful golden crust.
- After ninety seconds, add one half of the butter to the pan. Flip the scallops in the same order they were added, then tilt the skillet to pool the melted butter and use a spoon to baste the scallops generously.
- Continue cooking them for another ninety seconds to two minutes, or until they reach an internal temperature of 115°F on an instant-read thermometer.
- Transfer the perfectly cooked scallops to the plate and tent with foil to keep warm. Repeat the process with the remaining scallops and butter.
- Once all scallops are cooked, turn off the heat and add the parsley to the remaining melted butter in the skillet. Pour this herb-infused butter over the scallops for a final touch before serving.
- Enjoy your Seared Scallops immediately while they’re warm and succulent!
Things Worth Knowing
- Don’t overcrowd the pan: This is crucial for achieving that golden crust. If you add too many scallops at once, they’ll steam instead of sear.
- Use high heat: Scallops need to be cooked at a high temperature to develop a good sear. Make sure your skillet is hot enough before adding them.
- Choose the right scallops: Look for dry-pack scallops, which are not treated with preservatives. They yield the best flavor and texture.
- Pat them dry: Moisture is the enemy of a good sear. Ensure your scallops are very dry before cooking for the best results.
- Monitor cooking time: Scallops cook quickly, so keep an eye on them to avoid overcooking, which can make them rubbery.
Ways to Adapt This Recipe
There are so many ways to adapt Seared Scallops to suit your taste and dietary needs. Here are some ideas:
- Storage: Store any leftovers in an airtight container in the refrigerator for up to two days. Make sure to keep them dry to maintain texture.
- Freezing: It’s best not to freeze cooked scallops, as they can become rubbery when thawed. If you must freeze them, do so uncooked.
- Serving Suggestions: Pair your scallops with a fresh salad, creamy risotto, or steamed vegetables for a complete meal. They also go wonderfully over pasta.
- Flavor Variations: Experiment with different herbs and spices in the butter for added flavor, such as thyme, dill, or garlic (if not avoiding).
- Cooking Method: Try cooking them on a grill or in an air fryer for varied textures and flavors.
Great Combinations for Seared Scallops
When it comes to serving Seared Scallops, the options are endless! Here’s how to make the most of this exquisite dish:
- Side Dishes: Complement your scallops with light sides such as a fresh arugula salad drizzled with lemon vinaigrette, or creamy mashed potatoes to balance the dish.
- Seasonal Pairings: Enjoy scallops in spring with asparagus and peas or in the summer with ripe tomatoes and corn.
- Occasions: Perfect for special events like anniversaries or dinner parties, but also simple enough for a cozy weeknight meal.
- Wine Pairing: While I won’t suggest alcohol, consider serving refreshing lemon-infused sparkling water to elevate the experience.
- Garnishing Ideas: A sprinkle of finely chopped herbs or a drizzle of flavored oil can enhance the presentation and flavor of your scallops.
FAQ
Conclusion
The beauty of Seared Scallops lies in their simplicity and elegance. With just a few ingredients and a bit of technique, you can create a dish that feels luxurious and satisfying. I encourage you to try this recipe; it’s perfect for impressing guests or treating yourself after a long day. Whether you’re a seasoned chef or a beginner in the kitchen, you’ll find joy in cooking and tasting these delightful scallops. So gather your ingredients and enjoy the experience; you won’t regret it!
Seared Scallops
Equipment
- Skillet
- Chef's Knife
Ingredients
- 1 ½ pounds sea scallops about 16; seek out dry pack for the best sear
- 3 tablespoons unsalted butter divided
- 1 tablespoon canola oil or similar neutral cooking oil
- Kosher salt
- 1 tablespoon finely chopped fresh parsley
Instructions
- Remove the scallops from the refrigerator 10 minutes before you plan to cook them. Place them on a double layer of paper towels. Set a second double layer on top and press them VERY dry (don’t smash them, but really try to get out as much liquid as you can; moisture is the enemy of a good sear).
- Get ready, this happens fast: Heat oil in a cast iron on similar skillet over high heat until VERY hot. Divide the butter in half and set both pieces right next to the stove. Set a spoon for basting the scallops, an empty plate, and a piece of foil larger enough to cover it by the stove.
- Add the oil to the skillet. Once it is so hot it’s smoking, use tongs to add half the scallops in a single layer—note where you start and go in a circle so you can easily remember which scallops started cooking first. Every second counts; 30 seconds is a long time in the life of a seared scallop. Sprinkle the tops with a pinch of Kosher salt. Cook 90 seconds on the first side without disturbing.
- Add one half of the butter. Flip the scallops in the same order you laid them down. Tilt the skillet to pool the butter, then use the spoon to baste the scallops. Cook for a total of 90 seconds to 2 minutes (you’ll practically have just finished basting). Scallops are done when they reach 115°F on an instant read thermometer—transfer to the plate and tent with foil.
- Repeat with the remaining scallops and butter (this batch will go even better because now you have a feel for it!).
- Turn off the heat. To the now empty skillet, add the parsley to the melted butter. Pour the butter over the scallops, then serve immediately.
Notes
- Tip 1: Store scallops in an airtight container and refrigerate for up to 2 days.
- Tip 2: Gently reheat scallops in a skillet over medium heat until warm throughout. Take care not to overcook them, as they can become rubbery.