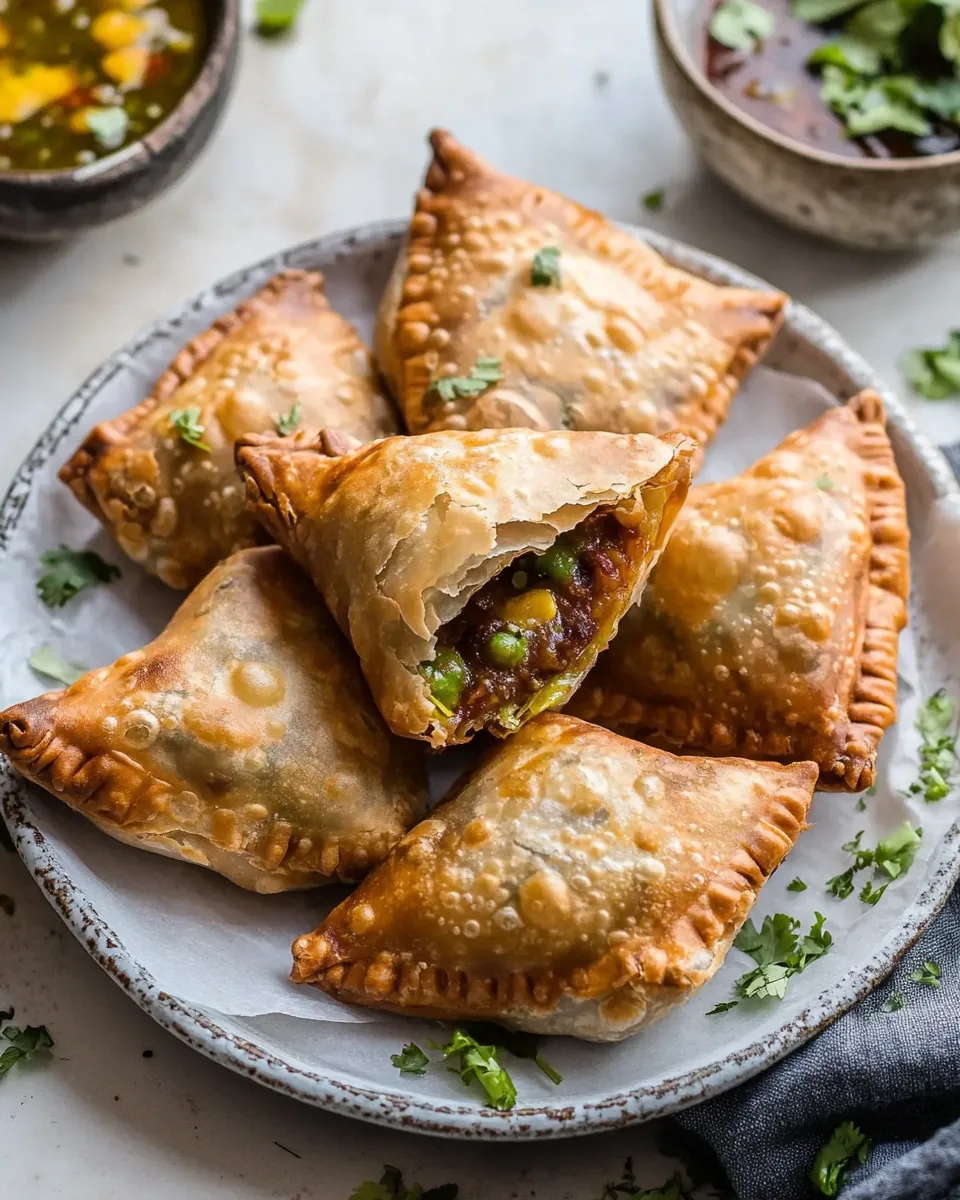
Samosas
Samosas have a special place in my heart, often reminding me of family gatherings and festive celebrations. I remember the first time I watched my grandmother prepare these delightful pastries. The aroma of the spices wafting through the kitchen was simply irresistible. As she expertly folded the dough, I was in awe of her skill, and even more excited to taste the golden, crisp creations that would soon emerge from the oil. Every bite was a burst of flavors and textures – the flaky crust giving way to a savory filling of spiced potatoes and peas. Samosas are not just a snack; they represent comfort and togetherness in my family. Whenever I make Samosas, it’s like reviving those cherished memories, allowing me to share the joy with my loved ones. Whether served as an appetizer at parties or as a comforting treat during a movie night, these little pockets of happiness never fail to bring smiles. Let me take you through the process of creating these memorable Samosas that will surely become a favorite in your household.
Recipe Snapshot
1 hr 5 mins
45 mins
20 mins
Hard
210 kcal
4 g
Whole30, Gluten-Free, Low FODMAP
9 g
Peeler, Mixing Bowl, Frying Pan, Skillet, Chef’s Knife, Whisk, Cutting Board, Large Pot
Why This Samosas Hits Different
They’re Perfect for Any Occasion
One of the reasons I adore Samosas is their versatility. They can be served at any occasion, from casual family dinners to festive gatherings. The crunchy exterior and flavorful filling make them a perfect finger food that everyone loves.
Deliciously Customizable
Another aspect that makes Samosas stand out is how easy it is to customize them. You can mix and match fillings based on your preferences. Want to add some cheese or vegetables? Go for it! The possibilities are endless.
Great for Meal Prep
Preparing Samosas can be a fun activity with friends or family. You can make a large batch, freeze them, and fry them fresh whenever you’re craving a quick snack. This means you can enjoy them any time without the hassle of making them from scratch.
Incredible Flavor Combinations
With the right blend of spices, the filling for Samosas can be an explosion of flavors. Ingredients like cumin, coriander, and garam masala bring warmth and depth, making each bite a delightful experience.
They’re Loved by Everyone
Lastly, Samosas are universally loved! You won’t find anyone who can resist the allure of a crispy pastry filled with a heavenly mixture. They can easily please a crowd, making them a go-to recipe for entertaining.
What You’ll Need for Samosas
To create perfect Samosas, you’ll need a mix of pantry staples and fresh ingredients that come together beautifully. The heart of the recipe lies in the dough and the filling, with each component enhancing the overall flavor. Let’s dive into the key players that make these pastries truly special.
- 2 cups all-purpose flour – provides the base for the pastry.
- 1 teaspoon thyme – adds a subtle earthiness.
- 1 teaspoon salt – enhances overall flavor.
- ¼ cup ghee, clarified butter – gives richness to the dough.
- 8-12 tablespoons cold water – helps bring the dough together.
- 1 lb russet potatoes – the main filling ingredient.
- 1 tablespoon ghee – for sautéing the spices.
- 1 teaspoon cumin seeds – for warmth and depth.
- 1 teaspoon coriander seeds – adds a citrusy note.
- ½ teaspoon fennel seeds – provides a hint of sweetness.
- 1 tablespoon ginger, minced – adds a fresh, spicy kick.
- 1 green chili, diced – for a touch of heat.
- 1 cup green peas – gives a lovely texture.
- 1 teaspoon lemon juice – brightens the filling.
- 1 teaspoon fennel powder – enhances the spice profile.
- ½ teaspoon turmeric – offers color and earthiness.
- 1 teaspoon garam masala – adds warmth and complexity.
- 1 tablespoon cilantro, minced – for freshness.
- salt to taste – adjusts flavor.
- oil for frying – ensures a crispy finish.
Cooking Method for Samosas

Cooking Samosas is an enjoyable process that brings together all the ingredients beautifully. Follow these steps, and you’ll have golden, crispy pastries in no time!
- In a bowl, whisk together 2 cups of all-purpose flour, 1 teaspoon of thyme, and 1 teaspoon of salt. The mixture should be well combined, ensuring that the seasonings are evenly distributed throughout the flour.
- Add ¼ cup of ghee to the flour mixture. Mix well with your fingers until the ghee has completely incorporated, resulting in a shaggy dough that can hold its shape when pressed together.
- Gradually add 8-12 tablespoons of cold water, one tablespoon at a time, kneading the dough as you go. The dough should be fairly stiff and not stick to your hands. This process may take a few minutes.
- Cover the dough with a damp cloth and let it rest for about 30 minutes. This resting period allows the gluten to relax, making it easier to roll out later.
- Meanwhile, peel 1 lb of russet potatoes and cut them into 2-inch chunks. Boil the potatoes until they are just fork-tender; avoid overcooking them to prevent mushiness.
- Once the potatoes are cooked, drain them and roughly chop or crumble them without mashing. Set the potatoes aside as they will become the filling.
- In a medium-sized pan, heat 1 tablespoon of ghee over medium-high heat. Once hot, add 1 teaspoon of cumin seeds, 1 teaspoon of coriander seeds, and ½ teaspoon of fennel seeds. Sauté until they become fragrant and start to sizzle.
- Next, add 1 tablespoon of ginger, 1 green chili (diced), and 1 cup of green peas to the pan. Sauté everything together for about 2 minutes, allowing the flavors to meld.
- Finally, incorporate 1 teaspoon of lemon juice, ½ teaspoon of turmeric, 1 teaspoon of garam masala, 1 teaspoon of fennel powder, 1 tablespoon of cilantro, and salt to taste along with the chopped potatoes. Mix everything thoroughly and sauté for an additional 2 minutes. Remove the filling from the pan and set aside to cool.
- Once the filling has cooled to nearly room temperature, it’s time to assemble the Samosas. Divide the dough into six equal portions and form them into balls. Cover the dough balls and let them rest for about 10 minutes.
- Roll each ball into flat disks about 7 inches in diameter. For best results, use parchment paper to press the dough flat, preventing sticking.
- Keep the flattened dough covered to avoid drying out. Working with one piece at a time, cut the round in half. Wet the flat edge of one half and press the ends together to form a cone.
- Fill the cone with approximately two tablespoons of the potato filling, packing it gently. Wet the inside edge of the open side and press it closed to seal.
- Repeat this process with the other half of the round and the remaining dough, which should yield about 12 Samosas.
- In a large, heavy-bottom pan, heat 2 inches of oil for frying over medium heat. The oil is hot enough when a toothpick or wooden skewer inserted into it sizzles.
- Add the Samosas to the pan, ensuring there’s space between them. Fry them in batches for about 1 minute on each side until they turn golden brown and crispy without dark spots.
- Once fried, remove the Samosas from the pan and place them on a paper towel-lined plate to absorb excess oil. Enjoy them fresh with Mango Chutney or tamarind sauce!
Things Worth Knowing
- Resting the dough: Allowing the dough to rest is crucial as it relaxes the gluten, making it easier to roll out later.
- Heat control: Maintain a steady temperature while frying to achieve that perfect crispy texture without burning.
- Filling variations: Experiment with different fillings, such as lentils or vegetables, based on your preference.
- Serving suggestions: Pair your Samosas with different chutneys or a tangy yogurt dip for added flavor.
Variations to Try
If you love experimenting in the kitchen, there are endless possibilities to enhance your Samosas. Here are some variations you might enjoy:
- Spicy Paneer Samosas: Replace the potato filling with a mixture of paneer (Indian cheese), spices, and chopped vegetables for a rich and filling option.
- Vegetable Medley: Get creative by adding finely chopped vegetables such as carrots, beans, and bell peppers to your potato filling.
- Sweet Samosas: For a dessert twist, fill the dough with a sweet mixture of chopped fruits and sugar, then fry for a sweet treat.
- Oven-Baked Samosas: If you prefer a healthier version, brush the formed Samosas with oil and bake them in the oven until golden brown.
- Air Fryer Samosas: Use an air fryer for a low-oil option while still achieving that crispy exterior.
- Flavored Dough: Mix spices into your dough, such as cumin or ajwain, for an extra layer of flavor.
- Stuffing with Lentils: Try a filling made of spiced lentils for a nutritious twist on the classic.
What to Pair With Samosas
When serving Samosas, the options are as varied as the fillings! Here’s how to create the perfect meal:
- Mango Chutney: This sweet and tangy chutney complements the savory filling beautifully.
- Mint Chutney: A refreshing mint chutney provides a delightful contrast to the crispy Samosas.
- Tamarind Sauce: The tangy flavor of tamarind sauce pairs well with the spices in the Samosas.
- Yogurt Dip: A cool yogurt dip can balance out the spices and add a creamy element.
- Salad: Serve alongside a fresh salad to add crunch and freshness to your meal.
- Casual Gatherings: These pastries are perfect for parties, movie nights, or casual get-togethers.
- Festive Occasions: Make them for celebrations and holidays; Samosas are always a crowd-pleaser.
- Storage: If you have leftovers, store them in an airtight container in the fridge for up to three days.
FAQ
Conclusion
Samosas are not just a savory delight; they are a celebration of flavors and memories. Their crispy texture combined with the delightful filling makes them irresistible. I encourage you to try making Samosas in your home, as they’ll surely bring joy to your table. Whether you enjoy them as a snack or serve them at a gathering, they are bound to be a hit. Dive into this recipe and experience the warmth and happiness that a plate of Samosas can bring!
Samosas
Equipment
- Peeler
- Mixing Bowl
- Frying Pan
- Skillet
- Chef's Knife
- Whisk
- Cutting Board
- Large Pot
Ingredients
- 2 cups all-purpose flour
- 1 teaspoon thyme
- 1 teaspoon salt
- ¼ cup ghee, clarified butter
- 8-12 tablespoons cold water
- 1 lb russet potatoes
- 1 tablespoon ghee, clarified butter
- 1 teaspoon cumin seeds
- 1 teaspoon coriander seeds
- ½ teaspoon fennel seeds
- 1 tablespoon ginger, minced
- 1 green chili, diced
- 1 cup green peas
- 1 teaspoon lemon juice
- 1 teaspoon fennel powder
- ½ teaspoon turmeric
- 1 teaspoon garam masala
- 1 tablespoon cilantro, minced
- salt to taste
- oil for frying
Instructions
- In a bowl, whisk together 2 cups all-purpose flour, 1 teaspoon thyme, and 1 teaspoon salt. Add ¼ cup ghee to the flour mixture and mix well with your fingers until all the ghee has been incorporated. You should have a shaggy dough that can hold its shape when pressed together.
- Add 8-12 tablespoons of cold water, one tablespoon at a time, kneading the dough as you add it until it is fairly stiff. It shouldn't stick to your hands.
- Cover the dough and let it rest for 30 minutes.
- Peel 1 lb russet potatoes and cut them into 2-inch chunks. Then, boil them until they are just fork-tender. You don’t want them to be too soft and mushy.
- Drain the boiled potatoes, then roughly chop or crumble them; do not mash them. Set the potatoes aside.
- Heat 1 tablespoon of ghee in a medium-sized pan over medium-high heat. Add the 1 teaspoon of cumin seeds, 1 teaspoon of coriander seeds, and ½ teaspoon of fennel seeds and sauté until they begin to sizzle.
- To the pan, add 1 tablespoon of ginger, 1 green chili, diced, and 1 cup of green peas. Sauté everything for about 2 minutes.
- Lastly, add 1 teaspoon of lemon juice, ½ teaspoon of turmeric, 1 teaspoon of garam masala, 1 teaspoon of fennel powder, 1 tablespoon of cilantro, salt to taste, and the potatoes. Mix everything well and sauté for another 2 minutes.
- Remove the filling from the pan and set it aside to cool. Once the filling has cooled nearly to room temperature, it is ready to assemble.
- Divide the dough into six equal portions, form into balls, cover, and let them rest for about 10 minutes.
- Roll each ball into flat disks about 7 inches across. Press them between two pieces of parchment paper to roll flat.
- Cover the flattened dough sections to keep them from drying out. Work with one dough section at a time.
- Cut the round in half, wet the flat edge of one half of the round, and press the ends together to form a cone.
- Fill the cone with about two tablespoons of the filling and gently pack it in. Wet the inside edge of the open side and press it closed.
- Repeat with the other half of the round and then with the rest of the dough. This will yield 12 Samosas.
- Heat 2 inches of oil for frying in a large, heavy-bottom pan over medium heat. When the oil is hot enough, a toothpick or wooden skewer inserted into the oil should sizzle.
- Add enough Samosas to the pan to leave some room in between. You will need to work in batches. Fry the Samosas for about 1 minute on each side. They should be golden and crispy but not develop dark brown spots.
- Remove the fried Samosas from the pan and place them on a paper towel-lined plate to allow any excess oil to be absorbed.
- Once all the Samosas are finished frying, serve them fresh with Mango Chutney or tamarind sauce.
Notes
- Storage: Store leftovers in an airtight container in the fridge for up to three days.
- Freezing: You can freeze unbaked Samosas and fry them fresh whenever you desire.
- Pairing: Serve with a variety of chutneys for a flavorful experience.
- Oven-baked option: For a healthier alternative, try baking the Samosas instead of frying.
- Experiment: Don’t hesitate to try different fillings to find your favorite!