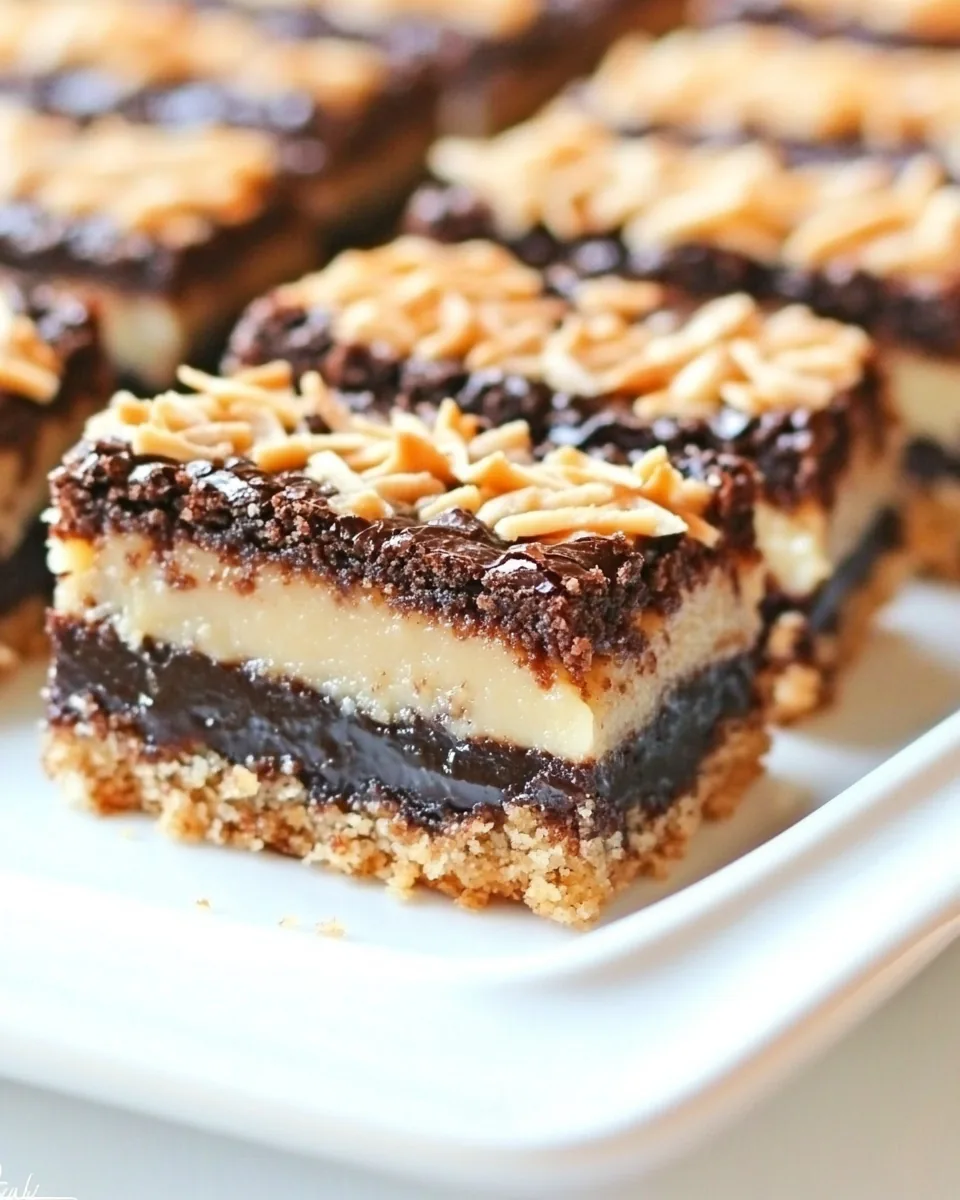
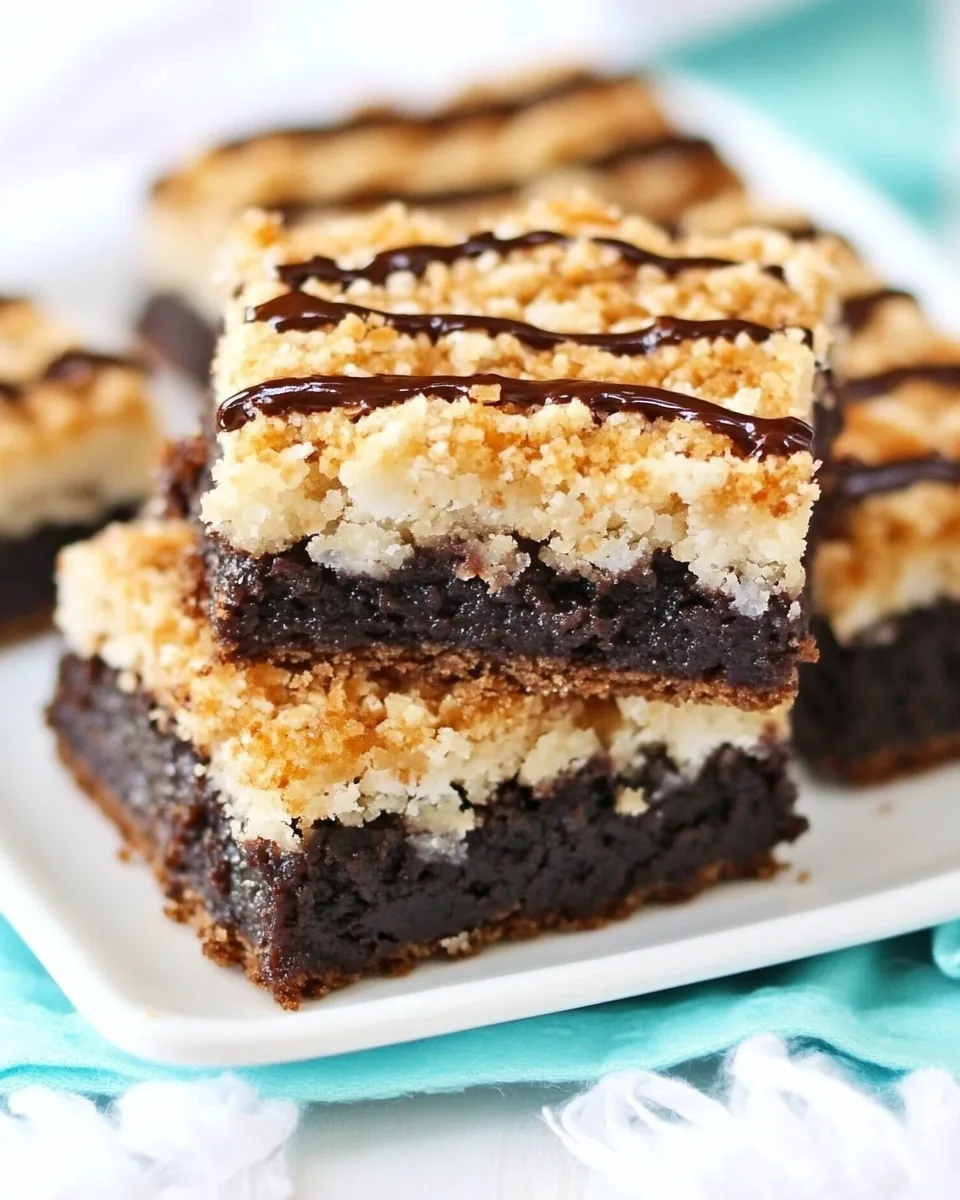
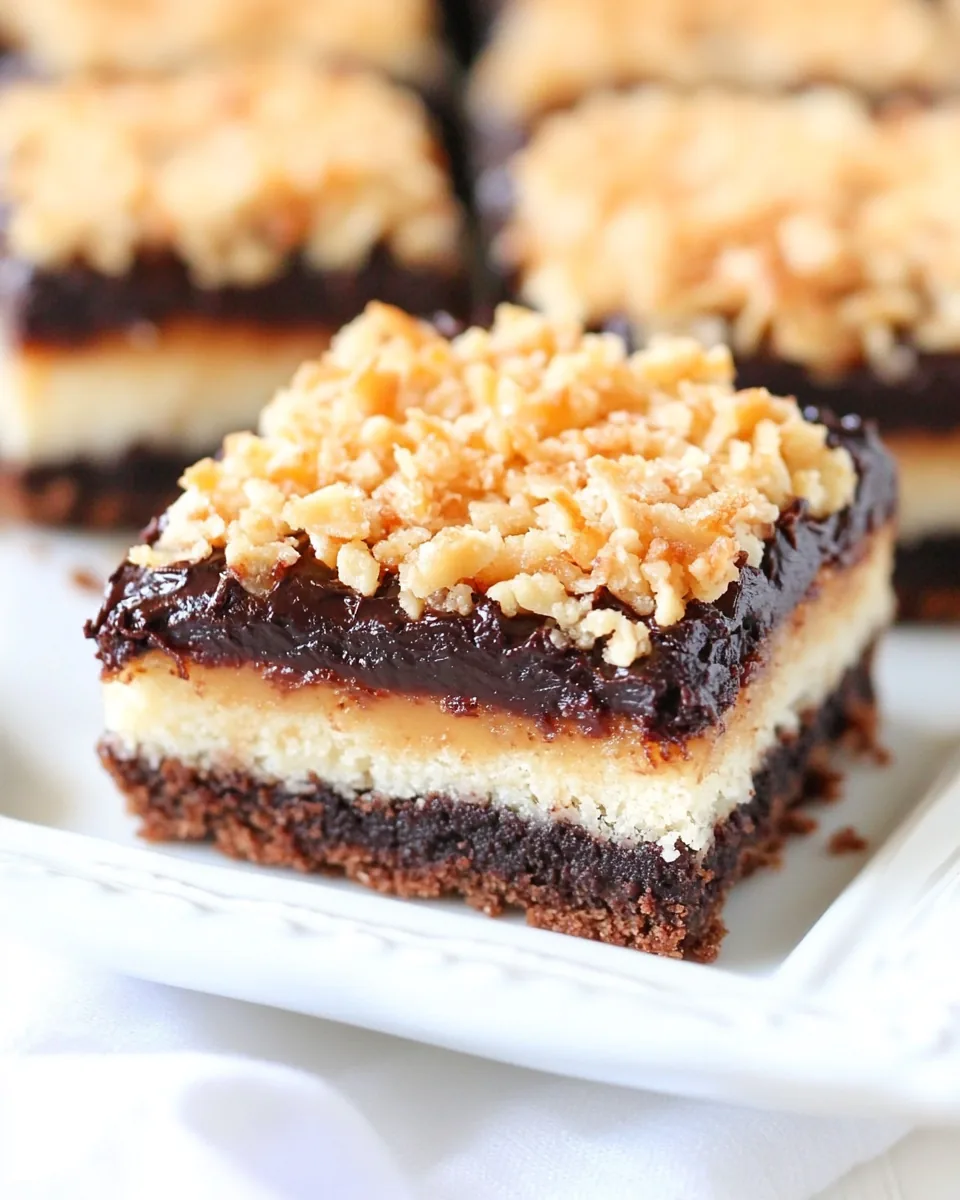
Samoa Brownie Bars
Every bite of Samoa Brownie Bars takes me back to my childhood, where the decadent flavors of coconut and chocolate danced together in perfect harmony. I remember the first time I tried these bars; they were a delightful surprise at a family gathering. The rich, fudgy base perfectly supports a luscious layer of coconut caramel, creating a treat that’s hard to resist. When I take a bite, the memories flood in, and I can’t help but smile. Whether you’re hosting friends or just indulging on a cozy afternoon, these bars are the ultimate crowd-pleaser. Trust me, once you make Samoa Brownie Bars, you’ll find yourself craving them again and again.
Recipe Snapshot
45 mins
15 mins
30 mins
Medium
320 kcal
3 g
Gluten-Free, Low FODMAP
16 g
Wooden Spoon, Mixing Bowl, Baking Sheet, Food Processor, Oven
What’s Great About This Samoa Brownie Bars
Irresistible Flavor Combination
What makes these Samoa Brownie Bars truly special is the combination of flavors. The rich chocolate brownie base pairs perfectly with the crunchy coconut topping, and the sweet caramel adds just the right amount of gooeyness. Every layer brings its unique taste and texture, making them not just a dessert but a whole experience.
Layered Delight
When you bite into one of these bars, you experience the harmony of multiple textures. The fudgy brownie layer gives way to the chewy coconut caramel layer, and the chocolate drizzle on top adds a finishing crunch. This contrast is what keeps you coming back for more. You might even find yourself savoring each layer separately!
Perfect for Any Occasion
These bars are versatile enough for any occasion. Whether it’s a birthday party, a holiday gathering, or just a regular Tuesday, Samoa Brownie Bars fit right in. They make for an impressive dessert that doesn’t take much effort to whip up, and they are sure to be a hit with both kids and adults alike.
Customizable to Your Taste
While the classic recipe is fantastic, you can easily adapt Samoa Brownie Bars to suit your preferences. If you love nuts, throw in some chopped pecans or walnuts for added crunch. Want a little more chocolate? Use dark chocolate chips instead of semi-sweet. The possibilities are endless!
Easy to Make
Making Samoa Brownie Bars is a breeze! The process involves simple ingredients that most people already have in their pantry. You don’t need any special equipment, just some mixing bowls and a baking dish. Even novice bakers will find success with this recipe.
Kid-Friendly Fun
This recipe is a great way to get the kids involved in the kitchen. They can help measure, mix, and even drizzle the chocolate when it’s time. Baking together creates lasting memories and teaches valuable skills. Plus, they’ll love tasting their delicious creations!
What’s In This Samoa Brownie Bars
The ingredients for Samoa Brownie Bars are thoughtfully chosen to create a delightful dessert that balances sweetness and texture. The key players include the rich brownie mix that forms the base and the toasted coconut that gives it that unmistakable Samoa flavor. Each ingredient plays a crucial role in making this dessert a fan favorite.
-
Unsalted Butter: 12 tablespoons
Cold and cut into cubes, this creamy butter adds richness to the brownie base. -
Powdered Sugar: 3/4 cup
Sweet and fine, it blends smoothly into the batter, creating a luscious texture. -
All-Purpose Flour: 1 1/2 cups
This provides the structure for the brownies, giving them that perfect fudgy feel. -
Salt: 1/2 teaspoon
A touch of salt enhances the sweetness and balances flavors. -
Brownie Mix: 1 package (18 ounces)
This is the star of the show that brings chocolatey goodness to life. -
Semi-Sweet Chocolate Chips: 1 cup
Folded into the brownie batter, they melt beautifully to create gooey pockets of chocolate. -
Sweetened Coconut Flakes: 3 cups
This layer adds flavor, texture, and that beloved coconut crunch. -
Caramels: 1 (12 ounce) bag
Unwrapped and melted, they add a delightful gooeyness to the bars. -
Milk or Cream: 3 tablespoons
This helps melt the caramels to a smooth consistency, making it easy to combine with the coconut. -
Salt: pinch
This additional pinch of salt balances the sweetness of the caramel layer.
Making Samoa Brownie Bars
Creating these Samoa Brownie Bars is a rewarding experience! The process is straightforward, and soon you’ll have a batch of irresistible treats to share. Follow these detailed steps to ensure your bars come out perfectly every time.
- Preheat your oven to 300 degrees. This low temperature is perfect for toasting the coconut. Cover a baking sheet with parchment paper and spread the sweetened coconut flakes evenly over the sheet. Bake for about 20 minutes, stirring every 5 minutes. You want the coconut to turn a light golden brown, giving off a wonderful aroma. Keep an eye on it because it can burn quickly!
- Once toasted, set the coconut aside to cool. Now, increase the oven temperature to 350 degrees and grease a 9×13 inch baking dish. In a large bowl, combine all the crust ingredients: unsalted butter, powdered sugar, all-purpose flour, and salt. You can use a pastry knife, a mixer, or even a food processor to mix until you achieve a coarse texture with pea-sized lumps.
- Press the crust mixture into the prepared baking dish evenly. This layer will form the foundation for your brownies. Bake this for about 8 to 10 minutes until it’s slightly set but not browned. The edges should begin to firm up, which is a sign that it’s ready for the next layer.
- While the crust bakes, prepare the brownie mix according to package directions. Add the semi-sweet chocolate chips to the batter for added richness. Once combined, carefully pour the brownie batter over the pre-baked crust, spreading it evenly with a spatula.
- Bake according to the package directions, checking with a toothpick test to ensure it comes out mostly clean from the center. This usually takes around 25 to 30 minutes. The brownies should be set but remain fudgy in texture.
- While the brownies are baking, prepare the coconut caramel layer. In a small bowl, combine the caramels and milk or cream. Heat in the microwave, stirring every 30 seconds until melted and smooth. Be patient with this step; the result is worth it!
- Once the brownies are done baking, remove them from the oven and let them cool slightly for about 10 minutes. Add the toasted coconut to the melted caramel in a large bowl and mix well to combine. This mixture will be thick but should blend beautifully.
- Pour the coconut caramel mixture over the brownie layer evenly. Use a spatula to gently spread it across the surface, pressing down slightly to ensure it sticks to the brownies. The thickness may require a bit of effort, but don’t worry; it will be delicious!
- For the final touch, melt additional semi-sweet chocolate chips in a zip-loc baggie. Microwave in short intervals, squish the bag to mix until smooth, then snip off a tiny corner of the bag. Drizzle the melted chocolate over the top of the bars for a beautiful finish.
- Allow the bars to cool completely before cutting them into squares. This will ensure clean edges, and the flavors will meld together beautifully.
Things Worth Knowing
- Storage: Keep your Samoa Brownie Bars in an airtight container at room temperature for up to five days. If you need to store them longer, consider refrigerating them.
- Serving Temperature: These bars are delightful cold or at room temperature. If you prefer a warm treat, you can microwave them for 10 to 15 seconds to warm them up.
- Ingredient Quality: Using high-quality unsalted butter and chocolate chips will elevate the flavors of your brownies. Don’t skimp on these ingredients!
- Toast Coconut Carefully: Keep a close eye on the coconut while toasting. It can go from golden brown to burnt in a matter of seconds!
Ways to Adapt This Recipe
There are countless ways to personalize your Samoa Brownie Bars. Here are some fun adaptations you can try:
- Storage: To store leftovers, place them in an airtight container. You can keep them at room temperature for up to five days or refrigerate for extended freshness.
- Freezing: Yes, you can freeze these bars! Cut them into pieces and wrap them individually in plastic wrap, then place them in a freezer-safe bag. They will last for up to three months in the freezer.
- Nutty Variations: Add chopped walnuts or pecans to the brownie batter for an extra crunch. This adds a delightful nuttiness that complements the chocolate.
- Different Chocolates: Feel free to use dark chocolate chips instead of semi-sweet for a more intense chocolate flavor.
- Layering Options: Experiment with different layer combinations. You can try adding a layer of peanut butter or a different flavor of chips to the brownie batter for unique twists.
- Seasonal Toppings: During the holiday season, consider adding crushed peppermint candies as a topping for a festive touch.
Serving This Samoa Brownie Bars
When it comes to serving Samoa Brownie Bars, the options are endless! Here are some creative ideas to make your presentation shine:
- Perfect for Parties: Cut the bars into bite-sized pieces for easy sharing at parties or gatherings. They make a delightful addition to any dessert table.
- Pair with Ice Cream: Serve warm bars alongside a scoop of vanilla ice cream to create an indulgent dessert experience.
- Accompanying Drinks: These bars pair beautifully with coffee, tea, or even a glass of milk. The chocolate and caramel flavors complement the drinks perfectly.
- Seasonal Occasions: Whether it’s a summer barbecue or a winter holiday gathering, Samoa Brownie Bars fit right in as a favorite sweet treat.
- Decorative Touches: Garnish with extra toasted coconut or drizzle more melted chocolate on top for an attractive presentation.
- Celebration Treat: These bars are perfect for birthdays, holidays, or just because. They’re sure to bring joy to any occasion!
FAQ
Conclusion
Samoa Brownie Bars are more than just a dessert; they offer a delightful experience with every bite. The layers of chocolate, caramel, and toasted coconut come together to create something truly special. I encourage you to try making these bars; you won’t regret it! They’re perfect for sharing with friends and family or keeping all to yourself!

Samoa Brownie Bars
Equipment
- Wooden Spoon
- Mixing Bowl
- Baking Sheet
- Food Processor
- Oven
Ingredients
- 12 tablespoons Unsalted Butter Cold and cut into cubes
- 3/4 cup Powdered Sugar
- 1 1/2 cups All-Purpose Flour
- 1/2 teaspoon Salt
- 1 package Brownie Mix I used an 18 ounce box
- Water, Oil, and Eggs Called for in the directions on the brownie box
- 1 cup Semi-Sweet Chocolate Chips
- 3 cups Sweetened Coconut Flakes
- 1 bag Caramels 12 ounce, unwrapped
- 3 tablespoons Milk or Cream
- 1/3 cup Semi-Sweet Chocolate Chips
- 1 tablespoon Unsalted Butter
- pinch Salt
Instructions
- Preheat your oven to 300 degrees. Cover a baking sheet with parchment paper and spread the sweetened coconut flakes evenly over the sheet. Bake for about 20 minutes, stirring every 5 minutes until golden brown. Remove and let cool. Raise the oven temperature to 350 degrees and grease a 9x13 inch baking dish. In a large bowl, combine unsalted butter, powdered sugar, all-purpose flour, and salt. Mix until coarse crumbs form. Press the mixture into the prepared dish and bake for 8 to 10 minutes. Prepare the brownie mix according to package instructions. Stir in semi-sweet chocolate chips and pour over the crust. Bake the brownies as directed until a toothpick comes out mostly clean. In a bowl, combine caramels and milk or cream. Heat until melted, then mix in the toasted coconut. Pour the mixture over the brownies and spread evenly. Melt additional semi-sweet chocolate chips in a baggie and drizzle over the top of the bars. Let cool completely before cutting into squares.
Notes
- Storage: Keep your Samoa Brownie Bars in an airtight container at room temperature for up to five days. If you need to store them longer, consider refrigerating them.
- Freezing: Yes, you can freeze these bars! Cut them into pieces and wrap them individually in plastic wrap, then place them in a freezer-safe bag. They will last for up to three months in the freezer.
- Nutty Variations: Add chopped walnuts or pecans to the brownie batter for an extra crunch. This adds a delightful nuttiness that complements the chocolate.
- Different Chocolates: Feel free to use dark chocolate chips instead of semi-sweet for a more intense chocolate flavor.
- Layering Options: Experiment with different layer combinations. You can try adding a layer of peanut butter or a different flavor of chips to the brownie batter for unique twists.