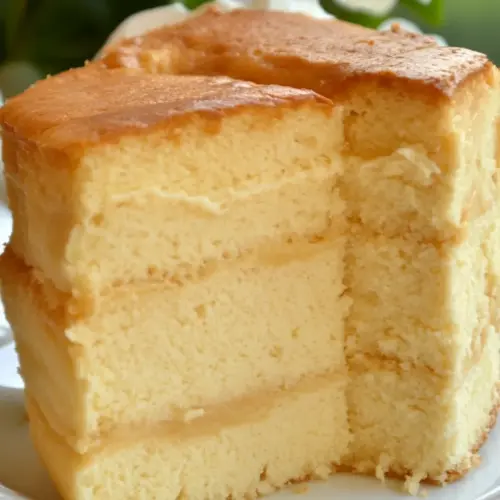
Ptichye Moloko Cake
There’s something magical about making a cake that feels like a warm hug, and the Ptichye Moloko Cake does just that. This delightful dessert brings back memories of my grandmother baking in the kitchen, her laughter dancing in the air as she expertly mixed ingredients together. The light, airy texture combined with the sweetness of the cream makes this cake a true masterpiece. Whether it’s a family gathering, a celebration, or simply a treat for yourself, the Ptichye Moloko Cake is bound to impress everyone.
Recipe Snapshot
1 hr 20 mins
60 mins
20 mins
Hard
340 kcal
6 g
Gluten-Free, Low FODMAP
16 g
Wooden Spoon, Peeler, Mixing Bowl, Frying Pan, Whisk, Baking Sheet, Blender, Large Pot
The Best Thing About This Ptichye Moloko Cake
Luxuriously Light Texture
One of the key features of the Ptichye Moloko Cake is its incredibly light texture. The use of whipped egg whites results in a cake that has a cloud-like fluffiness, making every bite feel ethereal. It’s a dessert that manages to be both indulgent and light, which is no easy feat!
Rich and Creamy Flavor
The combination of sour cream and cool whip creates a rich and creamy filling that balances beautifully with the lightness of the cake layers. Each forkful brings a luscious experience that keeps you coming back for more. It’s a perfect blend of sweet and slightly tangy that tantalizes the taste buds.
Versatile for Any Occasion
From birthdays to casual gatherings, the Ptichye Moloko Cake fits perfectly into any celebration. Its elegant appearance makes it a showstopper on dessert tables, while its flavor suits a wide range of palates. You could even serve it during the holidays or a cozy family dinner.
Refreshing Soda Soak
Another unique aspect is the use of soda as a soaking syrup, which adds a delightful twist. The carbonation adds moisture and a subtle sweetness that elevates the overall flavor profile of the cake. It’s an unexpected ingredient that surprises and delights!
Family Heirloom Recipe
This recipe has been passed down through generations in my family, and each baking session brings back cherished memories. Making the Ptichye Moloko Cake is not just about creating a dessert; it’s about preserving tradition, love, and connection. There’s something heartwarming about sharing this cake with loved ones, knowing it carries a piece of history.
Simple Yet Sophisticated
Despite its impressive look and taste, the Ptichye Moloko Cake is quite simple to make. With a few straightforward steps, you’ll achieve a dessert that seems like it took hours of effort. It’s perfect for both novice bakers and seasoned pros looking to impress!
Essential Ingredients for Ptichye Moloko Cake
The ingredients for the Ptichye Moloko Cake are what make it truly special. Each component works together to create a harmonious blend of flavors and textures. The key players include the fluffy cake layers, creamy filling, and the unique soda soak that brings it all together.
- Eggs – 8: Essential for structure and richness, egg whites add fluffiness while yolks contribute to flavor.
- Sugar – 3/4 cup: Sweetness is pivotal; it balances the tangy flavors of the cream and enhances the cake’s overall taste.
- Flour – 1 cup: This provides the necessary base for the cake, giving it stability while keeping it light.
- Unflavored Gelatin – 1 packet (7 grams): Vital for setting the creamy filling, ensuring it holds its shape and texture.
- Milk – 1/2 cup: Adds moisture and richness to the cake and filling, making it more indulgent.
- Sour Cream – 8 oz tub: A key ingredient for the filling, it adds creaminess and a slight tang that contrasts beautifully with the sweetness.
- Cool Whip – 8 oz tub: Provides a light, airy texture to the filling while making it easy to spread.
- Soda – 1 can (Sprite, 7-Up, or LaCroix) with 2 tbsp sugar: The secret ingredient that adds moisture and a unique flavor to the cake layers.
- Heavy Whipping Cream – 2 cups (1 pint): Used to create whipped cream topping, adding richness and decadence.
- Powdered Sugar – 3 tbsp: Sweetens the whipped cream without adding graininess, ensuring a smooth texture.
- Vanilla Extract – 3/4 tsp: Enhances the flavor profile of the cake and filling with a warm, inviting aroma.
- Semi-sweet Chocolate Chips – 3/4 cup: Used for garnish, they provide a delightful contrast to the light cake.
Putting Together Ptichye Moloko Cake
Creating the Ptichye Moloko Cake is a delightful journey that combines technique with creativity. Follow these steps to craft this elegant dessert that will impress everyone.
-
Start by separating the egg whites from the yolks. In a medium bowl, whisk the yolks together with sugar and vanilla until the mixture is pale and creamy. Then, gradually add the flour, mixing until just combined. You want to avoid overmixing to keep the batter light.
In a large bowl, beat the egg whites on high speed until they form soft peaks, about 2 to 3 minutes. The volume should triple, but be careful not to overbeat; they should still be glossy and soft.
Gently fold the yolk mixture into the whipped egg whites using a spatula. The key is to be gentle so that you don’t deflate the fluffy egg whites. The batter should be light and airy at this point, almost like a cloud.
-
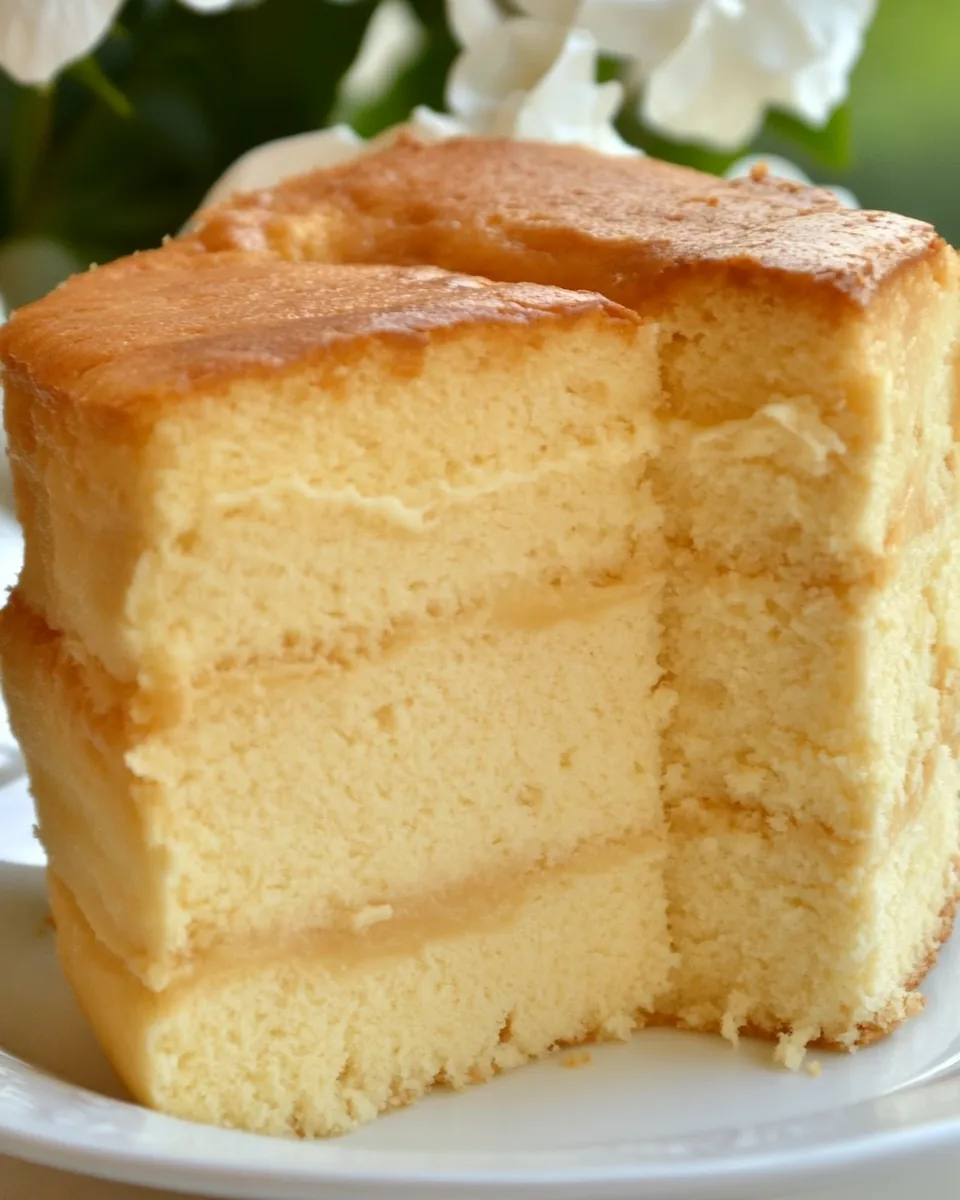
Divide the batter evenly between two lined cake pans. Bake in a preheated oven for about 20 minutes, or until the tops are golden brown and a toothpick inserted in the center comes out clean. The cakes should rise beautifully, indicating they are baking perfectly.
Once baked, immediately turn the cakes out onto a clean surface, carefully peeling off the wax paper. The warmth helps in avoiding any damage to the delicate structure of the cake.
Use a knife to trim any rough edges from the cakes, then let them cool completely to room temperature. This step is crucial; a warm cake may not hold the filling properly.
-
Place one cake layer in the bottom of a springform pan. Pour half of your chosen soda over the cake, allowing it to soak in. This will add moisture and a hint of sweetness, enhancing the overall flavor.
In a small saucepan, combine the gelatin with milk. Whisk over medium heat until it just begins to steam, then remove from heat and let it cool slightly. This will be a key component in setting your filling.
In the bowl of an electric mixer, whisk together the sour cream, cool whip, and the remaining sugar until well combined and smooth. With the mixer on low, gradually add the warm milk mixture. This will create a creamy filling that’s rich and flavorful.
-
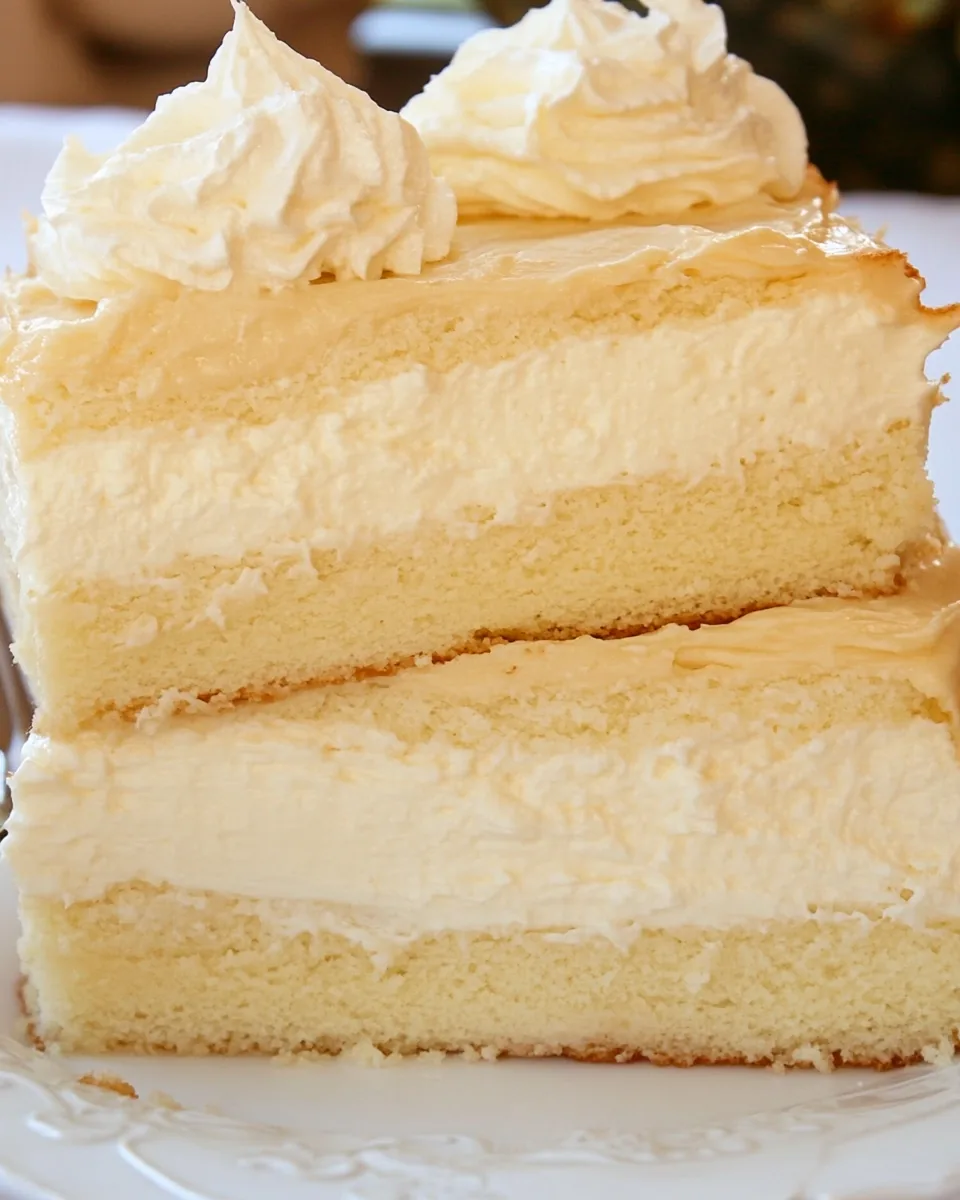
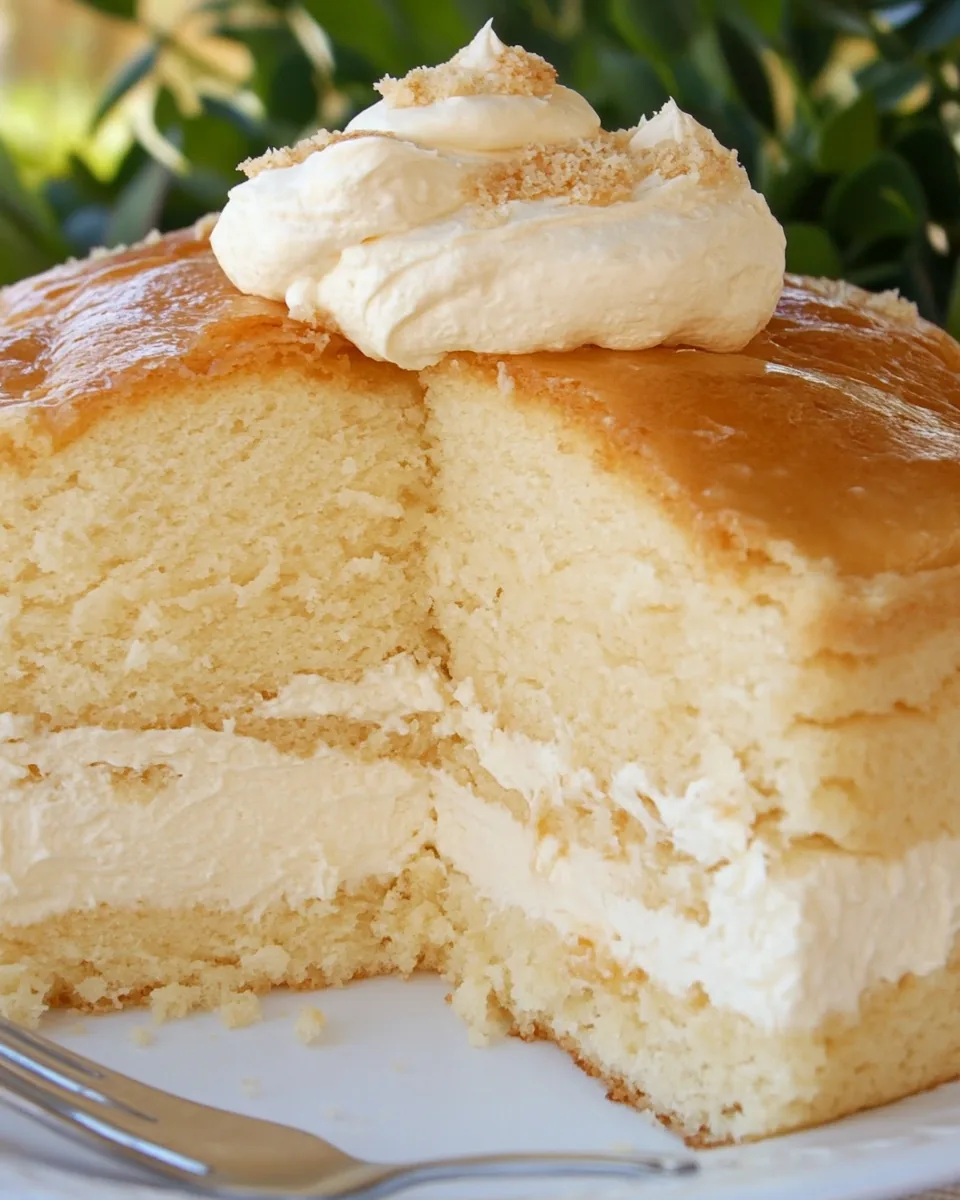
Carefully pour the creamy mixture over the first cake layer in the springform pan, smoothing the top as evenly as possible. Cover the pan and refrigerate for a few hours to allow it to set properly. This waiting period is essential for the flavors to meld beautifully!
Next, beat the heavy cream in a chilled bowl until it forms soft peaks, about a minute. Gradually add the powdered sugar and vanilla, continuing to whip until you achieve stiff peaks. This will be your luxurious topping!
Place the second cake layer on top of the filling, and pour the remaining soda over it. Gently press down to help it soak in. Using a sharp knife, trim around the edges of the cake to loosen it from the sides of the springform pan.
-
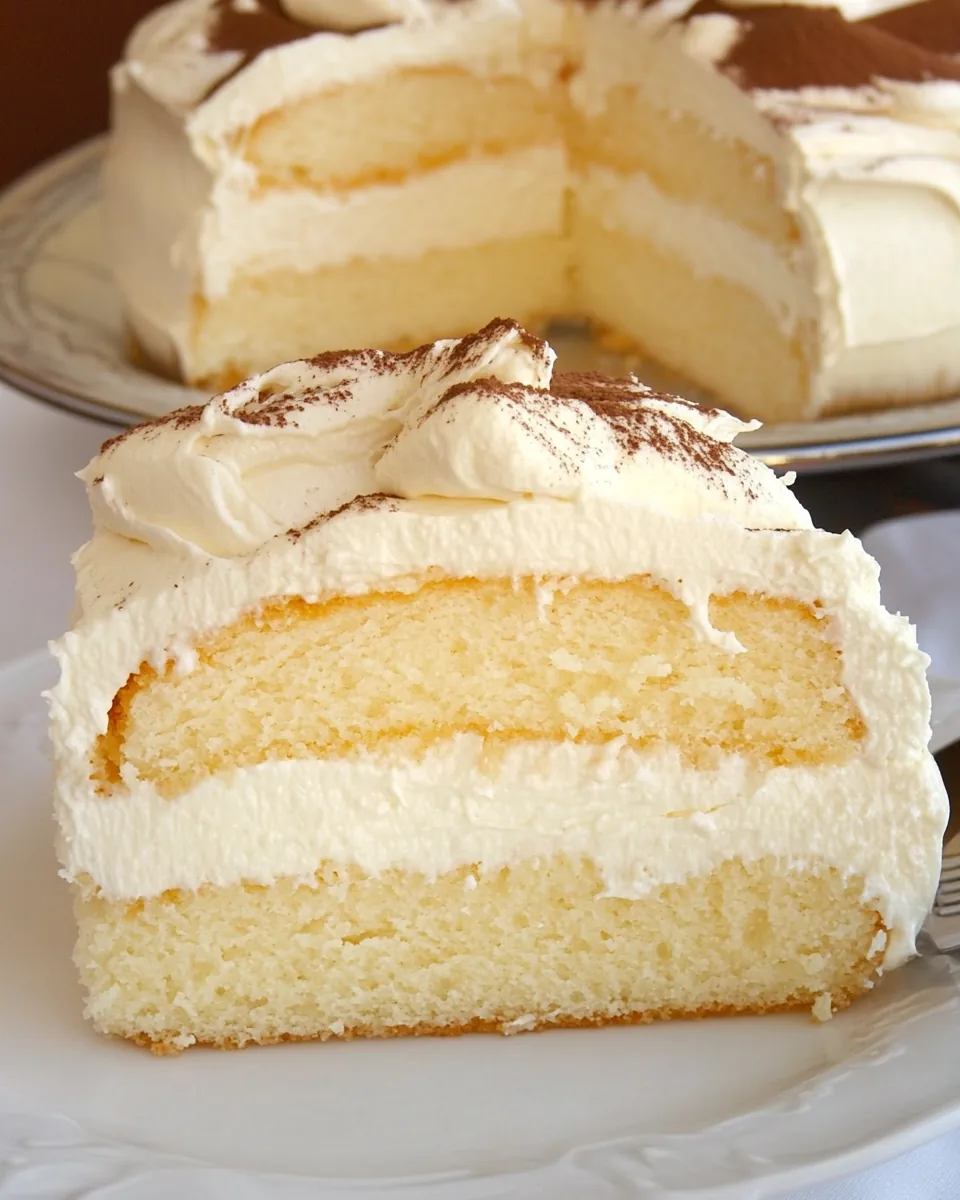
Frost the top and sides of the cake with the whipped cream, using a food scraper to smooth it out. This should create a beautiful finish to your cake, making it look as delightful as it tastes.
In a small saucepan, melt the chocolate chips over low heat, stirring constantly until smooth. Transfer the melted chocolate to a ziplock bag, snip a small hole in the corner, and decorate the top of the cake with chocolate stripes for that extra touch of elegance.
Transfer the cake to your favorite cake stand and refrigerate until you’re ready to serve. The waiting will only make it taste better!
Things Worth Knowing
- Use room temperature eggs: This helps in achieving better volume when whipping the egg whites, resulting in a lighter cake.
- Don’t rush the cooling: Allowing the cake to cool completely before assembling is key to maintaining its structure and flavor.
- Check the gelatin: Ensure the mixture isn’t too hot when added to the filling; it should be warm but not boiling to avoid curdling the cream.
- Whip cream carefully: Overwhipped cream can become grainy, so keep an eye on it as you whip to avoid this.
Customization Ideas
The Ptichye Moloko Cake is delightful on its own, but there’s always room for creativity! Here are some ideas to customize this dessert:
- Flavor Variations: Experiment with different flavored sodas such as ginger ale or flavored sparkling water to give a unique twist!
- Decorative Toppings: Add fresh fruits like strawberries or raspberries on top for a burst of color and sweetness.
- Layering Options: Consider adding layers of fruit jam or chocolate ganache between the cake layers for added flavor.
- Alternative Creams: Use mascarpone cheese mixed with whipped cream for a richer texture and flavor.
- Gluten-Free Version: Substitute regular flour with a gluten-free blend to accommodate dietary restrictions without compromising flavor.
- Personalized Garnishes: Use crushed nuts or sprinkles on top for added texture and visual appeal.
Pairing Suggestions for Ptichye Moloko Cake
When it comes to serving the Ptichye Moloko Cake, the possibilities are endless. Here are some ideas to elevate your dessert experience:
- With Fresh Fruits: Pair slices of the cake with fresh berries for a refreshing contrast to the creamy layers.
- Tea or Coffee: This cake goes wonderfully with a cup of your favorite tea or a strong coffee, enhancing the flavors beautifully.
- Casual Celebrations: Perfect as a showstopper at birthday parties or casual gatherings, delighting guests of all ages.
- Seasonal Occasions: The lightness of this cake makes it an excellent choice for spring and summer events, complementing warm weather perfectly.
- Storage Tips: Store leftovers in an airtight container in the refrigerator for up to three days to maintain freshness.
- Pairing with Ice Cream: For an indulgent treat, serve slices of the cake alongside a scoop of vanilla or chocolate ice cream.
FAQ
Conclusion
The Ptichye Moloko Cake is a mesmerizing dessert that combines lightness with richness, making it truly special. With its airy texture and creamy filling, it’s bound to become a favorite at your gatherings. I encourage you to try making this cake and share it with loved ones; it’s a treat that brings joy and sweetness to any occasion.
Ptichye Moloko Cake
Equipment
- Wooden Spoon
- Peeler
- Mixing Bowl
- Frying Pan
- Whisk
- Baking Sheet
- Blender
- Large Pot
Ingredients
- 8 eggs Eggs
- 3/4 cup Sugar
- 1 cup Flour
- 1 packet Unflavored Gelatin 7 grams
- 1/2 cup Milk
- 1/2 cup Sugar
- 8 oz Sour Cream
- 8 oz Cool Whip refrigerated (not frozen)
- 1 can Soda Sprite, 7-Up, or LaCroix with 2 tbsp sugar
- 2 cups Heavy Whipping Cream 1 pint
- 3 Tbsp Powdered Sugar sifted
- 3/4 tsp Vanilla Extract
- 3/4 cup Semi-sweet Chocolate Chips
Instructions
- Separate egg whites from yolks. In a medium bowl, whisk together yolks, sugar, and vanilla. Add flour until well blended.
- In a large bowl, beat egg whites on high-speed until they foam and are about 3-4 times in volume (about 2 1/2 to 3 minutes). Don’t beat too long or they will become too stiff and won't blend well.
- Use a spatula to gently fold the yolk mixture into the egg whites until well combined. Don’t mix too much or you will lose volume. The batter should have a fluffy texture.
- Divide the batter evenly among the two lined cake pans & bake for 20 minutes until the tops are golden.
- As soon as the cake is done, turn the cake out onto a clean surface and peel off the wax paper. This is much easier to do while the cake is still very warm.
- Use a knife to remove rough edges. Let cakes cool to room temperature.
- Place one of the cake layers into the bottom of a springform pan and pour 1/2 of your soda over the cake and let it soak in.
- In a small saucepan, combine gelatin with milk. Whisk together over medium heat. Continue whisking until it just begins to steam, then remove from heat (DON'T BOIL). Set aside to cool.
- In the bowl of an electric mixer on medium speed whisk together sugar, sour cream, and cool whip until well blended.
- With the mixer on, slowly add the warm milk mixture. Immediately pour over the first biskvit layer inside the prepared baking dish. Smooth the top as evenly as possible. Cover and refrigerate to cool.
- Freeze your mixing bowl and whisk attachment for 10-15 minutes before beating the heavy cream and keep it refrigerated until you are ready to use it.
- Whip the heavy cream at high speed until it forms soft peaks (1 minute).
- Add the sifted powdered sugar and vanilla and continue whipping at high speed until the cream forms stiff peaks but is still smooth (about 1 minute).
- Place the second cake layer over the ptichye moloko and pour the rest of syrup/soda over the cake layer. Cut around the edges of the cake to loosen it from the springform pan.
- Trim the edges of the ptichye moloko to make it even with the cake layers.
- Frost the cake and even it out with a food-scraper.
- In a small saucepan, over low heat, melt chocolate chips, stirring constantly until smooth.
- Transfer to a ziploc bag and cut a small hole on the tip. Practice a couple of strips on wax paper. Transfer the cake to your favorite cake stand. Refrigerate the cake until ready to serve.
Notes
- Storage: Store leftovers in an airtight container in the refrigerator for up to three days to maintain freshness.
- Freezing: If you want to freeze it, wrap the cake tightly in plastic wrap and store it for up to one month.
- Pairing: Serve with fresh berries or a scoop of ice cream for an indulgent treat.
- Variations: Feel free to experiment with different soda flavors for unique twists!
- Serving tips: Allow the cake to come to room temperature before serving for the best flavor.