Peanut Butter and Jelly Cookies
When I think of comfort food, the first thing that comes to mind is the delightful Peanut Butter and Jelly Cookies. There’s something incredibly nostalgic about the combination of rich, creamy peanut butter and sweet, fruity jam. I remember the first time I made these cookies; it was a rainy afternoon, and I was looking for a fun activity to do with my kids. We gathered all the ingredients, and the smell of butter and sugar creaming together filled the kitchen, instantly lifting our spirits. As we rolled the dough into little balls, my children excitedly argued over which flavors of fruit spread to use, resulting in a colorful assortment of cookies.
Recipe Snapshot
55 mins
25 mins
30 mins
Medium
150 kcal
3 g
Gluten-Free, Low FODMAP
7 g
Mixing Bowl, Whisk, Blender, Baking Sheet, Oven
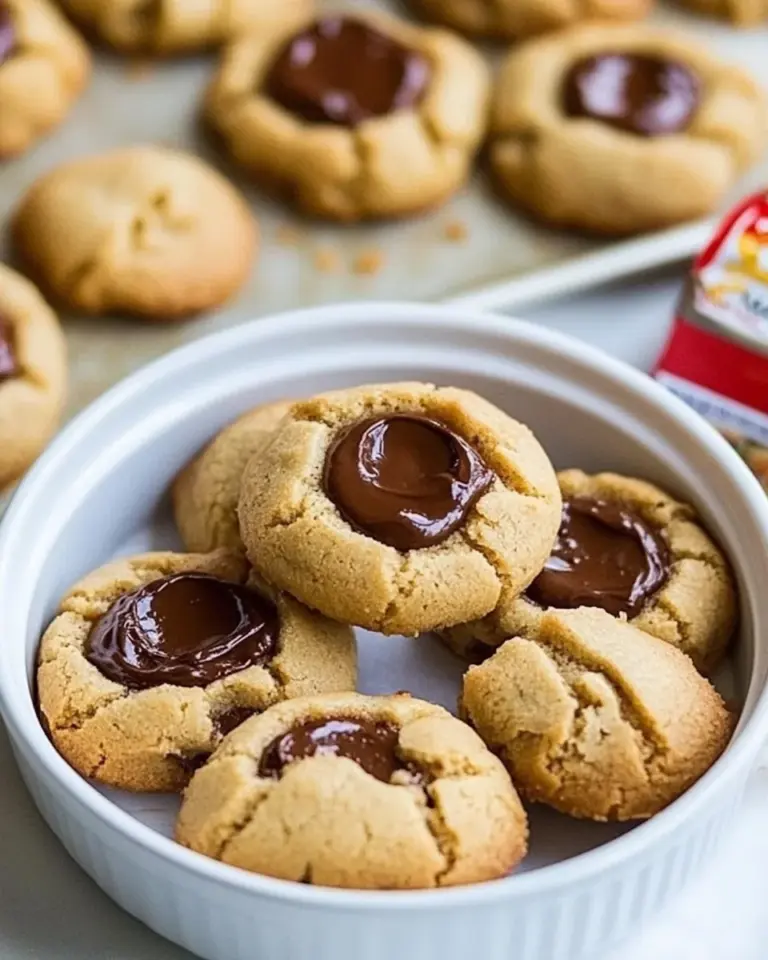
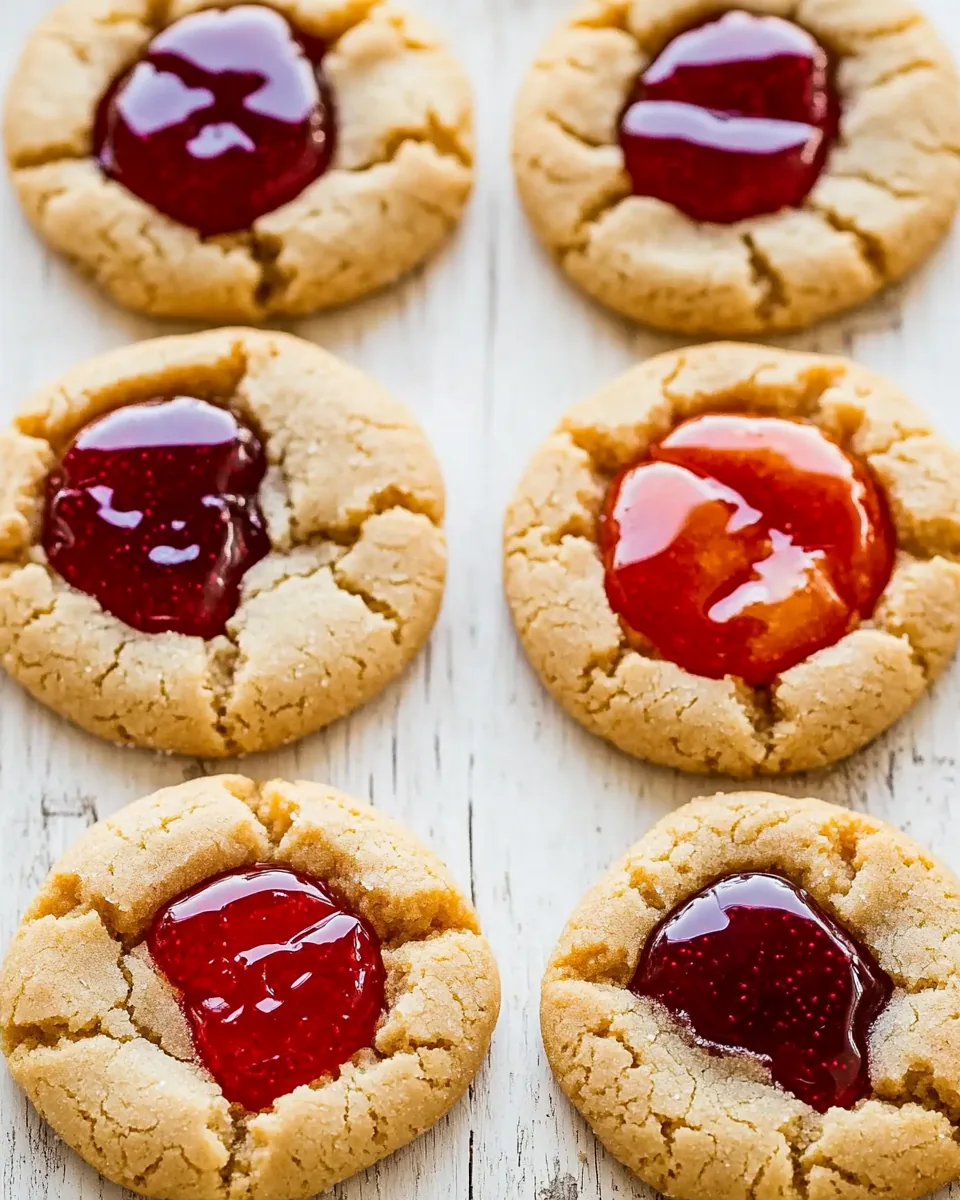
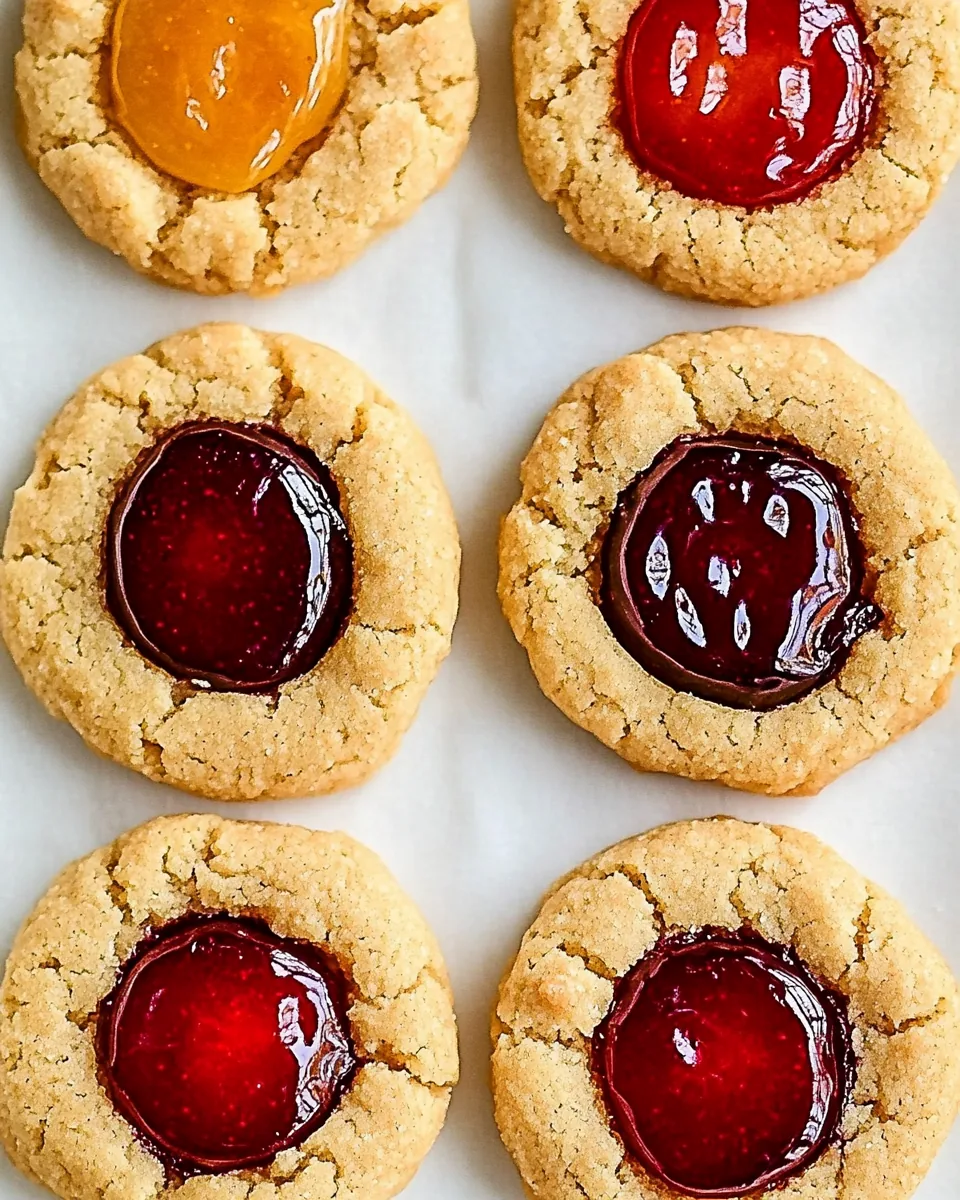
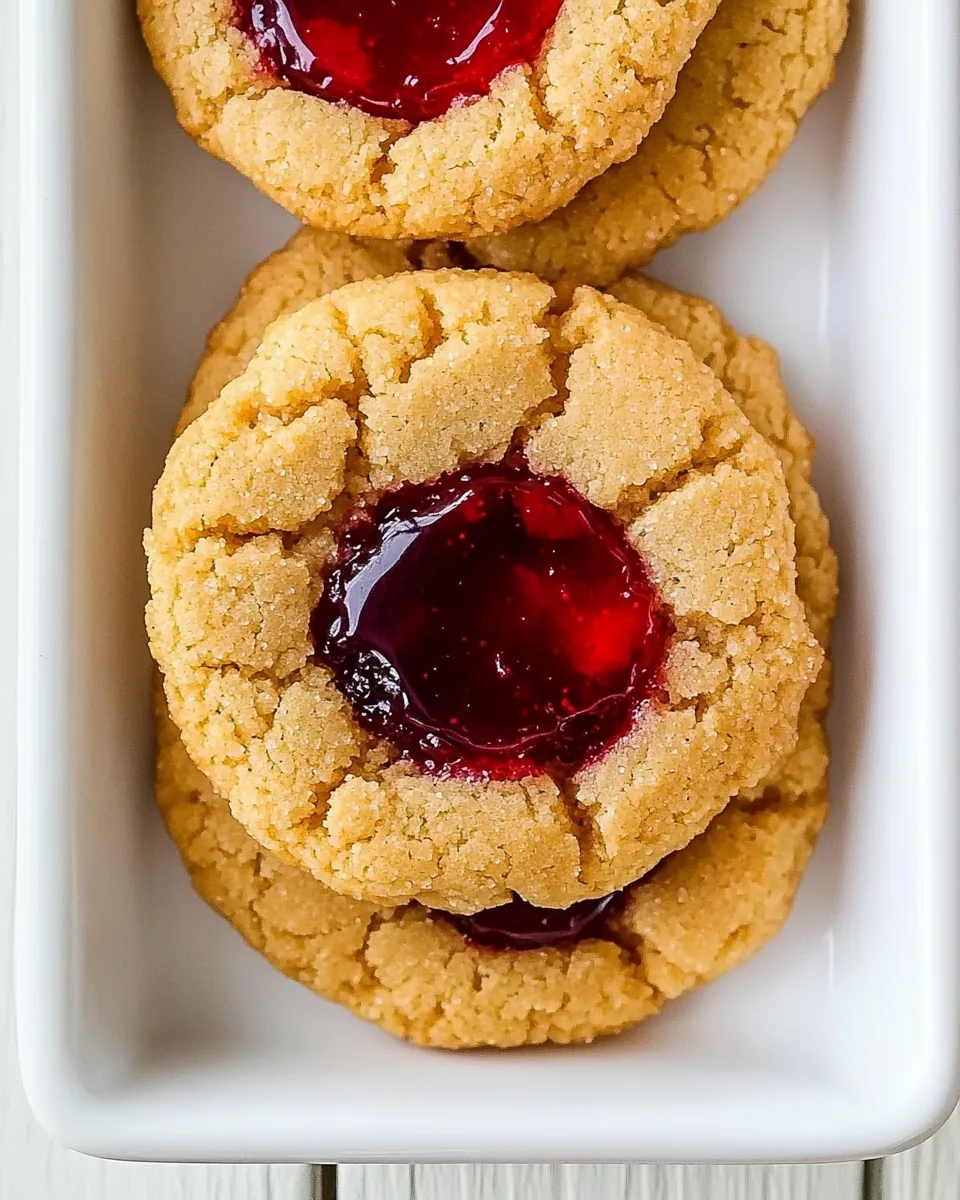
These cookies are not just a treat; they are a canvas for creativity. You can choose any flavor of jam you like, from classic grape to exotic apricot. Each one brings a unique twist to the Peanut Butter and Jelly Cookies. When they come out of the oven, they are slightly crispy around the edges and soft in the middle, creating the perfect texture. Once cool, we love to spoon a dollop of jam into the center of each cookie, making them look as good as they taste. The joy of biting into a warm cookie with a gooey center is truly unmatched.
If you’re looking for a way to impress friends and family, or simply want a sweet escape from the everyday hustle, these cookies are the answer. They are perfect for sharing at gatherings or enjoying with a cup of tea in the afternoon. So, why not join me in making a batch of these scrumptious Peanut Butter and Jelly Cookies? They’ll surely become a favorite in your home, just as they have in mine.
The Appeal of This Peanut Butter and Jelly Cookies
They’re Easy to Make
One of the best things about Peanut Butter and Jelly Cookies is how simple they are to whip up. Even if you’re not a seasoned baker, you can easily follow the steps and result in something wonderful. It’s an excellent recipe for beginners or anyone looking for a quick and satisfying treat.
Perfect for Any Occasion
Whether it’s a casual afternoon snack, a festive gathering, or a lunchbox surprise, these cookies are versatile. You can dress them up with a bit of powdered sugar or keep them classic. They’re a hit among kids and adults alike!
Rich Flavor Combination
The pairing of peanut butter and jam creates a flavor profile that’s hard to resist. The nuttiness of the peanut butter complements the sweetness of the jam, making each bite a delightful experience. It’s comfort food at its finest.
Customizable
Feel free to get creative! You can use any flavor of fruit spread, or even try adding chocolate chips for a little extra sweetness. This recipe allows for endless variations, making it a fun baking project.
Great for Sharing
These cookies are perfect for sharing with friends, family, or even neighbors. They make wonderful gifts when presented in a cute cookie jar or wrapped in a simple box. The joy of sharing homemade treats is one of the best parts of baking.
Main Ingredients for Peanut Butter and Jelly Cookies
The ingredients for the Peanut Butter and Jelly Cookies come together to create a perfect blend of flavors and textures. Each component plays a vital role in the final product, ensuring the cookies are soft, chewy, and bursting with flavor. The key players in this recipe include the creamy peanut butter, which provides richness, and the fruit spread, which adds sweetness and character.
- All-Purpose Flour: 1 1/3 cups (190g) – The foundation of any cookie, flour provides structure and texture. It binds all the ingredients together for a satisfying bite.
- Baking Soda: 1/2 tsp – This ingredient helps the cookies rise and become fluffy, giving them that perfect soft texture.
- Salt: 1/4 tsp – A pinch of salt enhances the overall flavor, balancing the sweetness and bringing out the richness of the peanut butter.
- Unsalted Butter: 1/2 cup (4 oz) – Softened butter is key for creating a creamy, rich base. It adds moisture and flavor to the cookies.
- Granulated Sugar: 1/2 cup (150g) – This common sweetener contributes to the overall sweetness and helps in achieving a nice golden color during baking.
- Light Brown Sugar: 1/4 cup (54g) – Brown sugar adds moisture and a slight chewiness, along with a hint of molasses flavor that complements the peanut butter.
- JIF Creamy Peanut Butter: 2/3 cup (162g) – The star of the show! Creamy peanut butter provides richness and a nutty flavor that makes these cookies irresistible.
- Large Egg: 1 – The egg binds the ingredients and adds moisture, helping to create the perfect cookie texture.
- Vanilla Extract: 1 tsp – A splash of vanilla enhances the sweetness and adds a warm, inviting flavor.
- Smucker’s Fruit Spread: 1/2 cup – This is the finishing touch that brings the Peanut Butter and Jelly Cookies to life, adding sweetness and a fruity punch.
How to Assemble Peanut Butter and Jelly Cookies

Making Peanut Butter and Jelly Cookies is a delightful process that fills your kitchen with wonderful aromas. Follow these simple steps, and you’ll have a batch of delicious cookies in no time!
- Preheat your oven to 350 degrees Fahrenheit. This step is crucial for ensuring your cookies bake evenly and achieve that perfect golden color.
- In a mixing bowl, whisk together the all-purpose flour, baking soda, and salt for about 20 seconds. This process helps to evenly distribute the baking soda and salt throughout the flour, ensuring your cookies rise properly.
- In the bowl of an electric stand mixer fitted with the paddle attachment, blend together the softened butter, granulated sugar, and light brown sugar just until creamy. The mixture should be light and fluffy, which will lead to a tender cookie.
- Add in the JIF Creamy Peanut Butter and blend just until combined. This is where the rich, nutty flavor starts to shine through your cookie dough.
- Mix in the egg and vanilla, combining until everything is well incorporated. The dough should be smooth and creamy at this point.
- With the mixer set on low speed, slowly add the flour mixture and mix just until combined. Be careful not to overmix, as this will affect the texture of your cookies.
- Scoop the dough out by the tablespoon and roll into balls. Each cookie should be about one tablespoon in size for even baking.
- Place the cookie balls on baking sheets lined with parchment paper or silicone liners, spacing them two inches apart to allow for spreading while baking.
- Using the back of a rounded 1/2 teaspoon, make an indentation in the top of each cookie ball. This is where the fruit spread will go later, creating a lovely filling.
- Bake the cookies in the preheated oven for 10 to 13 minutes. For softer cookies, lean towards the lesser time; for crisper cookies, bake longer. The edges should look set and slightly golden while the centers will appear soft.
- Once baked, remove from the oven and make an additional indentation in the center of each cookie with the back of a rounded tablespoon. This will create a nice well for the jam.
- Allow the cookies to cool on the baking sheet for several minutes before transferring them to a wire rack to cool completely. This step is important to prevent them from breaking apart.
- Once cooled, spoon and spread about 1 teaspoon of Smucker’s Fruit Spread into the center of each cookie. This is the final touch that makes these cookies special!
- Store the cookies in an airtight container, making sure they’re in a single layer to prevent them from sticking together. Enjoy your Peanut Butter and Jelly Cookies!
Things Worth Knowing
- Resting Time: Allow the cookie dough to rest for about 10 minutes before baking. This helps enhance the flavors and results in a more uniform bake.
- Indentation Tip: If you want thicker cookies, don’t make the indentation until after baking. Just leave the dough balls whole and press them down slightly after they’re baked.
- Experiment with Flavors: Don’t hesitate to try different flavors of fruit spread or add in chocolate chips for an extra treat!
- Oven Calibration: Keep in mind that all ovens can vary. If it’s your first time baking these cookies, check them a few minutes before the minimum baking time.
- Storing Cookies: Keep your cookies in an airtight container at room temperature for up to a week. You can also freeze them for longer storage.
Helpful Notes about Peanut Butter and Jelly Cookies
Here are some helpful notes for making your Peanut Butter and Jelly Cookies. Following these tips will ensure you achieve the best results every time you bake!
- Storage: Store leftover cookies in an airtight container at room temperature. They should stay fresh for up to a week, but I doubt they’ll last that long!
- Freezing: Yes, you can freeze these cookies! Just place them in a single layer on a baking sheet until firm, then transfer to a freezer-safe bag or container. They’ll maintain their taste and texture for about three months.
- Pairing: These cookies pair wonderfully with a glass of cold milk or a cup of tea. They also make a delightful addition to lunchboxes, offering a sweet surprise.
- Variations: Feel free to experiment with different types of fruit spreads or even add in chocolate chips for a richer flavor.
- Batch Size: This recipe yields about 28 cookies, making it great for sharing or for your weekly treat supply.
Perfect Matches for Peanut Butter and Jelly Cookies
When it comes to serving your Peanut Butter and Jelly Cookies, the options are endless. Here are some ideas to elevate your cookie experience:
- Milk: Serve these cookies with a cold glass of milk for a classic combination that never fails to please.
- Ice Cream: Crumble the cookies over your favorite vanilla ice cream for a delightful dessert.
- Tea Time: Pack these cookies in a tin and enjoy them during afternoon tea with friends.
- Lunchboxes: They make a fantastic snack for kids’ lunchboxes, adding a touch of sweetness to their meal.
- Picnics: Bring these cookies to your next picnic, as they are easy to transport and sure to be a hit.
- Seasonal Gatherings: Whether it’s a holiday party or a summer barbecue, these cookies are a great addition to any gathering.
FAQ
Conclusion
The Peanut Butter and Jelly Cookies are a nostalgic and delightful treat that brings back memories of childhood. With their rich flavor and soft texture, these cookies are sure to become a family favorite. So why not whip up a batch today? You’ll enjoy the warmth and comfort that comes from making and sharing this classic dessert.

Peanut Butter and Jelly Cookies
Equipment
- Mixing Bowl
- Whisk
- Blender
- Baking Sheet
- Oven
Ingredients
- 1 1/3 cups All-Purpose Flour
- 1/2 tsp Baking Soda
- 1/4 tsp Salt
- 1/2 cup Unsalted Butter
- 1/2 cup Granulated Sugar
- 1/4 cup Light Brown Sugar
- 2/3 cup JIF Creamy Peanut Butter
- 1 Large Egg
- 1 tsp Vanilla Extract
- 1/2 cup Smucker’s Fruit Spread
Instructions
- Preheat oven to 350 degrees. In a mixing bowl whisk together flour, baking soda, and salt for 20 seconds, set aside.
- In the bowl of an electric stand mixer fitted with the paddle attachment blend together butter, granulated sugar, and light brown sugar just until creamy.
- Mix in peanut butter and blend just until combined. Mix in egg and vanilla.
- With mixer set on low speed slowly adding in flour mixture and mix just until combined.
- Scoop dough out 1 Tbsp at a time and roll into balls. Place on baking sheets lined with parchment paper or silicone liners, spacing cookies two inches apart.
- Make an indentation with the back of a rounded 1/2 tsp in the top of each cookie.
- Bake in preheated oven for 10 to 13 minutes.
- Remove from oven and make an indentation in center of cookies with the back of a rounded tablespoon.
- Cool on baking sheet several minutes then transfer to a wire rack to cool completely.
- Once cool spoon and spread 1 tsp jam into center of each cookie. Store in an airtight container in a single layer.
Notes
- For thicker cookies: Don't add indentation needed until after baking, just leave as whole rounds without indentation in them before baking.
- After baking: Remove from oven and immediately make indentation by using the bottom of a rounded teaspoon to gently press to create well in center.