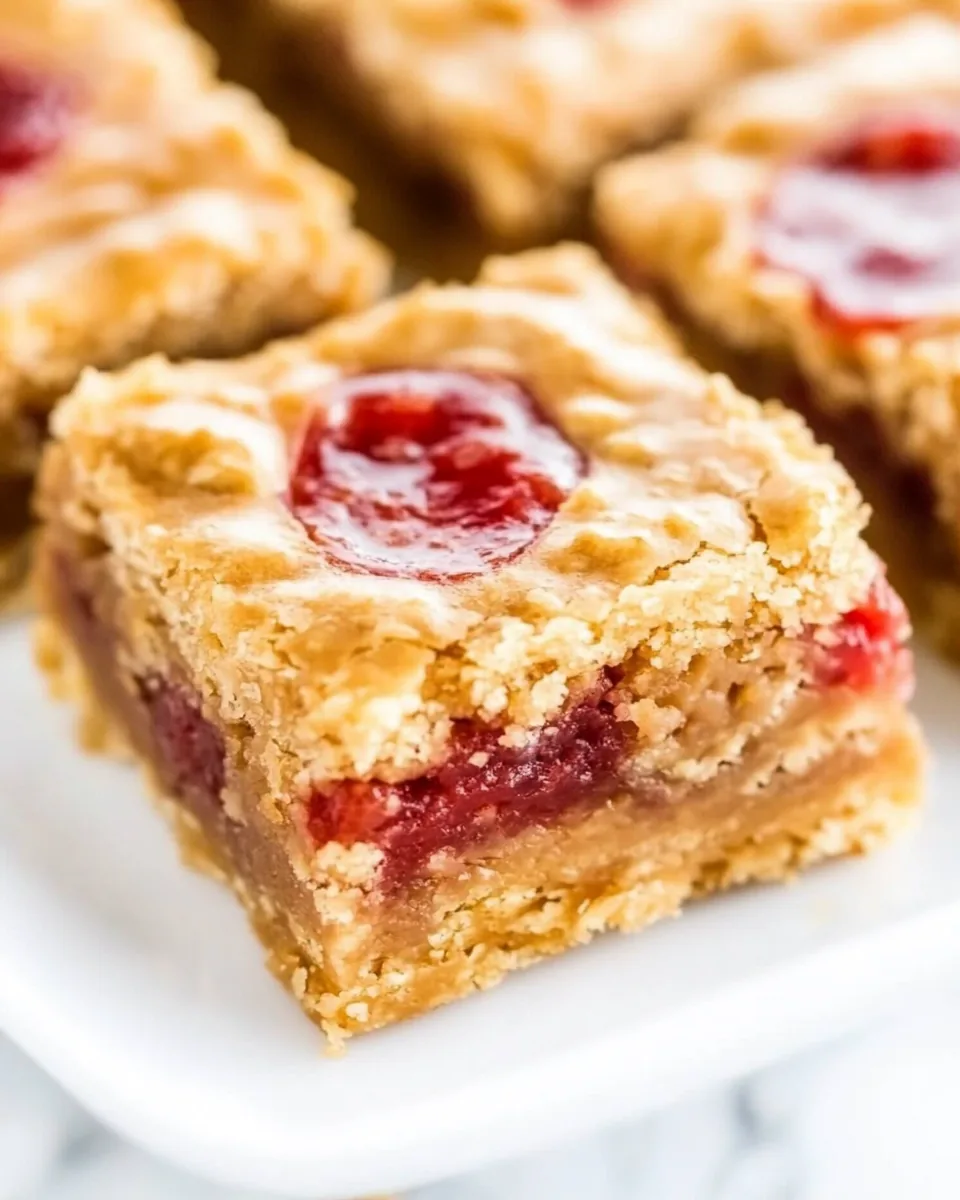
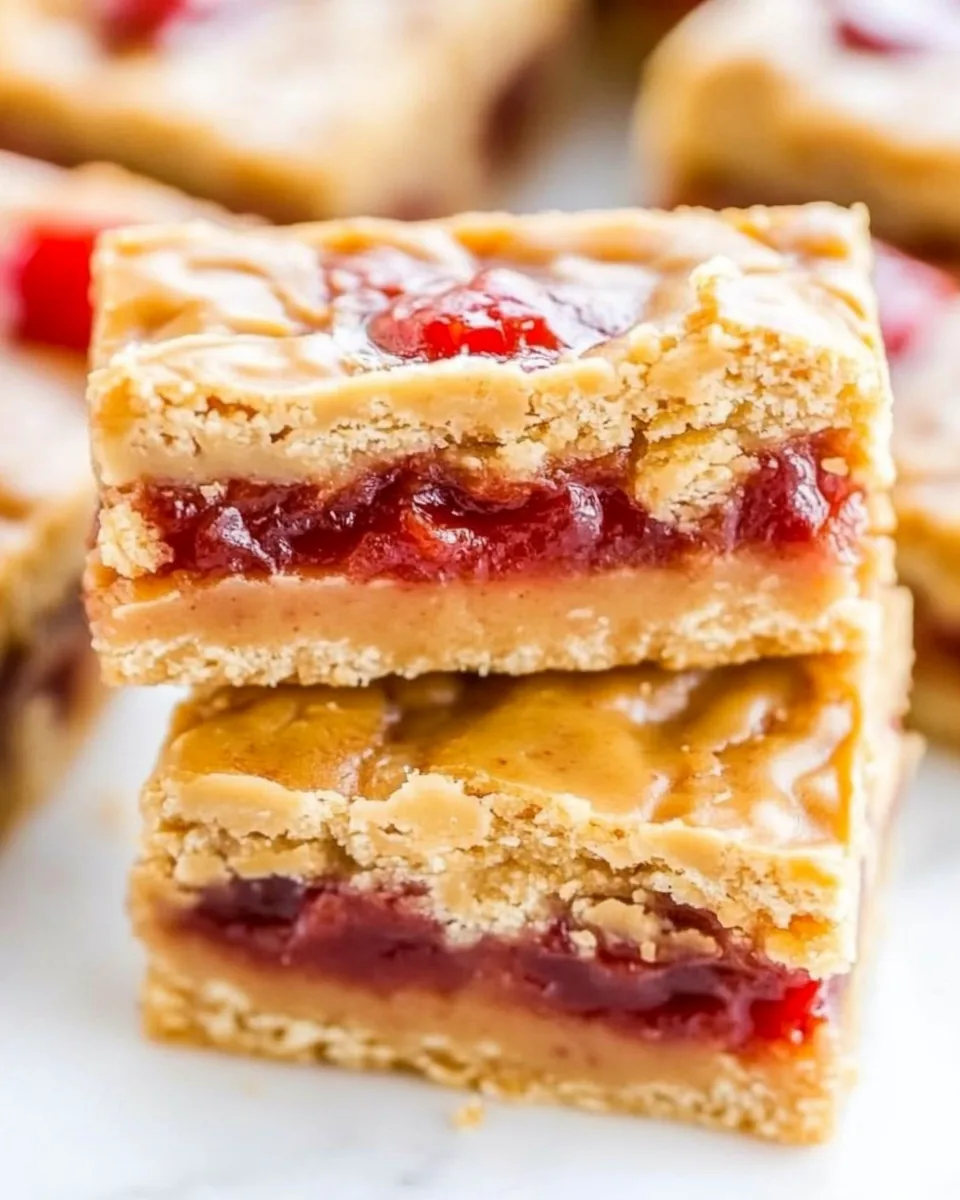
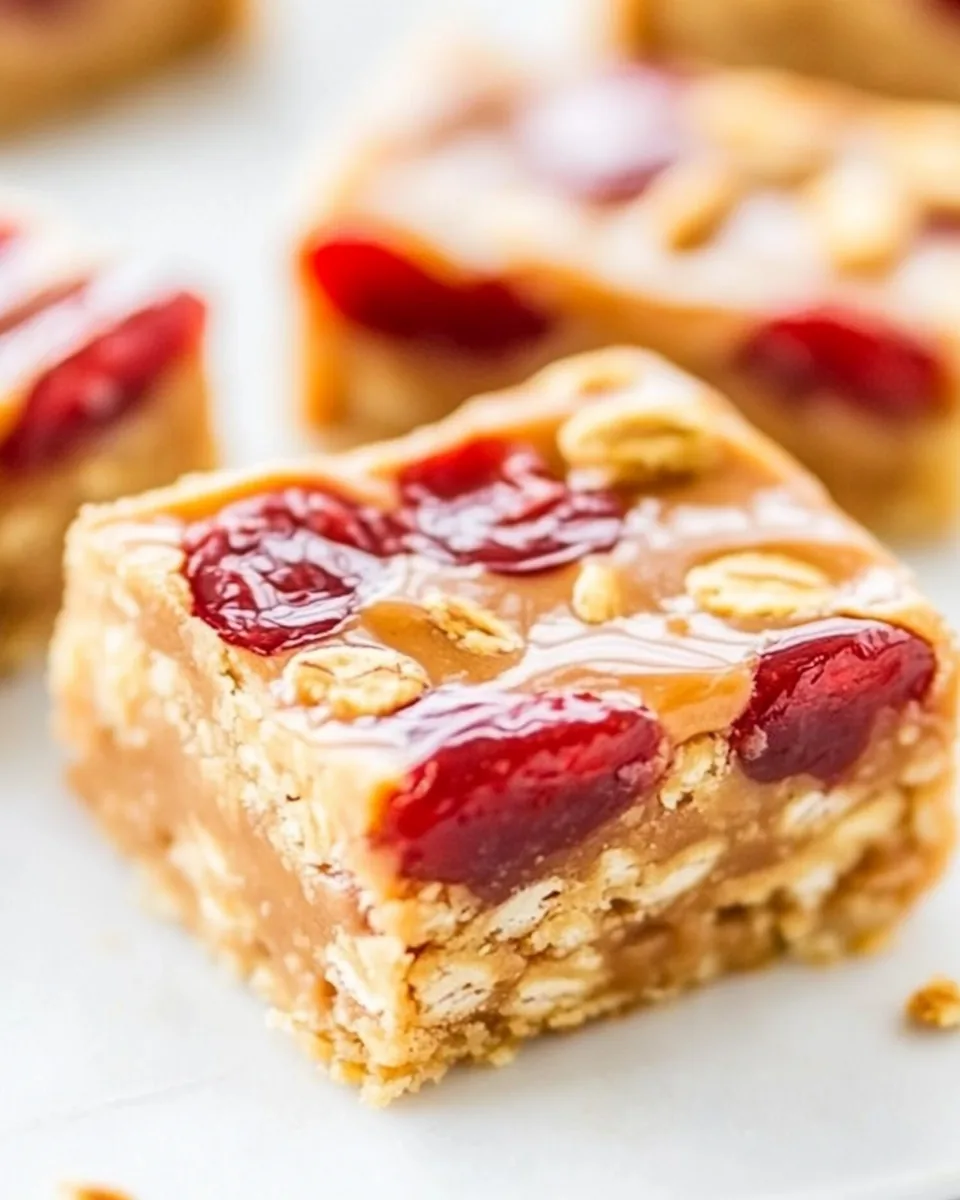
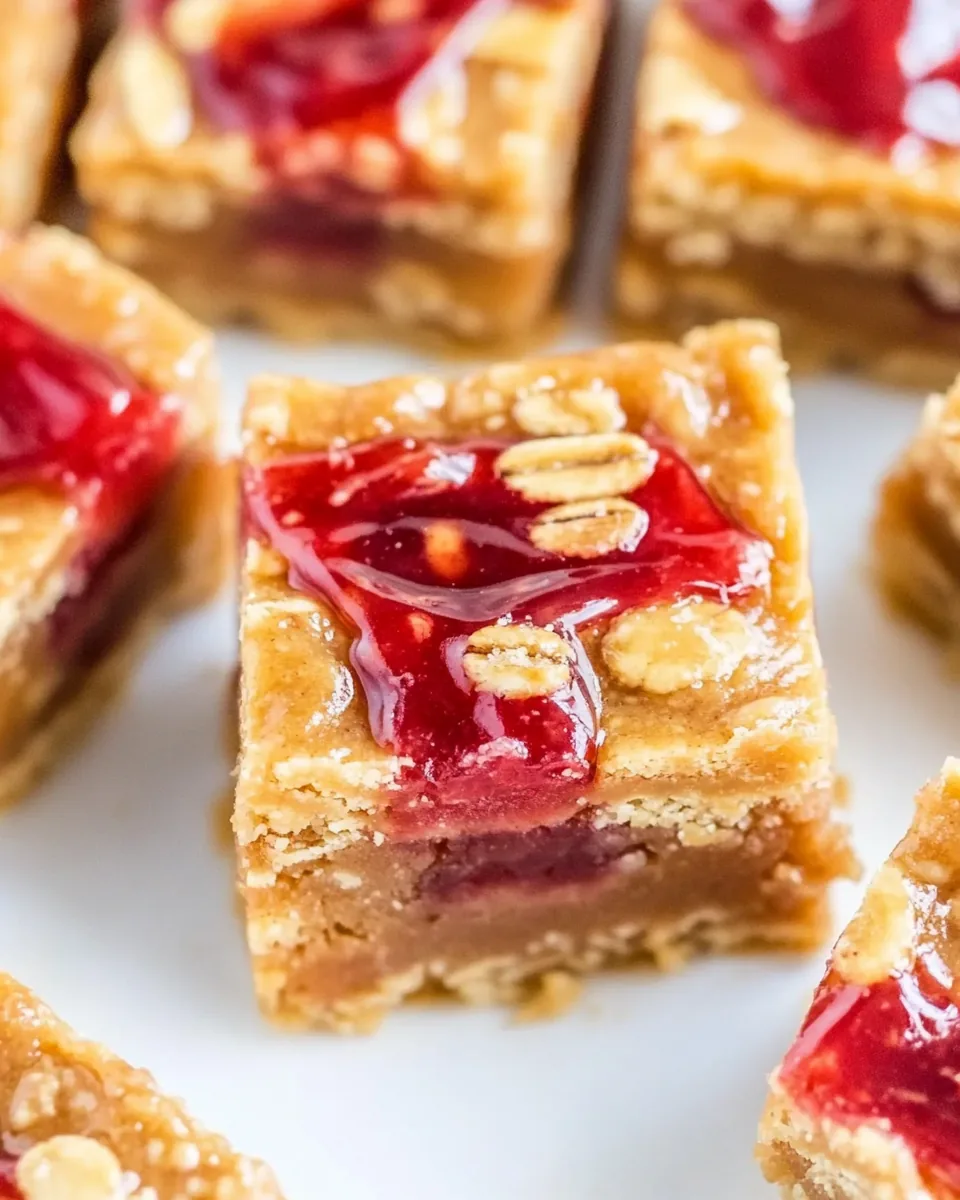
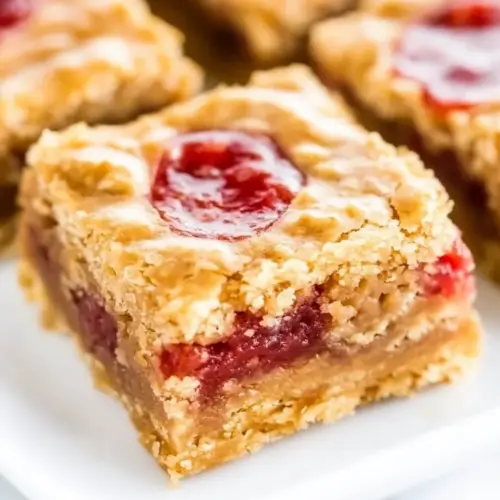
PB J Bars
There’s something incredibly nostalgic about PB J Bars. Growing up, my afternoons often revolved around that classic combination of peanut butter and jelly, spread between two slices of bread. But who says you can’t elevate those flavors? That’s exactly what these bars do! They bring back those memories in a chewy, gooey form that’s perfect for sharing with friends or savoring alone on a cozy evening. Every bite takes me back to my childhood, where the simple joys of life were just a spoonful of peanut butter away.
Recipe Snapshot
35 mins
10 mins
25 mins
Medium
220 kcal
5 g
Gluten-Free, Low FODMAP
10 g
Wooden Spoon, Mixing Bowl, Frying Pan, Whisk, Baking Sheet, Oven
Why This PB J Bars Works
Comforting Nostalgia
As I dig into a warm piece of PB J Bars, I am flooded with memories of after-school snacks that were quick and easy. These bars encapsulate that familiar feeling, combining sweet and savory elements that resonate with both children and adults alike.
Easy to Make
One of the best parts about these bars is their simplicity. You can whip them up in no time, making them a great choice for busy weekdays or a last-minute treat for unexpected guests.
Versatile Flavor
While this recipe features strawberry fruit spread, the beauty of PB J Bars lies in their versatility. You can easily swap out the fruit spread for your favorite flavors—think raspberry, blueberry, or even apple butter!
Make Ahead and Store
These bars are perfect for meal prep! You can make a batch ahead of time and store them in an airtight container. They’ll stay fresh for up to a week, but I doubt they’ll last that long!
Perfect for Any Occasion
Whether you’re hosting a gathering or looking for a snack to enjoy on your own, PB J Bars are an excellent choice. They’re great for potlucks, packed lunches, or just as a sweet pick-me-up during the day.
Kid-Friendly
Kids love them! Involving little hands in making these bars can create fun memories in the kitchen. Plus, they’ll be eager to devour their own creations afterward.
Essential Ingredients for PB J Bars
When it comes to making PB J Bars, the ingredients are straightforward yet essential. Each component plays a vital role in creating that perfect texture and flavor. The combination of creamy peanut butter, sweet fruit spread, and a hint of salt creates a delightful balance that makes these bars irresistible.
- Unsalted Butter: Provides the rich base and moistness that keeps the bars chewy.
- Peanut Butter: The star of the show, it adds that signature flavor we all love.
- Egg: Acts as a binder, helping everything stick together.
- Light Brown Sugar: Adds sweetness and a hint of molasses flavor that enhances the overall taste.
- Vanilla Extract: A hint of vanilla enhances the sweetness without overpowering the peanut butter.
- All-Purpose Flour: Forms the structure of the bars, creating a perfect chewy texture.
- Salt: Just a pinch to enhance all the flavors.
- Peanut Butter Chips: For an extra layer of peanut flavor and a delightful texture.
- Fruit Spread: Adds sweetness and a fruity twist, combining beautifully with the peanut butter.
Step by Step Guide for PB J Bars
Making PB J Bars is a delightful process that will fill your kitchen with a sweet aroma. Follow these simple steps to create your own batch of irresistible bars!
Preheat your oven to 350°F. This is the perfect temperature for creating a beautifully baked bar. Line an 8-by-8-inch baking pan with aluminum foil and spray it with cooking spray to ensure easy removal later.
-
In a large, microwave-safe bowl, add unsalted butter and heat it in the microwave on high for about 1 minute until melted. Keep an eye on it to avoid bubbling over!
Once melted, add 1/3 cup peanut butter to the bowl. Whisk the butter and peanut butter together until smooth and fully combined. The mixture should be creamy and well-blended.
Let the mixture cool for a moment, then add 1 large egg, light brown sugar, and vanilla. Whisk everything together until the mixture is smooth and glossy.
-
Carefully incorporate all-purpose flour and salt into the mixture. Stir gently until just combined; be careful not to overmix, as this helps maintain the chewy texture.
Transfer the batter into your prepared baking pan, smoothing the top with a spatula. You want an even layer to ensure uniform baking.
Now, dollop fruit spread over the batter in small teaspoon-sized drops. Using a knife or spatula, lightly spread it into an even but thin layer. Don’t worry about making it perfect; a little rustic charm is all part of the fun!
-
Place the pan in the oven and bake for about 21 to 25 minutes, or until the edges are lightly golden and a toothpick comes out clean. Keep an eye on them toward the end of baking!
Once baked, take them out and let them cool on a wire rack for at least 1 hour. This cooling time is crucial for the bars to set properly.
Finally, evenly sprinkle peanut butter chips over the top. If you want them to melt slightly, add them while the bars are still warm. To add a final touch, melt 1/4 cup peanut butter in a small microwave-safe bowl for about 20 to 30 seconds. Drizzle this melted peanut butter over the bars before slicing and serving.
Things Worth Knowing
- Oven Temperature: Always preheat your oven for even baking. This ensures that your bars rise correctly.
- Measuring Ingredients: Measure your ingredients accurately, especially the flour. Too much can make the bars dry.
- Cooling Time: Allowing the bars to cool completely is crucial. It helps set the texture and makes slicing easier.
- Storage: Keep the bars in an airtight container to maintain freshness. They’re best enjoyed within a week, but they can be frozen for longer storage.
Recipe Notes about PB J Bars
Here are some helpful tips for making the most out of your PB J Bars experience!
- Storage: Once cooled, store your bars in an airtight container at room temperature for up to a week. If you want to keep them longer, consider freezing them.
- Freezing: These bars freeze really well! Cut them into squares and wrap each in plastic wrap before placing them in a freezer-safe bag. They can last up to 6 months.
- Pairing: Consider serving these bars with a glass of cold milk or a scoop of vanilla ice cream for a delightful treat.
- Variations: Feel free to experiment with different fruit spreads or add nuts into the batter for extra crunch.
- Serving Suggestions: Perfect for lunch boxes, picnics, or as an after-school snack!
Great Combinations for PB J Bars
Serving PB J Bars can be as fun as making them! Here are some delightful ways to enjoy your bars:
- Perfect for Lunch Boxes: These bars make a fantastic addition to kids’ lunch boxes, offering a sweet treat that’s also filling.
- Snack Time: Enjoy them as a mid-afternoon snack, paired with a cup of yogurt or some fresh fruit for balance.
- Picnics: These bars are easy to transport, making them an ideal dessert for picnics or outdoor gatherings.
- Parties: Cut them into small squares for easy serving at parties, ensuring guests have a sweet treat to indulge in.
- Game Day: These bars are perfect for game day snacks, bringing comfort and joy to any gathering.
- Seasonal Pairings: Consider serving them during the summer with fresh berries on the side or during winter with a warm drink.
FAQ
Conclusion
In conclusion, PB J Bars are not just a treat; they’re a slice of childhood nostalgia wrapped in a sweet and chewy package. The blend of peanut butter and jelly brings a comforting flavor that many of us treasure. I encourage you to whip up a batch and enjoy them with your loved ones!
PB J Bars
Equipment
- Wooden Spoon
- Mixing Bowl
- Frying Pan
- Whisk
- Baking Sheet
- Oven
Ingredients
- ½ cup Unsalted Butter 1 stick, melted
- ⅓ cup Peanut Butter Dark Roasted Creamy + 1/4 cup, divided
- 1 large Egg
- 1 cup Light Brown Sugar packed
- 2 to 3 teaspoons Vanilla Extract
- scant 1 cup All-Purpose Flour
- ½ teaspoon Salt or to taste
- ½ cup Peanut Butter Chips
- ⅓ cup Fruit Spread Strawberry
Instructions
- Preheat your oven to 350°F. Line an 8-by-8-inch baking pan with aluminum foil and spray it with cooking spray.
- In a large, microwave-safe bowl, add unsalted butter and heat it in the microwave on high for about 1 minute until melted.
- Once melted, add 1/3 cup peanut butter to the bowl. Whisk the butter and peanut butter together until smooth and fully combined.
- Let the mixture cool for a moment, then add 1 large egg, light brown sugar, and vanilla. Whisk everything together until the mixture is smooth and glossy.
- Carefully incorporate all-purpose flour and salt into the mixture. Stir gently until just combined; be careful not to overmix.
- Transfer the batter into your prepared baking pan, smoothing the top with a spatula.
- Now, dollop fruit spread over the batter in small teaspoon-sized drops. Using a knife or spatula, lightly spread it into an even but thin layer.
- Place the pan in the oven and bake for about 21 to 25 minutes, or until the edges are lightly golden and a toothpick comes out clean.
- Once baked, take them out and let them cool on a wire rack for at least 1 hour.
- Finally, evenly sprinkle peanut butter chips over the top. If you want them to melt slightly, add them while the bars are still warm.
Notes
- Storage: Once cooled, store your bars in an airtight container at room temperature for up to a week.
- Freezing: These bars freeze really well! Cut them into squares and wrap each in plastic wrap before placing them in a freezer-safe bag.
- Pairing: Consider serving these bars with a glass of cold milk or a scoop of vanilla ice cream for a delightful treat.
- Variations: Feel free to experiment with different fruit spreads or add nuts into the batter for extra crunch.
- Serving Suggestions: Perfect for lunch boxes, picnics, or as an after-school snack!